
20 Classy and Simple Natural Acrylic Nail Ideas for All Lengths and Styles
When it comes to nail enhancements, the world of natural acrylic nails offers a perfect balance of durability and elegance without compromising the natural look. Whether you prefer them short and subtle, or long and glamorous, the versatility of acrylics allows for a wide range of designs and ideas that can be customized to fit your personal style. In this article, I’ll explore various nail art options, detailing everything from very simple to more intricate designs, using the photos you provided as inspiration. Let’s dive into the world of natural acrylic nails and discover how you can achieve these looks at home.
Subtle Peach and Gold Accents
As a professional manicurist, I often recommend a design that blends soft colors with subtle accents, like the peach and gold combination seen here. The use of clear acrylic as a base enhances the natural appearance, while the delicate swirls of peach and gold add just the right amount of flair without overpowering the simplicity. This design is perfect for those who prefer a clean, understated look with a touch of elegance.

Consumables:
-
- Clear acrylic powder – I suggest using Mia Secret Clear Acrylic Powder for a strong yet natural finish.
- Peach nail polish – OPI’s “Crawfishin’ for a Compliment” is a fantastic choice.
- Gold glitter – Use CND’s Additives in Gold Sparkle for a fine, delicate shimmer.
DIY Instructions:
-
- Start by prepping your nails with a base coat.
- Apply the clear acrylic powder, shaping the nails to your desired length.
- Once dry, use a fine brush to create peach swirls and accent them with gold glitter.
- Seal with a top coat for a glossy finish that lasts.
Classic French Tips with a Twist
The French tip is a timeless design, but adding a twist can make it modern and fresh. This look features short square nails with a clean nude base and crisp white tips, ideal for both casual and professional settings. What makes this design stand out is the slight curvature of the tips, giving a more rounded and soft appearance that complements the natural acrylic base.

Consumables:
-
- Nude base color – Essie’s “Ballet Slippers” gives a perfect natural tone.
- White nail polish for tips – I recommend Orly’s “White Tips” for a pure white finish.
- Fine nail brush – Beetles Nail Art Brushes work well for detailed tip application.
DIY Instructions:
-
- Begin with a nude base coat over your acrylics.
- Use a fine brush to carefully paint the white tips, ensuring a smooth curve.
- Allow the polish to dry completely before applying a final top coat to protect the design.
Almond French Tips in Soft Nude
Almond-shaped nails are a classic favorite, and when paired with a French tip, they become even more elegant. This design features a soft nude base with a very simple white tip, perfect for anyone seeking a refined look. The almond shape elongates the fingers and adds a touch of sophistication, making it suitable for both day-to-day wear and special occasions.

Consumables:
-
- Nude base color – Zoya’s “Taylor” provides a smooth, natural finish.
- White tip polish – CND Shellac in “Cream Puff” ensures a crisp, long-lasting tip.
- Nail file for shaping – OPI Crystal Nail File is ideal for achieving the perfect almond shape.
DIY Instructions:
-
- After shaping your nails into the almond style, apply the nude base color.
- Use a steady hand to create the white tips, following the natural curve of the nail.
- Finish with a top coat to add shine and protect your manicure.
Simple Yet Elegant Nude Manicure
For those who prefer a plain, simple look, this nude manicure is the epitome of minimalistic elegance. Short coffin nails in a nude shade provide a classy and basic aesthetic, perfect for any occasion. This look is both timeless and practical, offering a versatile option that pairs well with any outfit.

Consumables:
-
- Nude acrylic powder – Young Nails Cover Pink Acrylic Powder for a smooth application.
- Top coat – Seche Vite Dry Fast Top Coat to seal and add shine.
- Cuticle oil – CND SolarOil to keep your cuticles moisturized and healthy.
DIY Instructions:
-
- Apply the nude acrylic powder, shaping the nails into a short coffin style.
- After the acrylic sets, finish with a top coat to ensure a glossy, long-lasting finish.
- Regularly apply cuticle oil to maintain the health of your nails and surrounding skin.
Mint Green French Tips
For a unique twist on the classic French tip, try incorporating a mint green accent. This look is ideal for those who want a fresh, vibrant design while maintaining a clean and natural appearance. Short and square in shape, these nails are both chic and easy to wear, making them perfect for work or casual settings.

Consumables:
-
- Mint green polish – Essie’s “Mint Candy Apple” is a refreshing choice.
- Clear top coat – Sally Hansen’s Insta-Dri for a quick, durable finish.
- Base coat – OPI’s Natural Nail Base Coat to protect your natural nails.
DIY Instructions:
-
- Start with a clear base coat on your nails.
- Paint the tips with mint green polish, following the natural curve of your nail.
- Seal with a clear top coat to ensure your design stays intact and chip-free.
Pink French Tips with Floral Accent
This nail design showcases a beautiful short square shape with a soft pink French tip that is both classy and modern. The addition of delicate floral accents adds a feminine touch to this natural acrylic nails design. The subtle color palette makes it versatile enough to wear in any setting, whether you’re heading to the office or out for a casual day.

Consumables:
-
- Pink nail polish – Essie’s “Fiji” for a soft, elegant pink.
- Clear top coat – OPI’s Top Coat for a long-lasting shine.
- Nail art stickers – KADS Nail Art Stickers in floral patterns.
DIY Instructions:
-
- Start with a base coat to protect your nails.
- Apply the pink polish in a French tip style, ensuring clean edges.
- Once dry, carefully place the floral stickers on the accent nails.
- Seal everything with a clear top coat to lock in the design.
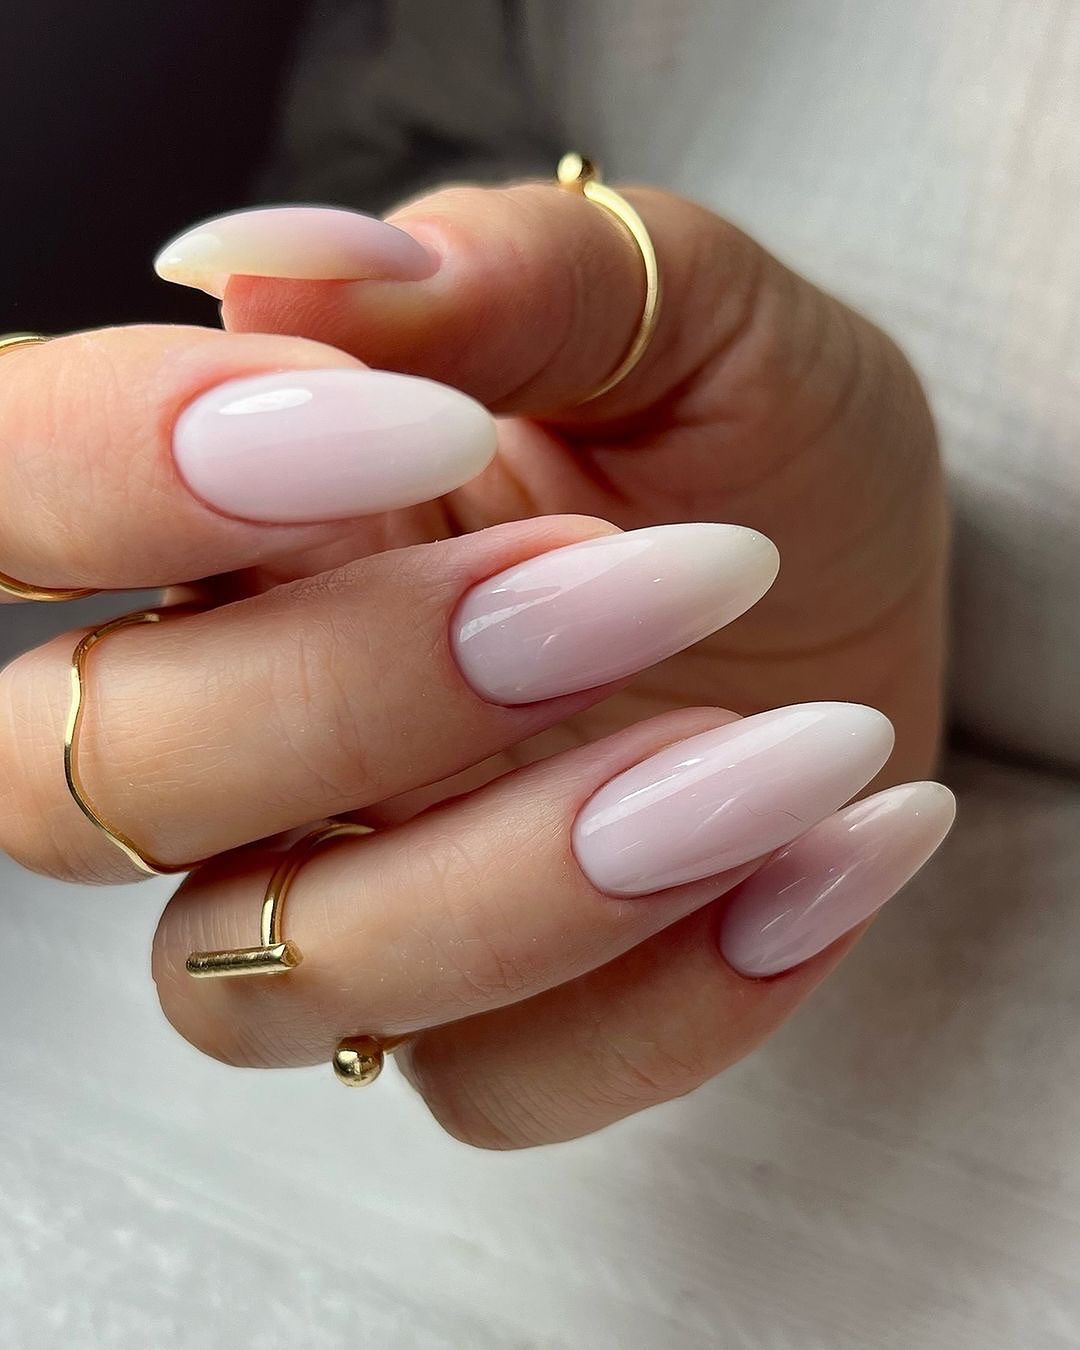
Almond Ombre Elegance
The almond-shaped nails featured here offer a clean and basic design that is both chic and understated. The subtle ombre effect, transitioning from a soft pink to a milky white, gives the nails a very natural and sophisticated appearance. This design is ideal for those who appreciate minimalistic beauty while still wanting their nails to make a statement.

Consumables:
-
- Pink to white ombre polish – Kiara Sky Gel Polish in “Romantique” for a seamless transition.
- Top coat – Gelish Top It Off for a glossy finish.
- Ombre sponge – Beetles Gel Polish Ombre Nail Brush Kit for easy application.
DIY Instructions:
-
- Apply a base coat and let it dry.
- Use the ombre sponge to apply the pink polish at the base and white polish at the tips, blending the colors as you move towards the center of the nail.
- Finish with a top coat to seal the ombre effect.
Classic French Tips on Short Square Nails
This short square nail design features the timeless French tip look, making it very simple yet incredibly elegant. The clear acrylic base enhances the natural beauty of the nails, while the crisp white tips offer a classic finish that never goes out of style. Perfect for any occasion, this design is as versatile as it is beautiful.
Consumables:
-
- White tip polish – Sally Hansen’s Hard as Nails “White On” for precise, durable tips.
- Clear acrylic powder – Young Nails Acrylic Powder for a strong base.
- Top coat – Seche Vite Dry Fast Top Coat for added shine and durability.
DIY Instructions:
-
- Apply the clear acrylic powder and shape the nails into a short square style.
- Carefully paint the white tips, ensuring a sharp, clean line.
- Finish with a top coat to protect your manicure and keep it looking fresh.
Soft Nude Elegance
For those who prefer a simple and clean look, this soft nude manicure on short nails is the perfect choice. The plain, glossy finish offers a basic yet sophisticated style that’s perfect for any occasion. This natural acrylic nails design is ideal for those who want their nails to look polished and well-kept without drawing too much attention.

Consumables:
-
- Nude polish – OPI’s “Dulce de Leche” for a smooth, natural finish.
- Top coat – Essie Gel Couture Top Coat for long-lasting shine.
- Base coat – Butter London Nail Foundation to protect your natural nails.
DIY Instructions:
-
- Start with a base coat to ensure a smooth application.
- Apply two coats of nude polish, allowing each coat to dry fully.
- Finish with a top coat for added gloss and protection.
Nude Almond Nails with Rhinestones
This nude almond nail design is perfect for adding a bit of sparkle to your natural acrylic nails. The small rhinestone accents near the cuticles add a touch of glam to an otherwise very simple design. The soft nude color keeps the look classy and sophisticated, making it suitable for both everyday wear and special occasions.

Consumables:
-
- Nude acrylic powder – Tammy Taylor Acrylic Powder for a smooth, even application.
- Rhinestones – Swarovski Crystal Rhinestones for a high-quality shine.
- Top coat – CND Vinylux Top Coat for long-lasting durability.
DIY Instructions:
-
- Shape your nails into an almond style using the nude acrylic powder.
- Once the acrylic sets, apply the rhinestones near the cuticle area, securing them with a dot of clear polish.
- Finish with a top coat to seal the rhinestones in place and add shine.
Floral Confetti Accents on Nude Nails
This natural acrylic nails design adds a playful twist with its floral confetti accents. The nude base serves as a perfect backdrop for the multicolored flakes, creating a design that is both subtle and eye-catching. The rounded almond shape of the nails gives a soft, feminine touch, making this design suitable for those who enjoy a balance of simplicity and creativity.

Consumables:
-
- Nude polish – Zoya “Rue” for a soft, natural base.
- Floral confetti – KADS Nail Art Glitter Flakes in assorted colors.
- Top coat – Essie Gel Couture Top Coat to lock in the design and add shine.
DIY Instructions:
-
- Start with a nude base coat and allow it to dry.
- Apply the floral confetti using a thin brush, focusing on the tips or scattered across the nails for a whimsical effect.
- Finish with a top coat to seal the design and ensure longevity.
Soft Lilac French Tips
This design features almond-shaped nails with soft lilac French tips. The delicate color choice adds a fresh, modern twist to the classic French manicure, while the almond shape keeps the look elegant and sophisticated. This style is ideal for those who want something unique yet still clean and polished.

Consumables:
-
- Lilac polish – OPI’s “Do You Lilac It?” for a soft, pastel hue.
- Base coat – Essie’s “All In One” as a protective base.
- Top coat – Seche Vite Dry Fast Top Coat for a durable, glossy finish.
DIY Instructions:
-
- After applying the base coat, use the lilac polish to create the French tips.
- Carefully paint along the nail tips, maintaining a consistent line.
- Seal with a top coat to protect the design and add shine.
Subtle Pink Glitter on Almond Nails
This design embraces a clean and basic approach with a soft pink glitter overlay on short almond nails. The glitter adds a touch of sparkle while keeping the overall look simple and understated. This style is perfect for those who prefer a bit of shimmer without going overboard, making it a versatile choice for any occasion.

Consumables:
-
- Pink glitter polish – China Glaze “Fairy Dust” for a delicate sparkle.
- Base coat – OPI Natural Nail Base Coat to protect your nails.
- Top coat – CND Vinylux Long Wear Top Coat for added durability.
DIY Instructions:
-
- Begin with a base coat to prepare your nails.
- Apply the pink glitter polish, focusing on an even, light layer.
- Finish with a top coat to ensure the glitter stays in place and adds a lasting shine.
Ombre French Tips on Long Square Nails
For those who love a long square shape, this ombre French tip design is both elegant and trendy. The gradient effect from pink to white creates a seamless transition that’s both subtle and striking. This design is ideal for anyone who wants a classy look with a modern twist.

Consumables:
-
- Ombre sponge – Beetles Gel Ombre Nail Brush Kit for easy blending.
- Pink and white polish – Kiara Sky Gel Polish in “Bubblegum” and “Snow White” for the perfect gradient.
- Top coat – Seche Vite Top Coat for a glossy finish.
DIY Instructions:
-
- After prepping your nails, apply the pink polish at the base and white at the tips.
- Use the ombre sponge to blend the two colors into a smooth gradient.
- Seal with a top coat for a polished and lasting finish.
Elegant Almond Ombre Nails
This almond ombre design offers a sophisticated and timeless look with its soft transition from a natural nude to a bright white tip. The elongated almond shape adds elegance, making this design perfect for formal occasions or a refined everyday look.

Consumables:
-
- Nude and white polish – Essie’s “Ballet Slippers” and OPI’s “Alpine Snow” for a smooth ombre effect.
- Ombre sponge – Makartt Nail Ombre Sponge for seamless blending.
- Top coat – CND Shellac Top Coat for a high-gloss finish.
DIY Instructions:
-
- Start by applying the nude polish at the base.
- Use the ombre sponge to gently blend the white polish from the tip towards the center of the nail.
- Finish with a top coat to enhance the shine and protect the design.
Abstract Pink and White Swirls on Short Square Nails
This short square nail design features delicate pink and white swirls that add a playful, abstract touch to a classic natural acrylic nails look. The swirling patterns create a dynamic design that is both subtle and stylish, making it an excellent choice for those who appreciate simple yet artistic nail art.

Consumables:
-
- Pink polish – Essie’s “Sugar Daddy” for a soft pink base.
- White polish – OPI’s “Alpine Snow” for the swirl details.
- Fine detail brush – Beetles Nail Art Brushes for precise swirl patterns.
DIY Instructions:
-
- Start with a pink base coat and let it dry completely.
- Using a fine detail brush, paint the white swirls onto the nails in a random yet balanced pattern.
- Finish with a clear top coat to protect the design and add shine.
French Tips with Rhinestone Accents
This long square nail design elevates the traditional French tip with the addition of rhinestone accents and abstract swirls. The combination of the classic white tips, minimalist swirls, and sparkling rhinestones creates a classy and glamorous look. Ideal for special occasions, this design adds a touch of luxury to the natural acrylic nails.

Consumables:
-
- White polish – CND Shellac in “Cream Puff” for the French tips.
- Rhinestones – Swarovski Crystal Rhinestones for a luxurious sparkle.
- Top coat – Seche Vite Dry Fast Top Coat to secure the rhinestones and protect the design.
DIY Instructions:
-
- After applying the base coat and creating the French tips, use a fine brush to add abstract white swirls.
- Place rhinestones on select nails, securing them with a small dot of clear polish.
- Finish with a top coat to ensure the rhinestones stay in place and the design remains chip-free.
Mint Green and White French Tips with Floral Accents
This almond-shaped nail design is a fresh take on the classic French tip with a playful twist. The combination of mint green and white tips, along with delicate floral accents, adds a fun and modern flair to the natural acrylic nails. The design is perfect for those who love to experiment with colors and patterns while maintaining a clean and polished look.

Consumables:
-
- White and mint green polish – Zoya “Purity” and OPI “This Cost Me a Mint” for the tips.
- Floral decals – KADS Nail Art Decals for easy application.
- Top coat – Essie Gel Couture Top Coat for a smooth, shiny finish.
DIY Instructions:
-
- Start by applying the mint green and white polish on the tips, creating a sharp contrast.
- Add floral decals to the accent nails, placing them strategically for a balanced look.
- Seal the design with a top coat to ensure it lasts and maintains its shine.
Ombre French Tips with Glitter Accents
This short square design combines the elegance of ombre French tips with the sparkle of glitter accents. The subtle gradient from pink to white is enhanced by a delicate line of glitter, adding a touch of glam to this simple and classy look. Perfect for any occasion, this design is both versatile and sophisticated.

Consumables:
-
- Pink and white ombre polish – Kiara Sky Gel Polish in “Barely There” and “White Out” for a seamless blend.
- Silver glitter – CND Additives in “Silver Sparkle” for the accent line.
- Ombre sponge – Beetles Gel Ombre Nail Brush Kit for easy blending.
DIY Instructions:
-
- Create the ombre effect using a sponge, blending the pink and white polish smoothly.
- Apply a thin line of glitter along the base of the French tip for an added sparkle.
- Seal with a top coat to ensure the glitter stays in place and the design remains flawless.
Clean and Simple Thin French Tips
This design brings a modern twist to the French tip by using thin, minimalistic lines on short square nails. The simplicity of the design highlights the natural beauty of the acrylic nails while providing a clean and understated look. This style is perfect for those who appreciate basic and very simple designs that are effortlessly chic.

Consumables:
-
- White polish – Essie’s “Blanc” for the thin tips.
- Base coat – OPI Natural Nail Base Coat to protect your nails.
- Top coat – CND Vinylux Top Coat for added shine and durability.
DIY Instructions:
-
- Start with a base coat to protect your nails and create a smooth surface.
- Use a thin brush to apply the white polish in a very thin line along the tips of the nails.
- Finish with a top coat to seal the design and enhance its longevity.
Save Pin
