
20 Ideas Nail Colors for Dark Skin: From Bright Summer Tones to Fall Gel Designs
When it comes to finding the perfect nail colors for dark skin, there’s no shortage of stunning options. But how do you choose the shades that not only pop but also complement your natural tones? Whether you’re aiming for a pretty and subtle look or a bright and bold statement, the right color can elevate your manicure to new heights. In this guide, we’ll explore a variety of gel and plain nail designs that are not only beautiful but also perfect for every season. From summer brights to fall gel tones, we’ve got you covered with ideas that will make your nails the center of attention. Let’s dive in and find your next perfect manicure shade.
Pastel Perfection: The Soft Blend
When you’re seeking a soft, elegant look, pastel shades can be incredibly flattering on dark skin. This blend of pastel colors offers a pretty and subtle touch that transitions effortlessly from day to night. The nails are meticulously shaped into a cute coffin style, with each nail flaunting a different pastel hue—from soft mint green to gentle lavender. The glossy finish enhances the natural beauty of each color, making this a perfect choice for those who love a classy yet modern manicure.

Consumables:
- Base Coat: OPI Natural Nail Base Coat
- Pastel Nail Polishes: Essie’s Mint Candy Apple, Lilacism, and Butter Please
- Top Coat: Seche Vite Dry Fast Top Coat
How to Create This Look at Home:
- Start with clean, filed nails. Apply the base coat and let it dry completely.
- Paint each nail with a different pastel color. You may need two coats for full opacity.
- Once the polish is dry, seal your manicure with a glossy top coat to ensure longevity.
Bold in Blue: The Striking Statement
Nothing says summer quite like a bold, sky-blue nail color. This shade is perfect for those who want to make a statement while keeping things plain and simple. The vibrant blue perfectly complements dark skin tones, offering a striking contrast that’s both pretty and cute. The coffin-shaped nails are long and glossy, making them ideal for any season but particularly suitable for warmer weather when you want your nails to stand out.

Consumables:
- Base Coat: CND Stickey Base Coat
- Blue Nail Polish: China Glaze in ‘Frostbite’
- Top Coat: Sally Hansen Miracle Gel Top Coat
How to Create This Look at Home:
- After prepping your nails with a base coat, apply the blue nail polish in even strokes.
- Make sure to cover the edges of your nails for a clean, professional finish.
- Once dry, add a top coat to keep your nails nice and glossy for days.
Holographic Dream: The Futuristic Flair
For those who love a bit of sparkle, a holographic nail polish is a beautiful way to add dimension and shine to your manicure. This look features a shimmering purple holographic polish that shifts colors in the light, creating a dazzling effect that’s perfect for a night out or a special occasion. The shorter nail length keeps it cute and subtle, making it suitable for any event.

Consumables:
- Base Coat: Zoya Anchor Base Coat
- Holographic Nail Polish: ILNP in ‘Mega’
- Top Coat: Glisten & Glow Top Coat
How to Create This Look at Home:
- Begin with a base coat to protect your nails and prevent chipping.
- Apply the holographic polish, making sure to layer it for maximum effect.
- Finish with a top coat to enhance the shine and longevity of the holographic finish.
Multichrome Magic: The Gradient Glow
If you’re looking to add some drama to your manicure, this multichrome nail polish is the way to go. The color shifts from green to purple to bronze depending on the light, offering a mesmerizing effect that’s pretty and perfect for those who love to experiment with their nail colors. The longer coffin shape adds a touch of elegance, making this design suitable for both casual and formal settings.

Consumables:
- Base Coat: Orly Bonder Base Coat
- Multichrome Nail Polish: Cirque Colors in ‘Ghost in the Machine’
- Top Coat: Essie Gel Setter Top Coat
How to Create This Look at Home:
- After applying the base coat, use the multichrome polish in thin layers to build up the color.
- Allow each layer to dry before applying the next to avoid streaks.
- Seal with a top coat for a smooth, glossy finish that enhances the color shift.
Neutral Elegance: The Subtle Sophistication
For a more natural and subtle look, this neutral beige shade is an excellent choice. It’s perfect for those who prefer their nails to look classy and understated. The almond shape elongates the fingers, while the shimmer adds just enough sparkle to keep things interesting. This beautiful shade is suitable for any season, making it a versatile option for your nail color collection.

Consumables:
- Base Coat: Deborah Lippmann Hard Rock Base and Top Coat
- Neutral Nail Polish: OPI in ‘Dulce de Leche’
- Top Coat: Zoya Armor Top Coat
How to Create This Look at Home:
- Start by applying a base coat to protect your nails.
- Paint your nails with the neutral polish, using two coats for an even, opaque finish.
- Finish with a top coat to add shine and protect your manicure.
Bright Orange Elegance: The Bold Statement
Bright, bold, and utterly captivating, this orange nail design is a head-turner. The gel polish boasts a high-gloss finish that amplifies the vibrancy of the color, making it perfect for those who love to make a statement with their nails. The almond shape adds a classy touch, while the bright orange is ideal for adding a pop of color during the summer months. This shade is particularly suitable for those with dark skin as it enhances the richness of your complexion, creating a beautiful contrast that is both subtle and striking.

Consumables:
- Base Coat: Zoya Get Even Ridge Filler
- Orange Gel Polish: OPI GelColor in ‘Orange You Fantastic!’
- Top Coat: Gelish Top It Off
How to Create This Look at Home:
- Prep your nails by filing them into an almond shape and applying a base coat.
- Apply two coats of the orange gel polish, curing under a UV lamp after each coat.
- Finish with a top coat for that high-gloss, salon-quality finish.
Neon Art: The Vibrant Splash
For those who love a mix of pretty and edgy, this neon-inspired nail design is a perfect choice. The nails are adorned with splashes of bright neon colors, each meticulously separated by thin gold lines that add a touch of luxury to the overall look. The contrast between the gel base and the vibrant neon colors makes this design ideal for someone who wants to express their creative side. It’s a perfect design for the summer season and will surely make your nails the center of attention.

Consumables:
- Base Coat: Essie Here to Stay Base Coat
- Gel Polish: Neon colors from The GelBottle Inc. in ‘Miami’, ‘Sunshine’, ‘Flamingo’
- Gold Striping Tape: Orly Instant Artist
How to Create This Look at Home:
- Start with a neutral base coat and cure under a UV lamp.
- Apply the neon colors in random patches across each nail.
- Use gold striping tape to separate the colors, and finish with a top coat to seal in the design.
Floral Dreams: The Soft Touch
If you’re looking for something cute and classy, this floral nail design on a sage green base is an excellent choice. The subtle floral pattern in white adds a touch of femininity and elegance, making it suitable for both everyday wear and special occasions. The plain yet intricate design is perfect for those who prefer a more understated look but still want their nails to make a beautiful statement. This color and design are particularly nice for the fall as the earthy tones complement the season.

Consumables:
- Base Coat: Butter London Nail Foundation Priming Base Coat
- Green Nail Polish: Essie in ‘Sage You Love Me’
- White Nail Art Pen: Sally Hansen I Heart Nail Art Pen in ‘White’
How to Create This Look at Home:
- Apply the base coat followed by two coats of the sage green polish.
- Use the white nail art pen to draw small flowers on each nail.
- Seal the design with a top coat to protect the artwork.
Marble Effect: The Chic Choice
This marble-effect nail design is a perfect example of how subtle can still be striking. The muted green base with delicate white veins creates a look that is both natural and classy. The marble effect is perfect for those who prefer a more understated design but still want something that stands out. This design is also suitable for any season, making it a versatile choice for your nail repertoire.

Consumables:
- Base Coat: OPI Natural Nail Base Coat
- Green Nail Polish: China Glaze in ‘Sea Spray’
- White Nail Art Polish: KISS Nail Art Paint in ‘White’
How to Create This Look at Home:
- Start with a base coat to protect your nails.
- Apply two coats of the green polish, allowing each coat to dry.
- Use a thin brush to create the white marble veins on each nail.
- Finish with a top coat to add shine and protect your design.
Terracotta Tones: The Warm Embrace
For those who love earthy tones, this terracotta nail polish is perfect for adding a warm, natural touch to your nails. The rich, rusty hue complements dark skin beautifully, offering a subtle yet striking contrast. The glossy finish adds a beautiful shine, making this a perfect choice for the fall season. This color is classy and suitable for both casual and formal occasions, making it a versatile addition to your nail color collection.

Consumables:
- Base Coat: Orly Bonder Base Coat
- Terracotta Nail Polish: Lights Lacquer in ‘HBIC’
- Top Coat: Essie Gel Couture Top Coat
How to Create This Look at Home:
- Start with a base coat to protect your nails.
- Apply two coats of the terracotta polish, making sure each coat dries fully before applying the next.
- Finish with a top coat to ensure a long-lasting, glossy finish.
Neutral Nude: The Timeless Elegance
A neutral nude polish like this one is a perfect choice for those who prefer a subtle, classy, and natural look. The high-gloss finish enhances the nude shade, making it appear beautiful and elegant on dark skin. The squoval shape of the nails adds to the classy feel, making it suitable for both professional and casual settings. This look is ideal for any season, providing a perfect canvas that can be easily dressed up with accessories or kept simple for an understated finish.

Consumables:
- Base Coat: Orly Bonder Base Coat
- Nude Nail Polish: OPI in ‘Samoan Sand’
- Top Coat: Seche Vite Dry Fast Top Coat
How to Create This Look at Home:
- Begin with a base coat to protect your nails.
- Apply two thin coats of the nude polish, ensuring even coverage.
- Finish with a top coat to seal in the color and add a high-gloss finish.
Forest Green Matte: The Sophisticated Statement
This forest green matte polish offers a deep, rich tone that’s perfect for making a bold yet classy statement. The matte finish gives it a modern edge, while the dark green color is particularly suitable for fall and winter seasons. This look is beautiful on dark skin, providing a striking contrast that draws attention without being too overpowering. The square shape of the nails adds to the overall sophistication, making this design a perfect choice for those who love a subtle yet impactful nail look.

Consumables:
- Base Coat: Deborah Lippmann Gel Lab Pro Base Coat
- Green Matte Nail Polish: Zoya in ‘Matilda’
- Matte Top Coat: Essie Matte About You Top Coat
How to Create This Look at Home:
- Start with a base coat to protect and smooth your nails.
- Apply two coats of the forest green polish, allowing each coat to dry.
- Finish with a matte top coat to achieve the desired finish.
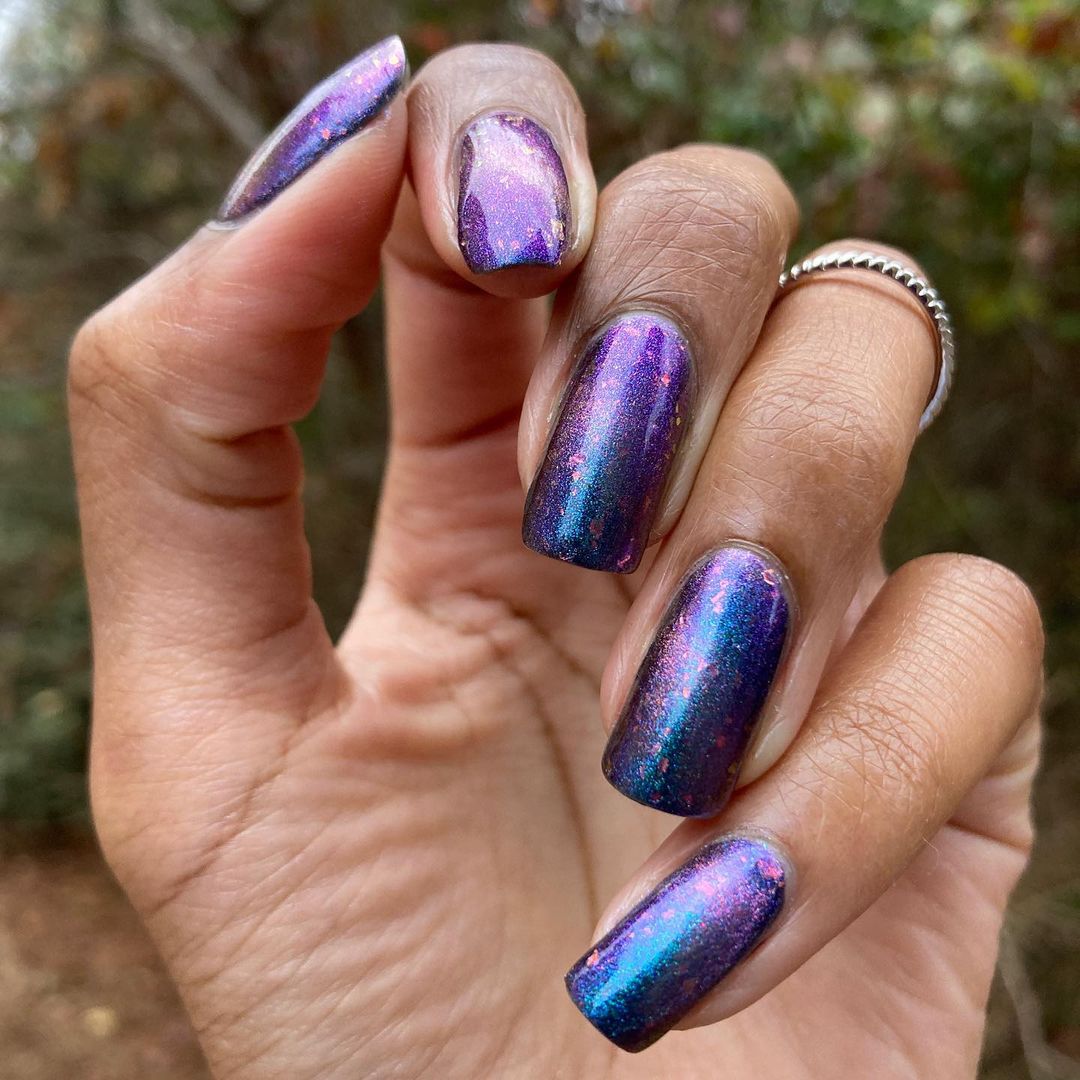
Cosmic Multichrome: The Galactic Glam
This multichrome nail polish creates a cosmic effect that shifts between purple, blue, and pink depending on the light. It’s a beautiful, bright option for those who want their nails to make a perfect statement. The color shift is pretty and eye-catching, making it ideal for nights out or special occasions. The short, square shape of the nails keeps the look cute and manageable while still allowing the multichrome polish to shine.

Consumables:
- Base Coat: Essie Strong Start Base Coat
- Multichrome Nail Polish: ILNP in ‘Reminisce’
- Top Coat: Glisten & Glow Top Coat
How to Create This Look at Home:
- Apply a base coat to your nails.
- Paint on the multichrome polish, building up the color with two to three coats.
- Seal with a top coat to enhance the multichrome effect and protect your manicure.
Floral French: The Delicate Detail
For those who appreciate intricate designs, this floral French manicure with gold accents is a perfect choice. The nude base allows the white floral designs to stand out, while the gold accents add a touch of luxury. The stiletto shape of the nails adds drama, making this a beautiful option for special occasions or when you want to make a statement. This design is classy, subtle, and suitable for anyone who loves detailed nail art with a touch of elegance.

Consumables:
- Base Coat: OPI Natural Nail Base Coat
- Nude Nail Polish: Essie in ‘Ballet Slippers’
- White Nail Art Polish: KISS Nail Art Paint in ‘White’
- Gold Nail Tape: Orly Instant Artist
How to Create This Look at Home:
- Apply the base coat followed by the nude polish.
- Use the white nail art polish to create floral designs on the tips of your nails.
- Add gold accents with nail tape or a thin brush, and finish with a top coat to seal in the design.
Subtle Pink with Gold Flakes: The Chic Minimalist
For those who prefer a subtle yet beautiful look, this soft pink manicure with delicate gold flakes is perfect. The pink polish is understated yet classy, while the gold flakes add a touch of elegance without overpowering the overall look. The short, square nails keep the design cute and easy to maintain, making it suitable for both everyday wear and more formal occasions.

Consumables:
- Base Coat: Butter London Horse Power Nail Rescue Basecoat
- Pink Nail Polish: Zoya in ‘Bella’
- Gold Flakes: Gold Leaf Flakes from Daily Charme
- Top Coat: Essie Gel Couture Top Coat
How to Create This Look at Home:
- Start with a base coat to protect your nails.
- Apply two coats of the pink polish, allowing each coat to dry.
- Gently place gold flakes on the nails using tweezers, then seal with a top coat.
Abstract Lines: The Modern Twist
This design showcases an abstract take on the classic French manicure, featuring clean lines in red and white that swirl gracefully across the nails. The design is both subtle and unique, perfect for someone who wants a classy yet modern look. The base is a soft nude, allowing the vibrant lines to stand out without being overwhelming. The rounded shape of the nails adds to the elegant feel of this manicure, making it suitable for both everyday wear and more formal occasions.

Consumables:
- Base Coat: Essie Here to Stay Base Coat
- Nude Nail Polish: OPI in ‘Bubble Bath’
- Red and White Nail Art Polish: Sally Hansen Nail Art Pens in ‘Red’ and ‘White’
- Top Coat: Seche Vite Dry Fast Top Coat
How to Create This Look at Home:
- Start with a base coat to protect your nails.
- Apply the nude polish and let it dry completely.
- Use the nail art pens to draw the abstract lines on each nail.
- Seal the design with a top coat to ensure it lasts.
Lavender Dreams: The Pastel Pop
Lavender nails are a beautiful choice for those who love soft and pretty shades. This cute pastel color is perfect for the summer months, providing a light and airy feel. The almond shape of the nails adds a touch of elegance, making the look both chic and feminine. Lavender is a bright yet subtle color that works wonderfully with dark skin tones, offering a lovely contrast without being too bold.

Consumables:
- Base Coat: Zoya Anchor Base Coat
- Lavender Nail Polish: Essie in ‘Lilacism’
- Top Coat: Essie Gel Couture Top Coat
How to Create This Look at Home:
- Begin with a base coat to protect your nails.
- Apply two coats of the lavender polish, making sure each layer dries fully before applying the next.
- Finish with a top coat to add a glossy shine and protect your manicure.
Smoky Ombre: The Gradient Glam
This smoky ombre design features a smooth transition from a soft nude at the base to a deep, smoky gray at the tips. The gradient effect is subtle yet striking, creating a classy look that is perfect for any season. The squared shape of the nails gives a modern edge to this beautiful design. The addition of a subtle sparkle throughout the gradient adds a pretty touch, making it suitable for both day and night wear.

Consumables:
- Base Coat: Orly Bonder Base Coat
- Nude and Gray Nail Polish: OPI in ‘Be There in a Prosecco’ and ‘Dark Side of the Mood’
- Ombre Sponge: Nail art sponges for blending
- Top Coat: Glisten & Glow Top Coat
How to Create This Look at Home:
- Apply a base coat to start.
- Use the ombre sponge to blend the nude and gray polishes together, creating a smooth gradient.
- Seal with a top coat to add shine and longevity to your manicure.
Sunshine Yellow: The Happy Hue
This vibrant yellow nail polish is a perfect way to add a pop of color to your nails. The bright and cheerful shade is ideal for the summer season, offering a pretty contrast against dark skin tones. The glossy finish makes the yellow even more eye-catching, while the squared shape of the nails keeps the look modern and classy. This color is beautiful and perfect for those who want their nails to stand out in a crowd.

Consumables:
- Base Coat: Deborah Lippmann Gel Lab Pro Base Coat
- Yellow Nail Polish: China Glaze in ‘Happy Go Lucky’
- Top Coat: Sally Hansen Miracle Gel Top Coat
How to Create This Look at Home:
- Start with a base coat to protect your nails.
- Apply two coats of the yellow polish, ensuring even coverage.
- Finish with a top coat to add a glossy shine and protect your manicure.
Classic French Manicure: The Timeless Elegance
The French manicure is a timeless and classy design that never goes out of style. This version features a soft pink base with crisp white tips, offering a subtle and elegant look that is perfect for any occasion. The square shape of the nails adds a modern twist to this classic design, making it suitable for both everyday wear and special events. This beautiful and subtle manicure is perfect for those who love a clean, polished look.

Consumables:
- Base Coat: OPI Natural Nail Base Coat
- Pink Nail Polish: Essie in ‘Ballet Slippers’
- White Nail Polish: OPI in ‘Alpine Snow’
- Top Coat: Seche Vite Dry Fast Top Coat
How to Create This Look at Home:
- Apply the base coat and let it dry.
- Paint your nails with the pink polish, then add the white tips using a nail guide for precision.
- Finish with a top coat to seal the design and add shine.
Save Pin
