
Acrylic toe nails are the perfect way to elevate your pedicure game, offering endless possibilities for creativity, style, and durability. Whether you’re aiming for something bold and vibrant or subtle and chic, acrylics provide a versatile canvas for any design. In this article, I will walk you through various stunning acrylic toe nail designs, with detailed insights on how to recreate these looks at home. I’ll also share the best products to use and answer some frequently asked questions to ensure your DIY pedicure is flawless.
Vibrant Orange Glitter Shell Design
When it comes to making a statement with your acrylic toe nails, nothing quite compares to the impact of a bright orange hue paired with glitter. This design features a striking orange base with a glittery accent nail, topped with a shell-inspired pattern that adds texture and depth. The bold colors and shimmering effect make this design perfect for those who love to stand out. It’s a vibrant, baddie-inspired look that brings the energy of summer right to your toes.

Consumables Needed:
-
- Bright orange nail polish (try OPI’s “Cajun Shrimp”)
- Fine orange glitter powder (consider CND Additives)
- Shell pattern nail stickers or stamping kit
- Clear acrylic powder and liquid monomer (Mia Secret is a great brand)
- Top coat for a glossy finish (Seche Vite Top Coat)
How to Create This Look at Home:
-
- Start by preparing your toenails, ensuring they are clean and free of any old polish.
- Apply the orange polish to all nails except the big toe.
- On the big toe, apply a base coat, then dip it into the orange glitter powder while it’s still wet.
- Once dry, use the shell pattern stickers or a stamping kit to add the design.
- Seal the look with a top coat, ensuring the glitter and pattern are secure and long-lasting.
Elegant French Tip with Gem Accents
The French tip design is a timeless classic, but this variation adds a touch of luxury with delicate gem accents. The soft pink base paired with a crisp white tip creates a classy and sophisticated look, while the gems provide just the right amount of sparkle. This acrylic toe nails design is perfect for those who prefer a neutral yet elegant look.

Consumables Needed:
-
- Soft pink nail polish (Essie’s “Ballet Slippers” is ideal)
- White polish for the tips (OPI’s “Alpine Snow”)
- Small rhinestones or gems (Swarovski flatbacks are recommended)
- Nail glue for applying gems
- Clear top coat
How to Create This Look at Home:
-
- Start with a base coat to protect your nails.
- Apply the pink polish as the base color, allowing it to dry completely.
- Carefully paint the French tip using the white polish. You can use nail guides for a perfect line.
- Once the tips are dry, apply a small amount of nail glue where you want to place the gems, then press them in place.
- Finish with a top coat to seal the gems and enhance the shine of your pedicure.
Edgy Black and White Zebra Print
For those who love unique and trendy designs, this black and white zebra print on acrylic toe nails is an absolute must-try. The stark contrast of black against a white background creates an eye-catching design that’s both edgy and stylish. It’s perfect for anyone looking to add a bit of wild flair to their pedicure.

Consumables Needed:
-
- White nail polish (Zoya’s “Purity” works well)
- Black nail polish (try Essie’s “Licorice”)
- Zebra print nail stickers or a stamping kit
- Clear top coat for sealing
How to Create This Look at Home:
-
- Apply the white polish as your base color and let it dry.
- Use the black polish or a stamping kit to create the zebra print on the big toe. You can also hand-paint the design if you’re feeling artistic.
- Make sure to apply a clear top coat to protect the design and give your nails a glossy finish.
Glamorous Green Glitter Set
This dark green glitter design is the epitome of glamour for acrylic toe nails. The rich green base color, paired with a heavy dose of glitter, makes for a stunning look that’s perfect for special occasions. It’s a pedikyr that screams luxury and inspiration for those who want their nails to be the highlight of their outfit.

Consumables Needed:
-
- Dark green nail polish (try OPI’s “Stay Off the Lawn!”)
- Green glitter powder (CND Additives in Emerald Mirage)
- Clear acrylic powder and liquid monomer
- Top coat for a glossy finish
How to Create This Look at Home:
-
- Begin by applying the dark green polish as your base.
- While the polish is still wet, dip the big toe into the green glitter powder.
- Once dry, apply a layer of clear acrylic to secure the glitter and add dimension.
- Finish with a high-gloss top coat to seal the glitter and enhance the shine.
Subtle Milky Nude Perfection
For a more understated look, this milky nude design is the perfect choice for acrylic toe nails. It’s a natural and elegant look that suits any occasion. The simplicity of the milky finish gives your nails a cute and polished appearance, making them ideal for everyday wear.

Consumables Needed:
-
- Milky nude polish (Essie’s “Mademoiselle” is a popular choice)
- Clear top coat for added shine and protection
How to Create This Look at Home:
-
- Start with clean, prepped toenails and apply the milky nude polish.
- Let the polish dry completely, then add a second coat for a more opaque finish.
- Seal with a clear top coat to give your nails a glossy, long-lasting finish.
Shimmering Green Glitter Overlays
This acrylic toe nail design brings together elegance and playfulness with a shimmering green glitter overlay on a clear base. The large hexagonal glitter pieces reflect light beautifully, adding a touch of glamour to an otherwise simple pedicure. This design is perfect for those who enjoy a bit of sparkle without overpowering the rest of their look. The colors are vibrant, yet the overall effect remains cute and classy.

Consumables Needed:
-
- Clear or nude base polish (try Sally Hansen’s “Bare It All”)
- Large hexagonal glitter pieces in green (CND Additives in Emerald Mirage)
- Clear acrylic powder and liquid monomer
- Top coat for a smooth finish (Seche Vite Top Coat)
How to Create This Look at Home:
-
- Apply a clear or nude base polish to all nails.
- Before the polish dries, carefully place the hexagonal glitter pieces on the big toe, concentrating the glitter towards the tip and allowing it to taper off towards the cuticle.
- Seal the look with a layer of clear acrylic for added dimension and durability.
- Finish with a high-shine top coat to secure the glitter and give your nails a professional look.
Red and White Zebra Print
For a bold and unique look, this red and white zebra print design on acrylic toe nails is a stunning choice. The contrast between the bright red and the crisp white creates a dynamic pattern that is both trendy and eye-catching. The rest of the toes are painted in solid red, complementing the zebra print perfectly. This design is ideal for those who want to make a statement with their pedicure.

Consumables Needed:
-
- Red nail polish (OPI’s “Big Apple Red” is a classic choice)
- White nail polish (Essie’s “Blanc”)
- Zebra print nail stickers or a stamping kit
- Clear top coat to protect the design
How to Create This Look at Home:
-
- Paint all nails with a base coat of red polish, except for the big toe.
- On the big toe, apply the white polish and let it dry completely.
- Use the zebra print nail stickers or a stamping kit to create the pattern on the big toe.
- Seal the entire look with a clear top coat to ensure longevity and add a glossy finish.
Deep Burgundy Glitter Elegance
This deep burgundy glitter design is the epitome of sophistication for acrylic toe nails. The rich, dark shade combined with fine glitter creates a classy and elegant look that’s perfect for evening events or the holiday season. The depth of color and the subtle sparkle make this design a favorite for those who appreciate trendy yet timeless nail art.

Consumables Needed:
-
- Burgundy nail polish (Essie’s “Bordeaux” is a great choice)
- Fine burgundy glitter powder
- Clear acrylic powder and liquid monomer
- Top coat for a glossy, long-lasting finish
How to Create This Look at Home:
-
- Begin by applying the burgundy polish as your base.
- While the polish is still wet, dust the fine glitter powder over the big toe to add a subtle shimmer.
- Apply a clear acrylic layer to enhance the durability and depth of the design.
- Finish with a top coat to seal in the glitter and give your nails a professional-grade shine.
Soft Pink French Tip Perfection
This soft pink French tip design is a fresh and modern take on a classic acrylic toe nails look. The delicate pink base color paired with a crisp white tip creates a pretty and cute appearance, perfect for any occasion. The colors are subtle, making this design versatile and easy to match with any outfit.

Consumables Needed:
-
- Soft pink nail polish (Essie’s “Fiji”)
- White polish for the tips (OPI’s “Alpine Snow”)
- Clear top coat for added shine and protection
How to Create This Look at Home:
-
- Apply the soft pink polish as your base and let it dry completely.
- Use a fine brush to paint the white tips, or use French tip guides for precision.
- Once the tips are dry, apply a clear top coat to protect the design and enhance its durability.
Milky Nude Elegance
This milky nude design on acrylic toe nails offers a natural, neutral, and effortlessly chic look. The milky finish adds a touch of sophistication while maintaining a clean and polished appearance. This design is ideal for those who prefer understated elegance in their pedicures, making it perfect for both casual and formal settings.

Consumables Needed:
-
- Milky nude polish (try Essie’s “Mademoiselle”)
- Clear top coat for a glossy finish
How to Create This Look at Home:
-
- Start with a base coat to protect your nails and enhance the longevity of the polish.
- Apply the milky nude polish in two thin coats, allowing each coat to dry completely before applying the next.
- Seal with a top coat to give your nails a glossy, smooth finish that lasts.
Pearl-Accented Milky Nude Design
This milky nude acrylic toe nails design is elevated with a delicate row of pearl-like accents along the cuticle of the big toe. The simplicity of the nude base combined with the small pearls creates a classy and elegant look, perfect for those who enjoy subtle yet luxurious details in their pedicures. This design is ideal for special occasions or for anyone who wants a touch of glamour without being too bold.

Consumables Needed:
-
- Milky nude polish (Essie’s “Mademoiselle” or similar)
- Pearl nail accents (try Swarovski Pearls)
- Nail glue for securing the pearls
- Clear top coat for protection and shine
How to Create This Look at Home:
-
- Start with a base coat to protect your nails, then apply the milky nude polish.
- Once the polish is dry, use a small amount of nail glue to apply the pearls along the cuticle of the big toe.
- Seal the design with a top coat to ensure the pearls stay in place and to add a glossy finish.
Cosmic Blue and Silver Galaxy Design
This acrylic toe nails design is truly out of this world, combining deep blue tones with glitter to create a cosmic galaxy effect. The big toe features a marble-like design with shades of blue and white, reminiscent of a swirling nebula. The other toes are adorned with fine glitter polish, adding to the celestial theme. This look is perfect for those who love unique and trendy designs that stand out.

Consumables Needed:
-
- Deep blue polish (OPI’s “Russian Navy”)
- White polish for the marble effect (Essie’s “Blanc”)
- Fine blue and silver glitter (CND Additives in “Blue Frost”)
- Clear top coat for a lasting finish
How to Create This Look at Home:
-
- Apply a deep blue base color to all toes, except the big toe.
- On the big toe, use the white polish to create a marble effect by swirling the colors together while wet.
- Apply the glitter polish to the remaining toes for a sparkling effect.
- Finish with a top coat to secure the design and add a high-shine finish.
Lavender Gloss Perfection
For a soft and cute pedicure, this lavender gloss design on acrylic toe nails is an excellent choice. The pastel lavender shade is both soothing and stylish, making it a versatile color for any season. The high-gloss finish gives the nails a polished, professional look, while the simplicity of the design ensures that it remains classy and understated.

Consumables Needed:
-
- Lavender polish (Essie’s “Lilacism”)
- Clear top coat for added shine
How to Create This Look at Home:
-
- Begin by applying a base coat to protect your nails.
- Apply two thin coats of lavender polish, allowing each layer to dry completely.
- Finish with a top coat to give your nails a glossy, smooth finish that lasts.
Metallic Blue and Silver Elegance
This acrylic toe nails design combines deep metallic blue with a silver accent nail for a sophisticated, high-contrast look. The big toe features a silver base with fine textured lines, creating a subtle but striking design. The remaining nails are painted in a rich metallic blue, perfect for those who love a trendy yet classy appearance.

Consumables Needed:
-
- Metallic blue polish (OPI’s “Yoga-ta Get This Blue!”)
- Silver polish for the accent nail (Zoya’s “Trixie”)
- Fine nail art brush for creating the textured lines on the big toe
- Clear top coat for a glossy finish
How to Create This Look at Home:
-
- Apply the silver polish to the big toe and the metallic blue to the other toes.
- Use a fine nail art brush to create the textured lines on the big toe while the polish is still wet.
- Finish with a clear top coat to seal the design and add shine.
Snake Print and White Combination
This acrylic toe nails design is perfect for those who love unique and edgy styles. The big toe features a snake print design, offering a wild contrast to the clean and crisp white polish on the other toes. This look is both trendy and baddie, making it ideal for anyone looking to add a bold touch to their pedicure.
Consumables Needed:
-
- Snake print nail decals or stamping kit
- White polish (Essie’s “Blanc”)
- Clear top coat to protect the design and add a glossy finish
How to Create This Look at Home:
-
- Apply a base coat to protect your nails.
- Use the snake print decals or stamping kit to create the design on the big toe.
- Paint the other toes with the white polish for a clean, contrasting look.
- Seal the design with a clear top coat to ensure longevity and a high-shine finish.
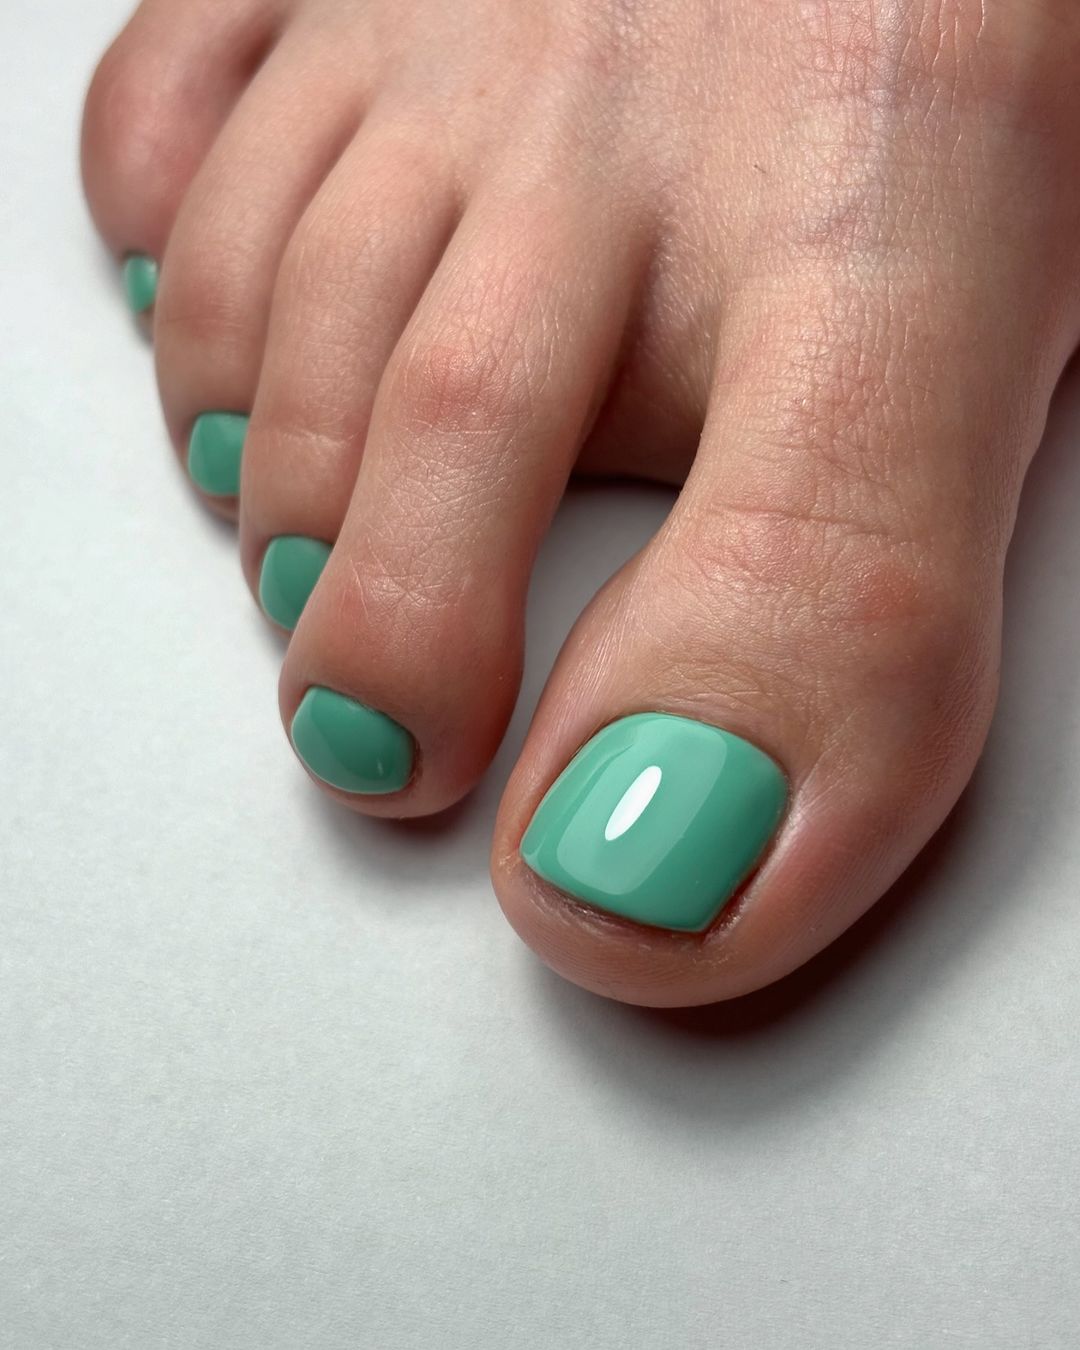
Fresh Mint Green Perfection
This mint green acrylic toe nails design is the epitome of freshness and simplicity. The soft, pastel green color is both soothing and trendy, making it an excellent choice for any season. This design is perfect for those who enjoy simple and natural looks with a touch of subtle color. The glossy finish adds to the cute and polished appearance, ensuring your nails look flawless in any setting.

Consumables Needed:
-
- Mint green polish (try Essie’s “Mint Candy Apple”)
- Clear top coat for added shine and durability
How to Create This Look at Home:
-
- Apply a base coat to protect your nails and ensure even application.
- Apply two thin coats of mint green polish, allowing each coat to dry completely.
- Finish with a clear top coat to enhance the shine and longevity of your pedicure.
Glittering White French Tip
This design elevates the classic French tip with a glittery twist. The white tips are perfectly accentuated with a subtle layer of glitter, adding a touch of sparkle to this otherwise classy and natural look. The acrylic toe nails are both elegant and versatile, making them suitable for any occasion, from weddings to casual outings.

Consumables Needed:
-
- White polish for the tips (OPI’s “Alpine Snow”)
- Fine silver glitter (CND Additives in “Shimmering Silver”)
- Clear top coat to seal the design and add a glossy finish
How to Create This Look at Home:
-
- Start with a base coat to protect your nails.
- Apply a thin layer of white polish to create the French tips, using nail guides if needed for precision.
- Before the polish dries, lightly dust the silver glitter over the tips to add a shimmering effect.
- Finish with a clear top coat to protect the design and ensure it lasts.
Iridescent Pink Glow on Dark Skin
This iridescent pink design on acrylic toe nails is stunningly beautiful, especially against dark skin. The subtle shift of colors as the light hits the nails gives them a glowing, ethereal quality. This design is perfect for anyone looking to add a hint of baddie flair to their pedicure while keeping it sophisticated and neutral.

Consumables Needed:
-
- Iridescent pink polish (try Essie’s “Pink Glove Service”)
- Clear top coat for a glossy, long-lasting finish
How to Create This Look at Home:
-
- Apply a base coat to ensure the polish adheres smoothly and lasts longer.
- Paint two thin layers of the iridescent pink polish, allowing each coat to dry fully.
- Finish with a top coat to enhance the shine and create a smooth finish that catches the light beautifully.
Lemon Sherbet Delight
This acrylic toe nails design features a delightful lemon yellow base with a subtle marbling effect on the big toe, accented by fine gold lines. The yellow color is cheerful and bright, making it perfect for summer or anyone looking to add a pop of color to their pedicure. The marbling and gold accents add a touch of elegance to this fun and trendy design.

Consumables Needed:
-
- Lemon yellow polish (Essie’s “Lemon Drop”)
- White polish for marbling (OPI’s “Alpine Snow”)
- Fine gold nail art brush for accent lines
- Clear top coat to protect the design
How to Create This Look at Home:
-
- Apply a base coat to your nails.
- Paint the nails with the lemon yellow polish, leaving the big toe for the marbling.
- Use a fine brush to create a marbling effect on the big toe with the white polish.
- Add fine gold lines for a touch of elegance, then seal the look with a clear top coat.
Blue Wave with Water Droplet Effect
This blue acrylic toe nails design is both bold and playful, featuring a vibrant blue base with a water droplet effect that makes the nails look freshly soaked. The blue color is rich and eye-catching, making it perfect for summer or beach-themed events. The water droplet effect adds a unique and creative touch, making this design stand out from the crowd.

Consumables Needed:
-
- Bright blue polish (Essie’s “Butler Please”)
- Clear gel top coat to create the droplet effect
- Dotting tool to apply the clear gel drops
How to Create This Look at Home:
-
- Start with a base coat to protect your nails and enhance the polish’s durability.
- Apply two coats of the bright blue polish, letting each layer dry completely.
- Use a dotting tool to apply small drops of clear gel top coat, creating the water droplet effect.
- Cure the gel under a UV lamp to set the droplets, then finish with a regular top coat for added shine and protection.
Save Pin
