
20 Stunning Champagne Color Nail Ideas with Rose Gold, Glitter & Acrylic Designs
When it comes to nail fashion, few colors offer the sophistication and versatility of champagne color nails. Whether you’re planning for a wedding, a prom, or just want something elegant yet understated, this soft and shimmering hue is a perfect choice. But what makes champagne nails so special? Is it their subtle sparkle, the way they complement every outfit, or the chic statement they make without being too loud? In this article, we’ll explore different champagne color nail ideas, detailing everything from rose gold accents to almond shapes, to give you all the inspo you need for your next manicure.
Champagne Nails with Rose Gold Accents
Champagne nails with rose gold accents are a match made in heaven. The subtle shine of champagne combined with the warm tones of rose gold creates a manicure that’s both timeless and trendy. This design is perfect for events like weddings or proms where elegance is key. The nails in this design are shaped in a delicate almond shape, which elongates the fingers and adds a touch of femininity. The glitter effect on these nails is subtle yet impactful, adding just the right amount of sparkle without overwhelming the design.

Consumables Needed:
- Champagne color nail polish: OPI “Champagne for Breakfast”
- Rose gold glitter polish: Essie “Penny Talk”
- Almond-shaped nail tips: Kiara Sky Gel Tips in Almond
- Top coat: Seche Vite Dry Fast Top Coat
Author’s Recommendations: The OPI champagne polish offers a smooth, streak-free application, while Essie’s rose gold glitter provides the perfect amount of shimmer. For the almond tips, Kiara Sky’s Gel Tips are easy to use and durable.
DIY Instructions:
-
- Start with a base coat to protect your natural nails.
- Apply two coats of OPI “Champagne for Breakfast” for full coverage.
- Once dry, lightly dust the tips with Essie “Penny Talk” for that rose gold accent.
- Seal the design with Seche Vite top coat for a long-lasting, glossy finish.
Chrome Champagne Nails
If you’re looking to make a statement with your nails, chrome champagne color nails are the way to go. This design is perfect for those who love a futuristic yet classy look. The chrome effect elevates the champagne base, giving it a mirror-like finish that catches the light beautifully. The nails in this design are kept at a short length, making them practical yet stylish.

Consumables Needed:
- Champagne color nail polish: Sally Hansen “Champagne Supernova”
- Chrome powder: Born Pretty Chrome Mirror Powder
- Short nail tips: BTArtbox Nail Tips Short Square
- No-wipe gel top coat: Modelones No Wipe Gel Top Coat
Author’s Recommendations: Sally Hansen’s polish is highly pigmented and only requires one coat. The Born Pretty Chrome Powder provides a high-shine finish that’s easy to apply. Modelones No Wipe Gel Top Coat is a must for sealing in the chrome effect without dulling the shine.
DIY Instructions:
-
- Apply a base coat to your nails.
- Follow with a single coat of Sally Hansen “Champagne Supernova.”
- Once dry, use an eyeshadow applicator to buff the Born Pretty Chrome Powder onto the nails.
- Finish with Modelones No Wipe Gel Top Coat to seal in the chrome and add a glassy shine.
Glitter Champagne Nails with 3D Accents
For a truly show-stopping manicure, glitter champagne color nails with 3D accents are unbeatable. Perfect for special occasions like weddings or quinceañeras, this design features intricate detailing that takes your nails to the next level. The nails are kept long and square, providing a perfect canvas for the art. The combination of gold glitter and champagne creates a luxurious look that’s sure to turn heads.

Consumables Needed:
- Champagne color nail polish: Zoya “Ziv”
- Gold glitter polish: China Glaze “Counting Carats”
- 3D nail art accessories: Swarovski Crystals, Butterfly Charms
- Long square nail tips: Makartt Nail Tips Long Square
Author’s Recommendations: Zoya’s “Ziv” polish is rich in color and has a smooth application. China Glaze’s “Counting Carats” offers a dense glitter that’s perfect for full coverage. For 3D elements, Swarovski Crystals are ideal for their brilliance and quality.
DIY Instructions:
-
- Apply your base coat.
- Paint the nails with Zoya “Ziv,” allowing each coat to dry thoroughly.
- Apply China Glaze “Counting Carats” to the tips, blending it towards the center for an ombre effect.
- Use a dotting tool to apply nail glue and place the 3D crystals and charms.
- Seal everything with a top coat for durability and shine.
Earthy Champagne and Brown Nails
Mixing champagne with earthy brown tones offers a unique take on champagne color nails. This design is perfect for autumn or winter, bringing warmth and comfort through its color palette. The design features swirls of light and dark brown on a square nail shape, adding a playful yet sophisticated element to the manicure.

Consumables Needed:
- Champagne color nail polish: Deborah Lippmann “Chasing Pavements”
- Brown polish: Essie “Wicked”
- Nail art brushes: Beetles Gel Nail Brushes
- Square nail tips: TipBeauty Square Nail Tips
Author’s Recommendations: Deborah Lippmann’s polish is luxurious and long-lasting. Essie’s “Wicked” provides a rich, deep brown that’s perfect for this design. Beetles Gel Nail Brushes are ideal for creating the swirl effect.
DIY Instructions:
-
- Start with a base coat.
- Apply Deborah Lippmann “Chasing Pavements” as the base color.
- Using a nail art brush, create swirls with Essie “Wicked,” blending the colors to create a seamless look.
- Finish with a top coat to protect your design and add shine.
Glamorous Champagne Nails with Gold Glitter
If you’re looking for something that’s both cute and glamorous, champagne color nails with gold glitter are the perfect choice. This design is versatile enough for both everyday wear and special occasions like prom or hoco. The square shape adds a modern touch, while the gold glitter adds a touch of sparkle that’s hard to resist.

Consumables Needed:
- Champagne color nail polish: Orly “Rage”
- Gold glitter polish: OPI “All That Glitters”
- Square nail tips: Glamnetic Square Nail Tips
- Nail glitter: NYX Face and Body Glitter
Author’s Recommendations: Orly’s “Rage” is a metallic champagne that offers great coverage. OPI’s “All That Glitters” is perfect for adding that extra sparkle. NYX Glitter is multi-functional and easy to apply for an extra layer of shine.
DIY Instructions:
-
- Begin with a base coat.
- Apply Orly “Rage” to the entire nail.
- While still wet, sprinkle NYX Glitter onto the tips, creating a gradient effect.
- Seal the design with OPI “All That Glitters” and a top coat for a smooth finish.
Classic Ombre Champagne Nails with Subtle Gems
Ombre champagne color nails with subtle gem accents are a timeless choice for those seeking a look that’s elegant yet understated. The gradual transition from a soft nude to a champagne tip is beautifully complemented by tiny gold gems placed near the cuticle, adding just the right touch of sparkle. The long, square shape gives these nails a modern edge while maintaining a classic appeal. This design is perfect for special occasions like weddings or quinceañeras, where you want your nails to be noticed but not overpowering.

Consumables Needed:
- Ombre champagne color nail polish: Kiara Sky “Barely There”
- Nude base polish: OPI “Bubble Bath”
- Gold gem accents: Swarovski Crystal Pixie
- Long square nail tips: Nailene Square Full Cover Nails
Author’s Recommendations: Kiara Sky’s “Barely There” provides a smooth transition for the ombre effect, while OPI’s “Bubble Bath” offers a delicate nude base. Swarovski Crystal Pixie adds just enough sparkle without being too bold.
DIY Instructions:
-
- Begin with a base coat.
- Apply OPI “Bubble Bath” to the entire nail as a base color.
- Using a sponge, gently dab Kiara Sky “Barely There” starting from the middle of the nail, blending upwards to create the ombre effect.
- Place a small drop of nail glue near the cuticle and apply the gold gems using a dotting tool.
- Seal the look with a high-shine top coat to ensure the gems stay in place and the ombre remains flawless.
Glitter-Tipped Champagne Nails with a Touch of Glam
Glitter-tipped champagne color nails are an excellent way to add a glamorous touch to a sophisticated base. The base is a soft, milky pink that transitions into chunky holographic glitter at the tips, giving the nails a multidimensional effect. The almond shape is ideal for this design, as it elongates the fingers and adds a feminine touch. This design is perfect for a prom or a wedding, where a little extra sparkle is always welcome.

Consumables Needed:
- Pink champagne base polish: Essie “Mademoiselle”
- Holographic glitter polish: ILNP “Mega”
- Almond-shaped nail tips: Aprés Gel-X Almond Tips
- Top coat: Sally Hansen “Miracle Gel Top Coat”
Author’s Recommendations: Essie “Mademoiselle” provides a sheer, buildable base, while ILNP “Mega” offers stunning holographic glitter. Aprés Gel-X Almond Tips are durable and comfortable to wear.
DIY Instructions:
-
- Apply a base coat to your nails.
- Apply two coats of Essie “Mademoiselle” for a soft pink base.
- Using a brush or sponge, apply ILNP “Mega” to the tips, creating a gradient effect.
- Finish with Sally Hansen “Miracle Gel Top Coat” to lock in the glitter and add a high-gloss finish.
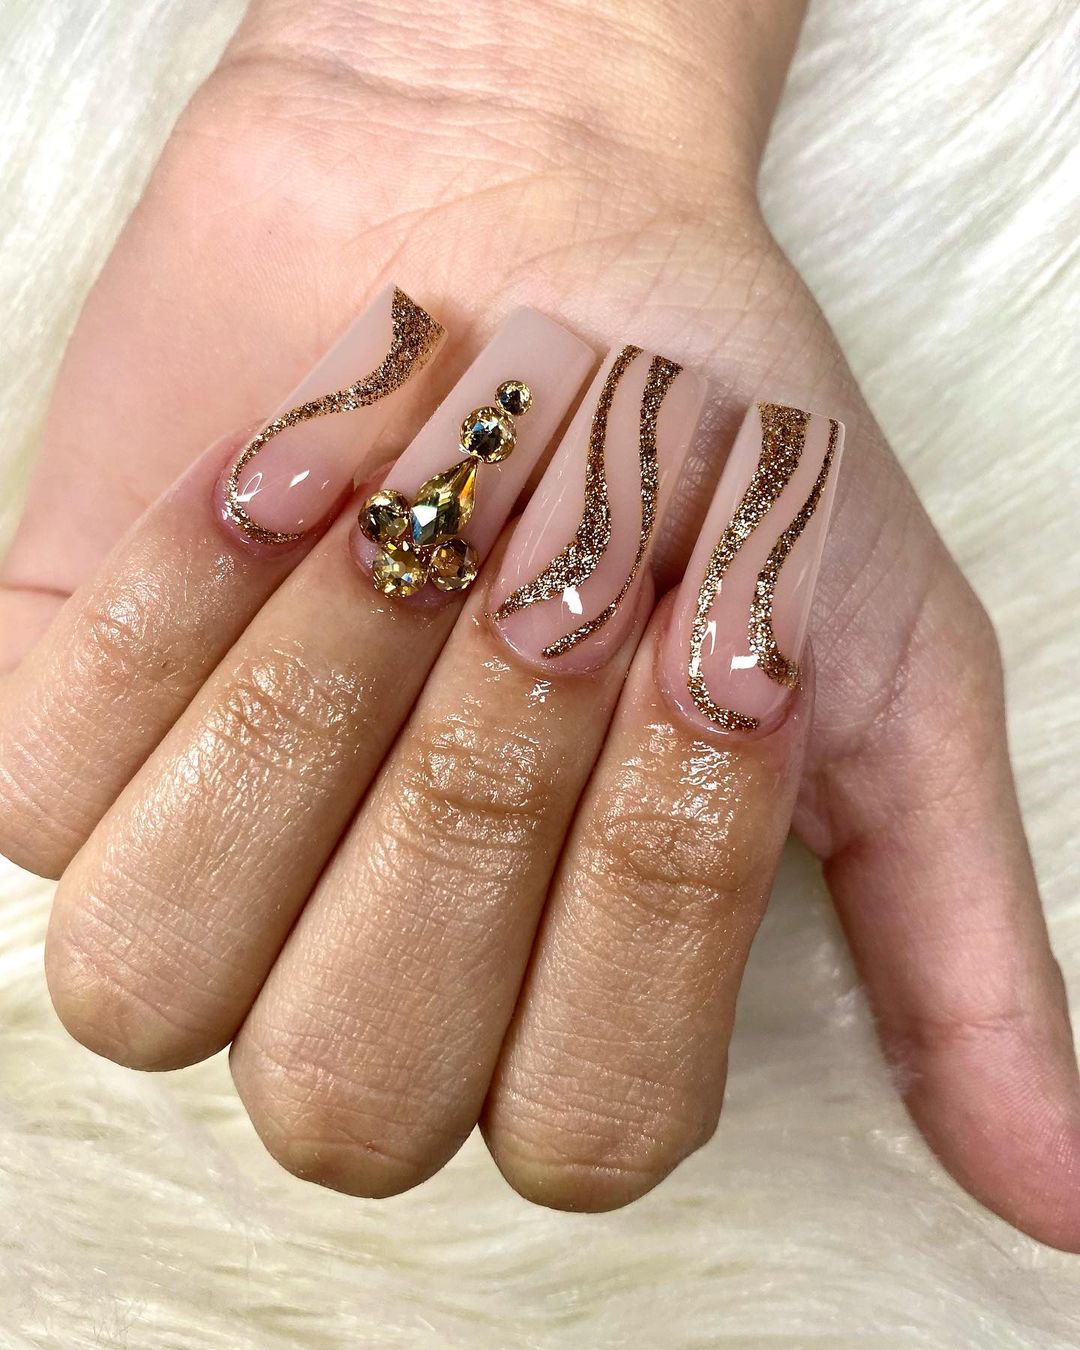
Champagne Nails with Golden Swirls and 3D Embellishments
Champagne nails adorned with golden swirls and 3D embellishments are perfect for those who love a luxurious, statement-making manicure. The nails are shaped into a long, square style, providing ample space to showcase intricate designs. The combination of gold glitter swirls and carefully placed 3D gems creates a dynamic, eye-catching look that’s ideal for formal events or a glamorous night out.

Consumables Needed:
- Champagne base polish: Zoya “Jacqueline”
- Gold glitter polish: CND Vinylux “Locket Love”
- 3D nail art: Swarovski Golden Gems
- Nail art brushes: Winstonia Fine Line Brush Set
- Square nail tips: Kiss Full Cover Square Nails
Author’s Recommendations: Zoya “Jacqueline” offers a creamy base that perfectly complements the gold accents. CND Vinylux “Locket Love” is a richly pigmented glitter polish that stays vibrant. The Swarovski Golden Gems add the perfect 3D embellishments for this look.
DIY Instructions:
-
- Start with a base coat to protect your nails.
- Apply Zoya “Jacqueline” as your base color.
- Use a fine nail art brush to create gold swirls with CND Vinylux “Locket Love.”
- Carefully place the Swarovski gems on the accent nails using nail glue.
- Finish with a strong top coat to secure the design and add a glossy finish.
Elegant Champagne and Gold Diagonal French Tips
For a refined and elegant look, champagne color nails with gold diagonal French tips are an exquisite choice. The nails feature a delicate champagne base with sleek diagonal lines of gold glitter, creating a modern twist on the traditional French manicure. The design is subtle yet sophisticated, making it suitable for a wide range of occasions, from casual outings to more formal events.

Consumables Needed:
- Champagne base polish: Deborah Lippmann “Shifting Sands”
- Gold glitter polish: OPI “Gold’s Night Out”
- Fine tip brush: Beetles Gel Nail Art Brushes
- Long square nail tips: Gelish Structure Gel
Author’s Recommendations: Deborah Lippmann’s “Shifting Sands” provides a flawless, smooth base, while OPI “Gold’s Night Out” delivers a striking gold accent. The Beetles Gel Nail Art Brushes are ideal for creating precise diagonal lines.
DIY Instructions:
-
- Begin by applying a base coat.
- Apply Deborah Lippmann “Shifting Sands” for a smooth and even base.
- Using a fine tip brush, paint diagonal lines with OPI “Gold’s Night Out” across the tips of the nails.
- Seal with a top coat to ensure the lines remain sharp and the polish stays intact.
Subtle Sparkle Champagne Nails for a Classic Look
For those who prefer a more subtle approach, champagne color nails with a hint of sparkle offer a classic and timeless look. The design features a sheer, soft champagne base with delicate gold flecks scattered throughout, creating an understated yet elegant effect. The short, square shape of the nails makes them practical for everyday wear, while still maintaining a touch of glamour.

Consumables Needed:
- Sheer champagne base polish: Butter London “Pink Champagne”
- Gold flake polish: KBShimmer “Snow Much Fun”
- Short square nail tips: Olive & June Press-On Nails
- Top coat: Essie “Gel Couture Top Coat”
Author’s Recommendations: Butter London’s “Pink Champagne” provides a soft, buildable base with a touch of shimmer. KBShimmer’s “Snow Much Fun” adds just the right amount of gold flecks for a delicate sparkle. Olive & June’s Press-On Nails offer a quick and easy application with a perfect square shape.
DIY Instructions:
-
- Apply a base coat to protect your nails.
- Apply two thin coats of Butter London “Pink Champagne.”
- Lightly dab KBShimmer “Snow Much Fun” onto the nails for a subtle sparkle effect.
- Finish with Essie “Gel Couture Top Coat” to add shine and protect the design.
Champagne Glitter Diagonal French Tips
Champagne glitter diagonal French tips are an elegant way to add a touch of glamour to a classic manicure. The nails are painted with a soft, nude base, while the tips feature a sharp diagonal line filled with fine, multi-toned glitter in champagne and rose gold hues. The long, square shape adds sophistication, making these nails perfect for formal events like weddings or prom.

Consumables Needed:
- Nude base polish: OPI “Samoan Sand”
- Champagne glitter polish: ILNP “Juliette”
- Square nail tips: Kiss Salon Acrylic Nude French Nails
- Fine line brush: Winstonia Nail Art Liner Brush
Author’s Recommendations: OPI’s “Samoan Sand” provides a flawless nude base, and ILNP’s “Juliette” is a stunning glitter polish with a perfect blend of champagne and rose gold. The Winstonia Nail Art Liner Brush ensures precise application for the diagonal tips.
DIY Instructions:
-
- Apply a base coat to your nails.
- Paint the entire nail with OPI “Samoan Sand” and allow it to dry completely.
- Use the fine line brush to apply ILNP “Juliette” diagonally across the tips of the nails.
- Seal with a top coat to protect the glitter and add shine.
Champagne and Gold Accented Nails
Champagne and gold accented nails offer a chic, mixed-style manicure perfect for any occasion. This design features a combination of a solid champagne color, a French tip, and a gold-glittered accent nail with wavy lines. The nails are shaped in a modern almond style, giving a feminine and stylish appearance.

- Consumables Needed:
- Champagne base polish: Essie “Ballet Slippers”
- Gold glitter polish: Orly “Luxe”
- Almond-shaped nail tips: Aprés Gel-X Almond Tips
- Nail art brushes: Beetles Gel Nail Art Brushes
Author’s Recommendations: Essie “Ballet Slippers” is a soft, elegant pink that works beautifully as a base, while Orly “Luxe” adds a luxurious gold accent. Aprés Gel-X Almond Tips are durable and provide a seamless look.
DIY Instructions:
-
- Apply a base coat to your nails.
- Paint all nails with Essie “Ballet Slippers” and let dry.
- For the accent nail, use the nail art brushes to create wavy lines with Orly “Luxe.”
- Finish with a top coat to secure the design and add a glossy finish.
Shimmering Champagne Almond Nails
Shimmering champagne almond nails are perfect for those who love a subtle sparkle. The nails feature a soft champagne color with a delicate shimmer that catches the light beautifully. The almond shape adds an elegant touch, making this design suitable for both everyday wear and special occasions like hoco or quinceañeras.

Consumables Needed:
- Champagne shimmer polish: Zoya “Godiva”
- Almond-shaped nail tips: Kiara Sky Almond Tips
- Top coat: Essie “Speed Setter Top Coat”
Author’s Recommendations: Zoya’s “Godiva” offers a beautiful champagne shimmer with just the right amount of sparkle. Kiara Sky Almond Tips are easy to apply and comfortable to wear.
DIY Instructions:
-
- Start with a base coat.
- Apply two coats of Zoya “Godiva” for a shimmery champagne finish.
- Finish with Essie “Speed Setter Top Coat” to add shine and ensure the polish lasts.
Metallic Copper Champagne Nails
For a bold and sophisticated look, metallic copper champagne nails are an excellent choice. The deep, metallic copper hue is rich and luxurious, making it a perfect statement for fall or winter. The long, square shape enhances the dramatic effect, making these nails ideal for a night out or a special event.

Consumables Needed:
- Metallic copper polish: Sally Hansen “Copper Penny”
- Square nail tips: Nailene Square Full Cover Nails
- Top coat: Seche Vite Dry Fast Top Coat
Author’s Recommendations: Sally Hansen’s “Copper Penny” is a richly pigmented polish with a stunning metallic finish. Seche Vite Top Coat is essential for sealing in the color and adding a high-gloss finish.
DIY Instructions:
-
- Apply a base coat to your nails.
- Paint your nails with Sally Hansen “Copper Penny,” applying two coats for full coverage.
- Finish with Seche Vite Dry Fast Top Coat for a long-lasting, glossy finish.
Full Glitter Champagne Nails
Full glitter champagne nails are perfect for those who want their nails to shine bright. This design features a solid, full-coverage champagne glitter that sparkles from every angle. The nails are shaped in an almond style, making them glamorous yet easy to wear. This design is perfect for festive occasions or when you simply want your nails to stand out.

Consumables Needed:
- Full coverage champagne glitter polish: OPI “All A’Twitter”
- Almond-shaped nail tips: Makartt Almond Nail Tips
- Top coat: Essie “Gel Couture Top Coat”
Author’s Recommendations: OPI’s “All A’Twitter” is a dense glitter polish that provides full coverage in just a few coats. Makartt Almond Nail Tips offer a perfect shape that’s easy to apply.
DIY Instructions:
-
- Start with a base coat.
- Apply two to three coats of OPI “All A’Twitter” until the nails are fully covered in glitter.
- Seal with Essie “Gel Couture Top Coat” for a smooth, long-lasting finish.
Soft Champagne Glitter Square Nails
Soft champagne glitter square nails offer a refined and delicate look that is both chic and sophisticated. This design features a nude base that seamlessly transitions into a subtle champagne glitter at the tips. The square shape enhances the neat and polished appearance, making it perfect for everyday wear or special events where understated elegance is key.

Consumables Needed:
- Nude base polish: OPI “Bubble Bath”
- Champagne glitter polish: Zoya “Alicia”
- Square nail tips: Nailene Square Full Cover Nails
- Top coat: Essie “Gel Couture Top Coat”
Author’s Recommendations: OPI’s “Bubble Bath” is a classic nude that complements any skin tone, while Zoya’s “Alicia” adds a soft, sparkling finish that is subtle yet noticeable.
DIY Instructions:
-
- Apply a base coat to protect your nails.
- Paint your nails with OPI “Bubble Bath” and let them dry.
- Lightly apply Zoya “Alicia” to the tips, blending it downward for a gradient effect.
- Seal with Essie “Gel Couture Top Coat” for added shine and durability.
Pink and Gold Swirl Chrome Nails
Pink and gold swirl chrome nails are a striking choice for those who love a bold and glamorous look. This design features a pink base with gold chrome swirls that add dimension and a luxurious feel. The long, square shape further accentuates the drama, making these nails perfect for a night out or a special occasion where you want to make a statement.

Consumables Needed:
- Pink base polish: Essie “Fiji”
- Gold chrome powder: Born Pretty Chrome Mirror Powder in Gold
- Nail art brushes: Beetles Gel Nail Art Brushes
- Square nail tips: Makartt Long Square Nail Tips
Author’s Recommendations: Essie’s “Fiji” provides a vibrant pink base that contrasts beautifully with the gold chrome. Born Pretty’s Chrome Powder delivers a mirror-like shine that adds an extra layer of luxury.
DIY Instructions:
-
- Start with a base coat.
- Apply two coats of Essie “Fiji” for a solid pink base.
- Using a nail art brush, create swirls with the Born Pretty Gold Chrome Powder.
- Finish with a top coat to lock in the design and add a glossy finish.
Minimalist Champagne Shimmer Short Nails
Minimalist champagne shimmer short nails are perfect for those who prefer a simple, clean look with a touch of sparkle. The short, rounded nails are painted with a soft champagne shimmer, creating a look that is both understated and elegant. This design is ideal for everyday wear, professional settings, or as a subtle complement to a more elaborate outfit.

Consumables Needed:
- Champagne shimmer polish: Butter London “Pink Champagne”
- Short nail tips: Olive & June Short Round Press-On Nails
- Top coat: Sally Hansen “Insta-Dri Top Coat”
Author’s Recommendations: Butter London’s “Pink Champagne” offers a beautiful, subtle shimmer that catches the light without being too flashy. Olive & June’s Short Round Press-Ons are easy to apply and perfect for a minimalist look.
DIY Instructions:
-
- Apply a base coat to protect your nails.
- Paint your nails with two coats of Butter London “Pink Champagne.”
- Finish with Sally Hansen “Insta-Dri Top Coat” for a quick-drying, glossy finish.
Silver Glitter Champagne Nails
Silver glitter champagne nails are a glamorous and eye-catching option for those who love a bit of sparkle. The nails are painted with a champagne base and topped with a dense layer of fine silver glitter, creating a dazzling, metallic effect. The almond shape adds a touch of elegance, making these nails suitable for both festive occasions and everyday wear.

Consumables Needed:
- Champagne base polish: Zoya “Giselle”
- Silver glitter polish: China Glaze “Fairy Dust”
- Almond-shaped nail tips: BTArtbox Almond Nail Tips
- Top coat: Seche Vite Dry Fast Top Coat
Author’s Recommendations: Zoya’s “Giselle” provides a smooth, neutral base, while China Glaze’s “Fairy Dust” adds a brilliant sparkle that’s sure to stand out. Seche Vite’s Top Coat ensures that the glitter stays in place and the nails have a high-gloss finish.
DIY Instructions:
-
- Apply a base coat.
- Paint your nails with Zoya “Giselle” and allow them to dry.
- Apply China Glaze “Fairy Dust” over the entire nail for full glitter coverage.
- Finish with Seche Vite Top Coat to lock in the glitter and add shine.
Champagne Glitter French Tips
Champagne glitter French tips are a modern twist on the classic French manicure. The nails are painted with a soft pink base and finished with a sparkling champagne glitter tip. The almond shape adds femininity and sophistication, making this design perfect for weddings, proms, or any event where you want your nails to look effortlessly chic.

Consumables Needed:
- Pink base polish: OPI “Bubble Bath”
- Champagne glitter polish: ILNP “Juliette”
- Almond-shaped nail tips: Aprés Gel-X Almond Tips
- Fine tip brush: Beetles Gel Nail Art Brushes
Author’s Recommendations: OPI’s “Bubble Bath” is a versatile pink that complements any skin tone, while ILNP’s “Juliette” provides a glamorous glitter finish. The Beetles Gel Nail Art Brushes are perfect for achieving precise French tips.
DIY Instructions:
-
- Apply a base coat.
- Paint your nails with OPI “Bubble Bath” for a soft pink base.
- Use a fine tip brush to apply ILNP “Juliette” along the tips of the nails.
- Finish with a top coat to seal in the design and add a glossy finish.
Save Pin
