
20 Stunning Short Oval Acrylic Nail Designs – French Tips, Colors & Cute Ideas
Are you a fan of short oval acrylic nails but feel like you’re stuck in a rut when it comes to new ideas? If so, you’re not alone. This nail shape is perfect for those who prefer a more natural, everyday look, but that doesn’t mean it can’t be extra chic or playful. In this article, we’ll dive into various short oval acrylic nail designs that not only enhance your everyday style but also show how versatile this shape can be. From French tips to stunning fall designs, we’ve got you covered!
Classic Royal Blue with Heart Accent
When it comes to timeless elegance, this short oval acrylic nails design featuring bold blue polish with a delicate heart accent takes the crown. The deep blue is both rich and playful, while the subtle nude base nail adorned with a miniature heart brings a touch of cuteness without overwhelming the overall look. One of the nails also has a mesmerizing marble effect combined with gold foil flakes, giving it a luxury feel.

Consumables Needed:
- OPI Nail Lacquer in “Russian Navy”
- Gold foil flakes by Beauty Secrets
- Heart nail art stickers by Maniology
- Nude base polish, such as Essie’s “Mademoiselle”
Author’s Recommendation: Opt for a thick, gel-like topcoat to ensure the gold flakes stay intact and add an extra layer of shine to your short oval acrylic nails.
DIY Guide:
-
- Apply a base coat to your natural nails.
- Paint your nails with the blue polish, leaving one nail bare for the heart design.
- On the accent nail, use a tiny brush to paint a heart, or apply a heart sticker.
- For the marble effect, dab a small sponge in blue polish and carefully press it onto the nail. Apply gold foil with tweezers while the polish is wet.
- Finish off with a glossy top coat to seal the design.
Playful Lavender Smiley Face Design
For those who want a playful twist, this cute lavender design is perfect. The nails are coated in a pastel purple shade, with minimalistic, simple accents like smiley faces and abstract white swirls. It’s a fun, youthful look that’s ideal for someone looking for something cute yet understated.

Consumables Needed:
- Essie Nail Polish in “Lilacism”
- White nail art pen by Sally Hansen
- Smiley face decals by Shein
Author’s Recommendation: Use a peel-off latex barrier to prevent mistakes during the freehand swirl application.
DIY Guide:
-
- Apply a base coat and two layers of lavender polish.
- Once dry, use a nail art pen or a small brush to create the smiley faces and swirls on select nails.
- Finish with a high-shine top coat to enhance the details and make the design last longer.
Earthy Green with Botanical Art
This green and neutral botanical-inspired design brings a hint of nature to your short oval acrylic nails. With deep green nails complemented by white matte nails adorned with painted leaves and soft florals, it’s a minimalist design that leans towards earthy, natural vibes. It’s a great option for anyone looking for fall designs or something more nature-inspired.

Consumables Needed:
- OPI Nail Lacquer in “Stay Off the Lawn!”
- White matte polish by Zoya in “Leigh”
- Nail art pen in green by Twinkled T
Author’s Recommendation: Try using quick-dry nail oil to prevent smudging the detailed floral art.
DIY Guide:
-
- After applying a base coat, paint your nails with green and white polishes, alternating the colors.
- Using a fine-tipped nail art brush or pen, create the leaf and floral designs on the white nails.
- Seal with a matte topcoat to keep the design looking fresh.
Glittery Confetti Nails
For a more festive approach, these nails feature a sheer, neutral base with extra fine glitter flakes in pastel colors scattered across the nail surface. The glitter reflects light, giving your nails an almost holographic effect while still maintaining a natural aesthetic.

Consumables Needed:
- Sheer nude polish by Chanel in “Ballerina”
- Glitter flakes by INM Out The Door
- Peel-off base coat (for easy removal)
Author’s Recommendation: Make sure to pat down the glitter flakes lightly to avoid rough edges after application.
DIY Guide:
-
- Apply a neutral base coat followed by two thin layers of sheer polish.
- While the polish is still tacky, gently press the glitter flakes onto the nails.
- Finish with a gel topcoat to secure the glitter in place and give your nails that glossy finish.
Black and Gold Chic
Nothing says bold and extra like sleek black nails with gold foil accents. This stunning design combines the elegance of black polish with the luxury of delicate gold leaf applied in asymmetrical patterns. Perfect for those who want something simple yet striking.

Consumables Needed:
- OPI Nail Lacquer in “Black Onyx”
- Gold leaf by Nailtopia
- Top coat by Essie Gel Setter
Author’s Recommendation: For a sleek look, apply the gold leaf sparingly, so it doesn’t overpower the simplicity of the black base.
DIY Guide:
-
- Paint your nails with two coats of black polish.
- Gently press small pieces of gold leaf onto the wet polish using a pair of tweezers.
- Seal with a high-shine topcoat for long-lasting wear.
Delicate Floral and Lavender Nails
This dreamy design merges short oval acrylic nails with delicate florals and subtle lavender polish, creating a whimsical, soft look. The key feature is the floral accents, carefully placed over a sheer neutral base, giving the design an airy feel. Combined with the lavender polish, it evokes a sense of spring and femininity, perfect for anyone who loves a soft yet creative design. The little floral bees add a playful touch that’s not overwhelming but adds character to the nails.

Consumables Needed:
- OPI Nail Lacquer in “Do You Lilac It?”
- Floral nail art stickers by Maniology
- Sheer base coat by Essie in “Mademoiselle”
- Bee decals by Born Pretty
Author’s Recommendation: Use a fine-tipped brush for the floral accents if you prefer hand-painting over stickers for a more personalized touch.
DIY Guide:
-
- Apply a sheer neutral base to the nails.
- For two accent nails, apply the floral and bee stickers or use a small brush for hand-painted designs.
- Paint the remaining nails with lavender polish.
- Seal with a glossy top coat to protect the design and add shine.
Playful Green and Mushroom Nails
For a quirky twist on short oval acrylic nails, this design incorporates a soft green polish with cute little mushroom accents. The green nails add a fresh, earthy vibe, while the mushroom decals give the manicure a fun, almost fairytale-like feel. This design is perfect for those who love playful yet cute nail designs that aren’t afraid to mix things up.

Consumables Needed:
- Sally Hansen Insta-Dri Nail Color in “Thyme is Money”
- Mushroom nail art decals by Shein
- Clear base coat by Seche Vite
Author’s Recommendation: The mushroom decals are a great way to add a cute twist, but feel free to go extra by adding tiny dots of white polish for additional texture.
DIY Guide:
-
- Start with a clear base coat.
- Apply the green polish on three nails, and leave two nails bare for the mushroom designs.
- Attach mushroom decals or hand-paint the mushrooms using brown, white, and red polish.
- Finish with a clear top coat to enhance the shine and protect the mushrooms from wear.
Lavender Simplicity with Gold Flakes
This is an elegant yet simple design for short oval acrylic nails, where a soft lavender polish takes the lead, and the accent nail is adorned with dainty gold foil flakes. The combination of the pastel shade with a hint of gold makes this manicure perfect for both casual wear and special occasions. It’s minimalist yet luxurious, showing that sometimes less is more.

Consumables Needed:
- Zoya Nail Polish in “Violette”
- Gold foil flakes by Beauty Secrets
- Gel topcoat by Essie
Author’s Recommendation: If you’re not comfortable using foil flakes, gold nail art pens are a great alternative to achieve a similar effect without the hassle.
DIY Guide:
-
- Start by applying two coats of lavender polish to all your nails.
- For the accent nail, use tweezers to carefully place gold foil flakes while the polish is still tacky.
- Seal the nails with a gel topcoat to ensure the gold flakes stay in place and to give the nails a long-lasting shine.
Fun Pink and Red Floral Nails with Leopard Print
This design is a bold and cute take on short oval acrylic nails, combining pink polish with bright red floral designs and a touch of leopard print. The contrast between the red flowers and the pink base makes the design pop, while the subtle leopard print adds an unexpected edge, creating a fun and flirty manicure.

Consumables Needed:
- OPI Nail Lacquer in “Mod About You” (pink base)
- Red floral nail decals by Maniology
- Leopard print nail art pen by Twinkled T
Author’s Recommendation: To keep the leopard print from overpowering the floral design, limit it to just one or two nails for balance.
DIY Guide:
-
- Start with a pink base coat on all your nails.
- Apply red floral decals to one or two nails.
- On other nails, use a leopard print nail art pen to create spots near the edges.
- Seal with a high-gloss top coat to protect the intricate designs.
Natural Pink Nude Nails
For a more natural and effortless look, these short oval acrylic nails are coated in a soft pink nude that enhances the natural beauty of your nails without being too flashy. This simple design is ideal for those who prefer a low-maintenance look but still want their nails to appear polished and neat. It’s the perfect balance between casual and chic.

Consumables Needed:
- Essie Nail Polish in “Ballet Slippers”
- Clear topcoat by Seche Vite
Author’s Recommendation: If you want a little more shine, apply a second layer of the top coat to really make the natural pink pop.
DIY Guide:
-
- Apply a clear base coat to protect your natural nails.
- Paint two thin coats of the pink nude polish.
- Finish with a high-shine top coat for a polished look that lasts.
Pastel French Tips with Blue Floral Accents
This delicate take on short oval acrylic nails adds a touch of whimsy with its French tip design in a soft blue shade. What makes it extra special are the subtle floral accents on two nails, where tiny white flowers are dotted along the tip. The combination of the sheer neutral base and the charming blue details make it an elegant yet fun look, perfect for any season.

Consumables Needed:
- Essie Nail Polish in “Butler Please” (blue)
- White nail art pen by Maniology for the flowers
- Clear base coat by Zoya in “Milky”
Author’s Recommendation: Use a dotting tool for precise placement of the floral accents, and add tiny white dots for an extra cute effect.
DIY Guide:
-
- Apply a sheer base coat to all nails.
- Carefully create blue French tips on each nail using the polish.
- Add the floral details using a small dotting tool for precise placement.
- Seal with a top coat for a glossy finish and long-lasting wear.
Autumn Floral French Tips
This design combines a French tip with subtle, autumnal floral accents in warm hues of red, orange, and green. Each tip features tiny, detailed flowers, giving the nails a cute yet sophisticated fall vibe. It’s an ideal choice for anyone looking for fall designs that are simple yet striking.

Consumables Needed:
- OPI Nail Lacquer in “Big Apple Red” (red)
- Sally Hansen Insta-Dri in “Pumpkin Spice” (orange)
- Green nail art pen by Twinkled T for leaf details
- Sheer base coat by Essie
Author’s Recommendation: To keep the flowers looking neat, use a very fine brush or pre-made floral decals if you’re not confident with freehand designs.
DIY Guide:
-
- Start with a clear, sheer base coat.
- Create French tips using the floral colors, alternating red and orange with green leaves.
- Finish with a top coat to ensure the design stays intact.
Natural Pink Sheen
For a super natural and understated look, these short oval acrylic nails feature a soft pink sheen that enhances the natural beauty of the nails. The subtle shimmer gives the nails a polished and elegant appearance, making it a perfect choice for those who prefer a simple and low-maintenance look while still wanting to appear put-together.

Consumables Needed:
- Zoya Nail Polish in “Alyssa” (soft pink with shimmer)
- Clear top coat by Seche Vite
Author’s Recommendation: Add an extra layer of top coat for a more intense glossy finish and longer durability.
DIY Guide:
-
- Apply a clear base coat to protect your nails.
- Paint two thin coats of the pink polish to give it that natural sheen.
- Finish with a top coat for added shine and protection.
Neon Striped Minimalist Design
This design takes a simple approach, using bold neon stripes of green and blue on a clear base for a modern, minimalist look. The extra pop of color makes it a trendy yet subtle design, ideal for someone looking for a modern twist on short oval acrylic nails. It’s chic yet understated, perfect for those who love a sleek style.

Consumables Needed:
- Neon green and blue striping polish by Twinkled T
- Clear base coat by Essie
Author’s Recommendation: Apply a nail tape as a guide for precise striping, or freehand if you want a more relaxed, organic line.
DIY Guide:
-
- Apply a clear base coat to all nails.
- Use a thin brush or striping tool to paint vertical neon lines of green and blue on each nail.
- Finish with a top coat to smooth out the design and add shine.
Neon and Gold French Tips
This unique twist on the classic French tip adds a fun neon gradient that fades from orange to pink, accented with a delicate gold strip along the edge. The clear neutral base keeps the focus on the vibrant tips, while the gold adds a touch of elegance. It’s perfect for those who want something extra yet balanced, with both fun and refined elements.

Consumables Needed:
- OPI Nail Lacquer in “Toucan Do It If You Try” (orange)
- Essie Nail Polish in “Excuse Me, Sur” (pink)
- Gold striping tape or polish by Born Pretty
Author’s Recommendation: For a seamless gradient, use a makeup sponge to blend the neon colors together before applying the gold strip.
DIY Guide:
-
- Start with a clear base coat to protect your nails.
- Use a makeup sponge to blend the neon orange and pink on the tips.
- Apply gold striping tape or paint a fine gold line along the French tip.
- Finish with a glossy top coat for a smooth and sleek look.
Heart Confetti Design
This playful design is all about love! The short oval acrylic nails are adorned with heart confetti in shades of red, pink, and white, scattered on a glittery base. The tiny hearts, along with polka dots, create a cute and fun aesthetic, making these nails perfect for a festive or romantic occasion. The glitter adds a subtle shimmer, tying the whole design together.

Consumables Needed:
- OPI Nail Lacquer in “Mod About You” (pink)
- Red heart nail decals by Shein
- White heart nail art stickers by Maniology
- Glitter topcoat by Zoya
Author’s Recommendation: Use a fine-tipped brush to evenly place the hearts and dots for a neat and professional finish.
DIY Guide:
-
- Start with a clear base coat.
- Apply small red, pink, and white heart decals randomly across the nail.
- Use a dotting tool to create additional dots for added flair.
- Seal with a glitter top coat to lock in the design and add sparkle.
Neon Zebra with Pop of Green
For a funky and bold twist, this neon design combines animal print with vibrant colors. The zebra print on the middle nails uses white and green neon stripes for a unique look, while the ring finger pops with a solid neon green polish. This extra bold design is perfect for someone who loves daring nail designs that stand out from the crowd.

Consumables Needed:
- Essie Nail Polish in “Mint Candy Apple”
- White and neon green striping polish by Twinkled T
- Clear base coat by Zoya
Author’s Recommendation: For a clean zebra stripe, use a nail striping brush for precise lines. Adding neon gives a modern, playful edge to this classic nail design.
DIY Guide:
-
- Apply a base coat.
- Create neon green and white stripes on the middle nails using a thin brush.
- Paint the accent nail with solid green polish.
- Seal with a glossy topcoat for extra shine and protection.
Bright Orange with Floral Accent
This bright orange manicure is bold, fun, and perfect for summer. One accent nail features a floral design with a clear base, adding a soft and playful contrast to the vibrant color. It’s a great way to mix simplicity with a touch of cute detailing, making it versatile for both casual and festive occasions.

Consumables Needed:
- OPI Nail Lacquer in “A Good Man-darin is Hard to Find” (orange)
- Floral nail decals by Maniology
- Clear base coat by Essie
Author’s Recommendation: Use floral decals for a fast, precise design, and pair them with bold colors to create a perfect balance between fun and delicate.
DIY Guide:
-
- Apply a base coat.
- Paint four nails with orange polish, and leave one clear for the floral accent.
- Apply the floral decals to the accent nail.
- Seal with a clear top coat for a smooth finish.
Pastel French Tips with Heart Details
These short oval acrylic nails feature a soft pastel French tip design in shades of lavender, mint, and peach, finished off with small heart details. The combination of pastel hues and hearts creates a soft, romantic look that’s perfect for spring or summer. This design strikes the perfect balance between simple and cute.

Consumables Needed:
- OPI Nail Lacquer in “Do You Lilac It?” (lavender)
- Essie Nail Polish in “Mint Candy Apple” (mint)
- Heart nail decals in white and pastel colors by Born Pretty
Author’s Recommendation: For the perfect pastel French tip, use nail guides or tape to create clean lines. Adding heart accents gives a cute, extra touch.
DIY Guide:
-
- Start with a clear base coat.
- Create pastel French tips using a fine brush or nail guides.
- Add heart accents with decals or a small dotting tool.
- Finish with a glossy top coat to enhance the colors.
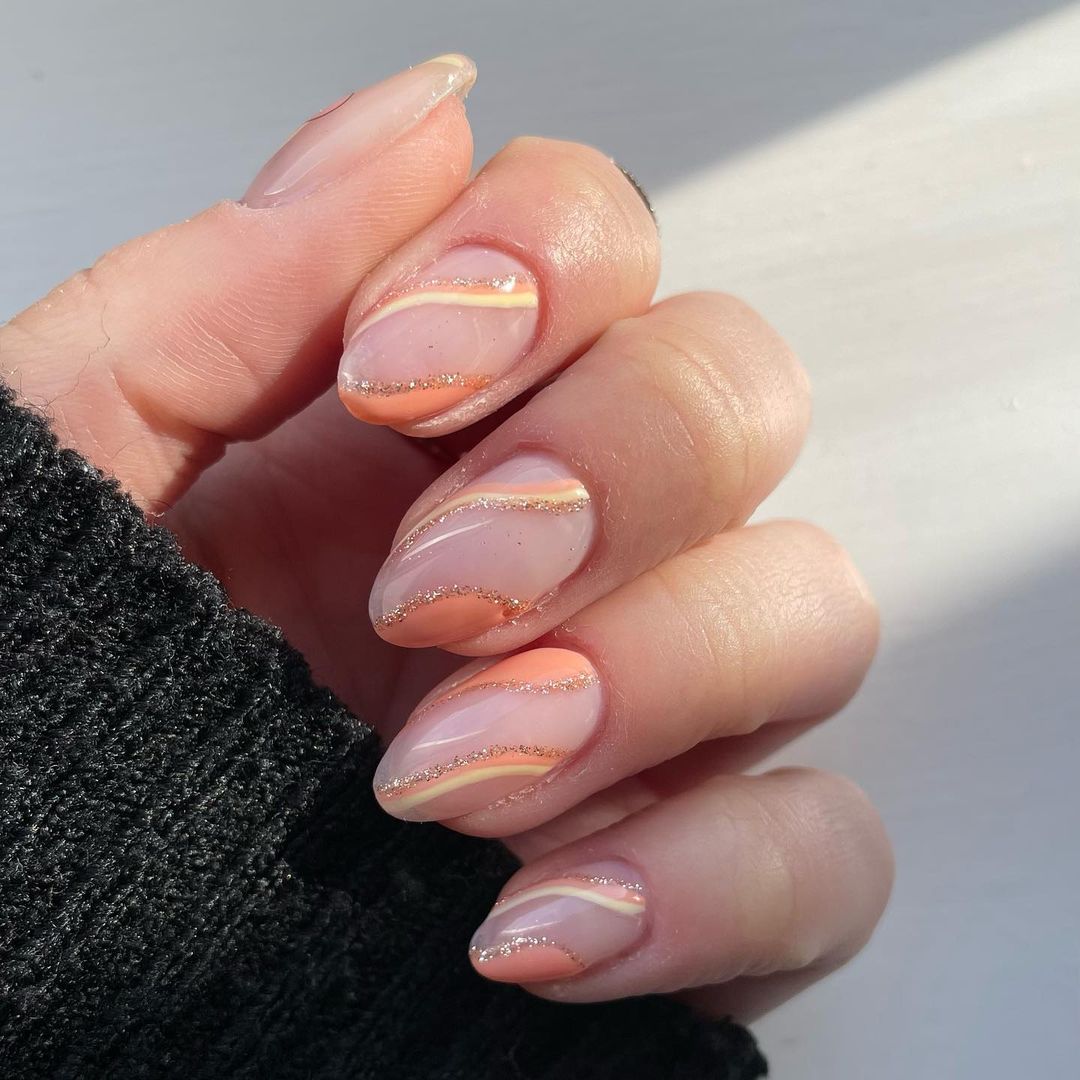
Peach and Glitter Swirl
This design offers a soft and dreamy aesthetic, with peach swirls across a nude base, outlined in a delicate glitter strip. The glitter gives a subtle shine, while the peach tones make the nails look light and fresh, perfect for a minimalist yet elegant look. It’s a subtle way to add some glam without going overboard.

Consumables Needed:
- OPI Nail Lacquer in “Crawfishin’ for a Compliment” (peach)
- Glitter striping polish by Twinkled T
- Clear base coat by Seche Vite
Author’s Recommendation: Use a thin striping brush to create the peach swirls, and carefully outline with glitter polish for a sleek, professional finish.
DIY Guide:
-
- Apply a nude base coat.
- Paint peach swirls across each nail using a striping brush.
- Add a thin line of glitter along the edge of the swirls.
- Seal with a top coat to lock in the design and give it a glossy finish.
Save Pin
