
20 Trendy Round Acrylic Nail Designs: Cute, Short, Long, Pink & More Ideas
When it comes to round acrylic nails, versatility and chicness come together in perfect harmony. Whether you’re aiming for a cute and girly look or something more natural and simple, this shape offers endless possibilities for all styles and preferences. In this article, we will explore some of the best design ideas that make round acrylic nails an irresistible choice for both everyday wear and special occasions. Let’s dive into some gorgeous examples and discuss how you can achieve these stunning looks at home.
Soft Pink with Cherry Accent
Soft, light pink round acrylic nails can instantly give your manicure a cute and delicate vibe. This design features a classic French tip with a small cherry accent on the ring and middle fingers. The minimal design keeps things subtle but playful, making it perfect for those who prefer natural nails with a twist. The cherries add a fun, girly touch without overpowering the manicure, giving you the best of both worlds—simple yet stylish.

Consumables List:
- Light pink nail polish (e.g., Essie “Ballet Slippers”)
- White polish for French tip (e.g., OPI “Alpine Snow”)
- Small dotting tool for cherry design
- Red polish (e.g., Sally Hansen “Red Carpet”)
- Green polish for cherry stems
- Thin detailing brush for accents
How to Create This Look:
- Start by applying a base coat to protect your nails.
- Apply two coats of light pink polish and allow it to dry.
- Using a white polish, create a thin French tip on each nail.
- Use a dotting tool to create small red dots for cherries on the middle and ring fingers.
- With a thin brush, draw small green stems on top of the cherries.
- Finish with a top coat to seal the design and add shine.
Pastel Swirl Designs
For those who love a playful and colorful manicure, this round acrylic nails design with pastel swirls is ideal. The soft mix of blue, purple, yellow, and peach hues creates a dreamy, artistic effect. This style is perfect for those who want something fresh yet sophisticated. The pastel swirls are subtle but visually striking, making these nails look like little pieces of art.
Consumables List:
- Pastel blue (e.g., Zoya “Blu”)
- Pastel purple (e.g., Essie “Lilacism”)
- Soft peach polish (e.g., OPI “Crawfishin’ for a Compliment”)
- Thin nail art brush for swirling effect
- Top coat for sealing the design
How to Create This Look:
- Apply a base coat to protect your nails.
- Paint each nail with a soft nude or neutral base coat.
- With a thin brush, create swirling designs on each nail using the pastel colors. Be sure to vary the direction of the swirls for an organic look.
- Once dry, apply a top coat to seal in the design and give it a smooth finish.
Bold Green Abstract Swirls
If you’re in the mood for something bold, these round acrylic nails with green abstract swirls are a statement-making option. The green swirls contrast beautifully with the natural nude base, giving the design a fresh and modern appeal. This look is perfect for those who love edgy, yet girly nails that stand out. The round shape enhances the softness of the design while keeping it versatile for both casual and formal settings.

Consumables List:
- Green polish (e.g., Essie “Mojito Madness”)
- Thin nail art brush for abstract swirls
- Nude or transparent polish for the base
- Top coat to add shine and longevity
How to Create This Look:
- Apply a base coat to protect your nails.
- Paint a nude or transparent base color on each nail.
- Using a thin brush, create abstract green swirls on each nail, varying the thickness and curve of the lines.
- Seal the design with a top coat for durability.
Green and Tortoiseshell Combo
This round acrylic nails design combines two trendy elements—green polish and tortoiseshell accents. The combination of solid green nails and the stylish tortoiseshell pattern gives the manicure a sophisticated, yet playful feel. It’s an ideal choice for those who want to incorporate cute and trendy designs without going over the top. The tortoiseshell design adds a touch of luxury, while the green nails keep the overall look grounded.

Consumables List:
- Deep green polish (e.g., OPI “My Dog Sled is a Hybrid”)
- Tortoiseshell polish kit or colors (e.g., brown, black, amber shades)
- Thin brush for creating tortoiseshell pattern
- Top coat for shine and protection
How to Create This Look:
- Start with a base coat to protect your nails.
- Apply two coats of green polish on the nails you want solid.
- For the tortoiseshell nails, start with a light brown or amber base and then add random spots of darker brown and black using a thin brush to create the tortoiseshell effect.
- Seal with a top coat to protect the design.
Soft Marble with Chrome Flakes
For a luxurious and delicate manicure, these round acrylic nails with soft marble and chrome flakes are a beautiful choice. The subtle light pink base pairs perfectly with the marble effect and chrome accents, creating an ethereal, elegant look. This design is perfect for weddings, formal events, or anyone looking to add a touch of class to their nails.

Consumables List:
- Light pink polish (e.g., Essie “Fiji”)
- Marble nail polish (e.g., OPI “It’s in the Cloud”)
- Chrome flakes (available from nail art supply stores)
- Thin brush for marble effect
- Top coat for added shine
How to Create This Look:
- Apply a base coat to protect your nails.
- Use a light pink polish as your base color.
- Create the marble effect by using a thin brush to swirl white polish over the pink base. You can add small accents of chrome flakes for extra shine.
- Seal the design with a top coat to lock in the marble and chrome.
Pastel French Tips
Pastel round acrylic nails with a modern take on the classic French tip give a soft, cute, and girly touch to your manicure. Each nail features a different pastel color, from light pink to soft blue and peach, creating a playful but subtle rainbow effect. This design is perfect for someone looking for something fresh yet understated, suitable for both casual and formal settings. The round shape enhances the softness of the overall look.

Consumables List:
- Nude base polish (e.g., Essie “Bare With Me”)
- Pastel polish set (e.g., Modelones “Pastel Collection” for light blue, pink, yellow, and peach)
- Thin nail art brush for creating French tips
- Top coat for shine and protection
How to Create This Look:
- Start with a base coat to protect your nails.
- Apply a nude polish for the base.
- Using a thin nail art brush, carefully create French tips in alternating pastel shades on each nail.
- Once dry, apply a top coat to seal the design and ensure long-lasting wear.
Fiery Red Flames
These round acrylic nails with red flame accents are the ultimate cute and bold manicure choice. The flames feature shades of red and white over a natural nude base, adding an edgy vibe without being overwhelming. The contrast between the red flames and the nude base makes this look perfect for someone who wants to stand out, whether it’s for a casual day out or a night on the town.

Consumables List:
- Nude base polish (e.g., OPI “Be There in a Prosecco”)
- Red polish for flames (e.g., Sally Hansen “Red-ience”)
- White nail polish for accent details (e.g., Essie “Blanc”)
- Nail art brush for drawing the flames
- Top coat for sealing the design
How to Create This Look:
- Apply a base coat to protect your nails.
- Use a nude polish to cover the base of each nail.
- With a fine brush, draw flame shapes starting from the base of the nail using red polish.
- Add white accents to enhance the flame look.
- Finish with a top coat to protect and add shine.
Neutral Ombre Elegance
This round acrylic nails style features a neutral-toned ombre effect, blending shades of beige, light pink, and cream for an elegant, natural look. This subtle transition of colors makes the nails look classy and sophisticated while still staying on the minimalist side. It’s an ideal choice for those who prefer something refined yet understated.

Consumables List:
- Nude base polish (e.g., Essie “Mademoiselle”)
- Beige polish (e.g., Zoya “Jillian”)
- Light cream polish for ombre effect (e.g., OPI “Dulce de Leche”)
- Nail sponge for blending colors
- Top coat to seal the look
How to Create This Look:
- Start with a base coat to protect your nails.
- Apply the nude base polish.
- Using a sponge, gently blend beige and cream polishes to create the ombre effect.
- Apply a top coat to smooth out the transition and give it a shiny finish.
Bold Autumn Colors
These round acrylic nails are painted in rich autumn tones, including mustard yellow, burnt orange, green, and royal blue. This bold, multi-color look is perfect for fall and adds a trendy seasonal vibe to any outfit. The smooth glossy finish gives the nails a sleek, polished appearance, making them look well-rounded and balanced.

Consumables List:
- Mustard yellow polish (e.g., OPI “Sun, Sea, and Sand in My Pants”)
- Burnt orange polish (e.g., Essie “Playing Koi”)
- Green polish (e.g., OPI “My Italian is a Little Rusty”)
- Royal blue polish (e.g., Essie “Aruba Blue”)
- Top coat for shine and durability
How to Create This Look:
- Apply a base coat to protect your nails.
- Paint each nail with one of the selected autumn colors.
- Finish with a top coat to seal the polish and give it a high-gloss finish.
Soft Pastel with Gold Accents
This round acrylic nails design is a lovely combination of soft pastels like light pink and lavender with an accent nail featuring delicate gold foil details. The overall look is soft, feminine, and cute, with just the right amount of sophistication. The gold foil adds a touch of luxury to an otherwise simple and girly pastel palette.

Consumables List:
- Pastel pink polish (e.g., Essie “Fiji”)
- Lavender polish (e.g., OPI “Do You Lilac It?”)
- Gold foil for accents
- Top coat for sealing the gold accents
How to Create This Look:
- Start by applying a base coat.
- Paint your nails with alternating pastel pink and lavender shades.
- For the accent nail, carefully apply gold foil using tweezers, pressing it lightly into the base polish.
- Seal the look with a top coat to ensure the foil stays in place and to add shine.
Neon Flames with Watermelon Vibes
This vibrant round acrylic nails look combines neon flames with watermelon-inspired details for a bold and fun manicure. The pink and neon green flames add a fiery touch, while the tiny black dots resemble watermelon seeds, making the design cute and playful. This style is perfect for those who want to stand out with a colorful and unique design. The round shape softens the bold color choices, creating a balanced yet eye-catching manicure.

Consumables List:
- Neon pink polish (e.g., China Glaze “Flip Flop Fantasy”)
- Neon green polish (e.g., Essie “Bright Cider Life”)
- Thin nail art brush for flames
- Black polish for seed-like accents
- Top coat for shine and durability
How to Create This Look:
- Apply a base coat to protect your nails.
- Paint the tips with alternating neon pink and green flames using a thin brush.
- Add small black dots to resemble watermelon seeds on each nail.
- Finish with a top coat to seal the design and ensure longevity.
Festive Holiday Sparkle
These round acrylic nails are perfect for the holiday season, featuring a cute combination of red, green, and neutral tones with glitter and holly accents. The natural matte base on the accent nail adds a soft touch to the festive colors, while the glittery green nail offers a bit of glam. The red and green palette screams Christmas without being too over the top, making this a balanced yet festive look.

Consumables List:
- Red polish (e.g., OPI “Big Apple Red”)
- Glittery green polish (e.g., Essie “Getting Groovy”)
- Neutral beige polish for accent nail (e.g., Essie “Clothing Optional”)
- Thin nail art brush for holly details
- Top coat for shine and protection
How to Create This Look:
- Start by applying a base coat to protect your nails.
- Paint alternating nails with red and glittery green polish.
- For the accent nail, use a neutral beige base and paint tiny holly leaves and berries using a thin brush.
- Seal the look with a top coat for added shine and durability.
Pink Chrome Shimmer
These round acrylic nails feature a light pink base with shimmering chrome flakes, giving the nails a holographic, sparkling effect. This girly and elegant design is ideal for special occasions or anyone looking for a chic yet simple manicure. The chrome accents add a modern twist to the classic pink nail, creating a standout style that is both subtle and dazzling.

Consumables List:
- Light pink polish (e.g., Essie “Ballet Slippers”)
- Chrome flakes for accents
- Thin brush for precise application
- Top coat for sealing and shine
How to Create This Look:
- Start with a base coat to protect your nails.
- Apply two coats of light pink polish as your base.
- Carefully apply chrome flakes using a thin brush or tweezers for precise placement.
- Finish with a top coat to lock in the chrome and add a high-shine finish.
Lime Green with Gold Flakes
For a fresh and trendy look, these round acrylic nails feature a lime green base with gold foil accents. The combination of vibrant green and metallic gold creates a striking, luxurious manicure that’s perfect for those who want to add a pop of color without going overboard. The gold flakes provide an elegant contrast against the green background, making this style both cute and sophisticated.

Consumables List:
- Lime green polish (e.g., OPI “How Does Your Zen Garden Grow?”)
- Gold foil flakes for accents
- Thin nail art brush or tweezers for applying the gold flakes
- Top coat for protection and shine
How to Create This Look:
- Apply a base coat to protect your nails.
- Paint your nails with two coats of lime green polish.
- Use tweezers to place gold foil flakes randomly on each nail.
- Seal the look with a top coat for added shine and durability.
Bold Orange Shine
These bright orange round acrylic nails are a bold and energetic choice. The glossy finish enhances the vibrancy of the orange, making it pop even more. This look is perfect for summer or any occasion where you want to make a statement. The round shape complements the striking color, making the nails look well-balanced and polished.

Consumables List:
- Orange polish (e.g., OPI “Orange You Fantastic!”)
- Top coat for added shine and protection
How to Create This Look:
- Start by applying a base coat to protect your nails.
- Apply two coats of orange polish for a rich, vibrant finish.
- Seal the look with a top coat to enhance the shine and longevity of the manicure.
Bold Summer Mix
This round acrylic nails design features a vibrant mix of summer-inspired hues and patterns. From neon orange to bright yellow, along with a mix of rainbow stripes, abstract swirls, and polka dots, this playful look is perfect for someone who loves to experiment with color. The round shape keeps the design looking soft despite the bold color palette, making it an excellent option for anyone looking to stand out this summer.

Consumables List:
- Orange polish (e.g., OPI “A Good Man-darin is Hard to Find”)
- Yellow polish (e.g., Essie “Sunny Business”)
- Thin brush for stripe and swirl designs
- Dotting tool for polka dots
- Top coat for sealing and shine
How to Create This Look:
- Start with a base coat to protect your nails.
- Use alternating yellow and orange polishes as the base for different nails.
- Add stripes, swirls, and polka dots using a thin brush and dotting tool.
- Seal the design with a top coat to ensure longevity and shine.
White Webbed Illusion
This round acrylic nails design gives off a striking yet minimalist effect with its webbed white pattern on a clear base. The intricate lines resemble an optical illusion, creating a sense of texture and depth. This design is perfect for someone looking for something modern, sleek, and creative without adding too much color. The white contrast against the natural nail adds a subtle elegance.

Consumables List:
- White polish (e.g., OPI “Alpine Snow”)
- Thin nail art brush for webbed pattern
- Clear top coat for sealing the design
How to Create This Look:
- Start with a clear base coat.
- Using a thin nail art brush, create curved web-like lines with white polish across each nail.
- Seal the look with a top coat to add shine and ensure durability.
Glitter Explosion and Bold Colors
These round acrylic nails bring together glitter and vibrant solid colors in a cute and playful design. The combination of blue, pink, and glitter on alternating nails makes this manicure fun yet balanced. The glittery nails add a festive flair, making this design perfect for parties or summer festivals.

Consumables List:
- Blue polish (e.g., Essie “Butler Please”)
- Shimmering pink polish (e.g., OPI “The Color That Keeps On Giving”)
- Chunky glitter polish for accent nails
- Top coat for sealing the design
How to Create This Look:
- Apply a base coat to protect your nails.
- Use blue and pink polishes for alternating nails.
- Apply glitter polish on the accent nails for a bold statement.
- Finish with a top coat to ensure longevity and shine.
Floral Ombré
This round acrylic nails design combines soft pastel shades with hand-painted floral accents. The light pink and lavender ombré base is paired with delicate white flowers, making this manicure both elegant and girly. The natural transition of colors from the ombré effect adds a dreamy quality, making these nails ideal for spring or summer occasions.

Consumables List:
- Light pink polish (e.g., Essie “Fiji”)
- Lavender polish for the ombré effect (e.g., OPI “Do You Lilac It?”)
- White polish for floral accents
- Thin brush for creating flowers
- Top coat for added protection and shine
How to Create This Look:
- Start by applying a base coat.
- Create an ombré effect with pink and lavender polishes using a sponge.
- Paint delicate floral accents on a few nails using a thin brush and white polish.
- Finish with a top coat to protect the design.
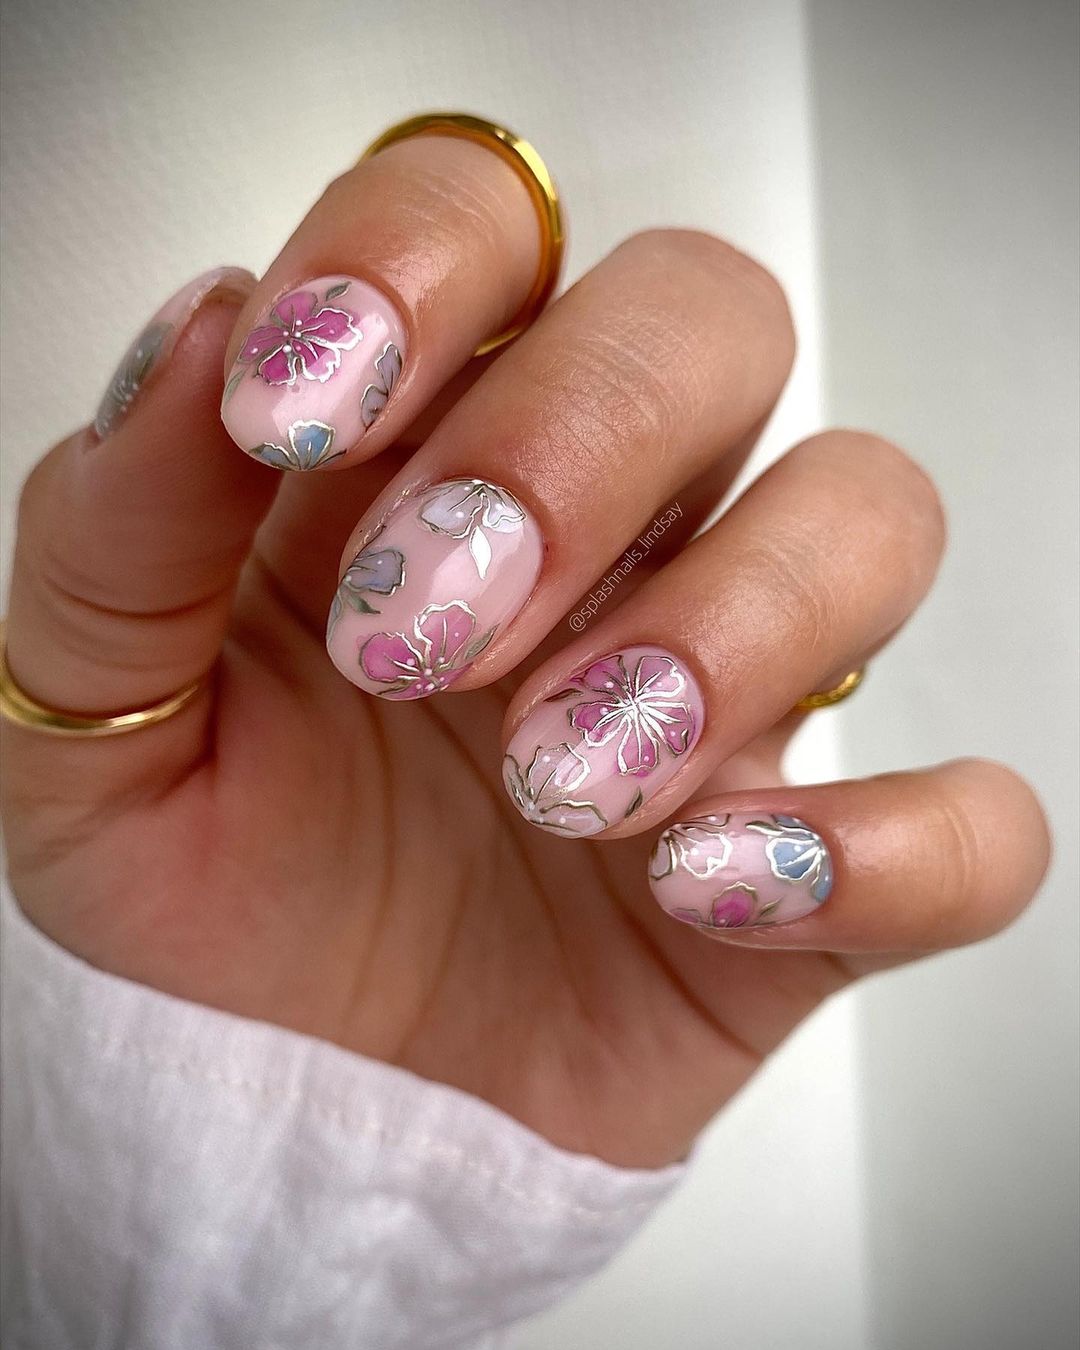
Metallic Floral
These round acrylic nails feature a soft nude base with metallic floral accents in shades of pink and silver. The delicate floral outlines give the manicure a romantic and luxurious feel, while the metallic finish adds a touch of glamour. This design is perfect for those who love intricate nail art with a sophisticated twist.

Consumables List:
- Nude base polish (e.g., OPI “Bubble Bath”)
- Metallic pink and silver polishes for floral accents
- Thin brush for outlining floral designs
- Top coat for sealing the look
How to Create This Look:
- Apply a base coat to protect your nails.
- Paint a nude base color on each nail.
- Use a thin brush to create metallic floral outlines on the nails.
- Seal the look with a top coat for added shine and durability.
Save Pin
