
21 awesome American flag nail ideas for the 4th of July – simple, cute and patriotic
As we gear up for the 4th of July, many of us are searching for the perfect way to show our patriotism. What better way to do that than with American flag nails? Whether you’re heading to a barbecue, watching fireworks, or simply enjoying the day off, your nails can be a fun and festive way to celebrate. In this article, I’ll showcase some stunning American flag nail designs that you can recreate at home, complete with detailed descriptions, a list of materials, and step-by-step instructions. Let’s dive into these creative and patriotic nail art ideas!
Stunning Patriotic Nails with Stars and Stripes
This nail design captures the essence of the American flag with a mix of bold stripes and star patterns. The combination of red, white, and blue is both eye-catching and patriotic. The blue glitter nails add a touch of glamour, while the red nails with a single star accent create a sophisticated look. The white base with red stripes mimics the flag’s stripes perfectly, and the blue nail with white stars completes the theme beautifully.

- Red Nail Polish: OPI Big Apple Red
- White Nail Polish: Essie Blanc
- Blue Glitter Polish: China Glaze Fairy Dust
- Star Decals: Whats Up Nails Star Vinyl Stencils
- Top Coat: Seche Vite Dry Fast Top Coat
Step-by-Step Instructions:
- Apply a base coat to protect your natural nails.
- Paint two nails with red polish, two with blue glitter polish, and one with white polish.
- Once the base colors are dry, use the star decals on the blue glitter nails and paint over them with white polish. Remove the decals carefully.
- For the striped nails, use striping tape to create even stripes on the white nail and paint over with red polish. Remove the tape to reveal clean lines.
- Finish with a top coat to seal in your design and add shine.
Classic and Simple American Flag Nails
This classic design features a simpler take on American flag nails. The design uses red and blue polishes with white stars and stripes to create a cohesive look. The red nails are bold and vibrant, while the blue nails with white stars offer a fun contrast. The white and red stripes are sleek and elegant, making this design perfect for any patriotic event.

- Red Nail Polish: Sally Hansen Red My Lips
- White Nail Polish: Zoya Purity
- Blue Nail Polish: Essie Butler Please
- Star Stickers: Kiss Nail Artist Paint & Stencil Kit
- Top Coat: Essie Gel Setter Top Coat
Step-by-Step Instructions:
- Start with a base coat to ensure your polish lasts longer.
- Paint two nails red, two nails blue, and one nail white.
- Use star stickers on the blue nails, pressing them down firmly.
- For the striped nails, use a thin brush to paint red stripes over the white nail.
- Seal the design with a top coat for a glossy finish.
Glamorous and Glittery American Flag Nails
These nails are perfect for those who love a bit of sparkle. The design includes glittery red and blue nails, with intricate star and stripe patterns on the accent nails. The use of different textures and finishes makes this design stand out. The glitter adds a festive touch, while the detailed nail art showcases true patriotic spirit.

- Red Glitter Polish: Deborah Lippmann Ruby Red Slippers
- Blue Glitter Polish: Butter London Scouse
- White Nail Polish: OPI Alpine Snow
- Star and Stripe Decals: Born Pretty Store Nail Stickers
- Top Coat: Sally Hansen Miracle Gel Top Coat
Step-by-Step Instructions:
- Apply a base coat to your nails.
- Paint two nails with red glitter polish, two with blue glitter polish, and one with white polish.
- Use star and stripe decals on the white nail to create the flag pattern.
- Carefully paint over the decals with the opposite color (red for stripes, blue for stars) and remove the decals to reveal the pattern.
- Finish with a top coat to protect your design and add extra shine.
Full Patriotic Flag Nails
This design covers each nail with the American flag pattern. Each nail features a different part of the flag, creating a cohesive look when put together. The stars and stripes are perfectly balanced, with the use of bold colors and clean lines. This design is perfect for those who want to go all out for their 4th of July celebrations.

- Red Nail Polish: China Glaze Hey Sailor
- White Nail Polish: Orly White Tips
- Blue Nail Polish: Zoya Ryan
- Star and Stripe Stencils: Twinkled T Nail Vinyls
- Top Coat: Orly Sec’n Dry Top Coat
Step-by-Step Instructions:
- Begin with a base coat to protect your nails.
- Paint each nail with either red, white, or blue polish.
- Use star and stripe stencils to create the flag pattern on each nail.
- Carefully paint over the stencils with the appropriate colors and remove the stencils to reveal the design.
- Apply a top coat to seal your design and add a glossy finish.
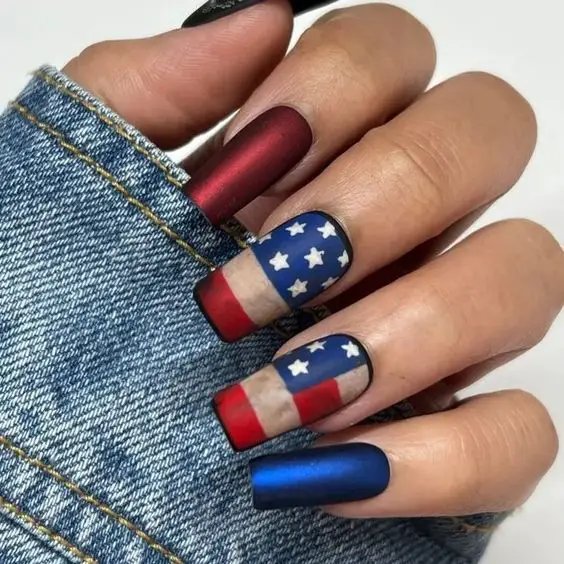
Matte and Bold American Flag Nails
This design features a matte finish, giving a modern twist to the traditional American flag nails. The bold colors and matte texture create a unique and stylish look. The use of red, white, and blue with star and stripe accents ensures that the patriotic theme is clear and vibrant. This design is perfect for those who prefer a more subdued yet striking nail art.

- Red Matte Polish: OPI Matte Top Coat over OPI Big Apple Red
- White Matte Polish: Essie Matte About You over Essie Blanc
- Blue Matte Polish: Zoya Matte Velvet in Yves
- Star Stencils: Whats Up Nails Star Vinyl Stencils
- Striping Tape: Nail Art Striping Tape
- Top Coat: Essie Matte About You
Step-by-Step Instructions:
- Apply a base coat to your nails.
- Paint your nails with red, white, and blue polish, and let them dry.
- Use star stencils on the blue nails and striping tape on the white nails to create the flag pattern.
- Apply a matte top coat over each nail to achieve the desired finish.
- Remove the stencils and tape to reveal the design, and finish with another layer of matte top coat for durability.
Glamorous American Flag Nails with Glitter and Stars
This design blends bold colors with glitter accents, creating a striking and patriotic look. The nails feature a mix of solid red and blue colors, glitter, and detailed star patterns. The holographic glitter nail in the center adds an extra touch of glamour, while the white nail with a patriotic star decal and the red stripe make the design cohesive and festive.

- Red Nail Polish: OPI Big Apple Red
- Blue Nail Polish: Essie Aruba Blue
- White Nail Polish: Zoya Purity
- Holographic Glitter Polish: ILNP Mega
- Star Decals: Twinkled T Nail Vinyls
- Top Coat: Seche Vite Dry Fast Top Coat
Step-by-Step Instructions:
- Apply a base coat to your nails.
- Paint the pinky and thumb nails red, the ring finger white, the middle finger with holographic glitter, and the index finger blue.
- Once dry, apply star decals on the blue nail and a patriotic star sticker on the white nail.
- Seal with a top coat for a glossy finish.
Classic French Tip with a Patriotic Twist
This design features a classic French tip manicure with a patriotic twist. The tips are painted in red, white, and blue stripes, and the accent nail showcases a detailed American flag design. The combination of the traditional French manicure with patriotic colors makes this design both elegant and festive.

- White Nail Polish: OPI Alpine Snow
- Red Nail Polish: Essie Forever Yummy
- Blue Nail Polish: China Glaze First Mate
- Striping Tape: Nail Art Striping Tape
- Top Coat: Essie Gel Setter Top Coat
Step-by-Step Instructions:
- Start with a base coat on all nails.
- Create the French tips using white polish.
- Use striping tape to add red and blue stripes to the tips.
- For the accent nail, paint a blue base and add white stars and red stripes.
- Finish with a top coat for durability and shine.
Sparkling and Striped American Flag Nails
These nails feature a sparkling, glittery background with red and white stripes and blue and white polka dots, resembling the American flag. The combination of glitter and bold colors creates a fun and festive look perfect for any patriotic celebration.

- Red Nail Polish: Sally Hansen Red Carpet
- White Nail Polish: Zoya Purity
- Blue Nail Polish: Essie Butler Please
- Glitter Polish: China Glaze Fairy Dust
- Top Coat: Sally Hansen Miracle Gel Top Coat
Step-by-Step Instructions:
- Apply a base coat to your nails.
- Paint the nails with a glitter polish base.
- Use a thin brush to paint red and white stripes diagonally across the nails.
- Add blue polish with white polka dots at the base of the nails.
- Seal with a top coat for a sparkly finish.
Elegant French Manicure with Patriotic Accents
This design features a classic French manicure with a touch of patriotism. The red glitter tips and a detailed American flag design on the accent nail make this manicure both elegant and festive. The use of glitter adds a glamorous touch, perfect for a 4th of July celebration.

- Red Glitter Polish: OPI Red Glitter
- White Nail Polish: Essie Blanc
- Blue Nail Polish: OPI Eurso Euro
- Top Coat: Seche Vite Dry Fast Top Coat
Step-by-Step Instructions:
- Apply a base coat to your nails.
- Create the French tips using red glitter polish.
- Paint the accent nail blue and add white stars and red stripes.
- Seal with a top coat for a glossy finish.
Splatter Paint American Flag Nails
These nails feature a splatter paint design in red, white, and blue, resembling the American flag. The splatter effect creates a unique and artistic look, perfect for those who want something different yet patriotic. The use of textured polish adds depth and interest to the design.

- White Nail Polish: Illamasqua Scorch
- Red Nail Polish: Essie Fifth Avenue
- Blue Nail Polish: Essie Butler Please
- Top Coat: Essie Matte About You
Step-by-Step Instructions:
- Apply a base coat to your nails.
- Paint your nails with a white base coat.
- Use a toothbrush or splatter tool to flick red and blue polish onto the nails.
- Finish with a matte top coat for a textured look.
Festive Firework American Flag Nails
This design is vibrant and full of festive energy, resembling fireworks in the night sky. The nails feature a blend of red, white, and blue colors with intricate patterns of stars, stripes, and dots. The combination of sparkling accents and bold colors makes these nails perfect for any Independence Day celebration.

- Red Nail Polish: OPI Red Hot Rio
- White Nail Polish: Essie Blanc
- Blue Nail Polish: Sally Hansen Pacific Blue
- Glitter Polish: China Glaze Fairy Dust
- Dotting Tool: Pueen 2-Way Dotting Tool
- Top Coat: Seche Vite Dry Fast Top Coat
Step-by-Step Instructions:
- Apply a base coat to your nails.
- Paint the nails with a mix of red, white, and blue polishes.
- Use a dotting tool to create star and dot patterns on the nails.
- Apply glitter polish over the designs for a sparkling effect.
- Seal with a top coat to protect your manicure and add shine.
Bold and Simple Patriotic Nails
This design is straightforward yet bold, featuring solid red, blue, and white nails with star accents. The simplicity of the design makes it easy to recreate at home while still being festive and eye-catching.

- Red Nail Polish: OPI Big Apple Red
- Blue Nail Polish: Essie Butler Please
- White Nail Polish: Zoya Purity
- Star Stickers: Kiss Nail Artist Paint & Stencil Kit
- Top Coat: Essie Gel Setter Top Coat
Step-by-Step Instructions:
- Start with a base coat on all nails.
- Paint two nails red, two nails blue, and one nail white.
- Apply star stickers on the blue nails.
- Finish with a top coat for a glossy finish.
All-American Flag Nails
These nails feature a full American flag design, covering each nail with stars and stripes. The intricate detailing of the stars and the diagonal stripes create a cohesive and patriotic look. This design is perfect for those who want to make a bold statement.

- Red Nail Polish: Sally Hansen Red My Lips
- White Nail Polish: OPI Alpine Snow
- Blue Nail Polish: Essie Aruba Blue
- Star Decals: Twinkled T Nail Vinyls
- Top Coat: Sally Hansen Miracle Gel Top Coat
Step-by-Step Instructions:
- Apply a base coat to your nails.
- Paint each nail with a white base coat.
- Use star decals and striping tape to create the flag pattern on each nail.
- Paint over the decals and tape with red and blue polishes.
- Remove the decals and tape carefully to reveal the design.
- Seal with a top coat for durability and shine.
Modern and Chic American Flag Nails
This design takes a modern approach to the classic American flag nails, featuring bold stripes and stars on a mix of red, white, and blue nails. The clean lines and vibrant colors make this design both stylish and festive.

- Red Nail Polish: Essie Forever Yummy
- White Nail Polish: Zoya Purity
- Blue Nail Polish: OPI Eurso Euro
- Striping Tape: Nail Art Striping Tape
- Top Coat: Seche Vite Dry Fast Top Coat
Step-by-Step Instructions:
- Apply a base coat to your nails.
- Paint the nails with red, white, and blue polishes.
- Use striping tape to create clean lines for the stripes and star patterns.
- Paint over the tape with the corresponding colors and remove the tape carefully.
- Seal with a top coat to protect your design and add shine.
Glittery and Detailed American Flag Nails
This design combines glitter and detailed star and stripe patterns for a glamorous look. The nails feature a mix of red, white, and blue polishes with sparkling accents, creating a festive and eye-catching manicure.

- Red Glitter Polish: OPI Red Glitter
- White Nail Polish: Essie Blanc
- Blue Glitter Polish: China Glaze Fairy Dust
- Star Decals: Whats Up Nails Star Vinyl Stencils
- Top Coat: Essie Gel Setter Top Coat
Step-by-Step Instructions:
- Apply a base coat to your nails.
- Paint the nails with a mix of red glitter, blue glitter, and white polishes.
- Use star decals on the blue glitter nails and create stripe patterns on the red glitter and white nails.
- Seal with a top coat for a glossy finish.
Heart-Shaped American Flag Nails
This design features a unique heart-shaped American flag on one nail, surrounded by traditional stars and stripes. The use of red, white, and blue colors creates a cohesive patriotic look. The heart accent adds a touch of sweetness and creativity to the overall design.

- Red Nail Polish: OPI Big Apple Red
- White Nail Polish: Essie Blanc
- Blue Nail Polish: China Glaze First Mate
- Star Stickers: Kiss Nail Artist Paint & Stencil Kit
- Top Coat: Seche Vite Dry Fast Top Coat
Step-by-Step Instructions:
- Apply a base coat to your nails.
- Paint one nail white, one nail blue, and the others red.
- Use a fine brush to paint red stripes on the white nail and white stars on the blue nail.
- For the heart design, paint a white base and use a nail art brush to create the heart shape with red and blue colors.
- Finish with a top coat for a glossy finish.
Glittery Blue Stars and Stripes
This design combines glittery blue polish with white stars and red stripes. The sparkling blue nails add a glamorous touch, while the stars and stripes maintain the patriotic theme. This look is perfect for a festive and eye-catching 4th of July manicure.

- Red Nail Polish: Sally Hansen Red Carpet
- White Nail Polish: Zoya Purity
- Blue Glitter Polish: China Glaze Fairy Dust
- Star Decals: Twinkled T Nail Vinyls
- Top Coat: Sally Hansen Miracle Gel Top Coat
Step-by-Step Instructions:
- Apply a base coat to your nails.
- Paint two nails blue glitter, one nail white, and the others red.
- Use star decals on the blue nails and create stripe patterns on the white nail with red polish.
- Seal with a top coat for a sparkling finish.
Bold Red, White, and Blue Nails
This design features solid red, white, and blue nails with simple star and stripe accents. The clean and bold colors create a striking and patriotic look that is easy to achieve and perfect for any 4th of July event.

- Red Nail Polish: Essie Forever Yummy
- White Nail Polish: Essie Blanc
- Blue Nail Polish: Essie Butler Please
- Star Stickers: Kiss Nail Artist Paint & Stencil Kit
- Top Coat: Essie Gel Setter Top Coat
Step-by-Step Instructions:
- Apply a base coat to your nails.
- Paint your nails with red, white, and blue polishes.
- Add star stickers to the blue nails and stripe patterns to the white nails.
- Finish with a top coat for a polished look.
Glittery Patriotic Stripes and Stars
These nails feature a mix of red glitter, white, and blue polishes with detailed star and stripe patterns. The glitter adds a festive touch, while the stars and stripes maintain the patriotic theme. This design is perfect for those who want a bit of sparkle in their 4th of July manicure.

- Red Glitter Polish: OPI Red Glitter
- White Nail Polish: Zoya Purity
- Blue Nail Polish: Essie Aruba Blue
- Star Decals: Twinkled T Nail Vinyls
- Top Coat: Sally Hansen Miracle Gel Top Coat
Step-by-Step Instructions:
- Apply a base coat to your nails.
- Paint the nails with a mix of red glitter, blue, and white polishes.
- Use star decals on the blue nails and create stripe patterns on the white nails with red glitter polish.
- Seal with a top coat for a sparkling finish.
Simple and Sparkly American Flag Nails
This design combines simple red and blue nails with a sparkly white accent nail. The use of stars and stripes on the accent nails adds a festive and patriotic touch. This look is easy to achieve and perfect for any 4th of July celebration.

- Red Nail Polish: OPI Big Apple Red
- White Glitter Polish: China Glaze Fairy Dust
- Blue Nail Polish: Essie Butler Please
- Star Stickers: Kiss Nail Artist Paint & Stencil Kit
- Top Coat: Seche Vite Dry Fast Top Coat
Step-by-Step Instructions:
- Apply a base coat to your nails.
- Paint one nail white glitter, one nail blue, and the others red.
- Add star stickers to the blue nail and create stripe patterns on the white glitter nail with red polish.
- Finish with a top coat for a glossy finish.
Bold and Bright Patriotic Nails
This design features bold red and blue nails with a detailed American flag accent nail. The use of bright colors and clean lines creates a striking and patriotic look that is perfect for any 4th of July celebration.

- Red Nail Polish: Essie Forever Yummy
- Blue Nail Polish: OPI Eurso Euro
- White Nail Polish: Zoya Purity
- Star Decals: Twinkled T Nail Vinyls
- Top Coat: Seche Vite Dry Fast Top Coat
Step-by-Step Instructions:
- Apply a base coat to your nails.
- Paint one nail white, one nail blue, and the others red.
- Use star decals on the blue nail and create stripe patterns on the white nail with red polish.
- Seal with a top coat for a glossy finish.
Save Pin
