
21 Best Dark Nail Color Ideas: Designs, Seasonal Picks, and Skin Tone Tips
When it comes to choosing the perfect nail color, dark nail colors have always stood out as a symbol of sophistication, mystery, and boldness. But what makes these hues so captivating? How can you pick the best shade to match your style, skin tone, and season? In this article, we will explore some of the most stunning dark nail colors that you can try, offering both professional insights and practical tips to achieve these looks at home.
Midnight Black Matte: Pure Drama and Elegance
Black matte nails exude a timeless elegance that can turn heads in any season. This design features long, almond-shaped nails coated in a pure black matte finish, providing a sleek and sophisticated look. The matte texture adds a modern twist, making these nails perfect for any formal occasion or a night out. The understated shine allows the shape of the nails to take center stage, making them appear elongated and graceful.

Consumables:
-
- OPI Matte Top Coat: A must-have to achieve that flawless matte finish.
- Black Nail Polish: Opt for a high-pigment polish like OPI Black Onyx for deep coverage.
- Nail File and Buffer: To perfect the nail shape and ensure smooth edges.
How to Achieve This Look:
-
- Start by shaping your nails into an almond shape using a file.
- Apply a base coat to protect your natural nails.
- Paint two thin coats of OPI Black Onyx, allowing each layer to dry completely.
- Finish with the OPI Matte Top Coat for that smooth, velvety finish.
Burgundy with a Glitter Accent: Classic with a Sparkle
Winter burgundy nails are a classic choice that never goes out of style, especially when paired with a touch of glitter. This design combines deep burgundy nails with a single accent nail featuring a cascade of silver glitter. The contrast between the matte burgundy and the shimmering glitter creates a dynamic look that’s both festive and elegant. This style is perfect for winter, adding warmth and a bit of sparkle to the cold season.

Consumables:
-
- OPI Nail Lacquer in Malaga Wine: A deep burgundy with a rich, glossy finish.
- Silver Glitter Top Coat: Essie Set in Stones is a great choice for a sparkling accent.
- Nail Tape: To create clean lines if you prefer a more structured glitter placement.
How to Achieve This Look:
-
- Shape your nails to your preferred length and style.
- Apply a base coat, followed by two coats of OPI Malaga Wine.
- On the accent nail, apply a thin layer of Essie Set in Stones, focusing on the tip for an ombre effect.
- Seal all nails with a high-gloss top coat to ensure longevity.
Navy Blue: Sophisticated and Understated
Winter navy blue nails are the epitome of subtle sophistication. This deep, almost-black blue shade offers a rich, velvety finish that is perfect for any season. The rounded nail shape adds a soft, feminine touch, making these nails ideal for both professional and casual settings. The navy blue color is versatile, complementing a wide range of outfits and skin tones.

Consumables:
-
- OPI Russian Navy: A dark navy blue with a slight shimmer for added depth.
- Base Coat: CND Stickey Anchoring Base Coat to enhance polish adhesion.
- Top Coat: Seche Vite for a long-lasting, high-gloss finish.
How to Achieve This Look:
-
- Start by applying a base coat to protect your nails.
- Apply two coats of OPI Russian Navy, allowing each coat to dry completely.
- Finish with a glossy top coat to seal in the color and add shine.
Brown Gradient: Earthy Tones for a Warm Look
This dark nail color design uses a range of earthy tones, from deep chocolate brown to a light, creamy beige, creating a stunning gradient effect. The nail shape is almond, which enhances the gradient by elongating the nails and showcasing each color’s richness. This look is versatile enough for both fall and winter, offering a warm, cozy feel that complements neutral outfits.

Consumables:
-
- OPI Chocolate Moose: A warm, medium brown.
- Essie Mochachino: A lighter brown with a subtle shimmer.
- Sally Hansen Miracle Gel in Creme de la Creme: A soft, creamy beige for the tips.
- Sponge: To blend the colors seamlessly for the gradient effect.
How to Achieve This Look:
-
- Apply a base coat to each nail.
- Using a sponge, dab on the darkest color at the base of the nail, gradually moving to lighter shades towards the tip.
- Repeat the sponging process until you achieve the desired gradient.
- Seal with a glossy top coat to blend the colors further and protect the design.
Dark Multicolor: A Modern Twist on Classic Colors
This design features a striking combination of dark nail colors including black, burgundy, and a shimmering dark green. The use of multiple colors on a single hand creates a modern, eclectic look that’s perfect for anyone looking to experiment with bold, dark nail colors. The rounded, almond shape of the nails adds to the modern aesthetic, making this a chic choice for any occasion.

Consumables:
-
- OPI Black Onyx: A classic black with a glossy finish.
- Essie Smokin’ Hot: A deep, smoky purple.
- Sally Hansen Miracle Gel in V-Amplified: A shimmering dark green.
- Nail Art Brush: For precise application of each color.
How to Achieve This Look:
-
- After prepping your nails, apply a base coat.
- Paint each nail a different color, using a precise brush to ensure clean lines.
- Allow the polish to dry completely before applying a top coat to each nail.
- Finish with a high-shine top coat to ensure all colors pop.
Ombre Glow: Mystical Elegance with a Modern Twist
This stunning nail design features a mesmerizing ombre effect that transitions from a deep, dark nail color at the base to a glowing purple in the center of each nail. The nail shape is a long coffin, which enhances the elongation effect of the ombre. The subtle gradient of colors creates a mystical, almost ethereal look that catches the light beautifully, making these nails a showstopper for any season.

Consumables:
-
- OPI Lincoln Park After Dark: A deep, dark purple for the base.
- Purple Glow Powder: To achieve that luminous center.
- Sponge: Essential for blending the colors seamlessly.
- Seche Vite Top Coat: To seal in the design and add a high-gloss finish.
How to Achieve This Look:
-
- Start with clean, prepped nails and apply a base coat.
- Use OPI Lincoln Park After Dark to paint the base of the nails, letting it dry completely.
- Apply the purple glow powder to the center of each nail using a sponge to blend it outwards for a smooth ombre effect.
- Seal the design with a glossy top coat to enhance the glow and add shine.
Starry Night: A Touch of Cosmic Magic
This enchanting design brings the night sky to your fingertips with a blend of nude, black, and glitter. The nail shape is almond, which is perfect for creating a more elongated and graceful look. The nails feature a nude base with a black ombre effect that fades into glittering stars, giving the illusion of a starry night. This design is both elegant and whimsical, making it ideal for those who want a subtle yet striking dark nail color.

Consumables:
-
- Essie Licorice: A rich, black polish for the tips.
- Nude Polish: OPI Samoan Sand provides a soft, neutral base.
- Silver Glitter: China Glaze Fairy Dust for that cosmic sparkle.
- Fine Detail Brush: For creating the star patterns.
How to Achieve This Look:
-
- Begin by applying a nude base coat to the nails.
- Using a sponge, create an ombre effect by applying Essie Licorice to the tips and blending it into the nude base.
- Add silver glitter to the tips for a starry effect, then use a fine brush to paint small stars for added detail.
- Finish with a glossy top coat to protect the design and add shine.
Futuristic Green: Bold and Edgy
This design is for those who dare to stand out. The dark nail colors here are combined with futuristic elements like metallic accents and bold green patches. The nail shape is stiletto, which adds to the edgy vibe of the design. The nails feature a mix of metallic silver, deep green, and black, creating a unique, almost robotic look. This design is perfect for someone who loves bold, statement-making nails.

Consumables:
-
- OPI My Private Jet: A dark, charcoal polish with a hint of shimmer.
- Essie Off Tropic: A rich, forest green for the patches.
- Metallic Chrome Powder: For the futuristic silver accents.
- Nail Art Rhinestones: To add texture and dimension.
How to Achieve This Look:
-
- Shape your nails into a stiletto point and apply a base coat.
- Paint the nails with OPI My Private Jet and allow it to dry.
- Apply Essie Off Tropic in a patchwork pattern, and use chrome powder for the silver accents.
- Add rhinestones or other embellishments as desired, then seal with a top coat.
Classic Burgundy: Timeless Sophistication
Winter burgundy nails are a timeless choice, and this design takes it to the next level with its deep, rich color and flawless glossy finish. The nail shape here is short and rounded, making this design perfect for everyday wear. The burgundy color is classic and sophisticated, offering a warm, cozy feel that is perfect for the colder months.

Consumables:
-
- OPI Malaga Wine: A classic burgundy with a high-gloss finish.
- CND Stickey Base Coat: To enhance polish adhesion.
- Seche Vite Top Coat: For a long-lasting, high-shine finish.
How to Achieve This Look:
-
- Start with a base coat to protect your nails.
- Apply two coats of OPI Malaga Wine, allowing each coat to dry thoroughly.
- Finish with a glossy top coat to seal the color and add shine.
Red Flames: Fierce and Fiery
This dramatic design features a dark base with fiery red flames flickering across the tips. The nail shape is stiletto, which adds to the fierce, edgy vibe of the design. The combination of black and red creates a bold, high-contrast look that is perfect for making a statement. This design is ideal for those who love to incorporate a bit of drama into their manicure.

Consumables:
-
- OPI Black Onyx: A classic black polish for the base.
- Red Gel Polish: Essie A List for the fiery red flames.
- Nail Art Brush: For creating the flame designs.
- CND Super Shiney Top Coat: To add a glossy finish and protect the design.
How to Achieve This Look:
-
- Start by shaping your nails into sharp stilettos and applying a base coat.
- Paint the nails with OPI Black Onyx and let it dry completely.
- Use a fine brush to paint red flames on the tips with Essie A List.
- Seal the design with a glossy top coat for added shine and durability.
Matte Blue with Glitter Accent: Modern Minimalism
This design features a chic combination of matte blue and a subtle glitter accent that runs down the center of two nails. The nail shape is square, which complements the minimalistic and modern vibe of this manicure. The deep blue color is perfect for creating a calm, sophisticated look, while the glitter adds just the right amount of sparkle, making this design ideal for both daily wear and special occasions.

Consumables:
-
- OPI Matte Top Coat: To achieve that sleek, matte finish.
- Blue Nail Polish: OPI Russian Navy works perfectly for the deep blue base.
- Silver Glitter Polish: Essie Set in Stones for the glitter accent.
- Striping Tape: To create the clean line down the center.
How to Achieve This Look:
-
- Start by applying a base coat to all nails.
- Paint two nails with a clear or nude base, then use striping tape to section off the middle strip and paint it with OPI Russian Navy.
- Apply Essie Set in Stones along the middle strip, then remove the tape carefully.
- Finish all nails with OPI Matte Top Coat to achieve the matte effect.
Psychedelic Blue: Retro Vibes with a Modern Twist
This bold design features a striking combination of winter navy blue with psychedelic black patterns, creating a retro-inspired yet modern look. The nail shape is short and square, making this design both practical and stylish. The matte finish adds an extra layer of sophistication, making these nails a statement piece that’s perfect for those who love bold, artistic designs.

Consumables:
-
- OPI Matte Top Coat: To lock in the matte finish.
- Blue Base Polish: Essie Butler Please for the vibrant blue base.
- Black Stamping Polish: Born Pretty Black for the patterns.
- Nail Stamper: To easily transfer the intricate designs onto the nails.
How to Achieve This Look:
-
- Apply a base coat, followed by two coats of Essie Butler Please.
- Use the nail stamper to transfer the black psychedelic pattern onto each nail.
- Finish with OPI Matte Top Coat to seal the design and ensure a long-lasting finish.
Evergreen Elegance: A Timeless Classic
This dark nail color is a deep evergreen, perfect for those who appreciate understated elegance. The nail shape is almond, which adds a soft, feminine touch to the bold color. This design is perfect for any season but especially shines in winter due to its rich, dark hue. The glossy finish makes the green look almost velvety, adding a luxurious feel to the nails.

Consumables:
-
- OPI Stay Off the Lawn!: A deep green polish with a glossy finish.
- CND Stickey Base Coat: To enhance polish adhesion.
- Seche Vite Top Coat: To add a high-gloss finish.
How to Achieve This Look:
-
- Shape your nails into an almond shape and apply a base coat.
- Apply two coats of OPI Stay Off the Lawn! to achieve a deep, even color.
- Finish with a glossy top coat to seal in the color and add shine.
Purple Foil: A Splash of Metallic Glamour
This design combines dark nail colors with a bold, metallic foil accent. The deep purple base is luxurious and rich, perfect for colder seasons. The foil accents on two nails add a striking contrast, catching the light and giving the nails a glamorous, high-impact look. The nail shape is short and square, keeping the design modern and wearable.

Consumables:
-
- OPI Lincoln Park After Dark: For the deep purple base.
- Foil Transfer Gel: To adhere the foil accents.
- Metallic Foil Sheets: In a mix of red and purple for the accents.
- CND Super Shiney Top Coat: To seal in the foil and add a glossy finish.
How to Achieve This Look:
-
- Begin with a base coat to protect your nails.
- Apply two coats of OPI Lincoln Park After Dark, letting each coat dry completely.
- Use foil transfer gel to apply the foil accents on two nails, pressing the foil onto the gel while it’s tacky.
- Seal the design with a top coat to ensure the foil stays in place.
Olive Matte with Silver Accent: Subtle Sophistication
This design features an elegant olive matte base with a striking silver accent nail. The nail shape is almond, enhancing the soft yet sophisticated look of the design. The matte finish gives the olive color a muted, earthy tone, while the silver accent adds a touch of modern chic. This design is perfect for those who appreciate subtle, sophisticated manicures with a twist.

Consumables:
-
- OPI Matte Top Coat: To achieve the matte finish.
- Olive Nail Polish: Zoya Wyatt for the earthy green base.
- Silver Chrome Powder: For the metallic accent.
- CND Stickey Base Coat: To ensure the polish adheres smoothly.
How to Achieve This Look:
-
- Shape your nails into an almond shape and apply a base coat.
- Apply two coats of Zoya Wyatt for the olive base.
- On the accent nail, apply silver chrome powder using a sponge applicator.
- Seal the design with OPI Matte Top Coat to achieve a chic, matte finish.
Cosmic Blue with Iridescent Swirls: Out of This World
This striking design combines a cosmic blue base with iridescent swirls, creating a mesmerizing effect that looks like it’s straight out of a galaxy far, far away. The nail shape is long and almond, providing a perfect canvas for the intricate design. The use of holographic foil and glitter enhances the multidimensional effect, making these nails a true statement piece.

Consumables:
-
- OPI Give Me Space: A deep blue with fine glitter.
- Holographic Foil: For the iridescent swirl accents.
- Fine Detail Brush: For precise application of the swirl design.
- Seche Vite Top Coat: To add a high-gloss finish and seal in the design.
How to Achieve This Look:
-
- Start with a base coat and apply two coats of OPI Give Me Space for the deep blue base.
- Use a fine detail brush to apply the holographic foil in a swirling pattern across each nail.
- Seal the design with a glossy top coat to enhance the multidimensional effect.
Rich Chocolate Brown: Luxurious Simplicity
This design showcases the beauty of dark nail colors with a rich chocolate brown polish that exudes luxury and simplicity. The nail shape is a sharp stiletto, which adds an edgy contrast to the warm, inviting color. The glossy finish gives the brown polish a luscious, almost edible look, making this design perfect for those who appreciate understated elegance with a bold twist.

Consumables:
-
- OPI You Don’t Know Jacques: A deep, warm brown polish.
- CND Stickey Base Coat: To enhance polish adhesion.
- Seche Vite Top Coat: For a high-shine finish.
How to Achieve This Look:
-
- Shape your nails into a sharp stiletto and apply a base coat.
- Apply two coats of OPI You Don’t Know Jacques for a rich, even color.
- Finish with a glossy top coat to seal the color and add a luxurious shine.
Textured Teal: Deep Sea Glamour
This textured design combines a deep teal base with a wave-like pattern, creating a sense of depth and movement reminiscent of the ocean. The nail shape is long and rounded, which complements the fluidity of the design. The use of glitter adds a touch of glamour, making these nails perfect for a night out or any occasion where you want to make a splash.

Consumables:
-
- OPI Teal the Cows Come Home: A vibrant teal polish.
- Textured Gel Polish: Gelish Rough Around the Edges for the wave pattern.
- Glitter Powder: To add a sparkling finish.
- Seche Vite Top Coat: To seal in the texture and add shine.
How to Achieve This Look:
-
- Apply a base coat to protect your nails, then paint them with two coats of OPI Teal the Cows Come Home.
- Use a textured gel polish to create the wave-like pattern on each nail.
- Sprinkle glitter powder over the waves while the gel is still tacky, then cure under a UV lamp.
- Seal the design with a glossy top coat to lock in the texture and shine.
Mauve with Geometric Accent: Subtle and Chic
This elegant design features a soft mauve base with a delicate geometric accent on the ring finger, adding a touch of sophistication to an otherwise simple look. The nail shape is almond, which enhances the femininity of the design. The subtle contrast between the mauve polish and the metallic silver accent creates a chic, modern look that’s perfect for everyday wear or special occasions.

Consumables:
-
- OPI Tickle My France-y: A soft mauve polish.
- Silver Striping Tape: For the geometric accent.
- Essie Set in Stones: For the glitter accent.
- Seche Vite Top Coat: To add a glossy finish and protect the design.
How to Achieve This Look:
-
- Shape your nails into an almond shape and apply a base coat.
- Apply two coats of OPI Tickle My France-y for a smooth, even finish.
- Use striping tape to create the geometric pattern on the ring finger, then fill in with Essie Set in Stones.
- Seal with a glossy top coat to enhance the shine and protect the design.
Deep Teal with Gold Accents: Rich and Regal
This luxurious design pairs a deep teal base with subtle gold accents, creating a look that’s both rich and regal. The nail shape is long and square, providing a bold canvas for the striking color combination. The matte finish of the teal polish contrasts beautifully with the shimmering gold, making these nails perfect for someone who wants to make a statement without being overly flashy.

Consumables:
-
- OPI Stay Off the Lawn!: A deep teal polish.
- Gold Foil: For the accent details.
- Matte Top Coat: OPI Matte Top Coat to achieve the matte finish.
- Seche Vite Top Coat: To seal the gold accents.
How to Achieve This Look:
-
- Apply a base coat, then paint your nails with two coats of OPI Stay Off the Lawn!.
- Apply gold foil to the accent nails, using a foil adhesive for best results.
- Finish with a matte top coat on all nails, except for the accent nails where you’ll apply a glossy top coat to seal the foil.
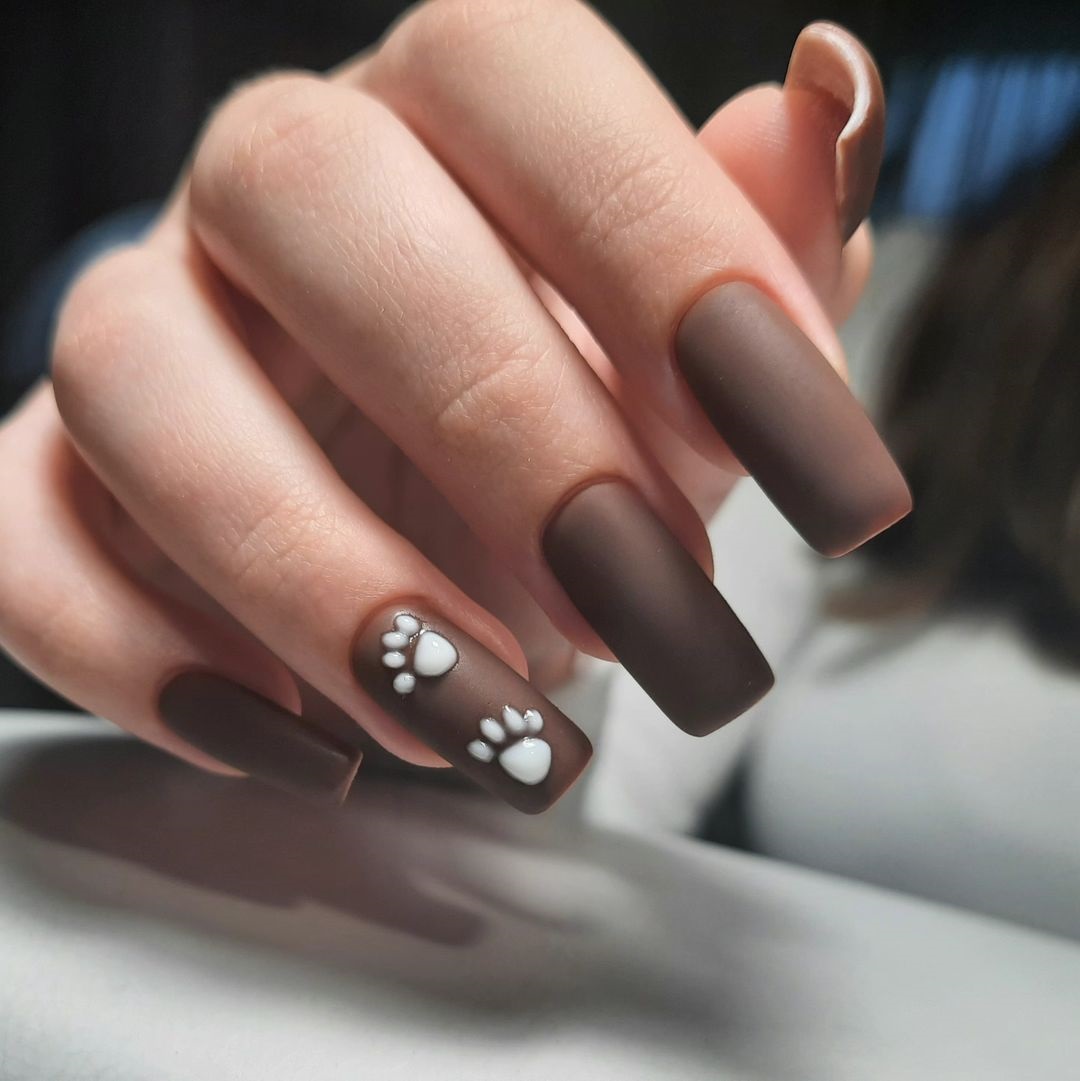
Matte Brown with Paw Prints: Playful and Warm
This playful design features a matte brown base with adorable white paw prints, perfect for animal lovers. The nail shape is long and square, giving the design a bold and modern look. The warm brown color is cozy and inviting, while the paw prints add a touch of whimsy, making this design both fun and stylish.

Consumables:
-
- OPI Chocolate Moose: A warm brown polish.
- White Acrylic Paint: For the paw print design.
- Dotting Tool: To create the paw prints.
- OPI Matte Top Coat: To achieve the matte finish.
How to Achieve This Look:
-
- Shape your nails into a long square and apply a base coat.
- Apply two coats of OPI Chocolate Moose for a rich, even color.
- Use a dotting tool and white acrylic paint to create the paw prints on the accent nails.
- Finish with a matte top coat to seal the design and add a soft, velvety finish.
Save Pin
