
21 Burnt Nail Color Ideas to Perfectly Match Your Burnt Orange Dress and Style
When it comes to nail colors, burnt nail color is a trend that’s making waves in the manicure world. It’s bold, versatile, and perfect for those who want to make a statement without being too flashy. But how do you pull off this stunning shade? What nail designs work best with it? And most importantly, how can you match your nails to that perfect burnt orange dress you’ve been eyeing? In this article, I’ll walk you through some of the most popular and trendy burnt nail color designs that will not only elevate your look but also complement your style effortlessly.
Burnt Orange Nails with Gold Cross Accent
Burnt orange is a color that radiates warmth and confidence, and when paired with a gold cross accent, it creates a look that’s both bold and sophisticated. This nail design is perfect for anyone looking to add a touch of elegance to their everyday style.

Consumables:
- Gelish Soak Off Gel Polish in “Hot Rod Red”: This provides a solid base with high pigmentation.
- Gold Cross Nail Charm: A delicate but bold accessory that adds flair.
- UV Lamp: Essential for curing the gel polish.
Instructions for Home Application:
- Start with a base coat to protect your nails.
- Apply two coats of Gelish Soak Off Gel Polish in burnt orange.
- Cure each layer under the UV lamp.
- Place the gold cross charm on the accent nail while the topcoat is still tacky.
- Cure under the UV lamp and finish with a glossy topcoat.
Sleek Burnt Orange Almond Nails
For a more minimalist approach, these simple and solid burnt orange almond-shaped nails are a perfect choice. They’re sleek, cute, and can effortlessly match a burnt orange dress or be a stylish addition to your everyday look.

Consumables:
- OPI Nail Lacquer in “My Italian is a Little Rusty”: A deep burnt orange that’s perfect for a plain and elegant finish.
- Almond-shaped nail file: To achieve that flawless almond shape.
- Gel topcoat: To lock in the color and give a lasting shine.
Instructions for Home Application:
- File your nails into an almond shape.
- Apply a base coat to each nail.
- Apply two coats of OPI Nail Lacquer in burnt orange, allowing each coat to dry in between.
- Finish with a gel topcoat for a long-lasting shine.
Mixed Burnt Orange and Black Art
This nail design is for those who love to experiment with designs. The burnt orange base combined with black and nude art creates a striking contrast that is both edgy and modern. It’s a great option for someone looking to match burnt orange dress but with a twist.
Consumables:
- Essie Nail Polish in “Playing Koi”: A burnt orange shade that is rich and vibrant.
- Black Nail Art Pen: For creating precise designs.
- Nude polish: To balance the bold colors.
Instructions for Home Application:
- Apply a base coat to each nail.
- Paint the nails with Essie Nail Polish in burnt orange, leaving one or two accent nails.
- Use the black nail art pen to create patterns on the accent nails.
- Add a layer of nude polish on selected areas for a soft contrast.
- Seal everything with a gel topcoat.
Classic Burnt Orange Short Nails
Short nails don’t mean you have to compromise on style. These shorties in burnt orange are pretty and simple, making them ideal for everyday wear. They’re especially great for those who prefer low-maintenance yet trendy looks.

Consumables:
- Sally Hansen Miracle Gel in “Rhapsody Red”: A durable polish that lasts long.
- Quick-dry topcoat: To speed up the process and add shine.
Instructions for Home Application:
- Start by filing your nails to your desired short length.
- Apply a base coat.
- Follow with two coats of Sally Hansen Miracle Gel in burnt orange.
- Apply a quick-dry topcoat for a smooth finish.
Burnt Orange French Tips with Nude Base
A fresh take on the classic French manicure, these nails combine a nude base with burnt nail color tips. This look is both cute and sophisticated, offering a modern twist on the traditional French tip.

Consumables:
- OPI Nail Lacquer in “Dulce de Leche”: A soft nude that pairs beautifully with burnt orange.
- Burnt orange nail polish: For the tips.
- French tip guide stickers: To achieve clean, precise lines.
Instructions for Home Application:
- Apply the nude polish as a base and let it dry completely.
- Use French tip guide stickers to section off the tips.
- Paint the tips with burnt orange polish.
- Remove the stickers carefully and apply a topcoat.
Burnt Orange French Ombre Nails
This burnt orange French ombre design is a sophisticated take on the classic French manicure, blending a soft nude base into a vibrant burnt orange tip. The ombre effect is perfect for adding a subtle yet eye-catching twist to your nails. This look is ideal for those wanting to go with a burnt orange dress without overwhelming the outfit.

Consumables:
- OPI Nail Lacquer in “Coconuts Over OPI”: For the nude base.
- Burnt orange gel polish: To create the gradient effect.
- Makeup sponge: Essential for achieving the ombre look.
Instructions for Home Application:
- Apply a nude base coat and let it dry completely.
- Dab burnt orange polish onto a makeup sponge and gently press it onto the tips of your nails, creating a gradient effect.
- Repeat the sponging process until you achieve the desired ombre effect.
- Seal with a gel topcoat to blend the colors smoothly.
Glossy Burnt Orange Coffin Nails
These glossy burnt orange coffin nails are the epitome of bold elegance. The rich color and high-shine finish make them stand out, and the coffin shape adds a touch of drama. This style is perfect for anyone looking to make a pretty and popular statement, especially when pairing it with an orange dress.

Consumables:
- Essie Nail Polish in “Playing Koi”: A deep, rich burnt orange.
- Coffin nail tips: For that elongated, elegant shape.
- Gel topcoat: To achieve a glossy finish.
Instructions for Home Application:
- Apply coffin nail tips to your natural nails and shape them as desired.
- Paint your nails with two coats of Essie Nail Polish in burnt orange.
- Finish with a gel topcoat for that stunning glossy effect.
Matte and Glossy Burnt Orange Nails
This design offers a striking contrast between matte and glossy finishes, both in a beautiful burnt orange hue. The combination of textures adds depth and interest, making this design ideal for those who want something trendy and unique.

Consumables:
- OPI Matte Top Coat: For the matte sections.
- OPI Nail Lacquer in “It’s a Piazza Cake”: For the burnt orange base.
- Gel topcoat: For the glossy sections.
Instructions for Home Application:
- Apply the burnt orange base color to all nails.
- Once dry, section off areas you want to keep glossy, and apply the matte top coat to the remaining areas.
- Finish by applying a gel topcoat to the glossy sections for a high-shine contrast.
Burnt Orange Gradient Nails
A smooth gradient from light orange to burnt orange creates a cute and solid look that’s perfect for any season. This gradient design is both versatile and simple, making it a great choice for everyday wear or special occasions.

Consumables:
- Zoya Nail Polish in “Jancyn”: A lighter orange for the gradient.
- Burnt orange gel polish: For the darker shade.
- Sponge applicator: To blend the gradient seamlessly.
Instructions for Home Application:
- Apply a base coat to protect your nails.
- Paint the lighter orange polish on the upper part of your nails.
- Using a sponge applicator, blend the burnt orange polish from the tips towards the center of the nail to create a gradient.
- Finish with a glossy topcoat to blend the colors further.
Burnt Orange Half Moon Nails
This half-moon design in burnt orange offers a unique take on traditional nail art. The use of negative space creates a modern and edgy look that’s cute yet simple. This style is perfect for those who want to try something different while still keeping their nails elegant.

Consumables:
- Essie Nail Polish in “Clambake”: For the burnt orange base.
- Half-moon nail stickers: To help create the negative space effect.
- Gel topcoat: For a lasting finish.
Instructions for Home Application:
- Apply the half-moon stickers near the base of your nails to create the desired shape.
- Paint the remaining nail with burnt orange polish.
- Carefully remove the stickers before the polish dries.
- Finish with a gel topcoat to protect the design.
Bold Burnt Orange Almond Nails
These bold burnt orange almond nails exude confidence and elegance. The high-gloss finish on these sleek, almond-shaped nails makes them perfect for a striking yet sophisticated look. This design is ideal for those who want to keep their manicure simple yet impactful, especially when pairing it with a burnt orange dress.

Consumables:
- Chanel Le Vernis in “Arancio Vibrante”: A vibrant burnt orange shade.
- Almond-shaped nail file: To achieve the elongated, elegant shape.
- High-shine topcoat: For that perfect glossy finish.
Instructions for Home Application:
- Shape your nails into a smooth almond shape using a nail file.
- Apply a base coat to each nail to protect them.
- Paint your nails with two coats of Chanel Le Vernis in burnt orange, allowing each layer to dry fully.
- Finish with a high-shine topcoat to enhance the glossy look.
Burnt Orange and Leopard Print Nails
This playful and artistic design combines burnt orange with leopard print and glitter accents, creating a trendy and cute look. The leopard print adds an edgy touch, while the glitter brings a hint of glamour, making these nails a great choice for a fun night out or to go with a burnt orange dress.

Consumables:
- Essie Nail Polish in “Playing Koi”: For the burnt orange base.
- Leopard print nail stickers: To easily create the leopard pattern.
- Gold glitter polish: To add some sparkle to the design.
Instructions for Home Application:
- Apply the burnt orange polish to your nails as the base color.
- Use leopard print nail stickers or a nail art pen to create the animal print on selected nails.
- Add gold glitter polish to accent nails for a touch of sparkle.
- Seal the design with a topcoat for longevity.
Burnt Orange French Manicure with Coffin Shape
This modern take on the classic French manicure features burnt orange tips on coffin-shaped nails. The high-contrast design is both solid and simple, making it perfect for those who want a trendy look that’s still easy to wear every day.

Consumables:
- OPI Nail Lacquer in “My Address is Hollywood”: A soft nude for the base.
- Burnt orange nail polish: For the tips.
- French manicure guide stickers: To achieve precise lines.
Instructions for Home Application:
- Apply the nude base color to your nails and let it dry completely.
- Use French manicure guide stickers to section off the tips.
- Paint the tips with burnt orange polish, making sure the lines are sharp and clean.
- Finish with a glossy topcoat for a polished look.
Burnt Orange and Black Contrast Nails
This design pairs burnt orange with black for a bold contrast that’s both trendy and elegant. The black nails add a touch of mystery and sophistication, while the burnt orange nails keep the look vibrant and lively. This is a great choice for fall or a night out.

Consumables:
- OPI Nail Lacquer in “Lincoln Park After Dark”: A deep black shade.
- Burnt orange gel polish: For the contrasting color.
- Gel topcoat: To add shine and durability.
Instructions for Home Application:
- Apply a base coat to protect your nails.
- Paint alternating nails with burnt orange and black polish.
- Apply a gel topcoat to each nail for a long-lasting finish.
Gradient Burnt Orange and Yellow Nails
This vibrant design transitions from a deep burnt orange to a bright yellow, creating a stunning gradient effect. This cute and simple design is perfect for those who want to add a pop of color to their look while keeping it light and fun.

Consumables:
- Essie Nail Polish in “Playing Koi”: For the burnt orange base.
- Yellow polish: For the gradient effect.
- Makeup sponge: To blend the gradient smoothly.
Instructions for Home Application:
- Apply a base coat to protect your nails.
- Paint your nails with the burnt orange polish as the base.
- Using a makeup sponge, blend the yellow polish from the tips towards the center of the nail to create the gradient effect.
- Finish with a glossy topcoat to blend the colors and add shine.
Burnt Orange and Gold Foil Art
This design combines burnt orange with intricate gold foil accents, creating a luxurious and unique look. The gold foil adds a touch of opulence to the burnt orange base, making it perfect for special occasions or when you want your nails to be the center of attention.

Consumables:
- CND Vinylux in “Clay Canyon”: A rich burnt orange base.
- Gold foil: For the detailed accents.
- Topcoat with a high gloss finish: To protect the foil and add shine.
Instructions for Home Application:
- Apply the burnt orange base color to your nails and let it dry completely.
- Carefully apply the gold foil in desired patterns using tweezers.
- Seal with a topcoat to protect the foil and enhance the shine.
Burnt Orange with Golden Leaf Accent
This design is simple yet striking, featuring a burnt orange base with a single nail adorned with a golden leaf accent. The contrast between the burnt orange and the gold makes this design both elegant and eye-catching, perfect for autumn.

Consumables:
- OPI Nail Lacquer in “It’s a Piazza Cake”: A warm burnt orange.
- Gold leaf: For the accent nail.
- Fine detail brush: For precise application of the gold leaf.
Instructions for Home Application:
- Apply the burnt orange polish to all nails, leaving one accent nail.
- Use a fine detail brush to apply the gold leaf to the accent nail.
- Finish with a topcoat to seal the design.
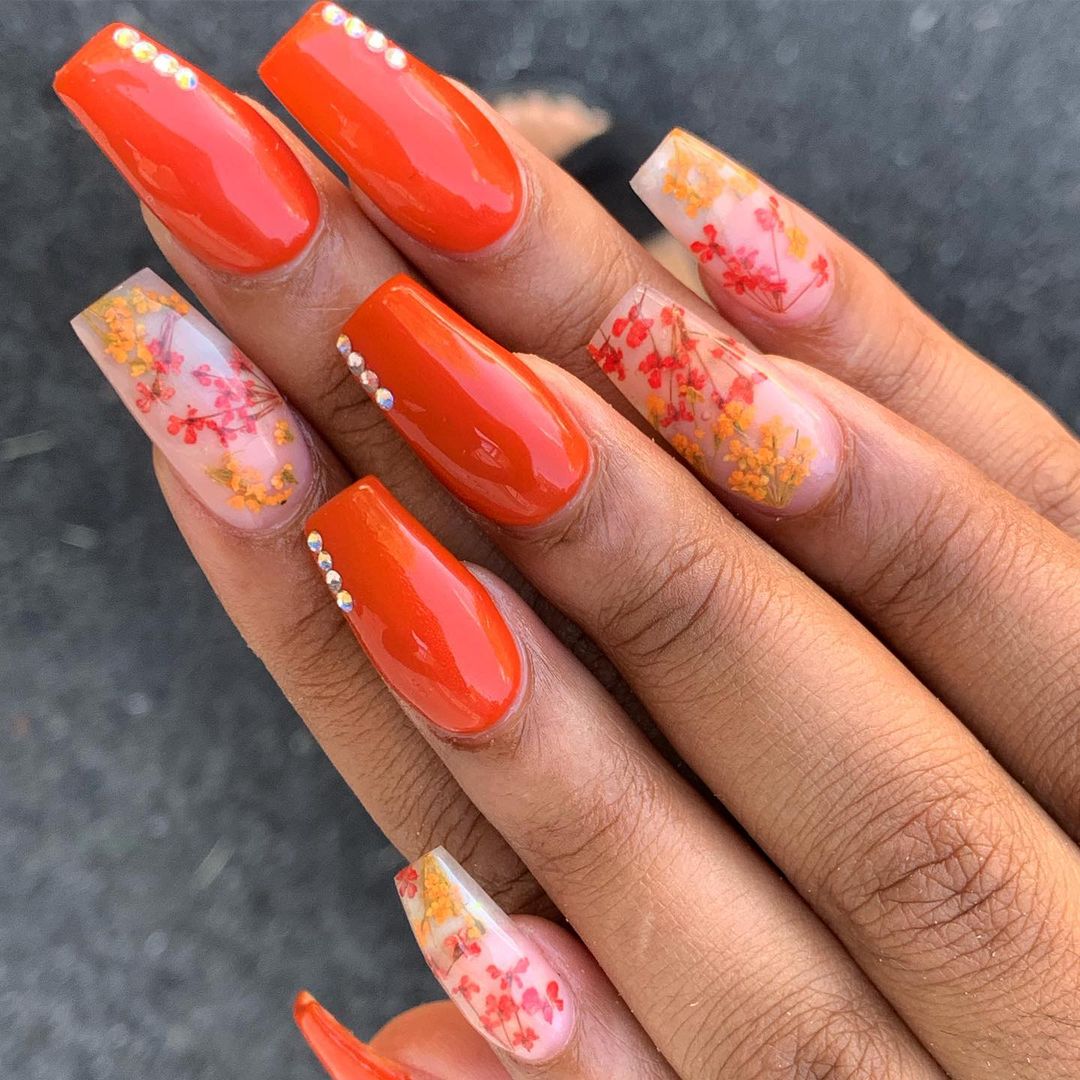
Burnt Orange with Floral Accents and Rhinestones
This design adds a floral twist to the classic burnt orange manicure, with delicate flowers embedded in a clear base and adorned with rhinestones. This combination of burnt orange, florals, and sparkle creates a look that’s both pretty and trendy.

Consumables:
- Zoya Nail Polish in “Jancyn”: For the burnt orange base.
- Pressed flower decals: For the floral accents.
- Small rhinestones: To add a touch of sparkle.
- Clear polish: To seal the decals and rhinestones.
Instructions for Home Application:
- Apply the burnt orange polish to all nails except the ones intended for floral accents.
- Place the pressed flower decals on the clear base nails.
- Add rhinestones for extra sparkle, securing them with clear polish.
- Seal the design with a topcoat.
Burnt Orange with Glitter Accents
This design features burnt orange nails with glittery accents, creating a glamorous and eye-catching look. The glitter adds just the right amount of sparkle, making this design perfect for both everyday wear and special occasions.

Consumables:
- China Glaze Nail Lacquer in “Desert Sun”: A soft burnt orange.
- Holographic glitter: For the accent nails.
- Topcoat with a glossy finish: To protect the glitter and add shine.
Instructions for Home Application:
- Paint all nails with the burnt orange polish.
- Apply holographic glitter to one or two accent nails while the polish is still tacky.
- Seal the entire design with a glossy topcoat.
Burnt Orange with Marbled Accent Nail
This design incorporates a burnt orange base with a marbled accent nail, blending shades of orange, yellow, and pink to create a stunning, artistic effect. This combination of solid and marbled nails makes for a unique and trendy manicure.

Consumables:
- Essie Nail Polish in “Playing Koi”: For the burnt orange base.
- Marbling tool: To create the marbled effect on the accent nail.
- Yellow and pink nail polish: For the marbling.
Instructions for Home Application:
- Paint most nails with the burnt orange base.
- For the accent nail, use a marbling tool to blend the orange, yellow, and pink polishes together in a swirling pattern.
- Seal with a topcoat to ensure the marbling effect lasts.
Burnt Orange Celestial Nail Art
This design is a cosmic blend of burnt orange, gold accents, and celestial motifs, creating a mystical and enchanting look. The nails feature intricate details like the sun, moon, and stars, combined with a rich burnt orange base, making this a standout design for those who love unique and detailed nail art.

Consumables:
- Burnt orange gel polish: For the base color.
- Gold foil and celestial nail stickers: To create the sun, moon, and star motifs.
- Fine detail brush: For applying intricate details and gold accents.
- Topcoat with a glossy finish: To seal the design and add shine.
Instructions for Home Application:
- Start by applying the burnt orange gel polish as the base color and curing it under a UV lamp.
- Use a fine detail brush to apply gold foil in a wavy pattern on selected nails, following the curve of the nail bed.
- Apply celestial nail stickers, positioning them carefully to create a cohesive design across the nails.
- Add additional gold accents using the fine detail brush to enhance the cosmic theme.
- Finish with a glossy topcoat to protect the design and give it a polished look.
Save Pin
