
21 Elegant Milky White Nail Designs: French, Glitter, Gold, and Acrylic Ideas
The all-time favorite milky white nails would be the first ones to come to mind in the discussion about nails in an always-changing nail art sector. This type of mani is a trend that is stylish enough to be worn with different designs, whether you are looking for soft, ethereal glow or a chic and minimalist design. In this, I will share with you the French designs to sprinkle nail ideas, and the professional advice that will help you to achieve these looks.
Timeless Elegance in Simplicity
The chic and minimalist design of this brilliant milky white nails obtained semi-precious is the definition of understated beauty. The soft almond shape with the smooth, translucent white polish creates a look that is effortlessly stylish. Choosing a gel finish makes the nails look clean and bright, thus demonstrating the pure beauty of the white polish itself. These nails would be suitable for someone who is a fan of minimalist style but still wants to look elegant.

Consommables :
-
- OPI Gel Color in “Funny Bunny”
- Almond-shaped nail forms
- UV/LED nail lamp for curing gel polish
- Nail file and buffer for shaping
- Gel topcoat for a long-lasting shine
Suggestions: OPI\’s \”Funny Bunny\” is a superlative milky white shade that demonstrates both opacity and translucence. By utilizing a UV/LED lamp, you make sure that the curing process is professional-grade, thus preventing any possible chips and cracks.
How to achieve this look: Start by shaping your nails into an almond shape with the help of a nail file. First, apply a base coat to prevent the natural nails, then apply two thin coats of OPI’s \”Funny Bunny.\” For 60 seconds, cure each layer of it under the UV/LED lamp. At last, finish it off with a high-gloss gel topcoat and finally cure. This uncomplicated pattern can be kept up by frequently using cuticle oil, which will help your nails be healthy and shiny.
How to achieve this look:
Start by shaping your nails into an almond shape with a nail file. Apply a base coat to protect the natural nails, followed by two thin coats of OPI’s “Funny Bunny.” Cure each layer under a UV/LED lamp for 60 seconds. Finish with a high-gloss gel topcoat and cure again. This simple design can be maintained with regular application of cuticle oil to keep your nails healthy and shiny.
Classy Short Square Nails
Acrylic nails short square shape are designed for people who want a practical length. These nails are perfect because they are stylish and functional at the same time. The glossy white finish is modern and adds a special touch to the basic short nails. They are suitable for work or daily wear. Their square edges give a clean and precise look while being super manageable.

Les articles consommables :
-
- Acrylic powder and liquid monomer (recommended brand: Young Nails)
- Square nail tips or forms
- White gel polish (suggestion: OPI Alpine Snow)
- Topcoat for durability
The young nails’ acrylic system is an excellent choice for new entrants and professionals as it is reliable and easy to apply.ALPINE Snow by OPI Bianxi is an ideal fit for square nails. It provides a flawless white finish.
How to create this style: First, you section the acrylic using square forms on the natural nails. After the acrylic is hard, file the nails to a perfect square shape with attention to a straight edge finish. Put on 2 layers of Alpine Snow white polish, curing in between each layer. The design is sealed with a high-shine topcoat and then cured. These acrylic short nails are just the thing for nails that look like you’ve been to the salon, but you just had minimal chores to do.
How to achieve this look:
Begin by applying the acrylic to the natural nail using square forms. Once the acrylic is dry, file the nails into a square shape, focusing on sharp, straight edges. Apply two coats of Alpine Snow white polish, curing between each layer. Seal the design with a high-shine topcoat and cure. These acrylic short nails are perfect for maintaining a polished look with minimal upkeep.
Soft Gradient Ombré
The design takes the milky white nails trend a step forward by introducing a mixt of ombré. The gradient effect from a purely pink color to a soft white finalizes the nails’ look to be dreamy and ethereal, which is ideal for people who fancy a combination of grace and fashion-abiding nail art. The sliver of glitter on the accent nail is the detail that brings the entire design to another level, as it adds a tiny bit of sparkle without blocking out the softness.

Produits de consommation:
-
- OPI Gel Color in “Bubble Bath” for the base
- White gel polish for the tips
- Makeup sponge for blending
- Glitter powder for the accent nail
Makeup sponge is the suggested beauty tool that you can take to softly pat the gel polish white on the nail tips then get a uniform gradient. Write the glitter on one nail for the sparkling accent.
This step-by-step technique will help you with the required look: First, you need to shape the nails and then apply a base coat of pink polish like OPI’s “Bubble Bath.” Next, take a makeup sponge and lightly dab the white polish at the tips, then blend it toward the base for a smooth ombré effect. After curing under a UV/LED lamp, you will take care of the glitter accent. For this step, you just need to sprinkle the glitter powder onto the wet polish, cure it and then finish it off with a glossy topcoat.
How to achieve this look:
After shaping the nails, apply a base coat of pink polish like OPI’s “Bubble Bath.” Using a makeup sponge, lightly dab the white polish at the tips and blend it toward the base for a smooth ombré effect. Cure under a UV/LED lamp. For the glitter accent, sprinkle the glitter powder onto the wet polish, then cure and finish with a glossy topcoat.
Edgy Acrylic Almond Nails with Gold Accents
If you are looking for a more dramatic finish, these acrylic almond nails are sharp, and they are typical of high-class style, with a glazy milky white polish base. The nails are then further embellished with small, delicate gold foil accents, thus, bringing a touch of luxury to the overall design. The prowess the almond shape has in the optical illusions it creates, of longer fingers renders, this design to be just right for those who are into bold but still elegant manicure.

Les consommables:
-
- Acrylic powder and liquid monomer (brand: Mia Secret)
- White gel polish (OPI “Funny Bunny” or similar)
- Gold foil flakes for accents
- Nail adhesive for applying foil
Suggestions: Mia Secret’s acrylic system is the right option for building a robust and smooth acrylic almond shape. The gold foil serves as an eye-catching contrast to the milky white base.
Nail the look of Dali through the following steps: Create the almond design by the use of acrylic and sculpt the nails first. When the shape is ready, apply a two-cure of white polish, and then cure between each layer. Place small gold foil flakes onto nails using tweezers and fix them with nail adhesive. Cure it, and then put a topcoat on it; thus, you seal the design and add a shiny finish to the nails.How to achieve this look:
Sculpt the nails using an acrylic almond technique. Once shaped, apply two layers of the white polish, curing between each layer. Use tweezers to carefully place small gold foil flakes onto the nails, securing them with nail adhesive. Cure, then apply a topcoat to seal the design and give the nails a glossy finish.
Elegant French Ballerina Nails with Rhinestones
The milky white nails with a design based on a French twist is a perfect combination of a classic French tip with the delicate, elongated shape of ballerina nails. The soft white base and clean French tips are the ideal backdrop to the addition of small rhinestones for a touch of glamour; thereby, this amazingly stylish design becomes an excellent choice for special events or everyday elegance.

Consommables :
-
- French manicure nail guides
- White gel polish (OPI “Alpine Snow”)
- Small rhinestones for accenting
- Ballerina nail tips or forms
- Gel topcoat for durability
Ballet-dancer’s shape is exceptionally powerful when it is alongside precisely arranged French tips. You can beautify your manicure with rhinestones on one or two nails, which will create just the needed sparkle effect.
Steps to obtain this look: Initially, create the ballerina design with either acrylic or tips. Nail guides are necessary to paint the tips using Alpine Snow white polish while the base should be left in a soft milky white. Rhinestones can be attached to a couple of the nails at the base for a sophisticated style. Conclude the art with a wear-resistant topcoat.
How to achieve this look:
Begin by sculpting the ballerina shape with acrylic or tips. Use nail guides to paint the tips with Alpine Snow white polish, leaving the base a soft milky white. Apply rhinestones to the base of a couple of nails for a refined look. Finish with a durable topcoat.
Sophisticated Rhinestone Glam
These milky white nails feature small rhinestone decorations, which establishes simplicity and elegance. The square short shape makes it functional, while the added rhinestones give it a luxurious touch. The nails are the soft and creamy white base which is perfect for the rhinestones to shine on. The absolutely identical placement of the rhinestones around the cuticle area locks the minimalist look.

Ces articles nécessaires à la facturation de la consommation des matériaux et des équipements.<|vq_816|>
-
- OPI Gel Color in “Funny Bunny” for the milky white base
- Clear rhinestones (small to medium size)
- Nail glue or adhesive gel for rhinestone application
- UV/LED lamp for curing
- Square nail tips or forms
I would say, \”Funny Bunny\” by OPI is the best start to create this soft, milky white color. Make sure the rhinestones are firmly attached by using a strong nail glue or a rhinestone adhesive gel.
Achieving this look first involves the same step as shaping the nails into a square format. Apply two coats of the milky white polish, curing between each layer, and don’t forget to use a small dot of nail glue or adhesive gels to attach the rhinestones near the cuticle area. Rhinestones are then cured under the UV/LED lamp to make them stay. For the final step, add a glossy topcoat, which is an additional shine and also prolongs the duration of the design.
How to achieve this look:
Start by shaping the nails into a short square design, then apply two coats of the milky white polish, curing between each layer. Use a small dot of nail glue or adhesive gel to apply the rhinestones near the cuticle area. Cure the nails under a UV/LED lamp to set the rhinestones in place. Finish with a glossy topcoat for extra shine and longevity.
Chic Almond Milky White
The almond nails with a milky white color effect here seem to be the epitome of a traditional and ageless charm. The almond shape which is mainly slim gives a discrete effect making the fingers look more delicate. The soft gel polish finish is an ideal solution that gives it a glow of calmness, therefore, it suits everyday use or a special event perfectly. The design is very simple and hence it is flexible enough to go with a variety of styles and dresses.

Consommables :
-
- Gel polish in a milky white shade (recommendation: OPI “Funny Bunny”)
- Almond nail forms or tips
- UV/LED lamp for curing gel polish
- Gel topcoat for added shine
Recommendations: The best suggestion for pairing this trend is using the soft gel finish because it gives a natural high-gloss look. The extended shape with a non-business look is made easier by using almond nail forms.
This stylish appearance is attainable through the following steps: You need to file your nails into an almond shape first and apply a base coat. Then, you should layer two coats of your preferred milky white gel polish, making sure to cure each coat under the UV/LED lamp for 60 seconds. After the final layer is cured, you should apply a high shine gel topcoat and cure it again to completely finish the look. The almond shape will give you a neat, feminine touch, which can be further complemented by cuticle oil.
How to achieve this look:
File your nails into an almond shape and apply a base coat. Layer two coats of your chosen milky white gel polish, curing each under the UV/LED lamp for 60 seconds. Once the final layer is cured, apply a high-shine gel topcoat and cure again to seal the look. The almond shape provides a sleek, feminine touch that can be enhanced with cuticle oil.
Classic French with Milky White Base
The design french nail look is a new interpretation of the traditional milky white nails with the addition of soft, rounded corners and a fine white tip. When it comes to the base, the creamy translucent is still the traditional one, and the white tips give it shape without losing the natural elegance. These nails are suitable for a clean and elegant style which is both classic and modern.

Consommables :
-
- French manicure guides
- White gel polish for tips (recommendation: OPI “Alpine Snow”)
- Milky white base gel polish (suggestion: OPI “Funny Bunny”)
- UV/LED lamp for curing
– To make the French tip look more crisply, OPI has \”Alpine Snow.\” French tip design can also be created easily with \”Funny Bunny\” as a …” – The uneven and dirty lines are now in the past, thanks to the use of French manicure guides.
To create this style, start with a milky white base coat on your oval nails. Post curing, use French manicure guides at the tips of the nail and paint the unmasked areas with white gel polish to get the classic French tip. Cure the nails under a UV/LED lamp and finally apply a gel topcoat for the protection of the design and for a long-lasting, shiny finish.
How to achieve this look:
Begin with a milky white base coat over your rounded nails. After curing, apply French manicure guides near the nail tips and paint the exposed areas with white gel polish for the classic French tip. Cure the nails under a UV/LED lamp and finish with a gel topcoat to protect the design and give it a long-lasting, high-shine finish.
Rhinestone-Studded Milky Nails
The design is a perfect hand, which is fashionable white nails and with the beauty of infinitesimal pearls. Beads of pearl rhinestones are worn over the simple white color of the nail. The soft, translucent white color tells the neutral background, while the rhinestones upon the light and add personality. The almond shape of the fingers makes the girls’ manicure chic and elegant, and the lovely length is for special occasions.

Consommables:
-
- Rhinestones in various small sizes
- Nail adhesive for rhinestones
- Milky white gel polish (suggestion: OPI “Funny Bunny”)
- UV/LED lamp for curing
- Almond nail tips or forms
Suggestions: Place the rhinestones in a random manner on the nails that you would like to add a touch of bling to without excessive decoration. The only requirement for this according to the designer is that you should fix the stones firmly using strong nail glue or adhesive.
Here is a guide to get this eye-catching look: Just file the nails into a cute almond shape, and then apply a milky white base and cure. Use a thin dotting tool or tweezers to randomly place the rhinestones on the nails, and press them slightly into the wet nail polish or add them using glue. Cure the nails under the UV/LED lamp in order to dry the rhinestones and complete the design with a glossy topcoat.
How to achieve this look:
After shaping the nails into an almond shape, apply a milky white base and cure. Use a small dotting tool or tweezers to place the rhinestones randomly across the nails, pressing them gently into the still-wet polish or applying them with adhesive. Cure the nails under the UV/LED lamp to set the design and finish with a glossy topcoat.
Subtle Marble Effect on Milky White
For a more artistic interpretation of milky white nails, you can use a subtly marbled design that will add texture and depth to the manicure. The marble-like swirls of the mix are perfect with the soft milky white base, so the look becomes detailed and sophisticated. The almond shape of the design is simple yet classy which is why these nails would look good in both casual and formal settings.

Articles de consommation :
-
- Milky white base gel polish (suggestion: OPI “Funny Bunny”)
- Marble effect tool or thin brush for swirling polish
- UV/LED lamp for curing
- Gel topcoat for sealing the design
Do you want to be creative? Then you can try to make a thin brush swirl different darker shades of white or soft gray on your nails. Just be careful not to overdo with the swirling, a minimalist clean effect of the nails must be preserved.
To recreate this look: Upon applying and curing the milky white base, utilize a fine brush or a marble tool to design soft swirls with a contrasting white or grey polish. The tool is dragged through the wet polish in a swirling motion to achieve a marble effect. After curing the nails under a UV/LED lamp, you finish with a high-shine topcoat to seal the design.
How to achieve this look:
After applying and curing the milky white base, use a fine brush or a marble tool to create soft swirls with a contrasting white or grey polish. Drag the tool through the wet polish in a swirling motion to achieve a marble effect. Cure the nails under a UV/LED lamp and finish with a high-shine topcoat to seal in the design.
Sophisticated Coffin Shape Milky White Nails
Coffin white nails look so amazing that they outshine all others. The long and clean stricken design is long and clean. The bold color of the shape makes the fingers look longer and enhances the look very chic. The design is simple but it is very luxurious; thus, it is perfect for a polished, fashion-forward appearance. The glossy milky white color of the nails gives them a \”no mistakes\” picture, and they are excellent for either a walk in the park or a classy event.

Les articles consommables sont les suivants:
-
- OPI “Funny Bunny” gel polish for the milky white base
- Coffin nail forms or tips
- UV/LED lamp for curing
- Gel topcoat for long-lasting shine
Tips: The trick to creating this lovely appearance is the exact shaping. Coffin nails necessitate careful filing to keep the edges sharp but not to modify the overall structure. If you want soft white shade, you can go for OPI’s “Funny Bunny”.
To get this look, you must first place the coffin-shaped nail forms and make the nails with acrylic or gel. To get a coffin-shaped look, make sure to file the edges properly. Put on two layers of OPI\’s \”Funny Bunny,\” curing each single layer with a UV/LED lamp. Finally, you can add a gel topcoat to seal the shine and durability through the top.
How to achieve this look:
Start by applying the coffin-shaped nail forms and building the nails with acrylic or gel. File the edges to ensure a defined coffin shape. Apply two layers of OPI “Funny Bunny,” curing each layer under a UV/LED lamp. Finish with a gel topcoat to lock in the shine and durability.
Minimalist Square Nails with Abstract Design
This model integrates the milky white nails with a design of modernism. The pure square shape is enhanced by the abstract white swirl on the ring finger, thus it becomes slightly artistic. The minimalist style of this design is why it can be worn by anyone who loves classic look with a contemporary twist. The swirl introduces just the right amount of interest but does not affect the simplicity of the milky white background at all.
Les consommables :
-
- OPI “Funny Bunny” for the milky white base
- Thin nail art brush for the white swirl
- UV/LED lamp for curing
- Gel topcoat for protection
Suggestions: To create a smooth and the swirl, use a high-quality, fine-tipped brush and a slightly thicker white polish to draw clean lines.
To create this nail look, first, you need to shape your nails into a square and then polish them with two coats of milky white and cure them. On the ring finger, with a fine-tipped nail art brush, draw an abstract white swirl. After curing the design, top off with a gel topcoat for sealing and protecting the design.How to achieve this look:
After shaping your nails into a square shape, apply two coats of the milky white polish and cure. On the ring finger, use a fine-tipped nail art brush to paint an abstract white swirl. Cure the design and finish with a gel topcoat to seal and protect the design.
Subtle Milky White with a Natural Finish
White is one of the colors that symbolizes innocence and purity but these nails take milky white polish to a deeper level by making it more understated and subtle. Their short square design not only provides a practical solution but also gives the nails an elegant look due to their transparent cover. As the case may be, this composition is suitable for the wearers who wish their style to be classic, easy to keep but at the same time a little refined. The stainer is slightly transparent which makes the nails look healthier and more natural.

Consommables:
-
- OPI “Funny Bunny” or any sheer milky white polish
- Square nail forms or tips
- UV/LED lamp for curing
- Topcoat for added shine and durability
Suggestion: A semi-transparent milky white Polish is a great way to give your nails a natural and polished look. Make sure you apply it thin and evenly to keep the surface smooth and classy. Obdachlose Menschen in der Subway.
How to get this look: A square nail shape is the first step, and to achieve this, you should apply 1-2 thin coats of milky white polish after curing in between the layers. The secret to this look is to obtain a delicate, and natural finish by not using excessive polish. The last step is to use a clear topcoat to seal the design and provide a light shine.
How to achieve this look:
Shape the nails into a square form and apply one to two thin coats of the milky white polish, curing between layers. The key to this look is achieving a soft, natural finish without over-applying. Complete the look with a clear topcoat to seal and give a subtle shine.
Gold Foil Accents on Milky White Nails
This trendy design adds a twist to the conventional milky white nails with the bold gold foil accents on the two nails. The gold foil element here is like a gem in everyday life by adding a touch of luxury and elegance to the normal and clean design. This style is ideal for those who want to add some originality to their manicure while remaining stylish and elegant.

Consommables :
-
- OPI “Funny Bunny” for the milky white base
- Gold foil accents
- Nail glue or adhesive for foil application
- UV/LED lamp for curing
- Gel topcoat to seal the design
Advice: While using the gold foil, mind it to not put too much of it. A tiny, accurately set figure can attract the eyes to the acrylics instead of making the nails look nad.
To accomplish this style: The first step is to apply the milky white base and cure nails under a UV/LED lamp. Take the tweezers and use them to put small pieces of gold foil onto the selected nails, affixing them with a thin layer of adhesive. Following this, you need to cure them under the lamp the, apply a glossy top coat to encapsulate the foil and give the nails a smooth finish.
How to achieve this look:
After applying the milky white base, cure the nails under a UV/LED lamp. Using tweezers, place small pieces of gold foil onto the chosen nails, securing them with a thin layer of adhesive. Cure under the lamp, then apply a glossy topcoat to seal the foil and give the nails a smooth finish.
Almond Shaped Milky White Elegance
The acrylic almond nails well deserve the title of the most elegant nails. The sharp almond shape with the smooth milky white polish is a combination that illustrates a clear design idea of lengthening the fingers while keeping things simple and refined. This look is appropriate for those who want a classic manicure that goes with both casual and formal occasions.

Produits récurrents :
-
- OPI “Funny Bunny” gel polish
- Almond nail tips or forms
- UV/LED lamp for curing
- Gel topcoat for extra durability
Suggestions: The milky white polish gives an almond shape that nails beautifully look on most hand shapes and a fresh, clean look. To keep the shape looking bold, make sure the edges are smooth.
To attain this style: Form the nails into the shape of a delicate almond point and adhere the milky white polish in layers of thinness, curing in between each coat. After the base coat is done, cover it with a gel topcoat that will give the nails a shiny and durable finish.
How to achieve this look:
Shape the nails into a soft almond point and apply the milky white polish in thin layers, curing between each coat. Once the base is applied, seal with a gel topcoat to give a long-lasting, shiny finish.
Marble Swirl Milky White Nails
The nail tip cover of these short square milky white nails is the marble swirl design that is not only beautiful but also artistic. The pale white color of the swirls, which look like clouds in the sky, smoothly highlight the white color of the base. This is a very romantic way to present this design. This design is for people who want to add a little bit of fun to their nails but do not want to be too striking.

Consommables :
-
- OPI “Funny Bunny” or any milky white gel polish
- Thin nail art brush for marble swirls
- UV/LED lamp for curing
- Gel topcoat for sealing
A very creamy white polish is basically a make marble with the least effort. To make the cloudy marbling effect, use a fine brush to prefix the polish in a circular pattern as long as it is still wet.
The following are the steps to get this look: Start by transforming your nails into a square short shape, then put on the milky white base coat and cure. To create the marble effect, you need to dip a thin brush into white polish and gently swirl it over the nail while the base is still tacky. After that, you have to cure and put on a topcoat that will protect your design and make it have a nice glossy look.
How to achieve this look:
After shaping the nails into a short square design, apply the milky white base coat and cure. For the marble effect, dip a thin brush into white polish and swirl it gently over the nail while the base is still tacky. Cure and apply a topcoat to protect the design and give it a high-gloss finish.
Transparent Coffin French with Milky Base
The French manicure has been redefined in this special way, which is a clear coffin tip along with milky white base. The difference between the soft transparency of the white and the fully transparent tip is that the nails become a sheer futuristic and styliz chic. The transparent tips are innovative and create a look that is very modern for someone who loves minimalistic designs but would still want to be noticed.

Consommables :
-
- Clear coffin tips or nail forms
- OPI “Funny Bunny” for the milky white base
- UV/LED lamp for curing
- Clear topcoat for sealing
Suggestions: To maintain the clarity and purity of the tips, apply a non-yellowing topcoat. This will extend the duration of the crystal-like appearance.
The COFFEE look should be achieved by placing transparent coffin tips on your natural nails. Use a milky white gel like OPI’s “Funny Bunny” to create the base, leaving the tips clear. Cure each layer under a UV/LED lamp, and finally use the clear topcoat to protect and seal the design.
How to achieve this look:
Begin by applying clear coffin tips to your natural nails. Use a milky white gel polish like OPI’s “Funny Bunny” to create the base, leaving the tips clear. Cure each layer under a UV/LED lamp, and apply a clear topcoat to protect and seal the design.
Soft Glitter Accent Milky White Almond Nails
These acrylic almond nails which blend the timeless milky white appearance of the covered glitter on one accent nail. The glitter is the sweetest of the sparkles to the design without detracting from its basic simplicity. Only for those who love glam and yet prefer the style to be classy, this design is the one.

Consommables :
-
- OPI “Funny Bunny” for the milky white base
- Gold glitter for the accent nail
- Almond-shaped acrylic tips
- UV/LED lamp for curing
- Gel topcoat for protection
Tips: For the soft and delicate look try to use a fine gold glitter. One of the best glitter applications is glitter to only one nail because it keeps the design balanced and not too extravagant.
How to turn your nails into this wonderful look: First, you have to put the almond-shaped acrylic nails on. Then, apply a milky white polish for the base and cure. When the base is still wet, put gold glitter on the accent nail, next cure. Finish all the nails with a clear topcoat to ensure a smooth and long-lasting finish.
How to achieve this look:
After applying the almond-shaped acrylic nails, use a milky white polish for the base and cure. Apply gold glitter to the accent nail while the base is still wet, then cure. Finish with a clear topcoat on all nails to ensure a smooth and long-lasting finish.
Multi-Texture Milky White Nails with Shimmer
This design is the best one, it has milky white nails, a hint of glitter, and also a marble effect. The nails go for the contrasting styles of a soft shimmery finish, a marble texture, and a solid white base. The textured bright colors bring out the 3D and depth effects, which are the main features of the design; despite the fact that it is still not very noticeable.

Consommables:
-
- OPI “Funny Bunny” gel polish
- Silver shimmer powder for accent nails
- Marble effect brush for swirls
- UV/LED lamp for curing
Council: For a multi-textured design, integrate a range of tools such as sponge to add shimmer, and a fine brush for the marble swirls. Before incorporating the next texture, make sure each layer is completely cured.
Achieving this look: To complete the look, first apply a milky white base on all the nails. With the help of a sponge, dap silver shimmer onto one nail for the glittering effect. For the marble pattern nails, you will need to use a very thin brush to intertwine white polish to your base that is still tacky. Between each layer, you need to cure the nails and in the end, you can apply the topcoat for a shiny look.
How to achieve this look:
Start by applying a milky white base to all nails. Use a sponge to dab silver shimmer onto one nail for a glittery effect. For the marble nails, use a fine brush to swirl white polish into the still-tacky base. Cure between each layer and finish with a topcoat to give the nails a glossy finish.
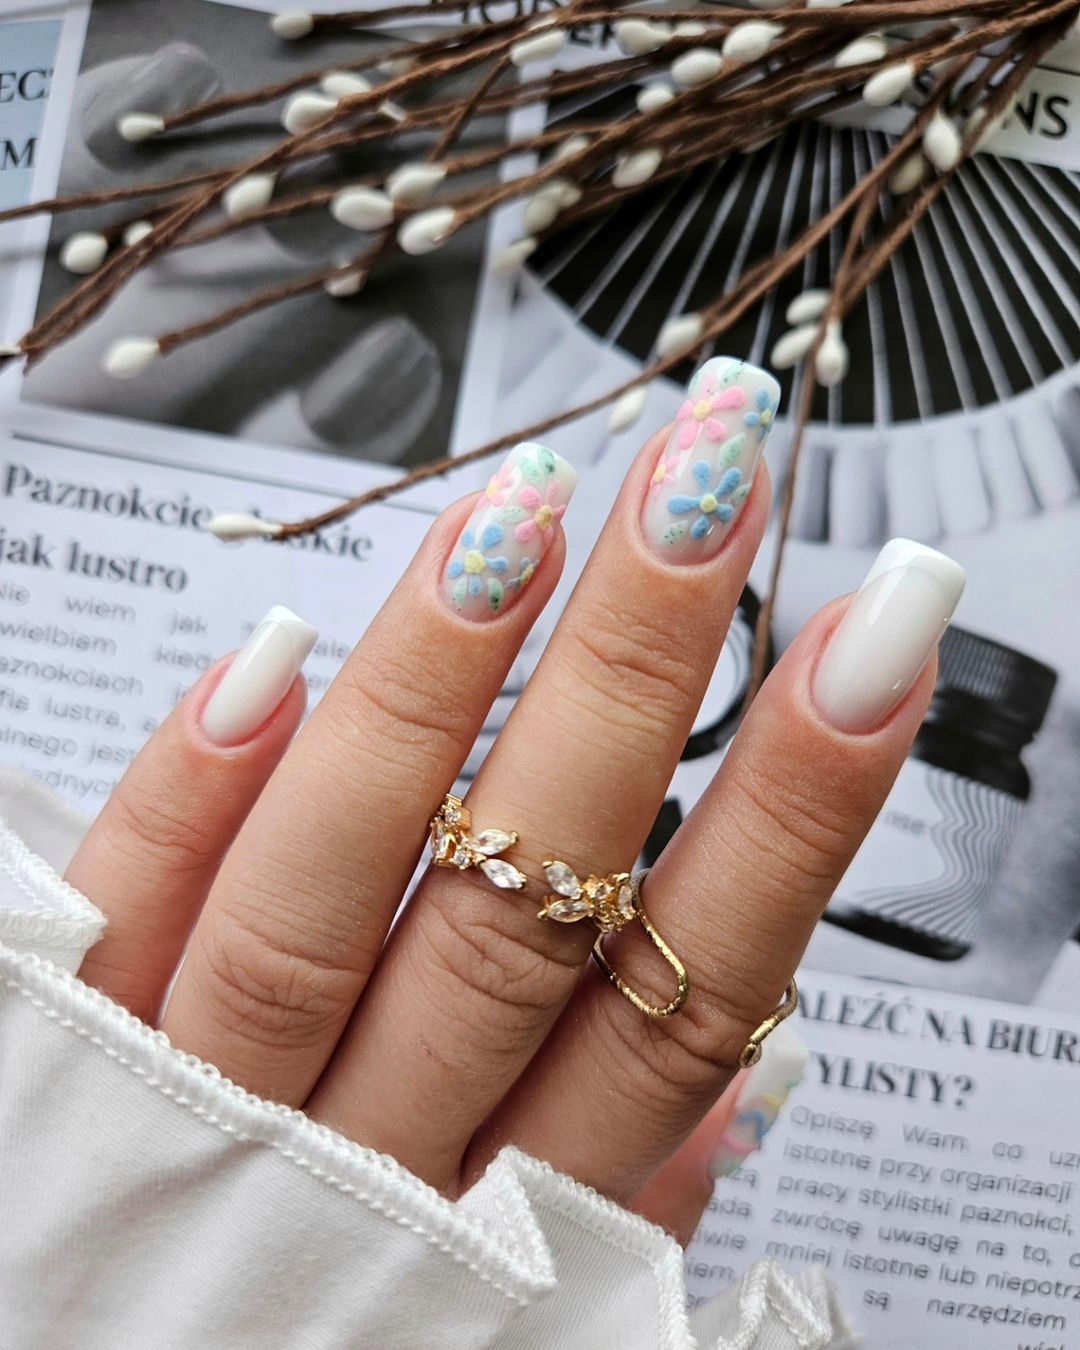
Floral Embellished Milky White French Tips
The mesmerizing design of this one is to wear milky white colored nails with a classic French tip that is inverted by a colorful floral design. Two accent nails are adorned with the flowers in the shades of pastel colors which give the classic French manicure a more cheerful and summery look.

Dépenses nécessaires aux consommables:
-
- Milky white polish for the base
- Pastel-colored gel paints for the floral designs
- Thin brush for detailing the flowers
- UV/LED lamp for curing
I would suggest that you use light and delicate floral accents in order to keep the sophisticated feel of the milky white base. You can use soft pastel colors for a charming and understated effect.
The style can be easily created by following this after setting up a classic French tip with a milky white base.___Style your nails exactly like this: After setting up a classy French tip with a milky white base, paint little flowers in pastel colors on two bull’s eye nails using a thin detailing brush. After each color is applied, cure and finally top it off with a high-gloss topcoat to make sure the design is properly sealed.How to achieve this look:
After creating a traditional French tip with a milky white base, use a thin detailing brush to paint small, pastel-colored flowers on two accent nails. Cure after applying each color, and finish with a high-gloss topcoat to seal the design.
Speckled Milky White Short Nails
These nails present a creative approach to white nails by incorporating a spattered and rough texture. The short square shape is not only practical but also the black speckled accents give a fun and young finish to the nails. This design is a good match for the people who like to add texture, but do not want to be very bold.

Consommables:
-
- Milky white gel polish (suggestion: OPI “Funny Bunny”)
- Black speckled gel polish for texture
- UV/LED lamp for curing
- Gel topcoat for protection
Tips: The easiest way to create this spattered design is by using a thin brush to place tiny spots of black polish on the nails. Just remember that for this to look really nice, you have to keep the speckles small and uniformly distributed.
To do such nails: First, you should form the nails and then apply two layers of milky white polish and cure. Second, with the help of a thin brush, add black speckled polish to the surface of the nails lightly to make a textured effect. Thirdly, cure it under the UV/LED lamp and apply a clear topcoat to it to seal the design and give it a shiny surface.How to achieve this look:
After shaping the nails, apply two layers of milky white polish and cure. Using a thin brush, lightly dab black speckled polish onto the surface to create a textured effect. Cure under the UV/LED lamp and finish with a clear topcoat to seal the design and add shine.
Save Pin
