
Fall nail designs for dark skin can be incredibly stylish and expressive. From classic neutral tones to bold and vibrant colors, each design can enhance the beauty of your skin tone. In this article, I’ll explore the most trending nail ideas for the fall season of 2024, detailing the necessary materials and providing practical advice on how to create these looks at home. Keep reading to discover how to make your nails stand out this fall.
Red Heart Accents
As a professional manicurist, I can confidently say that subtle red heart accents on a nude base are a timeless choice for fall nails, especially for those with dark skin. The contrast between the warm, earthy nude tones and the vibrant red creates a stunning visual effect. The hearts are delicately placed near the cuticle area, adding a cute yet sophisticated touch to the nails. This design is perfect for those who prefer something simple yet trendy, allowing the natural beauty of your hands to shine.

Consumables:
-
- Base Color: OPI Nail Lacquer in “Samoan Sand”
- Red Polish: Essie Nail Polish in “Russian Roulette”
- Top Coat: Seche Vite Dry Fast Top Coat
- Tools: Nail art brush, dotting tool, or toothpick
DIY Instructions:
-
- Prepare Your Nails: Start with clean, trimmed nails. Apply a base coat to protect your natural nails.
- Apply the Base Color: Apply two coats of nude polish and let it dry completely.
- Create the Hearts: Using a fine nail art brush or dotting tool, draw small red hearts near the cuticle area on each nail.
- Seal the Design: Apply a top coat to protect the design and add a glossy finish.
Golden Chrome Elegance
Gold chrome nails bring an elegant touch to any look, making them a perfect choice for fall. This luxurious design features a gradient effect from a soft nude to a striking gold chrome, adding a trendy and sophisticated vibe. The metallic finish not only catches the light beautifully but also complements the rich tones of dark skin. This look is ideal for special occasions or when you want to add a touch of glamour to your everyday style.

Consumables:
-
- Base Color: Essie Nail Polish in “Ballet Slippers”
- Gold Chrome Powder: Born Pretty Chrome Nail Powder in Gold
- Top Coat: Gelish Top It Off
- Tools: Makeup sponge, nail buffer, UV/LED lamp
DIY Instructions:
-
- Prep and Base: Begin by prepping your nails and applying a base coat. Cure under a UV/LED lamp if using gel polish.
- Apply the Base Color: Apply a thin layer of nude polish and cure if using gel.
- Add the Chrome Powder: Use a makeup sponge to dab the gold chrome powder onto the tips of the nails, blending towards the middle for a gradient effect.
- Seal the Look: Apply a top coat and cure under the lamp for a lasting finish.
Classic Nude Nails
Nude nails are a classic choice that never goes out of style, particularly for those with dark skin. This look is all about embracing simplicity and elegance, allowing the natural tone of your skin to be the star. The nude shade chosen here perfectly matches and enhances the skin tone, creating a chic and understated look. It’s perfect for any occasion, from casual outings to formal events.

Consumables:
-
- Base Color: Zoya Nail Polish in “Chantal”
- Top Coat: Sally Hansen Insta-Dri Anti-Chip Top Coat
- Tools: Nail file, buffer, cuticle oil
DIY Instructions:
-
- Prepare the Nails: File and shape your nails, then push back the cuticles.
- Apply the Base Color: Paint two coats of the nude polish, allowing each layer to dry fully.
- Finish with Top Coat: Seal with a top coat to add shine and protect the polish.
Sophisticated Slate Grey
Slate grey nails bring a modern and sophisticated touch to any look. This shade of grey complements dark skin beautifully, offering a neutral yet stylish option for fall. The smooth, glossy finish enhances the elegance of the nails, making them perfect for both professional settings and casual outings. This look is versatile, providing a classy base that can be easily dressed up or down.

Consumables:
-
- Base Color: OPI Nail Lacquer in “Suzi Talks with Her Hands”
- Top Coat: Essie Gel Couture Top Coat
- Tools: Nail file, buffer, cuticle pusher
DIY Instructions:
-
- Prep the Nails: File and shape your nails to the desired length and style.
- Apply the Base Color: Apply two coats of the slate grey polish, allowing each coat to dry completely.
- Finish with Top Coat: Apply a layer of top coat to seal the polish and add a glossy shine.
Mustard Yellow Pop
For those looking to add a pop of color to their fall look, mustard yellow nails are a bold and trendy choice. This vibrant color contrasts beautifully with dark skin, creating a standout look that’s perfect for the season. The rich yellow hue is not only eye-catching but also evokes the warm tones of autumn, making it a perfect choice for the fall nail palette.

Consumables:
-
- Base Color: China Glaze Nail Lacquer in “Mustard the Courage”
- Top Coat: Seche Vite Fast Dry Top Coat
- Tools: Nail file, buffer, cuticle trimmer
DIY Instructions:
-
- Prepare the Nails: Start by cleaning and shaping your nails. Push back and trim the cuticles.
- Apply the Base Color: Apply two coats of mustard yellow polish, ensuring full coverage.
- Seal the Look: Finish with a top coat to protect the color and add a glossy finish.
Blue Hue Elegance
This stunning deep blue shade is perfect for the fall season, offering a sophisticated and classy look for dark skin tones. The rich, cool color is both trendy and versatile, easily transitioning from casual daywear to more formal evening events. The glossy finish adds a touch of elegance, making these nails stand out in any setting. This design is ideal for those who love a bold yet refined look.

Consumables:
-
- Base Color: Essie Nail Polish in “After School Boy Blazer”
- Top Coat: Sally Hansen Miracle Gel Top Coat
- Tools: Nail file, buffer, cuticle pusher
DIY Instructions:
-
- Prep the Nails: Start with clean, shaped nails. Push back and trim cuticles as needed.
- Apply the Base Color: Apply two even coats of the deep blue polish, allowing each layer to dry thoroughly.
- Seal with Top Coat: Finish with a top coat to enhance the shine and protect the color.
Warm Brown Neutrals
Warm brown tones are a classic choice that perfectly complements dark skin, especially during the fall season. This particular shade offers a cozy and inviting look, ideal for those who prefer a more subtle and neutral nail design. The creamy texture and glossy finish add a touch of sophistication, making it a versatile option for various occasions.

Consumables:
-
- Base Color: OPI Nail Lacquer in “Chocolate Moose”
- Top Coat: Essie Good to Go Top Coat
- Tools: Nail file, buffer, cuticle oil
DIY Instructions:
-
- Prepare the Nails: File and shape your nails, then clean and push back the cuticles.
- Apply the Base Color: Apply two coats of the warm brown polish, ensuring an even application.
- Finish with Top Coat: Apply a top coat to protect the manicure and add shine.
Pastel Green and Nude Combination
This unique design features a playful mix of pastel green and nude shades, creating a soft and elegant look. The abstract patterns and varying shades add a modern and artistic touch, making this design perfect for those who want something different and eye-catching. The gentle colors complement dark skin beautifully, offering a fresh and trendy option for the fall season.

Consumables:
-
- Base Colors: Essie Nail Polish in “Ballet Slippers” and “Mint Candy Apple”
- Top Coat: Orly Sec ‘N Dry Top Coat
- Tools: Nail art brush, dotting tool
DIY Instructions:
-
- Prepare the Nails: Clean, file, and shape the nails. Apply a base coat if desired.
- Apply the Base Colors: Use the nude polish as the base and create abstract designs with the pastel green polish.
- Seal with Top Coat: Apply a top coat to protect the design and ensure longevity.
Glittery Green Glam
For a bold and glamorous look, these glittery green nails are a fantastic choice. The shimmering finish adds a touch of luxury and sophistication, making them perfect for festive occasions or special events. The vibrant green color stands out beautifully against dark skin, adding a pop of color and sparkle to any outfit.

Consumables:
-
- Base Color: Zoya Nail Polish in “Merida”
- Top Coat: INM Out the Door Top Coat
- Tools: Nail file, buffer, cuticle pusher
DIY Instructions:
-
- Prep the Nails: File and shape your nails, then clean the surface.
- Apply the Base Color: Apply two coats of the glittery green polish, allowing each to dry completely.
- Finish with Top Coat: Seal with a top coat to keep the glitter in place and add extra shine.
Camouflage Green and Nude
This creative nail design features a camouflage-inspired mix of green and nude shades, perfect for adding a touch of edginess to your fall look. The varying green tones create a unique and stylish pattern, making this design ideal for those who love to experiment with their nails. The combination of matte and glossy finishes adds depth and dimension, enhancing the overall aesthetic.

Consumables:
-
- Base Colors: OPI Nail Lacquer in “Alpine Snow,” “Suzi – The First Lady of Nails,” and “Stranger Tides”
- Top Coat: Essie Matte About You Top Coat
- Tools: Nail art brush, sponge
DIY Instructions:
-
- Prepare the Nails: Start by filing and shaping the nails. Clean the nail surface thoroughly.
- Apply the Base Colors: Use a combination of nude and green shades to create a camouflage pattern.
- Finish with Top Coat: Apply a matte top coat for a unique, non-glossy finish.
Shimmering Olive Matte
This matte olive nail design with a subtle shimmer is a perfect blend of elegance and modernity, ideal for the fall season. The matte finish gives it a sophisticated and understated look, while the fine shimmer adds a hint of glamour. This color complements dark skin beautifully, offering a unique and trendy option that stands out without being overly flashy.

Consumables:
-
- Base Color: Essie Nail Polish in “Take A Hike”
- Top Coat: Essie Matte About You Top Coat
- Shimmer Effect: Kiara Sky Sprinkle-On Glitter in “Green”
- Tools: Nail buffer, sponge
DIY Instructions:
-
- Prep the Nails: Clean, file, and shape your nails. Apply a base coat.
- Apply the Base Color: Paint two coats of the olive polish, allowing each coat to dry.
- Add Shimmer: Use a sponge to dab on the fine shimmer glitter lightly.
- Finish with Top Coat: Seal the design with a matte top coat to achieve the final look.
Cool Blue Coffin Nails
These vibrant blue coffin nails are a bold and stylish choice, perfect for making a statement this fall. The cool blue shade is eye-catching and contrasts beautifully with darker skin tones, creating a striking and trendy appearance. The glossy finish enhances the overall look, making these nails perfect for those who love to stand out.

Consumables:
-
- Base Color: OPI Nail Lacquer in “No Room For The Blues”
- Top Coat: Seche Vite Fast Dry Top Coat
- Tools: Nail file, buffer, cuticle pusher
DIY Instructions:
-
- Prepare the Nails: Start by filing and shaping the nails into a coffin shape. Push back the cuticles.
- Apply the Base Color: Apply two even coats of the vibrant blue polish.
- Finish with Top Coat: Use a glossy top coat to seal the color and add a shiny finish.
Soft Nude Elegance
This soft nude nail design is a timeless and classic choice, perfect for any occasion. The neutral color enhances the natural beauty of the nails, offering a subtle and sophisticated look. This design is particularly flattering on dark skin tones, as it provides a clean and polished appearance without being too bold.

Consumables:
-
- Base Color: Zoya Nail Polish in “Chantal”
- Top Coat: Sally Hansen Insta-Dri Top Coat
- Tools: Nail file, buffer, cuticle trimmer
DIY Instructions:
-
- Prep the Nails: File and shape the nails, then clean the surface.
- Apply the Base Color: Apply two coats of the nude polish, letting each layer dry completely.
- Finish with Top Coat: Seal with a top coat to ensure a long-lasting and glossy finish.
Olive Green with Gold Accents
These stunning stiletto nails feature a rich olive green base with intricate gold accents and rhinestones, creating a luxurious and glamorous look. The combination of matte and glossy finishes, along with the detailed designs, makes this a perfect choice for special occasions or when you want to add a touch of elegance to your style. This bold design is sure to turn heads and make a statement.

Consumables:
-
- Base Color: OPI Nail Lacquer in “Olive For Green”
- Gold Accents: Gold foil and rhinestones
- Top Coat: Essie Matte About You Top Coat
- Tools: Nail art brush, dotting tool, tweezers
DIY Instructions:
-
- Prepare the Nails: Shape the nails into a stiletto shape and clean the surface.
- Apply the Base Color: Use the olive polish as the base, applying two coats.
- Add Gold Accents: Use a nail art brush to apply gold foil and place rhinestones with tweezers.
- Finish with Top Coat: Seal the design with a matte top coat.
Red French Tips
A modern twist on the classic French manicure, these nails feature bright red tips on a nude base. The vibrant red adds a playful and chic element, making this design perfect for those who want a stylish yet simple look. This design works well on short nails and is a great way to incorporate color without overwhelming the overall appearance.

Consumables:
-
- Base Color: Essie Nail Polish in “Ballet Slippers”
- Red Tips: OPI Nail Lacquer in “Big Apple Red”
- Top Coat: Seche Vite Fast Dry Top Coat
- Tools: Nail art brush, striping tape
DIY Instructions:
-
- Prep the Nails: Start with clean, shaped nails. Apply a base coat.
- Apply the Base Color: Use a nude polish for the base, applying two coats.
- Create Red Tips: Use striping tape to outline the tips and apply the red polish.
- Finish with Top Coat: Seal the design with a glossy top coat.
Autumn Leaf Accents
These autumn-inspired nails feature a combination of warm orange tones and clear nail accents adorned with tiny fall leaves. The design captures the essence of the season, bringing a cozy and festive vibe. The mix of solid color and transparent elements adds depth and interest, making this manicure perfect for celebrating the changing seasons. The gold foil and glitter accents enhance the overall look, adding a touch of glamour.

Consumables:
-
- Base Color: Essie Nail Polish in “Playing Koi”
- Gold Foil: Nail art foil
- Leaf Decals: Nail stickers in autumn colors
- Top Coat: Sally Hansen Insta-Dri Top Coat
- Tools: Nail art brush, tweezers
DIY Instructions:
-
- Prep the Nails: File and shape the nails, then clean the surface.
- Apply the Base Color: Paint two nails with the solid orange and two with a clear base.
- Add Accents: Use tweezers to place leaf decals and gold foil on the clear nails.
- Seal the Look: Finish with a top coat to protect the design.
Earthy Marble Tones
This design features a beautiful mix of earthy tones and marble effects, perfect for a sophisticated and understated fall look. The combination of nude, brown, and cream colors creates a natural and elegant palette. The marble effect adds a modern twist, making these nails versatile for both casual and formal settings. The design is particularly flattering on dark skin, providing a subtle yet stylish contrast.

Consumables:
-
- Base Colors: OPI Nail Lacquer in “Dulce de Leche,” “Chocolate Moose,” and “Taupe-less Beach”
- Marble Effect: Acrylic paint in white and brown
- Top Coat: Essie Gel Couture Top Coat
- Tools: Nail art brush, sponge, toothpick
DIY Instructions:
-
- Prep the Nails: Start by filing and shaping the nails, then clean them.
- Apply the Base Colors: Paint each nail with a different shade from the palette.
- Create the Marble Effect: Use a thin brush or a toothpick to swirl the acrylic paint over the nails for a marble finish.
- Finish with Top Coat: Seal the design with a top coat.
Evil Eye Design
These nails feature a bold evil eye design, blending various shades of blue and intricate patterns. The evil eye symbol is not only a popular cultural motif but also a stylish choice for nail art. The design incorporates a mix of solid blue, marble effects, and 3D embellishments, creating a dynamic and eye-catching look. This manicure is perfect for those who love to express their individuality and appreciate unique designs.

Consumables:
-
- Base Color: Essie Nail Polish in “Blanc”
- Blue Shades: OPI Nail Lacquer in “No Room For The Blues” and “Blue My Mind”
- Embellishments: Blue rhinestones and evil eye decals
- Top Coat: Seche Vite Fast Dry Top Coat
- Tools: Nail art brush, dotting tool, tweezers
DIY Instructions:
-
- Prep the Nails: File and shape the nails, then clean the surface.
- Apply the Base Colors: Use the white polish as a base and add blue accents.
- Add Evil Eye Designs: Place decals and rhinestones using tweezers, arranging them artistically.
- Seal the Design: Finish with a top coat to keep the embellishments in place.
Mint Green French Tips
A fresh take on the classic French manicure, these nails feature mint green tips on a soft pink base. The pastel color adds a playful and modern twist, making this design perfect for spring or summer. The subtle yet vibrant mint green complements the natural pink, creating a chic and clean look. This design is great for those who prefer a simple yet stylish manicure.

Consumables:
-
- Base Color: OPI Nail Lacquer in “Bubble Bath”
- Tip Color: Essie Nail Polish in “Mint Candy Apple”
- Top Coat: Sally Hansen Miracle Gel Top Coat
- Tools: Striping tape, nail art brush
DIY Instructions:
-
- Prep the Nails: File and shape the nails, clean and push back the cuticles.
- Apply the Base Color: Paint the nails with a soft pink base, letting it dry completely.
- Create the French Tips: Use striping tape to outline the tips and apply the mint green polish.
- Finish with Top Coat: Seal the design with a top coat for a glossy finish.
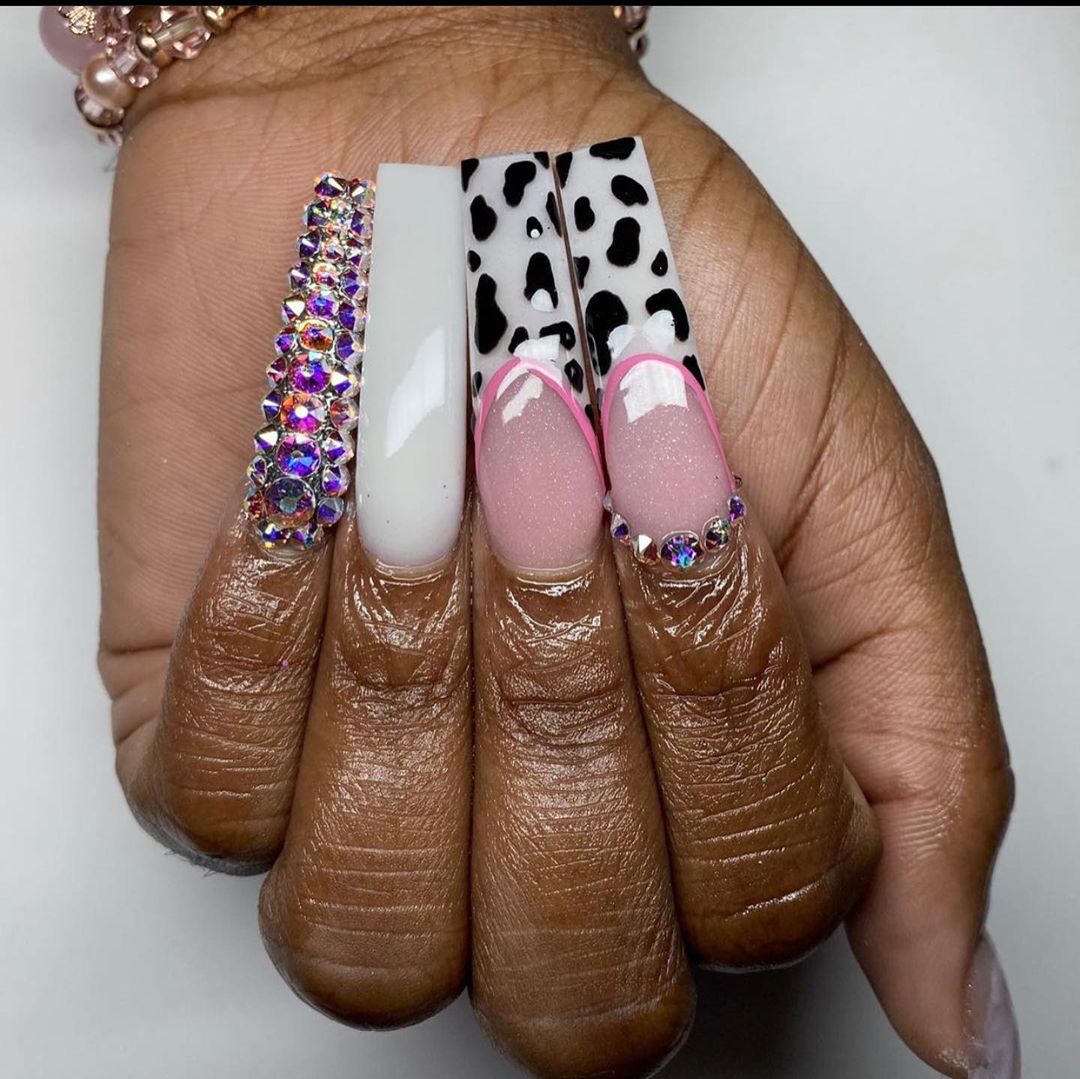
Bold Mix and Match
This nail design is a striking mix of different styles, including rhinestones, animal prints, and bold colors. The combination of textures and patterns creates a unique and eye-catching look, perfect for those who love to experiment with their nail art. The design features a vibrant pink French tip, a rhinestone-covered nail, a white nail with black spots, and a nude nail with pink accents. This eclectic mix is ideal for making a bold statement.

Consumables:
-
- Base Colors: OPI Nail Lacquer in “Alpine Snow” and “Mod About You”
- Rhinestones: Various sizes and colors
- Top Coat: INM Out the Door Top Coat
- Tools: Nail art brush, rhinestone picker, tweezers
DIY Instructions:
-
- Prep the Nails: Clean, file, and shape the nails, then apply a base coat.
- Apply the Base Colors: Use different colors and patterns on each nail.
- Add Rhinestones and Designs: Place rhinestones and create animal prints using a nail art brush.
- Finish with Top Coat: Seal the design with a top coat to protect the rhinestones and polish.
Delicate Floral French Tips
These delicate French tips feature a clear base with intricate floral designs, creating a soft and elegant look. The clear base adds a modern twist, while the floral accents bring a touch of femininity and grace. This design is perfect for weddings, special occasions, or simply adding a bit of elegance to your everyday style. The mix of blue and gold flowers adds a subtle yet beautiful detail that complements the overall look.

Consumables:
-
- Base Color: Essie Nail Polish in “Ballet Slippers”
- Floral Accents: Blue and gold nail decals
- Top Coat: Essie Gel Couture Top Coat
- Tools: Nail art brush, tweezers
DIY Instructions:
-
- Prep the Nails: File and shape the nails, then clean the surface.
- Apply the Base Color: Paint a clear or nude base on the nails.
- Add Floral Designs: Use tweezers to place the floral decals on the tips.
- Seal the Look: Finish with a top coat to protect the design.
Save Pin
