
21 Sparkle Nail Colors: Glitter, Ombre, and Matte Ideas for Every Occasion
When it comes to nail art, sparkle nail colors have a way of transforming any manicure into a show-stopping statement. Whether you’re looking to add a touch of glam to your everyday look or want something that will dazzle at a special event, there’s a sparkle nail design for everyone. In this article, I’ll dive into some of the most stunning sparkle nail ideas, providing you with detailed descriptions and practical advice on how to achieve each look at home. Let’s explore the world of glitter and shine!
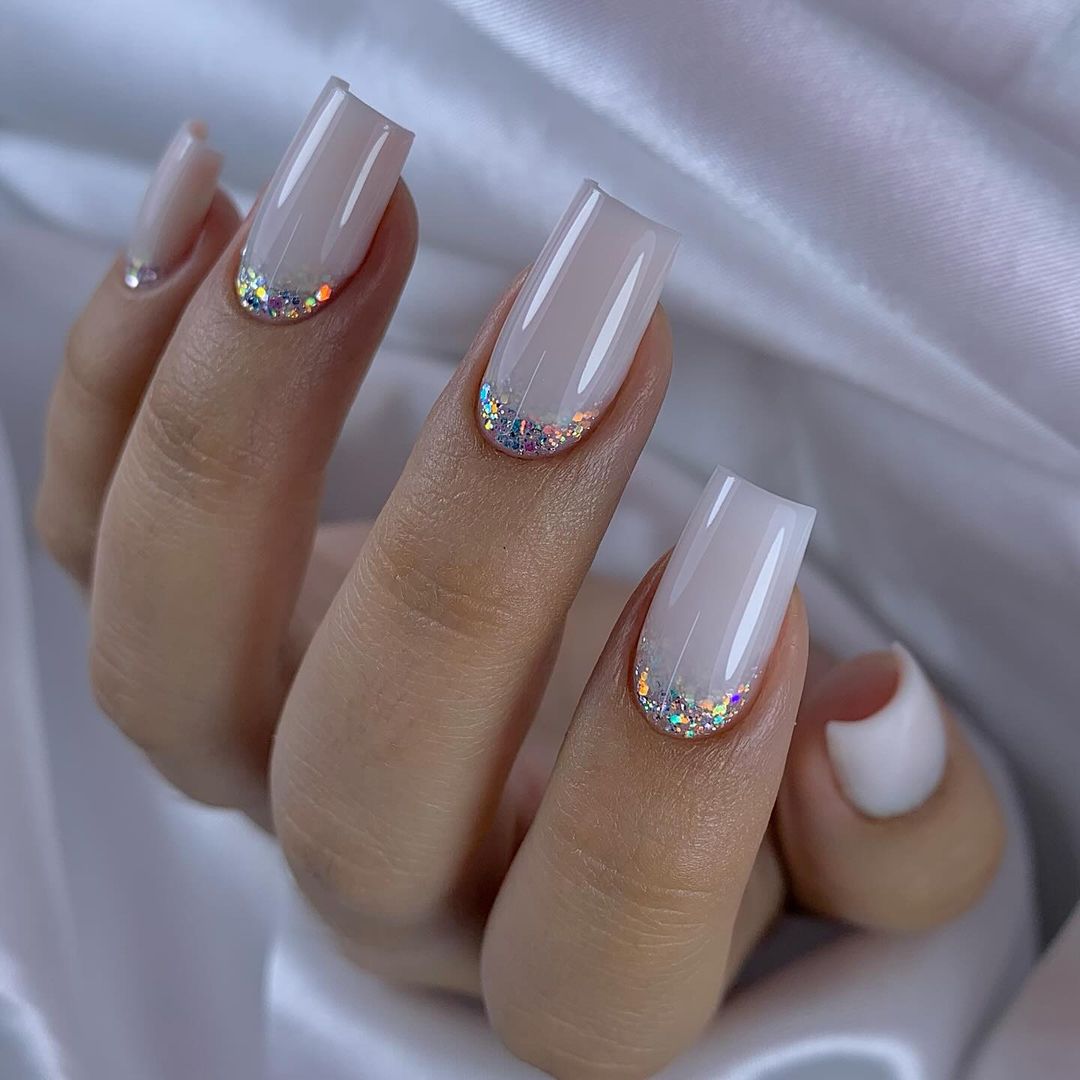
Subtle Yet Stunning Sparkle
If you’re a fan of minimalistic elegance, this design is perfect for you. These nails feature a light blue base with delicate glitter accents concentrated towards the tips. The transition from the clear base to the glittery tips creates a champagne shimmer that is both subtle and striking. This manicure is ideal for those who want a hint of sparkle without going overboard.

Consumables:
- Light blue nail polish: Essie’s “Bikini So Teeny”
- Fine champagne glitter: OPI Glitter Off
- Top coat: Seche Vite Dry Fast Top Coat
DIY Instructions:
- Start with a clear base coat to protect your nails.
- Apply two coats of light blue polish, allowing each coat to dry fully.
- Use a fine brush to apply the champagne glitter to the tips of your nails.
- Seal the look with a glossy top coat, ensuring the glitter stays in place.
Twilight Glitter French Tips
For a more dramatic look, these nails combine the timeless elegance of French tips with the allure of twilight glitter. The black glittery tips add a bold contrast to the natural nail base, making this design both classic and modern. Perfect for evening events, this black and silver combo is sure to turn heads.

Consumables:
- Base coat: DND Gel Base
- Black glitter polish: OPI “Black Onyx”
- Fine silver glitter: Ciaté London’s “Celestial”
- Top coat: CND Vinylux Long Wear Top Coat
DIY Instructions:
- Apply a base coat to all nails and let it dry completely.
- Paint the tips with black glitter polish using a French tip guide for precision.
- Add a touch of silver glitter over the black tips for added depth.
- Finish with a long-lasting top coat to enhance the shine and protect your nails.
Marble Blue and Gold Elegance
This nail design is a work of art, blending blue marble with accents of gold foil. The combination of these two elements creates a luxurious and unique look that is perfect for anyone looking to make a statement. The blue hues are deep and rich, while the gold adds a touch of opulence. This design is ideal for those who love intricate nail art.

Consumables:
- Blue marble polish: Sally Hansen’s “Blue Streak”
- Gold foil flakes: Gold Leaf Gilding Flakes
- Clear top coat: Essie Gel Couture Top Coat
DIY Instructions:
- Apply a clear base coat to protect your nails.
- Use a detail brush to create blue marble patterns on each nail.
- While the polish is still tacky, carefully place gold foil flakes on the desired areas.
- Finish with a thick layer of top coat to seal in the design and add a glossy finish.
Glittering Pink Elegance
For those who prefer a more feminine touch, these pink sparkle nails are an excellent choice. The hot pink base is complemented by multicolored glitter, creating a playful yet sophisticated look. The glitter is dispersed throughout the nails, making them sparkle from every angle. This design is perfect for a fun night out or a festive occasion.

Consumables:
- Hot pink nail polish: China Glaze “Strawberry Fields”
- Multicolored glitter: Sinful Colors “Pink Forever”
- Top coat: OPI Nail Lacquer Top Coat
DIY Instructions:
- Start with a base coat to prepare your nails.
- Apply two coats of hot pink polish, allowing each coat to dry thoroughly.
- Add the multicolored glitter to the entire nail surface for a full sparkle effect.
- Seal the look with a glossy top coat to enhance the shine and longevity of your manicure.
Simple Yet Shiny French Ombre
This simple yet elegant French ombre design incorporates a blend of white and silver glitter, creating a seamless transition from natural nails to a sparkling tip. The silver glitter adds just the right amount of sparkle, making it perfect for both everyday wear and special occasions. The result is a timeless look with a modern twist.

Consumables:
- Base coat: Zoya Naked Manicure Base
- White nail polish: OPI “Alpine Snow”
- Silver glitter: Sally Hansen “Disco Ball”
- Top coat: Revlon Quick Dry Top Coat
DIY Instructions:
- Apply a base coat to protect your nails and ensure even application.
- Paint a gradient ombre effect starting with white at the base, fading into silver glitter at the tips.
- Blend the colors using a sponge for a smooth transition.
- Finish with a top coat to lock in the design and add a glossy finish.
Fresh and Fun Light Blue Sparkle
This light blue nail design is a perfect blend of soft color and striking sparkle. The nails feature a light blue polish on three fingers, while the ring finger showcases a pink base with a diagonal sweep of silver glitter. The overall effect is fresh and playful, making it an ideal choice for a casual day out or a weekend brunch.

Consumables:
- Light blue nail polish: Essie’s “Bikini So Teeny”
- Pink base polish: OPI “Bubble Bath”
- Silver glitter polish: China Glaze “Fairy Dust”
- Top coat: Sally Hansen Miracle Gel Top Coat
DIY Instructions:
- Begin with a clear base coat to ensure smooth application.
- Apply two coats of light blue polish on the thumb, index, and middle fingers.
- On the ring finger, apply two coats of pink polish and allow it to dry.
- Use a fine brush to create a diagonal sweep of silver glitter on the pink nail.
- Seal with a top coat for added shine and durability.
Iridescent Gold Glamour
This design is all about luxurious shine and intricate detail. The nails are coated with an iridescent polish that shifts between pink and gold, creating a stunning holographic effect. To add to the glamour, one nail is adorned with sparkling rhinestones, and another features a delicate gold swirl, adding dimension and elegance.

Consumables:
- Iridescent nail polish: ILNP “The Magician”
- Gold striping tape: Kiss Gold Striping Tape
- Rhinestones: Swarovski Nail Crystals
- Top coat: Seche Vite Dry Fast Top Coat
DIY Instructions:
- Apply a base coat to all nails to protect your natural nail.
- Paint each nail with the iridescent polish, allowing each layer to dry completely.
- Use gold striping tape to create a swirl pattern on the accent nail.
- Place rhinestones on one nail for added sparkle.
- Seal with a top coat to secure the design and enhance the shine.
Teal Glitter with Floral Accent
This manicure features a stunning teal glitter polish that commands attention. The accent nail on the ring finger introduces a delicate floral design on a pink base, creating a beautiful contrast. The combination of glitter and soft florals makes this design both bold and feminine, perfect for those who love a touch of nature in their nail art.

Consumables:
- Teal glitter polish: Zoya “Dream”
- Pink base polish: OPI “Mod About You”
- Floral nail stickers: Maniology Floral Nail Stickers
- Top coat: CND Vinylux Weekly Top Coat
DIY Instructions:
- Start with a clear base coat on all nails.
- Apply two coats of teal glitter polish to all nails except the ring finger.
- On the ring finger, apply two coats of pink polish and allow it to dry.
- Apply floral nail stickers to the pink nail and press down firmly.
- Finish with a top coat to protect the design and add a glossy finish.
Rainbow and Glitter Delight
This design is all about fun and creativity. The nails feature a mix of rainbow ombre, glitter, and rhinestone accents, making them a true standout. The rainbow ombre effect is bright and cheerful, while the glitter adds just the right amount of sparkle. This design is perfect for those who love to express their personality through their nails.

Consumables:
- White base polish: Essie “Blanc”
- Rainbow ombre polish: Color Club “Rainbow Bright”
- Silver glitter: OPI “Crown Me Already!”
- Rhinestones: Swarovski Nail Crystals
- Top coat: Essie Gel Couture Top Coat
DIY Instructions:
- Apply a clear base coat to all nails.
- Create the rainbow ombre effect using a sponge, blending colors smoothly.
- Apply silver glitter to the pinky nail and accent nails.
- Add rhinestones along the cuticle line for extra sparkle.
- Seal with a top coat to lock in the design and add shine.
Rich Burgundy with a Hint of Sparkle
This nail design is sophisticated and rich, featuring a deep burgundy base with a subtle hint of silver glitter. The color is bold yet elegant, making it perfect for any formal occasion or a night out. The glitter is kept minimal, allowing the rich color to be the star of the show.

Consumables:
- Burgundy nail polish: OPI “Malaga Wine”
- Fine silver glitter: Sinful Colors “Queen of Beauty”
- Top coat: Revlon Quick Dry Top Coat
DIY Instructions:
- Start with a base coat to protect your nails.
- Apply two coats of burgundy polish, allowing each coat to dry fully.
- Lightly dust silver glitter on the tips of the nails for a subtle sparkle effect.
- Seal with a top coat to enhance the color and keep the glitter in place.
Elegant Black Glitter and French Twist
This manicure offers a sophisticated blend of classic French tips with a bold twist. The design features a black glitter accent nail paired with white and black diagonal French tips on the remaining nails. The black glitter polish adds depth and dimension, making this design perfect for a night out or a formal event. The sharp contrast between the black and white gives a modern edge to the traditional French manicure.

Consumables:
- Black glitter polish: China Glaze “Liquid Leather”
- White polish: OPI “Alpine Snow”
- Nail striping tape for clean lines
- Top coat: Essie Gel Couture Top Coat
DIY Instructions:
- Start with a base coat to protect your nails.
- Apply white polish to the nails, leaving the accent nail bare.
- Use nail striping tape to create diagonal lines on the tips and paint the tips with black polish.
- Paint the accent nail with black glitter polish.
- Finish with a top coat to seal the design and add shine.
Mint Green and Pink Glitter Ombre
This manicure is a fresh and fun take on ombre with a mint green base transitioning into pink glitter tips. The combination of green and pink creates a vibrant, youthful look that’s perfect for spring and summer. The soft green tones are balanced by the playful pink glitter, making this design both eye-catching and stylish.

Consumables:
- Mint green polish: Sally Hansen “Mint Sorbet”
- Pink glitter polish: Zoya “Aphrodite”
- Makeup sponge for ombre effect
- Top coat: OPI Nail Lacquer Top Coat
DIY Instructions:
- Apply a base coat to all nails.
- Paint the nails with mint green polish and allow to dry completely.
- Use a makeup sponge to dab pink glitter on the tips, creating an ombre effect.
- Finish with a top coat to blend the colors smoothly and add durability.
Sparkling Champagne Ombre
This elegant design features a champagne glitter ombre that fades seamlessly from the natural nail bed. The subtle shimmer of the champagne color gives the nails a refined and sophisticated look, making them perfect for any formal occasion. The glitter adds just the right amount of sparkle, ensuring that your nails catch the light from every angle.

Consumables:
- Base coat: Orly Bonder Base Coat
- Champagne glitter polish: Deborah Lippmann “Glitter and Be Gay”
- Top coat: Seche Vite Dry Fast Top Coat
DIY Instructions:
- Start with a base coat on all nails.
- Apply champagne glitter polish starting from the tips and fading downwards.
- Use a sponge to blend the glitter for a smooth ombre effect.
- Finish with a top coat to secure the design and add shine.
Pink and Purple Glitter Explosion
For those who love a bit of drama, this pink and purple glitter design is the way to go. The nails feature a clear base with chunky purple and pink glitter, creating a confetti-like effect that’s perfect for a celebration. The mix of different-sized glitter pieces gives the nails depth and texture, making them a fun choice for parties and festive events.

Consumables:
- Clear base polish: Essie “Ballet Slippers”
- Pink and purple glitter: Sinful Colors “I Miss You”
- Top coat: Revlon Ultra HD Snap Top Coat
DIY Instructions:
- Apply a clear base coat to all nails.
- Use a fan brush to apply pink and purple glitter across the nails, focusing on the accent nail.
- Seal with a top coat to keep the glitter in place and add a glossy finish.
Chic White and Gold Sparkle
This manicure is the epitome of chic, featuring white nails with gold accents. The design is simple yet elegant, with subtle gold details along the cuticle line and a hint of sparkle on the accent nail. This white and gold combination is perfect for a sophisticated event or even as a wedding manicure, offering a timeless and polished look.

Consumables:
- White polish: OPI “Funny Bunny”
- Gold nail foil: Foil It “Gold Leaf”
- Top coat: Zoya Armor Top Coat
DIY Instructions:
- Apply a base coat to all nails.
- Paint all nails with white polish and allow to dry.
- Use gold foil along the cuticle line for a delicate accent.
- Apply gold glitter on the accent nail for added sparkle.
- Finish with a top coat to protect the design and add a high-gloss finish.
Playful Pink Glitter with Star Accents
This manicure brings a playful twist to a classic pink design. The hot pink glitter is applied in an abstract, wavy pattern at the tips of the nails, creating a fun and carefree look. Tiny star accents and colorful dots add a whimsical touch, making this design perfect for someone who loves a bit of flair and personality in their nails.

Consumables:
- Pink glitter polish: Zoya “Aster”
- Star nail stickers: Born Pretty Star Stickers
- Colorful nail gems: Swarovski Nail Art Gems
- Top coat: Essie Gel Couture Top Coat
DIY Instructions:
- Start with a clear base coat on all nails.
- Apply a thin layer of pink glitter polish to the tips, allowing it to dry.
- Add star stickers and colorful gems randomly across the nails.
- Seal the design with a top coat to keep the decorations in place and add shine.
Black and Holographic Glitter Glam
This bold design contrasts black polish with holographic glitter, creating a striking and glamorous look. The black nails exude sophistication, while the accent nails, covered in chunky holographic glitter, add a dazzling effect. This design is perfect for a night out or any occasion where you want your nails to stand out.

Consumables:
- Black polish: OPI “Black Onyx”
- Holographic glitter polish: China Glaze “Fairy Dust”
- Rhinestones: Swarovski Crystal Pixie
- Top coat: CND Vinylux Long Wear Top Coat
DIY Instructions:
- Apply a base coat to protect your nails.
- Paint three nails with black polish and allow to dry.
- Apply the holographic glitter polish to the remaining nails, layering for intensity.
- Add rhinestones to the black nails for an extra touch of glam.
- Seal with a top coat to secure the design and add a glossy finish.
Pearlescent Pink and Gold Fantasy
This luxurious nail design features pearl and gold elements that create a dreamlike, fantasy-inspired look. The nails are coated with a pearlescent pink polish, adorned with intricate gold accents and embellishments like pearls and seashells. The result is a manicure that feels both ethereal and regal, perfect for someone who loves to indulge in detailed, artistic designs.

Consumables:
- Pearlescent pink polish: Essie “Pearl Perfection”
- Gold foil: Gold Leaf Gilding Flakes
- Pearl nail embellishments: Mia Secret Pearl Nail Art Kit
- Top coat: OPI Gel Top Coat
DIY Instructions:
- Begin with a base coat to protect your nails.
- Apply two coats of pearlescent pink polish for a smooth, even finish.
- Use tweezers to place gold foil and pearl embellishments on the nails.
- Seal with a top coat to keep everything in place and add a high-shine finish.
Sleek Black French Tips with Silver Glitter
This design combines the classic French manicure with a sleek, modern twist. The nails feature black tips contrasted by a nude base, with a subtle silver glitter accent at the cuticle. The result is a sophisticated and polished look that’s perfect for any occasion, whether casual or formal.

Consumables:
- Black polish: DND “Black Licorice”
- Silver glitter: OPI “I Snow You Love Me”
- Nude base polish: Essie “Mademoiselle”
- Top coat: Sally Hansen Miracle Gel Top Coat
DIY Instructions:
- Apply a base coat to protect your nails.
- Paint the tips with black polish, using a guide for precision.
- Add a line of silver glitter at the cuticle line for a subtle sparkle.
- Finish with a top coat to enhance the shine and protect the design.
Purple Glitter French with Ombre Accent
This design is perfect for those who love a touch of purple. The nails feature a purple glitter French tip with an ombre effect that adds depth and dimension. The accent nail, with a smooth transition from nude to purple glitter, brings a unique twist to the traditional French manicure, making it both chic and trendy.

Consumables:
- Purple glitter polish: Zoya “Aurora”
- Nude base polish: Essie “Ballet Slippers”
- Ombre sponge: Beauty Secrets Cosmetic Wedges
- Top coat: CND Vinylux Weekly Top Coat
DIY Instructions:
- Apply a base coat on all nails.
- Create a purple glitter French tip using a fine brush or guide.
- For the accent nail, use a sponge to blend the purple glitter into the nude base, creating an ombre effect.
- Finish with a top coat to seal in the design and add a glossy finish.
Gold Foil and Deep Blue Contrast
This manicure features a deep blue polish contrasted with gold foil accents, creating a luxurious and sophisticated look. The deep blue brings intensity, while the gold foil adds a touch of opulence. This design is perfect for making a statement and works well for both everyday wear and special occasions.

Consumables:
- Deep blue polish: OPI “Russian Navy”
- Gold foil: Born Pretty Gold Leaf Flakes
- Top coat: Seche Vite Dry Fast Top Coat
DIY Instructions:
- Apply a base coat to all nails.
- Paint one or two nails with the deep blue polish and allow to dry.
- On the remaining nails, apply gold foil to create a textured, luxurious look.
- Seal with a top coat to protect the foil and enhance the shine.
Save Pin
