
21 Stunning Ideas Goth Fall Nail Designs for a Dark and Elegant Autumn Look
As the leaves turn and the air gets crisper, our nail aesthetics should reflect the deep, moody vibes of fall. Goth fall nails are the perfect way to combine seasonal colors with edgy, dark designs. Whether you’re a fan of intricate nail art or prefer something more understated, this guide will help you find the perfect goth fall nails to match your style. Let’s dive into these captivating nail designs, each unique and ideal for the autumn season.
Gothic French Tips with Black Flames
The first design features a gothic twist on the classic French manicure. The nails are painted a nude base color with black flames creeping up from the tips. This design combines the elegance of a French tip with the dark, edgy vibe of goth aesthetics. The black flames add a dynamic element, making the nails appear as if they’re on fire.

Consumables and Recommendations
- Nude Nail Polish: Try Essie’s “Ballet Slippers” for a soft, neutral base.
- Black Nail Polish: OPI’s “Black Onyx” is perfect for the flames.
- Thin Nail Art Brush: Essential for drawing precise flame details.
- Top Coat: Seche Vite for a glossy, long-lasting finish.
How to Create This Design at Home
- Prep Your Nails: Clean, trim, and file your nails to the desired shape.
- Apply Base Coat: Start with a clear base coat to protect your nails.
- Nude Polish: Apply two coats of nude polish and let it dry completely.
- Draw Flames: Using a thin nail art brush dipped in black polish, draw flame shapes starting from the tips.
- Top Coat: Seal your design with a glossy top coat.
Black and Purple Gothic Hearts
This design features a stunning combination of black and purple shades with intricate heart shapes and gothic detailing. The nails are a blend of matte and glossy finishes, creating a multi-dimensional effect. Some nails have black hearts with a purple glitter background, while others are adorned with delicate silver accents.

Consumables and Recommendations
- Black Nail Polish: Essie’s “Licorice” for a deep black base.
- Purple Glitter Polish: China Glaze’s “Purple Panic” for sparkling accents.
- Silver Nail Art Pen: Ideal for adding fine details.
- Matte Top Coat: For a mix of matte and glossy finishes.
How to Create This Design at Home
- Prep and Base Coat: Prepare your nails and apply a base coat.
- Black Base: Apply two coats of black polish on all nails.
- Purple Glitter: On selected nails, apply purple glitter polish.
- Draw Hearts: Use a nail art pen to draw hearts and other gothic details.
- Finish: Use a matte top coat on some nails and a glossy one on others.
Iridescent Gothic Moons
This mesmerizing design features iridescent polish with black crescent moons. The iridescent base shifts colors in different lighting, giving a magical, otherworldly effect. The black moons add a gothic touch, making this design perfect for fall nights.
Consumables and Recommendations
- Iridescent Nail Polish: ILNP’s “Luna” for a holographic effect.
- Black Nail Polish: Zoya’s “Willa” for the moons.
- Moon Stencils: Helpful for precise shapes.
- Top Coat: For a protective, shiny finish.
How to Create This Design at Home
- Prep and Base Coat: Start with clean nails and a base coat.
- Iridescent Polish: Apply two coats of iridescent polish.
- Moon Stencils: Place stencils on nails and fill in with black polish.
- Remove Stencils: Carefully peel off stencils to reveal moons.
- Top Coat: Seal with a top coat for durability.
Spiderweb Gothic Nails
These nails feature delicate black spiderwebs on a gradient purple and black base. The spiderwebs add a spooky yet sophisticated touch, perfect for Halloween or any fall occasion. The gradient effect enhances the overall depth of the design.

Consumables and Recommendations
- Gradient Sponge: For creating a smooth gradient.
- Purple Nail Polish: Orly’s “Lola” for a vibrant base.
- Black Nail Polish: Sally Hansen’s “Black Out” for webs.
- Fine Nail Art Brush: Necessary for detailed spiderwebs.
- Top Coat: To protect your design.
How to Create This Design at Home
- Prep and Base Coat: Begin with a base coat.
- Gradient Effect: Use a sponge to apply purple and black polish in a gradient.
- Draw Webs: With a fine brush, draw spiderwebs over the gradient.
- Top Coat: Apply a top coat to seal and protect.
Gothic Skeleton and Cross Nails
This intricate design showcases black and white nails adorned with skeletons, crosses, and gothic patterns. The details are bold and dramatic, making a statement for any goth fall look. The combination of black and white keeps the design classic yet striking.
Consumables and Recommendations
- White Nail Polish: OPI’s “Alpine Snow” for a crisp base.
- Black Nail Polish: Revlon’s “Blackest Black” for details.
- Nail Art Stickers: Convenient for adding skeletons and crosses.
- Top Coat: To ensure longevity and shine.
How to Create This Design at Home
- Prep and Base Coat: Prepare nails and apply a base coat.
- White Base: Apply two coats of white polish.
- Add Details: Use nail art stickers or freehand with a fine brush.
- Top Coat: Finish with a top coat to protect your design.
Creepy Crawly Centipede Nails
This design is not for the faint-hearted. The nails feature realistic centipedes crawling across a translucent base, creating a creepy yet captivating look. The centipedes are detailed with black and silver accents, making them stand out starkly against the nails. This design is perfect for those looking to make a bold, goth statement this fall.

Consumables and Recommendations
- Translucent Nail Polish: Essie’s “Sheer Fantasy” for a subtle base.
- Black Nail Polish: OPI’s “Black Onyx” for the centipedes.
- Silver Nail Art Pen: For adding metallic details to the centipedes.
- Nail Glue: To secure any 3D elements.
How to Create This Design at Home
- Prep and Base Coat: Start with clean nails and apply a base coat.
- Translucent Base: Apply two coats of translucent polish.
- Draw Centipedes: Using a black nail polish and a fine brush, draw centipedes.
- Add Details: Use a silver nail art pen to add metallic accents to the centipedes.
- Top Coat: Finish with a top coat to protect the design.
Armored Gothic Nails
These nails look like they belong to a gothic warrior. The design features metallic and black elements with 3D accents like swords and crosses. The high-shine chrome effect gives a futuristic yet dark vibe, making them perfect for those who want to stand out with their goth fall nails.

Consumables and Recommendations
- Chrome Nail Powder: Mirror powder for a reflective finish.
- Black Nail Polish: China Glaze’s “Liquid Leather” for the base.
- 3D Nail Charms: Swords, crosses, and other gothic elements.
- Nail Glue: For attaching the 3D elements securely.
How to Create This Design at Home
- Prep and Base Coat: Prepare your nails and apply a base coat.
- Apply Black Polish: Use black polish as the base color.
- Chrome Effect: Apply chrome nail powder over the black polish.
- Add 3D Elements: Securely glue on the 3D charms.
- Top Coat: Use a top coat to seal everything in place.
Dark Skull Art Nails
These nails are a work of art with detailed skull designs on a dark, smoky background. The intricate skulls are painted in shades of white and yellow, giving them a lifelike appearance. This design is perfect for those who appreciate detailed nail art and want to add a spooky touch to their fall look.

Consumables and Recommendations
- Dark Base Polish: OPI’s “Lincoln Park After Dark” for a smoky background.
- White and Yellow Nail Polish: For the skull details.
- Fine Nail Art Brush: Essential for painting detailed skulls.
- Top Coat: To protect the intricate design.
How to Create This Design at Home
- Prep and Base Coat: Clean and apply a base coat.
- Dark Base: Apply two coats of dark polish.
- Paint Skulls: Use white and yellow polish with a fine brush to paint the skulls.
- Top Coat: Seal the design with a top coat.
Blood Red and Black Gothic Nails
This striking design features blood-red nails with black tips and silver cross accents. The gradient from red to black adds depth, while the crosses give it a religious yet gothic feel. These nails are perfect for a dramatic and bold fall look.

Consumables and Recommendations
- Red Nail Polish: Essie’s “Really Red” for the base.
- Black Nail Polish: Zoya’s “Willa” for the tips.
- Silver Nail Charms: Crosses to add gothic accents.
- Nail Glue: To attach the charms.
- Top Coat: For a shiny finish.
How to Create This Design at Home
- Prep and Base Coat: Prepare nails and apply a base coat.
- Apply Red Polish: Use two coats of red polish.
- Gradient Tips: Apply black polish to the tips, creating a gradient effect.
- Add Crosses: Securely glue on the silver crosses.
- Top Coat: Seal with a top coat.
Lunar Gothic Nails
These nails feature a mystical lunar theme with black gradients, silver stars, and crescent moons. The design is subtle yet striking, perfect for those who want a more understated goth look. The combination of black and silver adds a touch of elegance to the overall design.

Consumables and Recommendations
- Nude Nail Polish: Essie’s “Topless & Barefoot” for the base.
- Black Nail Polish: OPI’s “Black Onyx” for the gradient.
- Silver Nail Art Pen: For drawing stars and moons.
- Top Coat: To protect the design.
How to Create This Design at Home
- Prep and Base Coat: Start with clean nails and apply a base coat.
- Nude Base: Apply two coats of nude polish.
- Black Gradient: Use a sponge to apply black polish, creating a gradient effect.
- Draw Stars and Moons: Use a silver nail art pen for the details.
- Top Coat: Seal the design with a top coat.
Red and Black Cross Nails
This nail design features a bold combination of red and black with metallic cross accents. The nails alternate between solid red and black bases, with some nails featuring intricate red line patterns over a nude base. The metallic cross charms add a striking focal point, making these nails perfect for a goth-inspired fall look.

Consumables and Recommendations
- Red Nail Polish: OPI’s “Big Apple Red” for a vibrant color.
- Black Nail Polish: Essie’s “Licorice” for a deep, dark base.
- Metallic Cross Charms: Available on Amazon or at specialty nail art stores.
- Nail Glue: To secure the metallic charms.
- Top Coat: Seche Vite for a glossy, protective finish.
How to Create This Design at Home
- Prep and Base Coat: Start with clean nails and apply a base coat.
- Apply Base Colors: Paint alternating nails with red and black polish.
- Line Patterns: Use a fine brush to create red line patterns over the nude base.
- Add Cross Charms: Secure the metallic crosses with nail glue.
- Top Coat: Seal the design with a top coat.
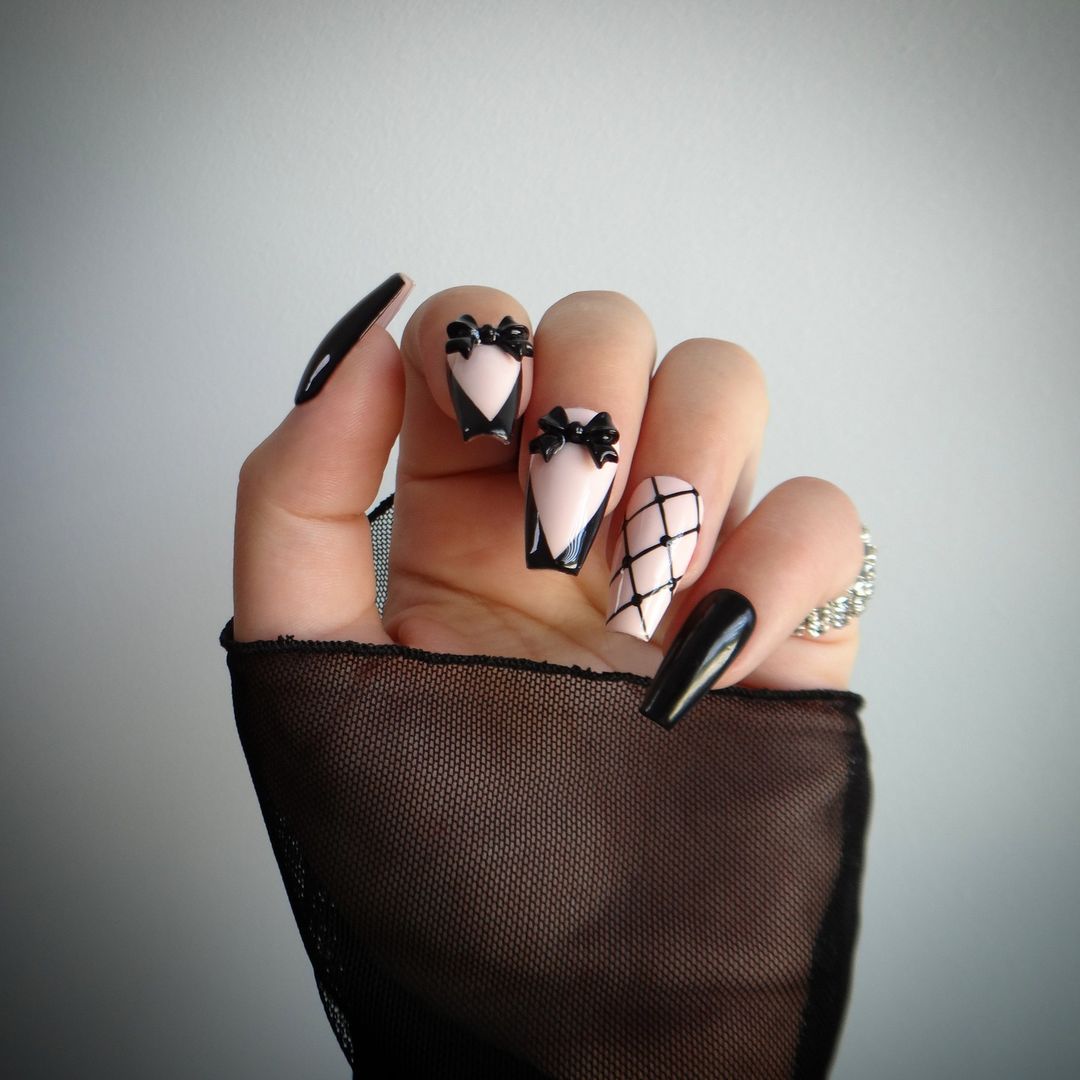
Black Lace and Bow Nails
This elegant design features nude nails with black lace and bow accents. The lace pattern adds a delicate, gothic touch, while the 3D bows provide a playful and cute element. The combination of matte and glossy finishes enhances the overall texture and depth of the design.

Consumables and Recommendations
- Nude Nail Polish: Essie’s “Topless & Barefoot” for a neutral base.
- Black Nail Polish: Sally Hansen’s “Black Heart” for details.
- Lace Nail Stickers: Easy to apply and perfect for intricate designs.
- 3D Bow Charms: Available at nail art stores or online.
- Top Coat: For a glossy finish.
How to Create This Design at Home
- Prep and Base Coat: Prepare nails and apply a base coat.
- Nude Base: Apply two coats of nude polish.
- Lace Pattern: Apply lace nail stickers to desired nails.
- Add Bows: Secure 3D bows with nail glue.
- Top Coat: Apply a top coat to protect the design.
Red and Black Rose Nails
This design features striking red and black nails adorned with delicate rose patterns. The red base is accentuated by black rose outlines, creating a bold and romantic gothic look. This design is perfect for fall and can be tailored to both short and long nail shapes.

Consumables and Recommendations
- Red Nail Polish: Essie’s “A List” for a rich red base.
- Black Nail Polish: OPI’s “Black Onyx” for detailing.
- Fine Nail Art Brush: For drawing precise rose patterns.
- Top Coat: To ensure a long-lasting finish.
How to Create This Design at Home
- Prep and Base Coat: Clean and apply a base coat.
- Red Base: Apply two coats of red polish.
- Draw Roses: Use a fine brush to draw black rose outlines on the red base.
- Top Coat: Seal with a top coat to protect the design.
Red Flames with Gold Accents
These nails feature a nude base with red flames and gold star accents. The flames add a fiery, dynamic touch, while the gold stars provide a touch of elegance. This design is perfect for those who want a bold yet classy goth look for the fall season.

Consumables and Recommendations
- Nude Nail Polish: OPI’s “Samoan Sand” for a neutral base.
- Red Nail Polish: Essie’s “Forever Yummy” for the flames.
- Gold Star Charms: Available at nail art stores.
- Nail Glue: For attaching the charms.
- Top Coat: For a glossy finish.
How to Create This Design at Home
- Prep and Base Coat: Start with clean nails and apply a base coat.
- Nude Base: Apply two coats of nude polish.
- Draw Flames: Use a fine brush to draw red flames.
- Add Gold Stars: Secure the gold star charms with nail glue.
- Top Coat: Apply a top coat to seal the design.
Snake and Flame Gothic Nails
This edgy design features translucent nails with metallic snake and flame patterns. The combination of the snake and flame elements creates a fierce and gothic look. The translucent base adds a subtle elegance, making this design perfect for both casual and formal fall occasions.

Consumables and Recommendations
- Translucent Nail Polish: Essie’s “Mademoiselle” for a sheer base.
- Metallic Nail Polish: OPI’s “Push and Shove” for the snake and flame details.
- Fine Nail Art Brush: For precise detailing.
- Top Coat: For a protective finish.
How to Create This Design at Home
- Prep and Base Coat: Clean and apply a base coat.
- Translucent Base: Apply two coats of translucent polish.
- Draw Patterns: Use a fine brush to draw metallic snake and flame patterns.
- Top Coat: Seal with a top coat to protect the design.
Monochrome Gothic Nails with Skull Accents
These nails showcase a monochrome color scheme with intricate black and white designs. The standout feature is the 3D skull accent on one nail, adding a striking gothic element. The combination of matte and glossy finishes creates a sophisticated, multi-dimensional look.

Consumables and Recommendations
- Black Nail Polish: Essie’s “Licorice” for a deep black base.
- White Nail Polish: OPI’s “Alpine Snow” for contrast.
- 3D Skull Charm: Available at specialty nail art stores.
- Matte Top Coat: For a matte finish on some nails.
- Glossy Top Coat: For a shiny finish on other nails.
How to Create This Design at Home
- Prep and Base Coat: Clean nails and apply a base coat.
- Base Colors: Paint alternating nails with black and white polish.
- Add Skull Accent: Secure the 3D skull charm with nail glue.
- Matte and Glossy Finishes: Apply matte top coat on some nails and glossy top coat on others.
Gothic French Tips with Skulls and Crosses
This design features a gothic twist on the classic French manicure, with white tips and detailed black skull and cross patterns. The nails have a nude base, making the intricate black designs stand out. This design is perfect for those who want a sophisticated yet edgy look.

Consumables and Recommendations
- Nude Nail Polish: Essie’s “Topless & Barefoot” for a neutral base.
- White Nail Polish: OPI’s “Alpine Snow” for the tips.
- Black Nail Polish: Sally Hansen’s “Black Heart” for details.
- Fine Nail Art Brush: For drawing detailed patterns.
- Top Coat: To protect the design.
How to Create This Design at Home
- Prep and Base Coat: Clean nails and apply a base coat.
- Nude Base: Apply two coats of nude polish.
- White Tips: Paint the tips of the nails white.
- Draw Details: Use a fine brush to draw black skulls and crosses.
- Top Coat: Seal with a top coat.
Metallic Hearts and Stripes
This design features a striking combination of metallic black and pink nails with heart and stripe patterns. The metallic finish adds a futuristic and edgy vibe, while the hearts provide a touch of softness. This design is perfect for those who want to add a bit of romance to their gothic nails.

Consumables and Recommendations
- Metallic Nail Polish: ILNP’s “Mega” for a reflective finish.
- Black Nail Polish: OPI’s “Black Onyx” for details.
- Pink Nail Polish: Essie’s “Fiji” for contrast.
- Fine Nail Art Brush: For drawing hearts and stripes.
- Top Coat: For a glossy finish.
How to Create This Design at Home
- Prep and Base Coat: Clean nails and apply a base coat.
- Base Colors: Apply metallic polish on some nails and pink polish on others.
- Draw Details: Use a fine brush to draw black hearts and stripes.
- Top Coat: Seal with a top coat.
Gothic Roses
This black nail design with black roses and studs creates a striking and elegant look. The detailed silver patterns stand out against the black base, adding sophistication and a gothic vibe perfect for fall.

Consumables and Recommendations
- Black Nail Polish: Essie’s “Licorice” for a deep black base.
- Silver Nail Polish: Sally Hansen’s “Celeb City” for detailing.
- Fine Nail Art Brush: Essential for drawing precise patterns.
- Top Coat: To protect the design.
How to Create This Design at Home
- Prep and Base Coat: Clean nails and apply a base coat.
- Black Base: Apply two coats of black polish.
- Draw Leaves and Thorns: Use a fine brush to draw silver patterns.
- Top Coat: Seal with a top coat.
Scorpions and Snakes
This nail design features nude nails with black scorpion and snake patterns, creating a spooky yet sophisticated look. The combination of creatures adds a gothic and mysterious vibe, perfect for the fall season.

Consumables and Recommendations
- Nude Nail Polish: OPI’s “Samoan Sand” for a neutral base.
- Black Nail Polish: Essie’s “Licorice” for details.
- Fine Nail Art Brush: For drawing intricate patterns.
- Top Coat: To protect the design.
How to Create This Design at Home
- Prep and Base Coat: Clean nails and apply a base coat.
- Nude Base: Apply two coats of nude polish.
- Draw Creatures: Use a fine brush to draw scorpions and snakes.
- Top Coat: Seal with a top coat.
Teal Spiderweb Nails
This design features teal nails with black spiderweb patterns, creating a stunning and vibrant look. The combination of teal and black is eye-catching and perfect for the fall season. The spiderwebs add a spooky yet stylish element to the design.

Consumables and Recommendations
- Teal Nail Polish: China Glaze’s “Turned Up Turquoise” for a vibrant base.
- Black Nail Polish: OPI’s “Black Onyx” for details.
- Fine Nail Art Brush: For drawing precise spiderwebs.
- Top Coat: For a glossy finish.
How to Create This Design at Home
- Prep and Base Coat: Clean nails and apply a base coat.
- Teal Base: Apply two coats of teal polish.
- Draw Spiderwebs: Use a fine brush to draw black spiderwebs.
- Top Coat: Seal with a top coat.
Save Pin
