
When it comes to choosing a nail color that transcends trends and seasons, mauve nail color stands out as a true classic. It’s that perfect blend of sophistication and subtlety, making it a favorite among both minimalist enthusiasts and those who love a bit of understated glamour. Whether you’re looking to refresh your manicure for the changing seasons or searching for that ideal shade for a special occasion, mauve offers endless possibilities. In this article, we’ll explore some of the most stunning mauve nail designs that you can try, each tailored to suit different styles, nail shapes, and personal preferences. From soft pastels perfect for spring to deeper, darker tones ideal for fall, these ideas will inspire your next manicure.
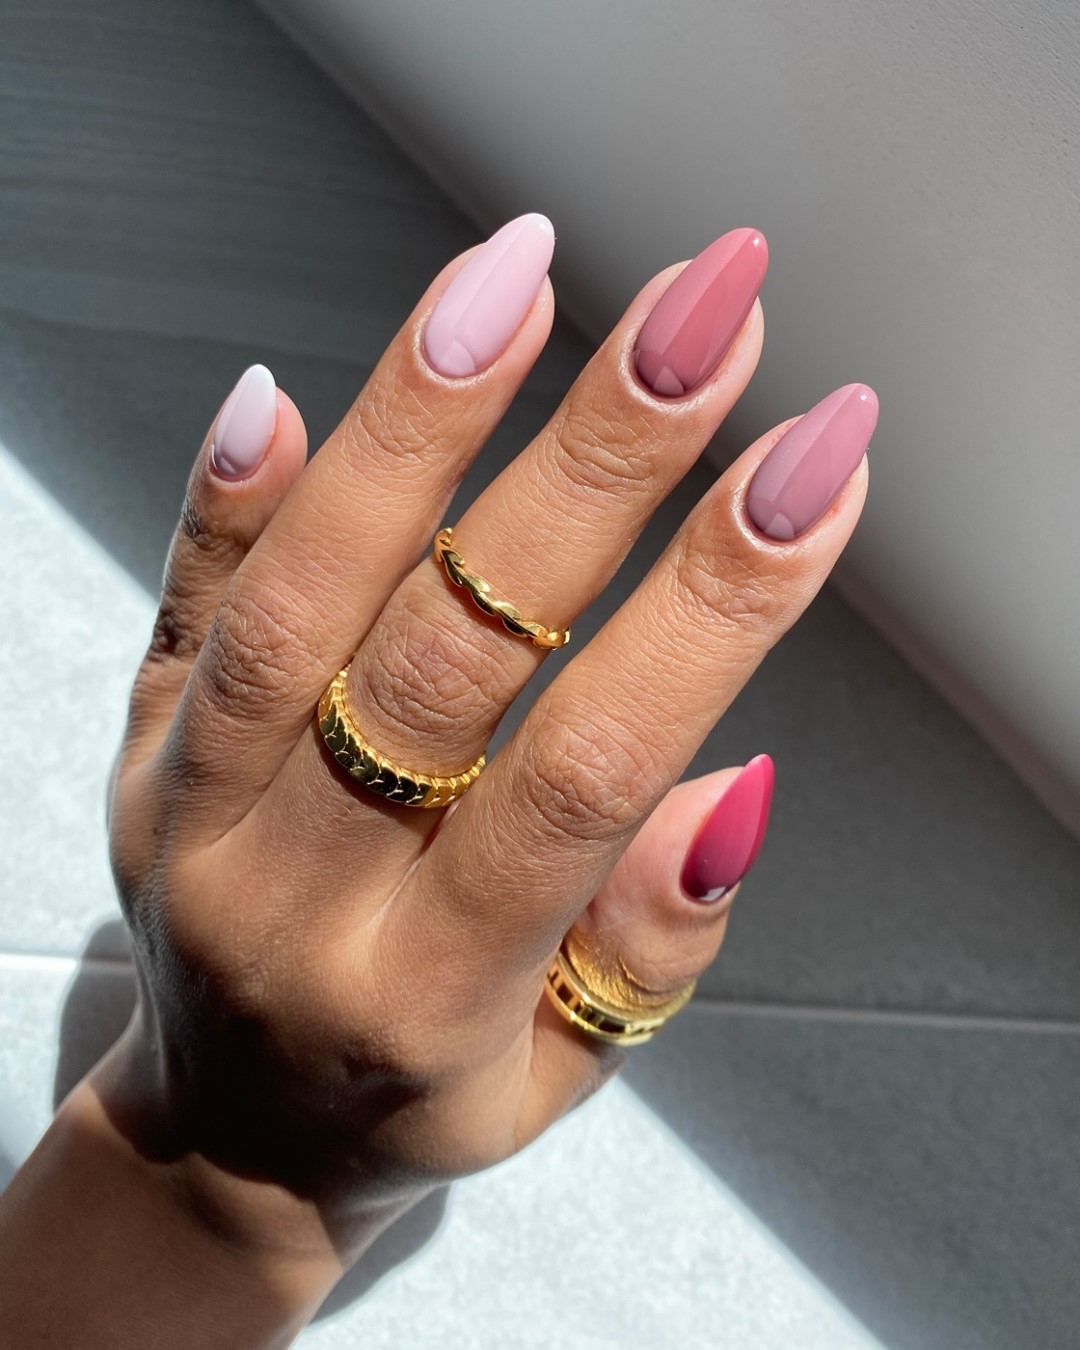
Glossy Mauve Nails with Subtle Ombre
This manicure showcases a stunning mauve nail color that transitions smoothly into a lighter shade towards the tips. The square-shaped nails are kept sleek and glossy, making them ideal for a sophisticated yet understated look. The subtle ombre effect adds depth and elegance, perfect for those who want a chic design that can be worn during any season.

Consumables:
-
- OPI GelColor in “Mauve On Over” for the base
- DND Gel in “Soft Lavender” for the gradient
- Sponge for blending
- CND Top Coat for a glossy finish
- Buffer Block for smoothing
How to Achieve this Look:
-
- Start by shaping the nails into a square using a Clair Nail File.
- Apply OPI GelColor in “Mauve On Over” as the base and cure under a UV lamp.
- Using a sponge, blend DND Gel in “Soft Lavender” towards the tips for a seamless gradient.
- Cure each layer and finish with CND Top Coat for a high-gloss finish.
Mauve Nails with Glitter and Floral Accents
This design combines mauve nail color with glitter and floral accents, creating a beautiful and feminine manicure. The mix of textures and patterns makes this look stand out, perfect for special occasions or everyday wear. The floral accent on a nude base adds a delicate touch, while the glitter enhances the overall design, making it both playful and elegant.

Consumables:
-
- OPI GelColor in “Mauve-olous Memories” for the base
- DND Gel in “Nude Pink” for the accent nail
- OPI Glitter Gel in “Sparkle Shine” for the glitter nail
- Floral Nail Decals for the floral design
- CND Top Coat for a glossy finish
How to Achieve this Look:
-
- Apply OPI GelColor in “Mauve-olous Memories” on most nails, leaving the accent nail nude.
- Apply DND Gel in “Nude Pink” on the accent nail and use floral decals to create the design.
- For the glitter nail, use OPI Glitter Gel in “Sparkle Shine”.
- Cure under a UV lamp and finish with CND Top Coat.
Minimalist Mauve Nails with Silver Accents
This minimalist design features a soft mauve nail color with subtle silver accents. The square-shaped nails are polished and simple, with a single nail featuring a silver foil detail for a modern and chic look. This design is perfect for those who prefer a clean and sophisticated manicure that still has a touch of unique flair.

Consumables:
-
- OPI GelColor in “Mauve it Over” for the base
- Silver Foil for the accent
- CND Top Coat for a glossy finish
- Fine Nail Art Brush for applying the foil
How to Achieve this Look:
-
- Start with a base of OPI GelColor in “Mauve it Over” and cure under a UV lamp.
- Use a fine nail art brush to apply silver foil on one nail for a minimalist accent.
- Cure and finish with CND Top Coat to seal the design and add shine.
Shimmery Mauve Short Nails
This design features a shimmery mauve nail color on short nails, perfect for a subtle yet eye-catching look. The fine shimmer gives the nails a soft glow, making them ideal for any occasion, whether casual or formal. The rounded shape of the nails adds to the overall delicate appearance, making this a great choice for those who prefer a simple and elegant manicure.

Consumables:
-
- OPI GelColor in “Mauve Shimmer” for the base
- Buffer Block for smoothing
- CND Top Coat for a glossy finish
How to Achieve this Look:
-
- Shape the nails into a rounded form using a Clair Nail File.
- Apply OPI GelColor in “Mauve Shimmer” as the base color.
- Cure under a UV lamp and finish with CND Top Coat for a high-gloss, shimmery finish.
Mauve and Pastel Geometric Design
This unique design blends mauve nail color with pastel shades in a geometric pattern, creating a playful and artistic look. The combination of patterns and textures makes this manicure stand out, perfect for those who love to experiment with their nail art. The use of both glossy and matte finishes adds depth and interest, making this a versatile design for any season.

Consumables:
-
- OPI GelColor in “Mauve Matters” for the base
- DND Gel in “Pastel Pink” and “Baby Blue” for the geometric designs
- Matte Top Coat for the matte finish
- Fine Nail Art Brush for precise application
How to Achieve this Look:
-
- Apply OPI GelColor in “Mauve Matters” as the base and cure under a UV lamp.
- Use a fine nail art brush to create geometric patterns with DND Gel in “Pastel Pink” and “Baby Blue”.
- Apply a matte top coat on selected nails to create a mix of matte and glossy finishes.
- Cure each layer and finish with a CND Top Coat on the glossy sections.
Soft Gradient Mauve Nails
This design showcases a beautiful ombre effect transitioning through various shades of mauve nail color, from light to dark. The short almond shape is both practical and stylish, making it a great choice for everyday wear. This look is perfect for those who appreciate subtle yet impactful nail designs that can easily transition from spring to fall. The smooth gradient creates a soft and elegant appearance that pairs well with any outfit.

Consumables:
-
- OPI GelColor in “I’m in the Moon for Love” for the darkest shade
- DND Gel in “French Lilac” for the medium tone
- OPI GelColor in “Lisbon Wants Moor” for the lightest shade
- Sponge for blending the colors
- CND Top Coat for a glossy finish
How to Achieve this Look:
-
- Start by applying a base coat and curing under a UV lamp.
- Using a sponge, blend the OPI GelColor shades from dark to light, starting with “I’m in the Moon for Love” at the base, transitioning to “French Lilac”, and finishing with “Lisbon Wants Moor” at the tips.
- Cure each layer under the UV lamp to set the colors.
- Finish with CND Top Coat for a glossy and long-lasting finish.
Classic Mauve Almond Nails
This classic mauve nail color on almond-shaped nails is timeless and versatile, making it a great option for those who prefer a simple yet polished look. The rich, dusty rose hue is perfect for the fall and winter seasons, offering a warm and sophisticated vibe. The gel finish ensures durability and a beautiful shine, making these nails perfect for both daily wear and special occasions.

Consumables:
-
- OPI GelColor in “Mauve-lous Memories”
- DND Gel in “Rosewood Romance”
- Buffer Block for smoothing the surface
- Clair Nail File for shaping
- CND Top Coat for a glossy finish
How to Achieve this Look:
-
- File your nails into an almond shape using the Clair Nail File.
- Apply OPI GelColor in “Mauve-lous Memories” as a base, followed by a layer of DND Gel in “Rosewood Romance”.
- Cure under a UV lamp between each layer.
- Finish with CND Top Coat for a high-gloss, durable finish.
Glitter Mauve Nails with Accents
This design adds a touch of glamour to the mauve nail color with a combination of glitter and metallic accents. The gel finish ensures a lasting shine, while the glitter adds a festive sparkle perfect for special occasions or a night out. The short acrylic shape keeps the look practical, making it suitable for those who want to add a bit of bling to their everyday style.

Consumables:
-
- OPI GelColor in “Let Me Bayou a Drink” for the base
- DND Gel in “Dusty Mauve” for the primary color
- OPI Glitter Gel in “Throw Me Something Purple” for the accent nails
- Swarovski Crystals for extra sparkle
- Nail Art Brush for precise glitter placement
How to Achieve this Look:
-
- Start with a base coat of OPI GelColor in “Let Me Bayou a Drink” and cure under a UV lamp.
- Apply DND Gel in “Dusty Mauve” on all nails except the ring fingers, where you’ll use OPI Glitter Gel in “Throw Me Something Purple”.
- Place Swarovski Crystals on the accent nails using a nail art brush for added bling.
- Cure all layers and finish with a top coat for a durable and shiny finish.
Light Mauve Square Nails
These light mauve nails are an excellent choice for those who love a neutral and understated look. The square shape adds a modern touch, while the light dusty rose color is perfect for any season, from spring to fall. The simplicity of this design makes it versatile enough to be worn for both casual and formal occasions.

Consumables:
-
- OPI GelColor in “Put It In Neutral”
- DND Gel in “Pink Pearl” for a subtle shimmer
- CND Top Coat for extra shine
- Buffer Block for a smooth surface
- Clair Nail File for shaping
How to Achieve this Look:
-
- Shape your nails into a square using the Clair Nail File.
- Apply OPI GelColor in “Put It In Neutral” as the base color.
- Add a layer of DND Gel in “Pink Pearl” for a subtle shimmer effect.
- Cure each layer under a UV lamp and finish with CND Top Coat for a glossy finish.
Glitter Mauve Nails for a Sparkling Finish
This design is all about glitter and shine. The mauve nail color is complemented by a glitter finish that adds a festive touch, perfect for the holiday season or any special event. The short and rounded nail shape is practical, while the gel ensures that the glitter stays in place and doesn’t chip easily.

Consumables:
-
- OPI GelColor in “Mauve-lous Memories” for the base
- OPI Glitter Gel in “Glam It Up” for the glitter effect
- Swarovski Crystals for added sparkle
- Nail Art Brush for precise application
- CND Top Coat for a long-lasting finish
How to Achieve this Look:
-
- Apply a base coat of OPI GelColor in “Mauve-lous Memories” and cure under a UV lamp.
- Add OPI Glitter Gel in “Glam It Up” for the glitter effect on all nails.
- Use Swarovski Crystals on an accent nail for extra sparkle.
- Finish with a top coat to seal in the glitter and add extra shine.
Gradient Mauve Nails with Square Shape
This manicure features a smooth transition from light to dark mauve nail color, elegantly displayed on a square nail shape. The subtle gradient creates a harmonious blend of tones, making it perfect for any season. The mix of shades adds depth and dimension to the nails, making them look sophisticated yet understated. This design is ideal for those who love a clean and modern look with a touch of creativity.

Consumables:
-
- OPI GelColor in “Tiramisu for Two” for the lightest shade
- DND Gel in “Rose Petal” for the medium tone
- OPI GelColor in “Mauve On Over” for the darkest shade
- Sponge for blending the colors
- CND Top Coat for a glossy finish
How to Achieve this Look:
-
- Shape your nails into a square shape using a Clair Nail File.
- Apply a base coat and cure under a UV lamp.
- Using a sponge, blend the different mauve shades from dark to light across the nails.
- Cure each layer under the UV lamp.
- Finish with a top coat to ensure a smooth and glossy finish.
Lilac Mauve Nails with Artistic Detailing
This design combines the elegance of mauve nail color with delicate artistic detailing, perfect for those who love a bit of flair. The almond-shaped nails are painted in a soft lilac mauve, with an accent nail featuring hand-painted details in pastel shades. The intricate design adds a whimsical touch, making it ideal for spring or summer events, such as weddings or special gatherings.

Consumables:
-
- Peggy Sage I-LAK Gel in “Lilac Purple” for the base
- DND Gel in “Soft Blush” for the detailing
- Fine Nail Art Brush for precision work
- Buffer Block for smoothing the surface
- CND Top Coat for a lasting finish
How to Achieve this Look:
-
- Begin by applying Peggy Sage I-LAK Gel in “Lilac Purple” as the base color.
- Use a fine nail art brush to create the delicate designs on the accent nail using DND Gel in “Soft Blush”.
- Cure each layer under a UV lamp for durability.
- Finish with CND Top Coat to protect the design and add a glossy shine.
Vibrant French Tip in Mauve
This bold take on the classic French manicure features a vibrant mauve tip on a neutral base. The almond-shaped nails offer a perfect canvas for the bright mauve tips, creating a look that is both modern and chic. This design is ideal for those who want to make a statement while maintaining a sense of elegance. It’s especially fitting for the summer or spring seasons, where bright and playful colors are in vogue.

Consumables:
-
- OPI GelColor in “Bubble Bath” for the base
- DND Gel in “Electric Mauve” for the tips
- Striping Tape for clean lines
- CND Top Coat for a glossy finish
- Buffer Block for smoothing
How to Achieve this Look:
-
- Start with a base of OPI GelColor in “Bubble Bath” and cure under a UV lamp.
- Use striping tape to define the tips, then apply DND Gel in “Electric Mauve”.
- Remove the tape carefully after curing to reveal sharp, clean lines.
- Finish with a top coat to seal the design and add shine.
Iridescent Mauve Nails with a Subtle Shine
This design incorporates a mauve nail color with a subtle iridescent shimmer, perfect for adding a touch of glamour to your look. The square-shaped nails are kept simple yet elegant, with the iridescent effect adding just the right amount of sparkle. This look is versatile and can be worn in any season, making it a great choice for both everyday wear and special occasions.

Consumables:
-
- OPI GelColor in “Soft Mauve” for the base
- DND Gel in “Iridescent Glow” for the shimmer
- Buffer Block for smoothing
- CND Top Coat for extra shine
- Fine Nail Art Brush for precise application
How to Achieve this Look:
-
- Shape the nails into a square using the Clair Nail File.
- Apply OPI GelColor in “Soft Mauve” as the base coat.
- Add a layer of DND Gel in “Iridescent Glow” for a shimmering effect.
- Cure each layer under a UV lamp and finish with CND Top Coat.
Deep Mauve Nails with Marble Accent
This striking design features a deep mauve nail color combined with a marble accent nail, creating a look that is both bold and sophisticated. The rich, dark mauve is perfect for the fall or winter seasons, offering a dramatic yet elegant appearance. The marble accent adds a modern touch, making this manicure perfect for those who love unique and stylish nail art.

Consumables:
-
- OPI GelColor in “Rich Mauve” for the base
- DND Gel in “Marble White” for the accent
- Fine Nail Art Brush for the marble effect
- Sponge for blending
- CND Top Coat for a glossy finish
How to Achieve this Look:
-
- Apply OPI GelColor in “Rich Mauve” to all nails except the accent nail.
- For the accent nail, use DND Gel in “Marble White” and a fine nail art brush to create the marble effect.
- Blend the colors with a sponge to achieve a natural-looking marble texture.
- Cure under a UV lamp and finish with a CND Top Coat for a polished finish.
Ombre Mauve Almond Nails
This elegant ombre design features a smooth transition of mauve nail color from light to dark across almond-shaped nails. The gradient effect beautifully highlights the versatility of mauve, making it suitable for any occasion. The combination of subtle and deep shades creates a sophisticated look that is perfect for the fall season, offering a stylish and modern approach to a classic manicure.

Consumables:
-
- OPI GelColor in “Baby Take a Vow” for the lightest shade
- DND Gel in “Dusty Rose” for the medium tone
- OPI GelColor in “Mauve On Over” for the darkest shade
- Sponge for blending the colors
- CND Top Coat for a glossy finish
How to Achieve this Look:
-
- Shape your nails into an almond shape using a Clair Nail File.
- Apply a base coat and cure under a UV lamp.
- Using a sponge, blend the different mauve shades from light to dark across the nails.
- Cure each layer under the UV lamp.
- Finish with a top coat to ensure a smooth and glossy finish.
Mauve Nails with Glitter Accent
This design combines different shades of mauve nail color with a glitter accent nail, adding a touch of sparkle to a classic manicure. The use of both dark and light mauve shades creates a harmonious blend, while the glitter adds a festive flair, making it perfect for special occasions. This look is ideal for those who love to mix and match different tones while keeping their manicure elegant and stylish.

Consumables:
-
- OPI GelColor in “Mauve-lous Memories” for the base
- DND Gel in “Pink Champagne” for the accent nail
- OPI Glitter Gel in “Glam It Up” for the glitter effect
- Buffer Block for smoothing
- CND Top Coat for a long-lasting finish
How to Achieve this Look:
-
- Start with a base of OPI GelColor in “Mauve-lous Memories” on all nails except the accent nail.
- Apply DND Gel in “Pink Champagne” on the accent nail and top it with OPI Glitter Gel in “Glam It Up”.
- Cure each layer under a UV lamp.
- Finish with CND Top Coat to seal the design and add extra shine.
Iridescent Mauve Almond Nails
This stunning manicure features an iridescent finish that gives the mauve nail color a beautiful, reflective glow. The almond shape adds elegance, while the iridescence creates a mesmerizing effect as it catches the light. This design is perfect for those who want to make a subtle yet impactful statement with their nails, especially during the spring and summer seasons.

Consumables:
-
- OPI GelColor in “Pearlescent Mauve” for the base
- DND Gel in “Iridescent Glow” for the shimmer
- Buffer Block for smoothing the surface
- CND Top Coat for a glossy finish
- Fine Nail Art Brush for precise application
How to Achieve this Look:
-
- Shape your nails into an almond shape using a Clair Nail File.
- Apply OPI GelColor in “Pearlescent Mauve” as the base coat.
- Add a layer of DND Gel in “Iridescent Glow” for the shimmering effect.
- Cure each layer under a UV lamp and finish with CND Top Coat for a high-gloss finish.
Mauve Nails with Abstract Glitter Design
This creative design features a mix of mauve nail color with abstract glitter accents, making it both modern and playful. The combination of nude and mauve shades creates a soft yet striking look, perfect for those who love to experiment with their nail art. The glitter accents add a touch of fun and can be easily customized to suit any occasion, making this a versatile and stylish choice.

Consumables:
-
- OPI GelColor in “Bare My Soul” for the nude base
- DND Gel in “Mauve Delight” for the mauve shade
- OPI Glitter Gel in “Twilight Sparkle” for the accents
- Fine Nail Art Brush for detailing
- CND Top Coat for a glossy finish
How to Achieve this Look:
-
- Start with a nude base using OPI GelColor in “Bare My Soul”.
- Apply DND Gel in “Mauve Delight” to selected nails, leaving others for glitter accents.
- Use OPI Glitter Gel in “Twilight Sparkle” to create abstract designs with a fine nail art brush.
- Cure each layer under a UV lamp and finish with CND Top Coat.
Classic Mauve Nails with Glossy Finish
This design showcases a classic approach to mauve nail color with a glossy finish. The square-shaped nails provide a modern twist, while the rich mauve shade is perfect for any season. This manicure is versatile enough to be worn in both casual and formal settings, offering a timeless look that complements any style.

Consumables:
-
- OPI GelColor in “Mauve Over You” for the base
- Buffer Block for smoothing
- CND Top Coat for a glossy finish
- Clair Nail File for shaping
How to Achieve this Look:
-
- Shape the nails into a square using a Clair Nail File.
- Apply OPI GelColor in “Mauve Over You” as the base color and cure under a UV lamp.
- Finish with CND Top Coat for a high-gloss finish that enhances the rich color.
Sculpted Mauve Nails with 3D Design
This avant-garde design features sculpted mauve nail color with intricate 3D designs, perfect for those who love to push the boundaries of traditional nail art. The long, coffin-shaped nails provide ample space for detailed work, while the mix of textures and shades creates a dynamic and eye-catching effect. This look is ideal for special occasions where you want to make a bold statement with your nails.

Consumables:
-
- OPI GelColor in “Mauve On” for the base
- DND Gel in “Clay Mauve” for the 3D designs
- Sculpting Gel for creating texture
- Fine Nail Art Brush for detailing
- CND Top Coat for a durable finish
How to Achieve this Look:
-
- Start by applying OPI GelColor in “Mauve On” as the base color and cure under a UV lamp.
- Use sculpting gel and a fine nail art brush to create 3D designs on the nails.
- Layer DND Gel in “Clay Mauve” over the 3D elements for a cohesive look.
- Cure each layer thoroughly and finish with CND Top Coat for durability.
Save Pin
