
21 Stunning Red Holiday Nails Ideas: Acrylic, Gel, Coffin, and Short Designs
The holiday season is the perfect time to elevate your nail game, and nothing captures the festive spirit quite like red holiday nails. Whether you’re a fan of simple designs or more intricate ones, there’s something about red that screams celebration. But how do you choose between Acrylic, Gel, Bright, or Dark reds? How about adding accents like Gold and glitter or combining colors like Black and, White and, or even Green and? In this article, I’ll dive into some stunning ideas for red holiday nails, with detailed breakdowns of various designs for both short and long nails. Get ready for some serious inspiration as we explore cherry, metallic, matte, and glossy finishes, along with Acrylic coffin and Designs square looks. Let’s create some magic this holiday season!
Festive Red Glam Nails
In this stunning red holiday nails look, the nails are shaped into a classic almond silhouette, covered with glossy red polish, and accented with festive rhinestones. The bright red color is perfect for drawing attention to your hands at any holiday party. The design strikes a balance between minimalism and glamour, with the red glitter and rhinestone accents giving a subtle yet chic touch. This look is perfect for someone who wants simple, yet eye-catching nails without going overboard.

Supplies you’ll need:
- Red Glitter Gel Polish (Modelones Glitter Gel)
- Rhinestones (Beetles Crystal Stones Kit)
- Top Coat (Gelish No-Cleanse Top Coat)
- Nail Glue (Mia Secret)
How to create this design at home:
- Shape your nails into an almond silhouette.
- Apply two coats of red gel polish, curing each layer under a UV lamp.
- Gently press rhinestones into the wet top coat and cure.
- Finish with a no-wipe top coat to secure the rhinestones and give the nails a shiny finish.
Modern Red and Black Accents
This look plays with the combination of Black and red, giving a modern twist to holiday nails. The alternating black matte and cherry red nails offer a bold contrast, with the addition of graphic white lines for a unique holiday twist. This design is perfect for those who want something bold but not too busy. The simple yet elegant accents make this design versatile, from casual holiday events to more formal gatherings.

Supplies you’ll need:
- Matte Black Polish (Essie Matte About You)
- Cherry Red Gel Polish (Beetles Red Gel)
- White Nail Art Pen (Saviland Nail Art Pen)
- Fine Tip Brush (Beetles Nail Art Brush Set)
How to create this design at home:
- Paint alternating nails with matte black and red polish, curing under a UV lamp after each layer.
- Use the white nail art pen to draw geometric lines on the matte black nails.
- Apply a glossy top coat to the red nails for contrast, while leaving the black matte.
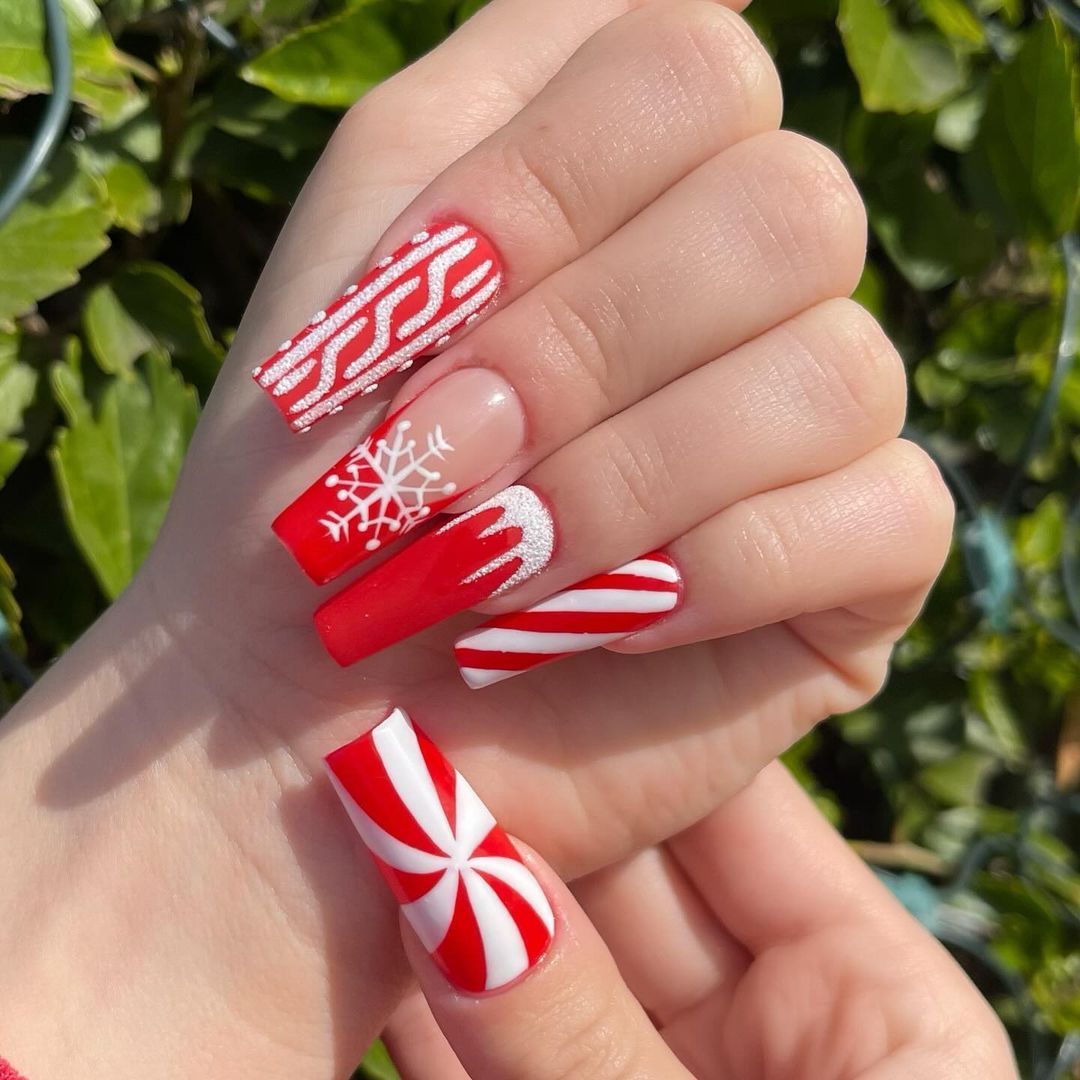
Candy Cane Stripes and Sparkles
For a more playful red holiday nails design, this candy cane-inspired look is both festive and fun. The bright red tips are paired with a candy stripe design on accent nails, while another nail features a delicate snowflake. The glittery red base combined with white stripes gives off serious holiday vibes, making it perfect for family gatherings or Christmas Eve celebrations. The simple yet eye-catching look is ideal for those who want something playful but still elegant.

Supplies you’ll need:
- Red Glitter Polish (OPI Big Apple Red with Glitter)
- White Striping Tape (KADS Nail Striping Tape)
- Nail Art Brush (Makartt Nail Art Brush Set)
- Top Coat (Seche Vite Dry Fast Top Coat)
How to create this design at home:
- Apply two coats of glittery red polish to all nails and cure under a UV lamp.
- On two accent nails, use a fine brush to create thin white stripes for a candy cane effect.
- Paint a delicate snowflake using a nail art brush on one nail and finish with a top coat.
Classic Red with White Snowflakes
Nothing says holiday like white and red together, and this design combines both in a classic, elegant way. These red holiday nails feature a glossy red base with intricate white snowflakes on two accent nails. The subtle yet bright contrast between the white snowflakes and the deep red base is perfect for a festive but classy look. This style works for any nail length and is versatile enough for both casual and formal holiday events.

Supplies you’ll need:
- Deep Red Polish (Zoya Red Polish in ‘Sooki’)
- White Snowflake Stickers (Born Pretty Snowflake Nail Stickers)
- Top Coat (Gelish No-Cleanse Top Coat)
How to create this design at home:
- Paint all nails with two coats of deep red polish and cure under a UV lamp.
- Apply white snowflake stickers to the accent nails and press them down gently.
- Seal the design with a top coat and cure once more for long-lasting wear.
Holiday Knitted Sweater Nails
For those who want to channel cozy winter vibes, these red holiday nails are reminiscent of a holiday sweater. With a combination of bright reds and intricate knitted patterns, this design adds warmth to your holiday look. The 3D texture of the design makes it stand out, and the subtle gold and embellishments add an extra touch of luxury.

Supplies you’ll need:
- Red Gel Polish (Madam Glam Perfect Red Gel)
- 3D Nail Art Gel (IBD 3D Gel)
- Fine Detail Brush (Makartt Nail Art Detail Brush)
- Gold Rhinestones (Beetles Nail Rhinestones Kit)
How to create this design at home:
- Apply red gel polish to all nails and cure under a UV lamp.
- Use the 3D nail art gel to create knitted sweater patterns on the accent nails.
- Adorn the design with small gold rhinestones and cure again for long-lasting wear.
Rudolph Red Holiday Nails
This cute and festive nail design features a playful take on red holiday nails, with a reindeer accent nail. The main nails are a glossy bright red, adding a classic holiday feel, while the accent nail features a small, charming Rudolph face with black antlers, a white background, and a shiny red nose. This look is perfect for someone who wants to add a touch of holiday fun while still keeping their nails stylish and simple.

Supplies you’ll need:
- Red Gel Polish (Beetles Gel Polish in Candy Cane Red)
- White Gel Polish (Gelish Arctic Freeze)
- Black Nail Art Pen (Makartt Nail Art Pen)
- Dotting Tool for Rudolph’s Nose (Saviland Dotting Tool Set)
How to create this design at home:
- Paint all nails with two coats of bright red polish and cure under a UV lamp.
- For the accent nail, apply white gel polish and cure.
- Use a black nail art pen to draw the antlers and eyes, and a dotting tool to create Rudolph’s red nose.
- Seal with a top coat to protect the design and cure again.
Elegant Red and Snowflake Design
This red holiday nails design is all about elegance and simplicity. The deep, shiny red is paired with subtle snowflake accents on clear nails, creating a wintery look that is both simple and festive. The design’s subtle contrast makes it versatile for both casual and more formal holiday events, adding just the right amount of flair with its snowflake details.

Supplies you’ll need:
- Red Gel Polish (OPI GelColor in Big Apple Red)
- Clear Top Coat (CND Shellac in No Wipe Top Coat)
- White Nail Art Brush for Snowflakes (Modelones Fine Nail Brush Set)
How to create this design at home:
- Apply two coats of red polish to the nails, leaving two nails clear for the snowflake design.
- On the clear nails, use a fine nail brush to paint delicate snowflakes with white gel polish and cure under a UV lamp.
- Finish with a clear top coat on all nails and cure again.
Metallic Red Holiday Coffin Nails
These Acrylic coffin nails in a shiny metallic red take the classic holiday look to a new level. The high-shine finish is perfect for catching the light during festive events, while the subtle snowflake accents on two nails add a winter touch. This look is bold, bright, and made for someone who isn’t afraid to make a statement with their nails during the holiday season.

Supplies you’ll need:
- Metallic Red Polish (Chrome Effect Polish in Ruby)
- White Nail Art Pen (Saviland Nail Art Pen for Snowflakes)
- Acrylic Extensions (Kiara Sky Acrylic Powder in Clear)
How to create this design at home:
- Apply acrylic extensions and file into the desired coffin shape.
- Paint all nails with the metallic red polish and cure under a UV lamp.
- Draw small white snowflakes on two accent nails and seal with a top coat.
Ombre Glitter Red and White Design
This design combines red holiday nails with a soft white and glitter ombre effect, creating a fresh and festive look. The simple design has a magical holiday feel with its combination of shimmering glitter and bright red. The mix of white and red works perfectly for those who love a softer, more playful holiday nail design.

Supplies you’ll need:
- Red Polish (OPI Nail Lacquer in Alpine Snow)
- Glitter (Born Pretty Glitter Powder in Red Sparkle)
- Sponge for Ombré Effect (Beetles Nail Art Sponge Set)
How to create this design at home:
- Apply a white base coat to all nails and cure.
- Using a makeup sponge, dab red glitter polish from the tip downwards to create a smooth ombré effect.
- Cure under a UV lamp and seal with a glossy top coat.
Festive Gift Wrap Design
This festive gift-inspired design brings the magic of the holidays to your nails. The red holiday nails feature a ribbon and bow design on one accent nail, while others have delicate white snowflakes. The use of white and red makes this design incredibly festive and bright, perfect for Christmas parties or family gatherings.

Supplies you’ll need:
- Red Polish (Essie Nail Polish in Forever Yummy)
- White Nail Art Brush (Makartt Fine Liner Brush for Bow and Snowflakes)
- Gold Studs for Embellishment (Beetles Nail Art Studs)
How to create this design at home:
- Apply two coats of red polish and cure under a UV lamp.
- On the accent nail, paint a white ribbon and bow using a fine liner brush.
- Add gold studs to the accent nail for a finishing touch and cure under a UV lamp.
Red and Nude Rhinestone Accent Nails
This red holiday nails look combines bright red tips with a subtle nude base, accentuated by delicate rhinestones. The mix of bright red French tips and the neutral background creates a chic and modern look for the holiday season. The rhinestones add a touch of elegance and glamour, making it perfect for those looking for a minimal yet sophisticated holiday nail design.

Supplies you’ll need:
- Bright Red Gel Polish (OPI GelColor in Cajun Shrimp)
- Nude Base Coat (Essie Sheer Silhouette)
- Rhinestone Nail Art (Beetles Rhinestone Kit)
- Top Coat (Seche Vite Fast Dry Top Coat)
How to create this design at home:
- Paint all nails with a nude base and cure under a UV lamp.
- Apply bright red French tips using a fine nail brush.
- Place rhinestones at the base of accent nails and seal with a top coat.
Snowflake and Gift Wrap Holiday Design
This festive design features classic red holiday nails with intricate snowflakes and a charming gift wrap accent. The use of white and red adds a festive flair while the snowflakes are delicate and detailed. The nails mimic the joy of gift-giving, making this design both cheerful and seasonal for holiday celebrations.

Supplies you’ll need:
- Red Gel Polish (CND Vinylux in Wildfire)
- White Nail Art Pen (Saviland Nail Art Pen for Snowflakes)
- Silver Stud for the Bow (Makartt Rhinestones)
How to create this design at home:
- Apply two coats of red polish and cure under a UV lamp.
- Use a white nail art pen to draw snowflakes and gift wrap details.
- Place a small silver stud at the bow’s center and finish with a top coat.
Candy Cane Red and White Striped Nails
This red holiday nails design is inspired by the classic candy cane, combining white and red stripes for a festive twist. The sharp almond-shaped nails bring out the elegance, while the candy cane accent adds a playful touch. This look is perfect for anyone who loves holiday-themed designs with a modern edge.

Supplies you’ll need:
- Red Gel Polish (OPI GelColor in Big Apple Red)
- White Nail Art Pen (Makartt Nail Art Pen for Candy Stripes)
- Top Coat (Gelish No-Wipe Top Coat)
How to create this design at home:
- Apply a nude base and cure under a UV lamp.
- Paint the red tips and cure again.
- Use a fine brush or pen to draw white stripes on the accent nails, creating a candy cane effect.
Minimalist Holiday French Tips with Bow Accent
This design features red holiday nails with a minimalist French tip paired with small festive details, such as a tiny gift bow and reindeer. The simplicity of the design makes it perfect for those who want a more understated holiday look, while still feeling festive. The red tips bring out the holiday spirit, while the bow and reindeer accents add a touch of charm.

Supplies you’ll need:
- Red Polish (Sally Hansen Miracle Gel in Red Eye)
- White Nail Art Brush (Makartt Fine Detail Brush for Bow)
- Rhinestones for Bow (Beetles Rhinestones Nail Art Kit)
How to create this design at home:
- Apply a nude base coat and cure under a UV lamp.
- Create red French tips using a fine nail brush and cure.
- Add tiny bow and reindeer details using a white nail art brush and top with rhinestones for extra sparkle.
Festive Red with Silver and Rhinestone Accents
This bold and festive look brings red holiday nails to the next level with dazzling rhinestones and a silver accent nail. The combination of bright red, white snowflakes, and sparkling rhinestones makes it ideal for a glamorous holiday party. The addition of the silver glitter nail adds contrast, making the design pop even more.

Supplies you’ll need:
- Red Gel Polish (Gelish in Hot Rod Red)
- Silver Glitter Polish (OPI Glitter Off Silver)
- Rhinestones (Beetles Nail Art Rhinestones Kit)
- White Nail Art Brush (Modelones Fine Detail Brush for Snowflakes)
How to create this design at home:
- Apply two coats of red polish and cure under a UV lamp.
- Paint a silver accent nail on each hand and cure.
- Add rhinestones and draw white snowflakes on selected nails for festive detail.
Peppermint Candy Holiday Nails
This festive red holiday nails design combines candy cane stripes, peppermint swirls, and snowflake accents for a truly eye-catching holiday look. The use of bright red and white and adds a playful holiday touch, perfect for the season. The intricate snowflake and candy cane stripes add elegance and festivity, making these nails a great option for Christmas gatherings.

Supplies you’ll need:
- Bright Red Gel Polish (OPI GelColor in Big Apple Red)
- White Nail Art Pen (Makartt White Nail Art Pen)
- Glitter (Born Pretty Glitter Dust)
How to create this design at home:
- Apply two coats of red polish and cure under a UV lamp.
- Use a fine nail art brush to create the candy cane stripes and peppermint swirl.
- Add snowflake accents using a white nail art pen and finish with glitter on select nails.
Red Glitter with Snowflake and Bow Designs
These Acrylic coffin nails exude holiday glam with a combination of bright red glitter, snowflake designs, and delicate bows. The glossy red base contrasts beautifully with the white details, while the snowflakes and rhinestone accents add elegance and charm. This design is ideal for those who love making a statement during the festive season.

Supplies you’ll need:
- Red Glitter Polish (Beetles Red Glitter Gel)
- White Nail Art Pen (Saviland Nail Art Pen for Snowflakes)
- Rhinestones (Beetles Nail Rhinestones Kit)
How to create this design at home:
- Apply a red glitter polish to all nails and cure under a UV lamp.
- Use a fine brush to create detailed snowflakes and bow designs with a white nail art pen.
- Apply rhinestones to the center of the bows for extra sparkle.
Candy Cane and Star Accent Nails
This design takes a modern twist on red holiday nails by combining bright red, candy cane stripes, and red stars on a white background. The sleek almond shape makes the design feel even more elegant. The mix of white and red creates a fresh, modern holiday look that is simple yet striking.

Supplies you’ll need:
- Bright Red Gel Polish (OPI GelColor in Big Apple Red)
- White Gel Polish (Essie Gel Couture in Blanc)
- Red Nail Art Pen (Makartt Fine Nail Brush Set for Stars)
How to create this design at home:
- Paint alternating nails with red and white polish, curing under a UV lamp after each coat.
- Use a fine nail brush to create candy cane stripes on selected nails.
- Draw red stars on the white accent nails and finish with a glossy top coat.
Red and White Glitter French Tips
This minimalist red holiday nails design combines acrylic coffin French tips with glittery snowflake accents. The bright red and white glitter create a festive touch, perfect for Christmas. The snowflake accents add a soft and magical feel to the nails, making them ideal for those who prefer a subtler holiday look with just the right amount of sparkle.

Supplies you’ll need:
- Red Gel Polish (OPI GelColor in Big Apple Red)
- White Glitter Powder (Born Pretty Snow Glitter)
- White Nail Art Pen (Makartt Nail Art Pen for Snowflakes)
How to create this design at home:
- Apply a nude base coat and cure.
- Create red French tips with a fine nail brush and cure under a UV lamp.
- Add glitter to the tips and draw delicate snowflakes on two accent nails.
Candy Cane and Santa Hat Accent Nails
This adorable design brings the magic of Christmas to life with candy cane stripes, a Santa hat accent, and bright red French tips. The design is playful and festive, making it perfect for anyone who wants a fun yet classy holiday look. The Santa hat adds a whimsical touch, while the candy cane stripes bring out the traditional holiday spirit.

Supplies you’ll need:
- Red Gel Polish (Sally Hansen Miracle Gel in Red Eye)
- White Nail Art Pen (Modelones Nail Art Pen for Santa Hat and Stripes)
- Glitter (Born Pretty Glitter Powder in Snow White)
How to create this design at home:
- Apply a nude base coat and cure.
- Create red French tips and a Santa hat accent using a fine nail brush.
- Add glitter to the Santa hat’s fur and candy cane stripes for a festive finish.
Festive Red Nails with Bow and Snowflake Accents
These red holiday nails are all about festive elegance, featuring a bold red base with a charming bow accent and delicate snowflake details. The red and white and combo adds a classic holiday feel, while the bow and snowflakes make the design stand out. The addition of small glitter accents brings a touch of sparkle, perfect for any holiday event.

Supplies you’ll need:
- Red Gel Polish (Beetles Gel Polish in Ruby Red)
- White Nail Art Pen (Saviland Nail Art Pen for Snowflakes and Bow)
- Glitter (Born Pretty Glitter Dust in Silver)
How to create this design at home:
- Apply two coats of red polish and cure under a UV lamp.
- Use a white nail art pen to create detailed bows and snowflakes on selected nails.
- Add glitter to the bow’s center and other accent areas for extra holiday sparkle.
Save Pin
