
Summer is the perfect time to refresh your nail style, and short oval-shaped nails are an ideal choice for the season. Are you looking for versatile, stylish, and easy-to-maintain nail designs? Wondering how to achieve those chic, summer-ready nails at home? In this article, I’ll walk you through various nail ideas, using real-life examples to inspire your next manicure.
The Blue and Nude Accent Manicure
As a professional manicurist, I often find that blue and nude combinations create a striking yet subtle summer look. The blue nails on the index and pinky fingers contrast beautifully with the nude base on the middle fingers, which feature delicate blue heart accents and marble designs. This style is not only trendy but also versatile for various summer outfits.

Consumables:
-
- Blue nail polish (e.g., OPI Nail Lacquer in “My Car Has Navy-gation”)
- Nude nail polish (e.g., Essie Nail Polish in “Bare With Me”)
- Nail art brushes
- Blue nail art stickers or decals
- Top coat (e.g., Seche Vite Dry Fast Top Nail Coat)
DIY Instructions:
-
- Apply a base coat to protect your natural nails.
- Paint your index and pinky fingers with two coats of blue polish.
- Use the nude polish for the remaining fingers.
- With a fine nail art brush, create the marble effect using the blue polish on the middle fingers.
- Add the heart stickers or carefully paint them using a tiny brush.
- Seal the design with a top coat for a long-lasting finish.
The Shimmering Confetti Design
This design showcases a subtle yet dazzling look with its shimmering confetti effect on a nude base. It’s perfect for those who prefer a natural look with a touch of glamour. The combination of pastel and metallic flakes adds depth and interest to the nails without overwhelming them.

Consumables:
-
- Nude nail polish (e.g., Zoya Nail Polish in “Chantal”)
- Confetti nail glitter (e.g., Born Pretty Glitter Nail Sequins)
- Clear top coat
DIY Instructions:
-
- Start with a base coat.
- Apply two coats of nude polish.
- While the second coat is still tacky, gently press the confetti glitter onto the nails.
- Finish with a clear top coat to seal the glitter and add shine.
The Pastel Speckled Manicure
For a playful and fresh summer look, the pastel speckled manicure is a fantastic choice. The soft lavender and mint colors are complemented by speckled black dots, creating a fun and artistic vibe. This design works well with short oval shaped nails, providing a neat and trendy appearance.

Consumables:
-
- Lavender nail polish (e.g., Sally Hansen Miracle Gel in “Street Flair”)
- Mint green nail polish (e.g., Essie Nail Polish in “Mint Candy Apple”)
- Black speckle nail polish (e.g., Nails Inc. Special Effects Sprinkles in “Sweets Way”)
- Top coat
DIY Instructions:
-
- Apply a base coat.
- Paint alternating nails with lavender and mint green polishes.
- Once dry, apply the black speckle polish on top.
- Seal with a top coat to ensure longevity.
The Orange and Gold Swirl Manicure
This vibrant orange manicure with gold swirls is a stunning choice for summer. The bright color is eye-catching, while the gold accents add a touch of elegance. This design is ideal for those who love bold and beautiful summer nails oval shape short.

Consumables:
-
- Orange nail polish (e.g., OPI Nail Lacquer in “A Good Man-darin is Hard to Find”)
- Gold glitter nail polish (e.g., China Glaze Nail Polish in “Golden Enchantment”)
- Fine nail art brush
- Top coat
DIY Instructions:
-
- Apply a base coat to protect the nails.
- Paint all nails with the orange polish.
- Use the fine brush to create gold swirls on the accent nails.
- Finish with a top coat for a glossy finish.
The Floral Mint Manicure
This design features a delicate floral pattern on a mint base, perfect for a fresh and feminine summer look. The combination of mint green and floral accents is ideal for summer nails oval shape short. It’s a subtle yet stylish way to embrace the season’s trends.

Consumables:
-
- Mint green nail polish (e.g., Essie Nail Polish in “Mint Candy Apple”)
- White and blue nail polish for floral accents (e.g., OPI Nail Lacquer in “Alpine Snow” and “No Room for the Blues”)
- Fine nail art brush
- Top coat
DIY Instructions:
-
- Apply a base coat.
- Paint all nails with mint green polish.
- Use the fine brush to create floral designs with white and blue polish.
- Seal with a top coat to protect the artwork.
The Multicolor Bright Manicure
For a fun and vibrant summer look, the multicolor bright manicure is a fantastic choice. The combination of mint green, yellow, orange, and red creates a rainbow effect that’s perfect for warm weather. Each nail showcases a different bright color, making it a playful and eye-catching design.

Consumables:
-
- Mint green nail polish (e.g., Essie Nail Polish in “Mint Candy Apple”)
- Yellow nail polish (e.g., OPI Nail Lacquer in “Sun, Sea, and Sand in My Pants”)
- Orange nail polish (e.g., Sally Hansen Miracle Gel in “Electri-Cute”)
- Red nail polish (e.g., Revlon Nail Enamel in “Red Hot Tamale”)
- Top coat
DIY Instructions:
-
- Apply a base coat to protect your nails.
- Paint each nail with a different bright color, applying two coats for full opacity.
- Seal the design with a top coat to ensure a glossy and long-lasting finish.
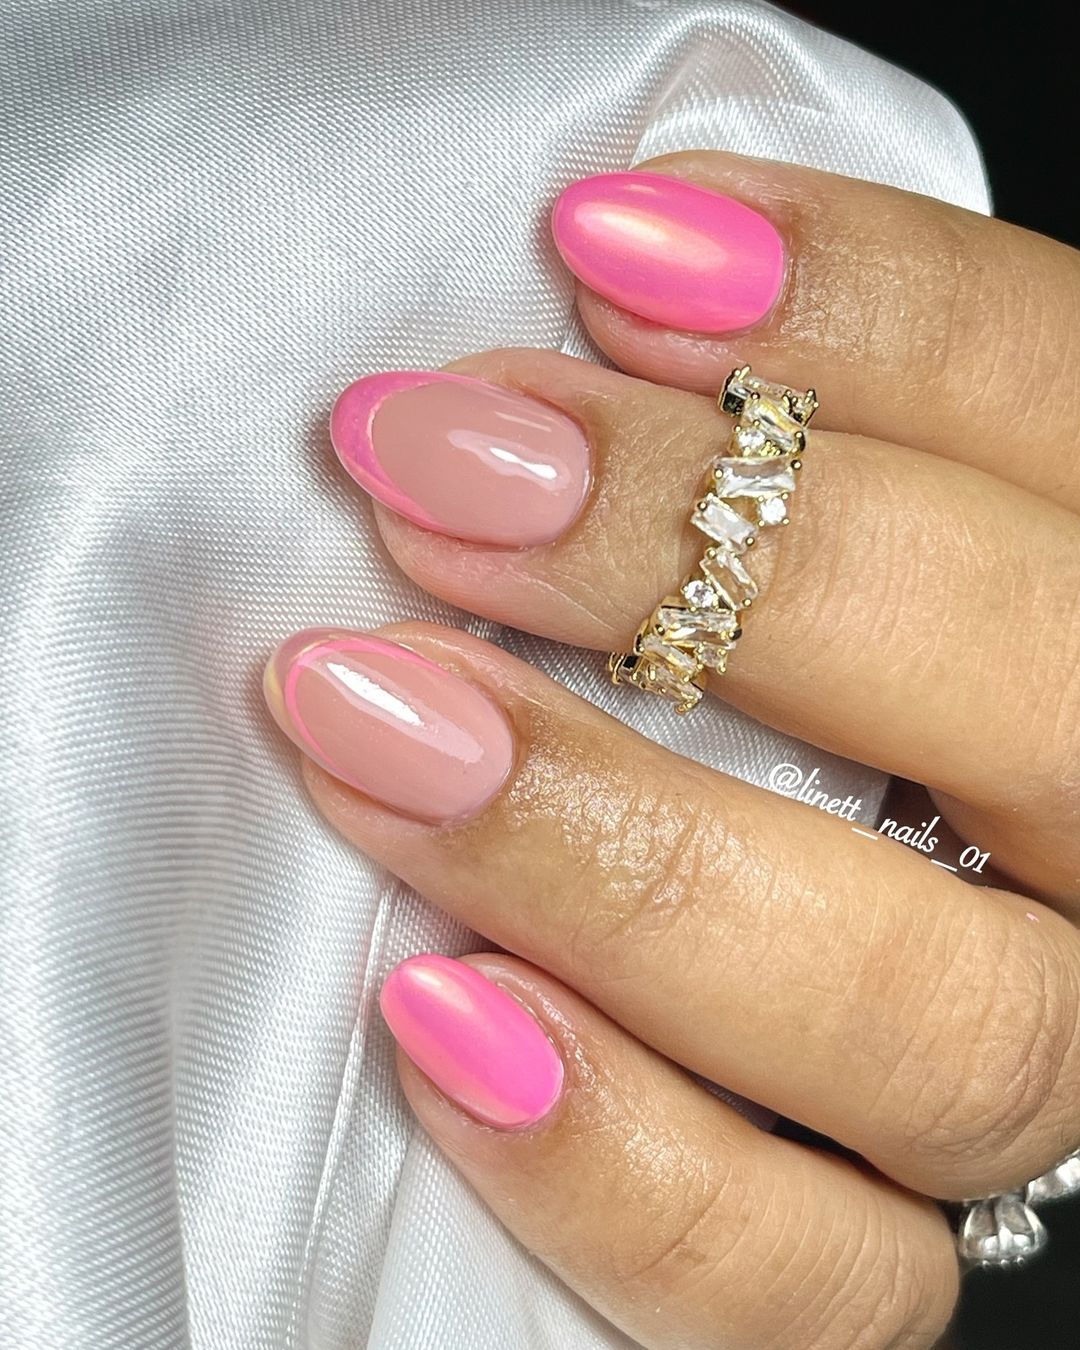
The Pink Ombre French Tip Manicure
This design features a stunning pink ombre effect combined with classic French tips. The gradient from a nude base to bright pink tips gives a modern twist to the traditional French manicure, making it perfect for summer nails oval shape short.

Consumables:
-
- Nude base coat (e.g., Essie Nail Polish in “Mademoiselle”)
- Pink nail polish (e.g., OPI Nail Lacquer in “Pink Flamenco”)
- Sponge for ombre effect
- Top coat
DIY Instructions:
-
- Start with a base coat.
- Apply the nude polish as the base color.
- Using a sponge, create the ombre effect by dabbing pink polish onto the tips, blending it towards the middle of the nail.
- Seal with a top coat to protect the design.
The Lavender Glitter Stripe Manicure
This chic and elegant design features a soft lavender base with subtle glitter stripes. The combination of lavender and glitter creates a sophisticated yet playful look, perfect for any summer occasion.

Consumables:
-
- Lavender nail polish (e.g., Essie Nail Polish in “Lilacism”)
- Silver glitter polish (e.g., China Glaze Nail Polish in “Fairy Dust”)
- Striping tape or fine nail art brush
- Top coat
DIY Instructions:
-
- Apply a base coat.
- Paint all nails with lavender polish.
- Use striping tape or a fine brush to apply glitter stripes on selected nails.
- Finish with a top coat for a smooth and shiny finish.
The Neon Animal Print Manicure
For a bold and funky look, the neon animal print manicure combines vibrant colors with animal print accents. The mix of neon green, purple, and animal print makes this design perfect for making a statement.

Consumables:
-
- Neon green nail polish (e.g., China Glaze Nail Polish in “I’m With the Lifeguard”)
- Neon purple nail polish (e.g., OPI Nail Lacquer in “Purple Palazzo Pants”)
- Black and white nail polish for animal print (e.g., Essie Nail Polish in “Licorice” and “Blanc”)
- Nail art brush
- Top coat
DIY Instructions:
-
- Apply a base coat.
- Paint alternating nails with neon green and purple polish.
- Use the nail art brush to create animal print patterns on the remaining nails with black and white polish.
- Seal with a top coat for a polished finish.
The Yellow and Floral Manicure
This delightful manicure features a bright yellow base with charming floral accents on a few nails. The combination of yellow and floral designs is perfect for a fresh and sunny summer look.

Consumables:
-
- Yellow nail polish (e.g., OPI Nail Lacquer in “Exotic Birds Do Not Tweet”)
- Blue and white nail polish for flowers (e.g., Essie Nail Polish in “Butler Please” and “Blanc”)
- Dotting tool or fine nail art brush
- Top coat
DIY Instructions:
-
- Apply a base coat.
- Paint most nails with yellow polish.
- Use the dotting tool or fine brush to create floral designs on selected nails with blue and white polish.
- Finish with a top coat to protect the design and add shine.
The Multicolor Leopard Print Manicure
This design combines bold colors with a fun leopard print, perfect for those who love vibrant and playful nails. The mix of blue, pink, neon green, and multicolor leopard print creates a striking and dynamic look.

Consumables:
-
- Blue nail polish (e.g., Essie Nail Polish in “Butler Please”)
- Pink nail polish (e.g., OPI Nail Lacquer in “Pink Flamenco”)
- Neon green nail polish (e.g., China Glaze Nail Polish in “I’m With the Lifeguard”)
- Black and various bright polishes for leopard print
- Dotting tool
- Top coat
DIY Instructions:
-
- Apply a base coat.
- Paint each nail with different bright colors as shown.
- Use a dotting tool to create the leopard print spots with black and various bright polishes on the accent nails.
- Seal with a top coat to protect the design and add shine.
The Blue and White Swirl Manicure
This elegant design features a swirl pattern in blue and white, creating a cool and calming effect. The abstract swirls are perfect for a sophisticated summer look.

Consumables:
-
- Blue nail polish (e.g., Essie Nail Polish in “Aruba Blue”)
- White nail polish (e.g., OPI Nail Lacquer in “Alpine Snow”)
- Fine nail art brush
- Top coat
DIY Instructions:
-
- Apply a base coat.
- Paint all nails with blue polish.
- Use a fine brush to create white swirls on each nail.
- Finish with a top coat for a polished look.
The Abstract Art Manicure
This manicure showcases a unique abstract art design with bright colors and bold black accents. It’s a perfect choice for those who appreciate artistic and modern nail designs.

Consumables:
-
- Nude base coat (e.g., Essie Nail Polish in “Bare With Me”)
- Black, orange, pink, and yellow nail polishes
- Fine nail art brush
- Top coat
DIY Instructions:
-
- Apply a base coat.
- Paint nails with the nude base coat.
- Use a fine brush to create abstract designs with black, orange, pink, and yellow polishes.
- Seal with a top coat for a smooth finish.
The Green and Gold Wave Manicure
This design features green and gold waves, creating a luxurious and sophisticated look. The combination of metallic green and gold adds a touch of elegance to your summer nails.

Consumables:
-
- Green nail polish (e.g., Zoya Nail Polish in “Merida”)
- Gold glitter polish (e.g., China Glaze Nail Polish in “Golden Enchantment”)
- White nail polish for waves
- Fine nail art brush
- Top coat
DIY Instructions:
-
- Apply a base coat.
- Paint all nails with green polish.
- Use a fine brush to create white and gold wave designs.
- Finish with a top coat to protect the design.
The Chrome Blue Manicure
This bold manicure features a stunning chrome blue polish that creates a mirror-like finish. It’s a sleek and modern choice for those who love to make a statement with their nails.

Consumables:
-
- Chrome blue nail polish (e.g., Sally Hansen Color Foil in “Cobalt Chrome”)
- Top coat
DIY Instructions:
-
- Apply a base coat.
- Paint nails with chrome blue polish, applying two coats for full coverage.
- Seal with a top coat to enhance the chrome effect and ensure durability.
The Cherry and Leopard Print French Manicure
This design combines a classic French manicure with playful accents. The nude base is complemented by leopard print tips and a charming cherry accent on one nail, making it a unique and trendy summer style.

Consumables:
-
- Nude nail polish (e.g., Essie Nail Polish in “Ballet Slippers”)
- White nail polish for French tips (e.g., OPI Nail Lacquer in “Alpine Snow”)
- Black and brown polish for leopard print
- Red and green polish for cherry design
- Fine nail art brush
- Top coat
DIY Instructions:
-
- Apply a base coat.
- Paint all nails with nude polish.
- Use a fine brush to create white French tips on all nails.
- Add leopard print details to the tips using black and brown polish.
- Draw a cherry on one accent nail with red and green polish.
- Seal with a top coat to protect the design.
The Blue Petal Manicure
This elegant design features delicate blue petals on a nude base. The soft and subtle look is perfect for those who prefer a more understated yet beautiful nail design.

Consumables:
-
- Nude nail polish (e.g., Essie Nail Polish in “Bare With Me”)
- Blue nail polish (e.g., OPI Nail Lacquer in “My Pal Joey”)
- Fine nail art brush
- Top coat
DIY Instructions:
-
- Apply a base coat.
- Paint all nails with nude polish.
- Use a fine brush to create blue petal designs on each nail.
- Finish with a top coat to protect the design.
The Rainbow Swirl Manicure
This vibrant design features a rainbow of colors swirled together, creating a psychedelic and eye-catching look. It’s perfect for those who love bold and colorful nails.

Consumables:
-
- Various bright nail polishes (red, blue, green, yellow, orange, purple)
- Dotting tool or fine nail art brush
- Top coat
DIY Instructions:
-
- Apply a base coat.
- Use the dotting tool or brush to apply various colors in a swirling pattern on each nail.
- Seal with a top coat for a glossy finish.
The Leopard and Mint Manicure
This design combines mint green, orange, and white with a bold leopard print accent. The mix of colors and patterns makes it a trendy and eye-catching summer look.

Consumables:
-
- Mint green nail polish (e.g., Essie Nail Polish in “Mint Candy Apple”)
- Orange nail polish (e.g., OPI Nail Lacquer in “A Good Man-darin is Hard to Find”)
- White nail polish (e.g., Essie Nail Polish in “Blanc”)
- Black polish for leopard print
- Dotting tool
- Top coat
DIY Instructions:
-
- Apply a base coat.
- Paint each nail with a different color as shown.
- Use the dotting tool to create the leopard print pattern on the accent nails.
- Finish with a top coat to protect the design.
The Minimalist Gold Accent Manicure
For a simple yet elegant look, this design features a nude base with tiny gold accents. The minimalist approach makes it perfect for those who prefer a subtle but sophisticated style.

Consumables:
-
- Nude nail polish (e.g., OPI Nail Lacquer in “Bubble Bath”)
- Gold glitter or nail studs
- Top coat
DIY Instructions:
-
- Apply a base coat.
- Paint all nails with nude polish.
- Add tiny gold accents to each nail.
- Seal with a top coat for a polished finish.
The Red Floral Manicure
This design features a bold red base with delicate floral accents. The vibrant red and intricate flowers create a striking and elegant summer look.

Consumables:
-
- Red nail polish (e.g., Essie Nail Polish in “Really Red”)
- Green and white nail polish for floral designs
- Fine nail art brush
- Top coat
DIY Instructions:
-
- Apply a base coat.
- Paint all nails with red polish.
- Use a fine brush to create floral designs on selected nails with green and white polish.
- Finish with a top coat to protect the design.
Save Pin
