
When it comes to fall nail trends, yellow is a standout color that offers a vibrant and refreshing twist to the usual autumn palette. Whether you’re a fan of yellow fall nails acrylic, prefer a simple yellow fall nails design, or love the elegance of yellow fall nails french tip, there’s a style for everyone. Let’s explore some captivating yellow fall nail designs that will make your nails the talk of the season.
Chic Mustard Nails
Yellow is a fantastic color for fall, and mustard yellow adds a sophisticated touch to your nails. This shade is perfect for those who want to embrace the autumn vibe without straying too far from classic fall colors. The glossy finish and elongated almond shape create a refined look that’s both modern and timeless.

Consumables:
- Mustard yellow nail polish (e.g., OPI Nail Lacquer in “Sun, Sea, and Sand in My Pants”)
- Base coat (e.g., Essie First Base Base Coat)
- Top coat (e.g., Seche Vite Dry Fast Top Coat)
How to Create Mustard Nails at Home:
- Start by applying a base coat to protect your natural nails.
- Apply two coats of mustard yellow nail polish, allowing each coat to dry completely.
- Finish with a top coat to seal in the color and add a glossy shine.
Vibrant Yellow French Tips
Combining the classic French tip with a bold yellow twist is a perfect way to modernize a timeless design. The bright yellow tips add a fun and playful element to your nails, making them perfect for both casual and formal settings.

Consumables:
- Yellow nail polish (e.g., Sally Hansen Miracle Gel in “Sunset Shimmer”)
- Nude or light pink base polish (e.g., Essie Ballet Slippers)
- French tip guides
- Base coat
- Top coat
How to Create Yellow French Tips at Home:
- Apply a base coat followed by a nude or light pink polish.
- Once dry, place French tip guides on your nails.
- Paint the tips with yellow polish and carefully remove the guides.
- Seal the design with a top coat.
Bold Yellow and Gold Coffin Nails
Coffin nails are a popular choice for those who love long and dramatic nails. Adding yellow with gold accents creates a striking look that’s perfect for fall festivities. This design is especially stunning when paired with gold jewelry.

Consumables:
- Yellow nail polish (e.g., China Glaze in “Happy Go Lucky”)
- Gold glitter polish (e.g., Zoya Nail Polish in “Gilty”)
- Base coat
- Top coat
How to Create Yellow and Gold Coffin Nails at Home:
- Apply a base coat to your nails.
- Paint your nails with yellow polish and let them dry.
- Add gold glitter polish to the tips or as an accent on one or two nails.
- Apply a top coat to protect your design.
Subtle Yellow Accents with Clear Nails
For a minimalist yet elegant look, clear nails with subtle yellow accents are the way to go. This design is understated but still makes a statement with its simplicity and sophistication.

Consumables:
- Clear nail polish (e.g., Sally Hansen Hard as Nails)
- Yellow polish for accents (e.g., OPI Infinite Shine in “Bee Mine Forever”)
- Nail art brush
- Base coat
- Top coat
How to Create Subtle Yellow Accents at Home:
- Apply a base coat followed by a clear polish.
- Use a nail art brush to add yellow accents to your nails.
- Finish with a top coat to secure the design.
Playful Yellow Swirls
Yellow swirls add a playful and artistic touch to your nails. This design is perfect for those who love to experiment with their nail art and enjoy unique patterns.

Consumables:
- Yellow nail polish (e.g., Essie in “Hay There”)
- Nail art brush or dotting tool
- Base coat
- Top coat
How to Create Yellow Swirls at Home:
- Apply a base coat and let it dry.
- Using a nail art brush or dotting tool, create swirl patterns with yellow polish.
- Seal the design with a top coat.
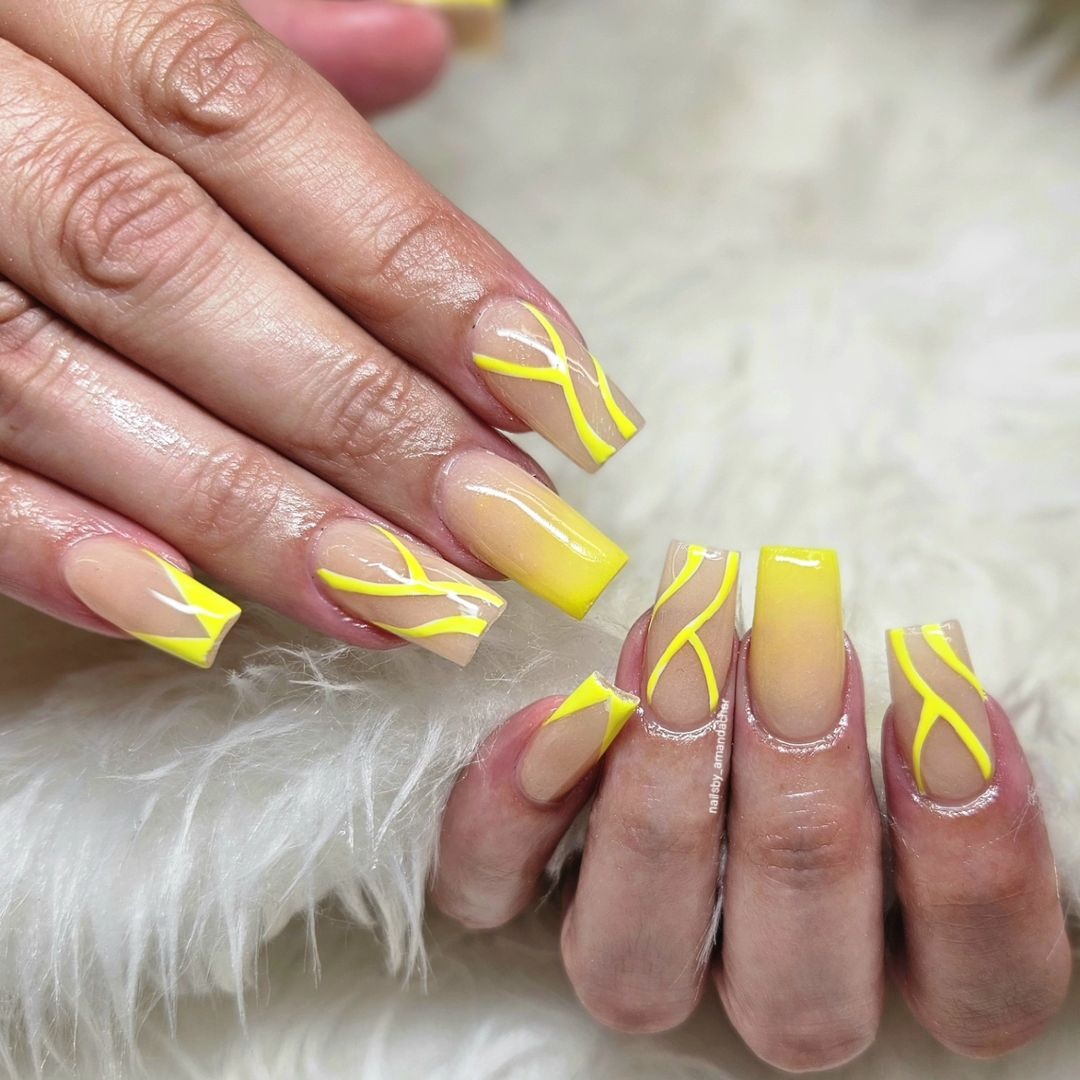
Elegant Yellow Swirl Nails
These nails feature a delicate swirl design that adds a touch of elegance and fun to your fall manicure. The swirls, created with yellow polish, stand out beautifully against the nude base, making this design both subtle and eye-catching.

Consumables:
- Nude base polish (e.g., OPI Nail Lacquer in “Dulce de Leche”)
- Yellow nail polish (e.g., Sally Hansen Miracle Gel in “Mellow Yellow”)
- Nail art brush or dotting tool
- Base coat
- Top coat
How to Create Yellow Swirl Nails at Home:
- Start with a base coat to protect your nails.
- Apply two coats of the nude base polish and let it dry.
- Using a nail art brush or dotting tool, create swirl patterns with the yellow polish.
- Finish with a top coat to secure the design and add shine.
Bright Yellow Almond Nails
Bright yellow almond nails are a bold statement for fall. The smooth, glossy finish of this vivid yellow polish highlights the perfect almond shape, making your nails look chic and sophisticated.
Consumables:
- Bright yellow nail polish (e.g., Essie Nail Polish in “Hay There”)
- Base coat
- Top coat
How to Create Bright Yellow Almond Nails at Home:
- Apply a base coat to prepare your nails.
- Paint your nails with two coats of bright yellow polish, allowing each coat to dry fully.
- Apply a top coat to add a glossy finish and protect your manicure.
Subtle Pastel Yellow Nails
For a more understated look, these pastel yellow nails are perfect. The soft yellow color is gentle and soothing, making it a great choice for those who prefer a minimalist yet elegant manicure.

Consumables:
- Pastel yellow nail polish (e.g., Zoya Nail Polish in “Bee”)
- Base coat
- Top coat
How to Create Subtle Pastel Yellow Nails at Home:
- Start with a base coat to protect your nails.
- Apply two coats of pastel yellow polish, letting each coat dry completely.
- Finish with a top coat to seal in the color and add a subtle shine.
Bold Leopard Print with Yellow Nails
Combining the boldness of yellow with the wildness of leopard print creates a striking and fashionable look. This design is perfect for making a statement and adds a touch of edginess to your fall manicure.

Consumables:
- Yellow nail polish (e.g., China Glaze in “Happy Go Lucky”)
- Black nail polish for leopard spots (e.g., OPI Nail Lacquer in “Black Onyx”)
- Gold glitter polish (e.g., Zoya Nail Polish in “Gilty”)
- Nail art brush
- Base coat
- Top coat
How to Create Leopard Print with Yellow Nails at Home:
- Apply a base coat to your nails.
- Paint most of your nails with yellow polish, leaving one or two for the leopard print accent.
- On the accent nails, create leopard spots with black polish using a nail art brush.
- Add gold glitter to some of the spots for extra flair.
- Finish with a top coat to seal the design.
Glossy Yellow French Tips
These glossy yellow French tips add a modern twist to the classic French manicure. The vibrant yellow tips against the clear base create a fresh and clean look that’s perfect for any occasion.

Consumables:
- Clear nail polish (e.g., Sally Hansen Hard as Nails)
- Yellow polish for the tips (e.g., OPI Nail Lacquer in “Need Sunglasses?”)
- French tip guides
- Base coat
- Top coat
How to Create Glossy Yellow French Tips at Home:
- Apply a base coat followed by clear polish.
- Once dry, place French tip guides on your nails.
- Paint the tips with yellow polish and carefully remove the guides.
- Seal the design with a top coat for a glossy finish.
Sophisticated Yellow Almond Nails
These yellow almond nails are a classic choice for fall, combining simplicity and elegance. The soft yellow shade is perfect for those who prefer a more understated yet stylish look. The glossy finish adds a touch of sophistication, making these nails suitable for any occasion.

Consumables:
- Soft yellow nail polish (e.g., Essie Nail Polish in “Vanilla Icing”)
- Base coat
- Top coat
How to Create Yellow Almond Nails at Home:
- Start by applying a base coat to protect your nails.
- Apply two coats of the soft yellow nail polish, allowing each coat to dry completely.
- Finish with a top coat to add a glossy finish and protect your manicure.
Bold Yellow and Pink Accent Nails
Combining bright yellow with pink accents creates a fun and eye-catching design. The mix of solid yellow nails with pink and yellow swirl accents makes for a unique and playful look, perfect for those who love bold and vibrant styles.

Consumables:
- Bright yellow nail polish (e.g., Sally Hansen Miracle Gel in “Mellow Yellow”)
- Pink nail polish (e.g., OPI Nail Lacquer in “Mod About You”)
- Gold glitter polish (e.g., Zoya Nail Polish in “Gilty”)
- Nail art brush
- Base coat
- Top coat
How to Create Yellow and Pink Accent Nails at Home:
- Apply a base coat to your nails.
- Paint most of your nails with yellow polish, and one or two with pink polish.
- Use a nail art brush to create swirl patterns with the yellow and pink polishes, adding gold glitter accents.
- Seal the design with a top coat.
Charming Yellow French Tips with Stars
These nails feature delicate yellow French tips adorned with tiny gold stars, creating a whimsical and charming look. The clear base keeps the design light and airy, perfect for those who love subtle yet detailed nail art.

Consumables:
- Clear nail polish (e.g., Sally Hansen Hard as Nails)
- Yellow polish for tips (e.g., OPI Infinite Shine in “Bee Mine Forever”)
- Gold star decals or nail art stickers
- French tip guides
- Base coat
- Top coat
How to Create Yellow French Tips with Stars at Home:
- Apply a base coat followed by clear polish.
- Once dry, place French tip guides on your nails.
- Paint the tips with yellow polish and carefully remove the guides.
- Add gold star decals to the tips.
- Finish with a top coat to seal the design.
Gradient Yellow Coffin Nails
Gradient yellow coffin nails are a trendy choice for fall. The smooth transition from nude to yellow creates a beautiful ombre effect, while the length and shape of the nails add drama and sophistication.

Consumables:
- Nude nail polish (e.g., OPI Nail Lacquer in “Samoan Sand”)
- Yellow nail polish (e.g., China Glaze in “Happy Go Lucky”)
- Sponge for gradient effect
- Nail art brush
- Base coat
- Top coat
How to Create Gradient Yellow Coffin Nails at Home:
- Apply a base coat to your nails.
- Paint the nails with nude polish and let it dry.
- Using a sponge, apply yellow polish to create the gradient effect, blending from the tip to the base.
- Add any desired nail art details with a brush.
- Finish with a top coat to seal the design.
Matte Yellow and Green Nails with Leaf Accents
This design combines matte yellow and green nails with intricate leaf accents, perfect for fall. The matte finish gives a modern twist, while the leaf patterns add a natural and artistic touch.

Consumables:
- Matte yellow nail polish (e.g., OPI Nature Strong in “Make My Daisy”)
- Matte green nail polish (e.g., Essie Matte in “Off Tropic”)
- Nail art brush for leaf patterns
- Base coat
- Matte top coat
How to Create Yellow and Green Nails with Leaf Accents at Home:
- Apply a base coat to protect your nails.
- Paint some nails with matte yellow polish and others with matte green polish.
- Use a nail art brush to draw leaf patterns with the opposite color on each nail.
- Seal with a matte top coat for a modern finish.
Festive Yellow Nails with Autumn Leaves
These festive nails incorporate bright yellow polish with clear accents filled with autumn leaves, creating a perfect seasonal look. The combination of yellow, red, and orange leaves on a clear base gives a natural and festive vibe, making your nails a highlight of the fall season.

Consumables:
- Bright yellow nail polish (e.g., China Glaze in “Happy Go Lucky”)
- Clear nail polish
- Autumn leaf nail decals
- Base coat
- Top coat
How to Create Festive Yellow Nails with Autumn Leaves at Home:
- Apply a base coat to protect your nails.
- Paint your nails with a bright yellow polish, leaving some nails clear.
- Apply autumn leaf decals to the clear nails.
- Seal the design with a top coat to add shine and protect the decals.
Terrazzo Yellow Fall Nails
This nail design combines bright yellow polish with terrazzo-inspired accents, creating a modern and chic look. The mix of colorful terrazzo patterns on a nude base pairs beautifully with the solid yellow nails, making it a unique and stylish choice for fall.

Consumables:
- Bright yellow nail polish (e.g., Essie Nail Polish in “Hay There”)
- Nude base polish (e.g., OPI Nail Lacquer in “Dulce de Leche”)
- Multi-color terrazzo nail decals or polishes
- Base coat
- Top coat
How to Create Terrazzo Yellow Fall Nails at Home:
- Apply a base coat followed by a nude base polish on some nails.
- Use terrazzo decals or create patterns with multi-color polishes on the nude nails.
- Paint the remaining nails with bright yellow polish.
- Finish with a top coat to protect the design and add a glossy finish.
Autumn Leaves on Yellow Nails
These nails feature a beautiful blend of yellow polish with vibrant autumn leaves, capturing the essence of fall. The detailed leaf designs on a yellow base create a natural and seasonal look that’s perfect for fall gatherings and events.

Consumables:
- Yellow nail polish (e.g., Sally Hansen Miracle Gel in “Mellow Yellow”)
- Autumn leaf nail decals
- Base coat
- Top coat
How to Create Autumn Leaves on Yellow Nails at Home:
- Start with a base coat to protect your nails.
- Apply two coats of yellow polish and let it dry completely.
- Place autumn leaf decals on each nail.
- Seal the design with a top coat to ensure longevity and add shine.
Yellow French Tips with Dots
These nails showcase a creative take on the classic French tip, featuring yellow tips and dotted accents. The nude base keeps the design elegant, while the yellow tips and dots add a playful touch, making it a versatile choice for any occasion.

Consumables:
- Nude base polish (e.g., OPI Nail Lacquer in “Samoan Sand”)
- Yellow nail polish for tips (e.g., OPI Nail Lacquer in “Need Sunglasses?”)
- Dotting tool for accents
- Base coat
- Top coat
How to Create Yellow French Tips with Dots at Home:
- Apply a base coat followed by a nude base polish.
- Use a French tip guide to paint yellow tips.
- Add dots with a dotting tool to enhance the design.
- Finish with a top coat to protect the design and add a glossy finish.
Gradient Yellow Marble Nails
Gradient yellow marble nails are a stunning and sophisticated choice for fall. The smooth transition from nude to yellow, combined with a subtle marble effect, creates a luxurious and elegant look.

Consumables:
- Nude nail polish (e.g., OPI Nail Lacquer in “Bubble Bath”)
- Yellow nail polish (e.g., China Glaze in “Lemon Fizz”)
- Sponge for gradient effect
- Nail art brush for marble effect
- Base coat
- Top coat
How to Create Gradient Yellow Marble Nails at Home:
- Apply a base coat to your nails.
- Paint the nails with a nude base and let it dry.
- Use a sponge to create a gradient effect with yellow polish.
- Add marble details with a nail art brush.
- Finish with a top coat to seal the design.
Bright Yellow and Pink Nails
These nails feature a vibrant combination of bright yellow and pink, accented with white swirl designs. The mix of colors and patterns creates a playful and eye-catching look, perfect for making a bold statement.

Consumables:
- Bright yellow nail polish (e.g., OPI Nail Lacquer in “Sun, Sea, and Sand in My Pants”)
- Pink nail polish (e.g., Essie Nail Polish in “Fiji”)
- White nail polish for swirls
- Nail art brush
- Base coat
- Top coat
How to Create Bright Yellow and Pink Nails at Home:
- Apply a base coat to protect your nails.
- Paint some nails with bright yellow polish and others with pink polish.
- Use a nail art brush to add white swirl designs.
- Seal the design with a top coat for a glossy finish.
Save Pin
