
22 Bright and Trendy Coral Color Nail Designs: Inspiring Ideas and Art Styles
Coral color nails are the epitome of vibrant, summer-ready manicures. Whether you’re drawn to the bright and neon hues or prefer a more peach-toned light look, coral has a way of making your nails pop like no other shade. But what makes this color so versatile? And how can you create a range of coral color nail designs that cater to different moods and occasions? In this article, I’ll guide you through some stunning coral nail ideas, each designed to inspire your next manicure. Let’s dive into the world of coral and discover how this lively hue can transform your nails into a work of art.
Coral and Floral Fusion
As a professional manicurist, I can confidently say that coral color nails paired with delicate flowers create an effortlessly cute and feminine look. The first design is a perfect blend of pink and peach tones with soft floral accents on a short nail canvas. The art here is subtle yet striking, making it suitable for both casual and formal settings.

Consumables:
-
- Coral pink polish: I recommend OPI’s “Coral-ing Your Spirit Animal.”
- White floral decals: Look for Sally Hansen’s Floral Fantasy stickers.
- Top coat: A quick-dry, high-shine option like Seche Vite.
DIY Instructions:
-
- Apply a base coat to protect your nails.
- Use the coral pink polish for two coats, allowing each to dry.
- Place the floral decals on the accent nails, pressing down gently.
- Finish with a top coat to seal the design.
Ombre Coral Blends
This ombre design seamlessly transitions from a light coral base to a deeper, almost red-orange tip, creating a mesmerizing gradient effect. The bright orange polish paired with a peach undertone gives the nails an electrifying yet soft appeal. The art of ombre nails requires precision, but the result is always worth the effort.

Consumables:
-
- Coral orange polish: Essie’s “Tart Deco” for the base.
- Bright orange polish: China Glaze’s “Flip Flop Fantasy.”
- Makeup sponge: For blending the colors seamlessly.
- Top coat: Opt for Essie Gel Setter.
DIY Instructions:
-
- After applying a base coat, paint the entire nail with the peach polish.
- Dab the bright orange polish onto a makeup sponge and gently press it onto the tips of the nails.
- Blend the colors in an ombre fashion by moving the sponge slightly down the nail.
- Seal with a top coat for a smooth finish.
Coral Leaves on Nude Base
For those who prefer a minimalist approach, this design incorporates coral leaf accents on a nude base, creating a delicate yet sophisticated look. The art of this design lies in its simplicity, making it an excellent choice for those new to nail designs.

Consumables:
-
- Nude polish: I recommend Essie’s “Mademoiselle.”
- Coral nail art polish: Sally Hansen’s “Insta-Dri” in Coral Commotion.
- Detailing brush: For precise leaf application.
- Top coat: Look for Zoya Armor Top Coat.
DIY Instructions:
-
- Apply a base coat followed by two coats of nude polish.
- Using the detailing brush, paint coral leaves on the nails with the coral nail art polish.
- Add a top coat to protect the design and add a glitter accent if desired.
Coral Almonds with a Twist
Almond-shaped nails are a timeless classic, and this coral variation adds a modern twist with a mix of solid coral and pink. The Acrylic application ensures the design lasts longer and remains bright throughout the wear. This is perfect for anyone looking to make a statement with their manicure.

Consumables:
-
- Coral acrylic powder: Mia Secret’s Coral Bliss.
- Pink polish: OPI’s “Pinking of You.”
- Acrylic brush: Ensure it’s a fine-tipped one for precision.
- Top coat: A matte option like OPI Matte Top Coat for a chic finish.
DIY Instructions:
-
- Apply the coral acrylic powder using the Acrylic brush and cure under UV light.
- Paint alternating nails with the pink polish for contrast.
- Seal with a matte top coat for a sophisticated look.
Multicolored Coral Elegance
Mixing coral, pink, peach, and red tones across your nails can create a bright and fun manicure. The combination of shades adds depth and interest, making this design ideal for those who love a bit of variety in their nail art.

Consumables:
-
- Coral polish: Zoya’s “Wendy.”
- Peach polish: Butter London’s “Trout Pout.”
- Red polish: Revlon’s “Red Hot Tamale.”
- Top coat: Sally Hansen’s Miracle Gel Top Coat for extended wear.
DIY Instructions:
-
- Start with a base coat, followed by alternating the coral, peach, and red polishes on each nail.
- Apply two coats of each color for opacity.
- Finish with a top coat to ensure longevity.
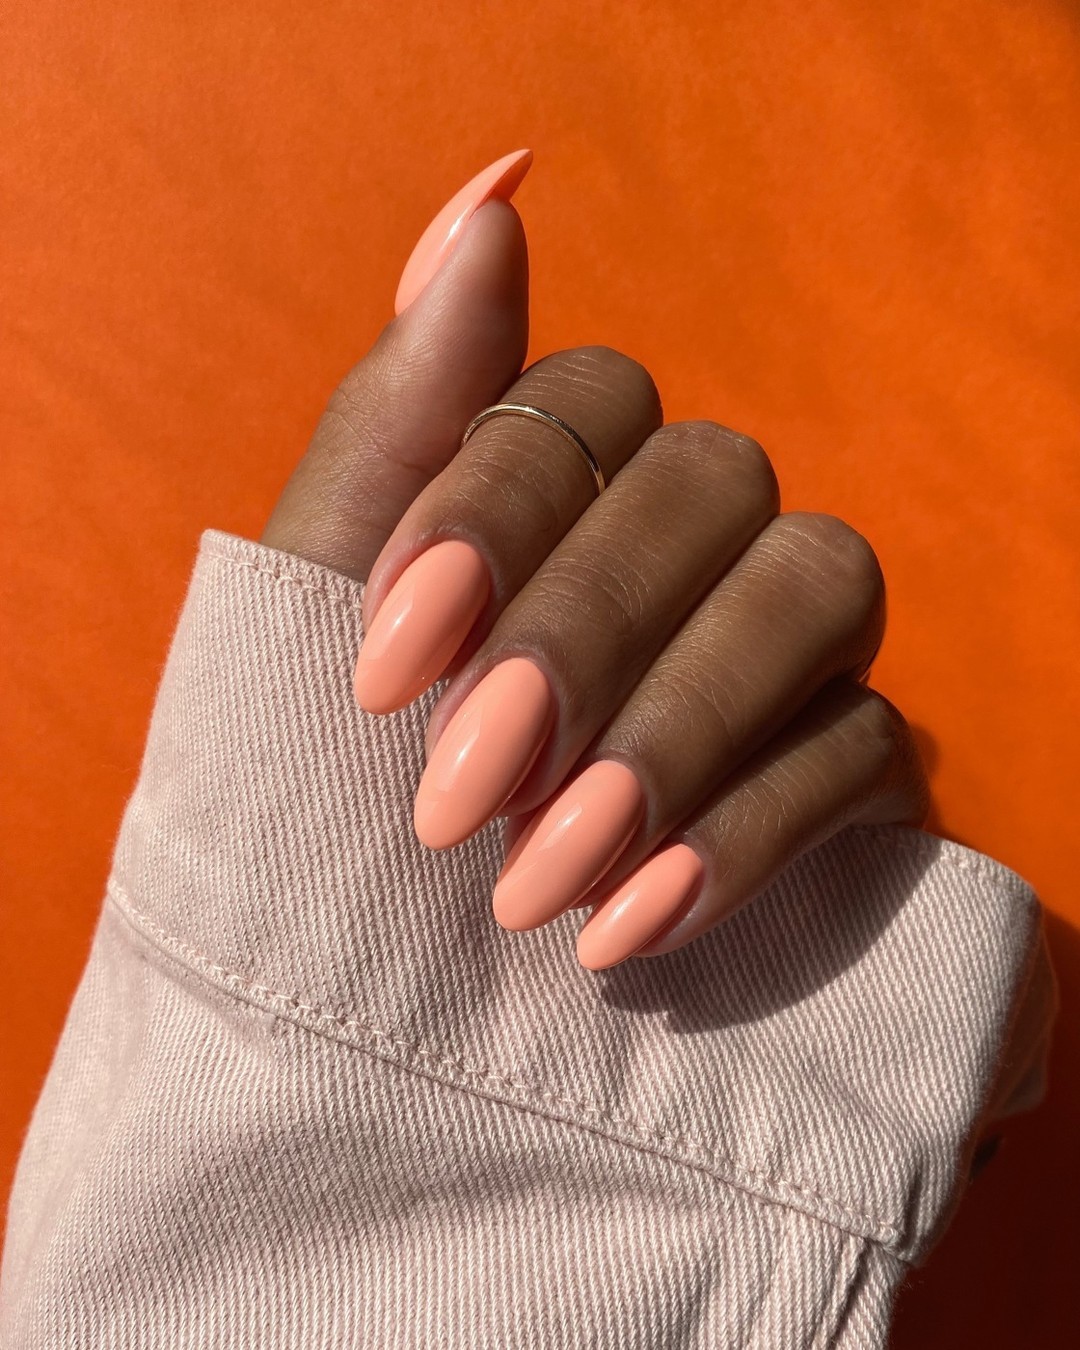
Bold Coral Elegance
This bright and peach coral manicure showcases a flawless almond shape, adding an elegant flair to a simple yet stunning design. The solid coral polish stands out against any backdrop, making it an ideal choice for those who love a bold look with minimal effort. The shape elongates the fingers, creating a sophisticated silhouette perfect for both day and night wear.

Consumables:
-
- Coral polish: Essie’s “Peach Side Babe.”
- Base coat: Orly Bonder Rubberized Basecoat for long-lasting wear.
- Top coat: Seche Vite for a glossy finish.
DIY Instructions:
-
- Start with a base coat to ensure the longevity of your manicure.
- Apply two coats of coral polish, allowing each coat to dry fully.
- Seal with a high-gloss top coat to enhance the shine and protect the design.
Neon Coral Perfection
For those who adore a neon pop, this coral manicure is a must-try. The intense bright coral shade is electrifying, and the almond shape adds a touch of elegance to the vibrant color. This design is perfect for summer, making a statement with its eye-catching pink-infused coral tone.

Consumables:
-
- Neon coral polish: China Glaze’s “Neon & On & On.”
- Base coat: CND Stickey Base Coat for added adhesion.
- Top coat: CND Super Shiney Top Coat for a reflective finish.
DIY Instructions:
-
- Begin with a base coat to help the neon polish adhere better.
- Apply two coats of the neon coral polish, ensuring full coverage.
- Finish with a top coat to lock in the color and add a high-shine finish.
Coral and Gold Glam
This design takes the elegance of coral nails to the next level by adding a touch of glitter and gold accents. The almond-shaped nails are adorned with glitter at the base and a subtle gold French tip accent, creating a luxurious and sophisticated look. This design is perfect for special occasions or whenever you want to add a bit of glamour to your everyday style.
Consumables:
-
- Coral polish: OPI’s “Living on the Bula-vard!”
- Gold glitter polish: Sally Hansen’s “Golden-I.”
- Detailing brush: For precise application of the gold accents.
- Top coat: Essie Gel Couture Top Coat for a long-lasting shine.
DIY Instructions:
-
- Apply a base coat followed by two coats of coral polish.
- Use a detailing brush to apply gold glitter polish to the base of the nails and along the French tip.
- Seal with a top coat to ensure the glitter stays in place and adds a brilliant shine.
Coral French Twist
This manicure is a modern take on the classic French tip. The coral color dominates the nails with a sleek and solid finish, while a delicate gold stripe adds a twist to the traditional French tip. This look is both cute and elegant, making it a versatile choice for any occasion.

Consumables:
-
- Coral polish: Zoya’s “Coraline.”
- Gold striping tape: Available from brands like Young Nails.
- Top coat: Sally Hansen Miracle Gel Top Coat for added durability.
DIY Instructions:
-
- Start with a base coat, followed by two coats of coral polish.
- Apply the gold striping tape along the French tip line and press down gently.
- Finish with a top coat to seal the tape and add a glossy finish.
Coral French with a Twist
For those who love a creative spin on the French tip, this design features coral accents with a hint of green along the tip of almond-shaped nails. The unique color combination adds a playful touch, making it a bright and trendy choice for those who want something different yet chic.

Consumables:
-
- Coral polish: Essie’s “Tart Deco.”
- Green polish: OPI’s “My Gecko Does Tricks.”
- Detailing brush: For precision in applying the French tip.
- Top coat: OPI’s Top Coat for a smooth, lasting finish.
DIY Instructions:
-
- Begin with a base coat and apply a neutral base color.
- Use the detailing brush to apply the coral polish to the French tip, then add a fine line of green along the edge.
- Seal the look with a top coat to ensure longevity and shine.
Coral Zebra Stripes
This striking coral color nail design incorporates a playful zebra stripe art on one nail, contrasting beautifully against the solid coral polish on the others. The almond shape enhances the elegance of this design while the subtle stripes add a touch of fun. It’s a perfect bright yet sophisticated choice for anyone looking to make a statement with their manicure.

Consumables:
-
- Coral polish: OPI’s “A Good Man-darin is Hard to Find.”
- White striping polish: Sally Hansen’s “White On” for the zebra stripes.
- Top coat: Essie Speed Setter for quick drying and shine.
DIY Instructions:
-
- Start with a base coat, followed by two coats of the coral polish on all nails.
- Use a fine detailing brush or striping tool to create the zebra stripes on the accent nail with the white polish.
- Finish with a top coat to ensure the stripes stay intact and add a glossy finish to the overall look.
Coral and Dots Delight
This design mixes coral, pink, and peach tones with playful black dot accents for a unique, stylish look. The gradient effect on the nails combined with the art of dotting makes this design stand out while still being wearable for everyday occasions. The short length of the nails keeps the look practical yet trendy.

Consumables:
-
- Coral polish: China Glaze’s “Flip Flop Fantasy.”
- Peach polish: Zoya’s “Haruko.”
- Black dotting tool: Any dotting tool for precision, or use a bobby pin.
- Top coat: OPI’s Infinite Shine for a long-lasting effect.
DIY Instructions:
-
- Apply a base coat, then alternate between coral and peach polishes on different nails.
- Use a dotting tool to create the black dots on the accent nails.
- Seal with a top coat to lock in the design and add a brilliant shine.
Coral Daisy Accents
This design features a delightful mix of coral and peach nails, with one accent nail adorned with delicate white daisy flowers. The short nails keep the look cute and fresh, while the solid coral and peach tones ensure it remains versatile and wearable.
Consumables:
-
- Coral polish: OPI’s “Cajun Shrimp.”
- Peach polish: Essie’s “Peach Daiquiri.”
- White nail art pen: Use to draw the daisy flowers on the accent nail.
- Top coat: Seche Vite for a quick-dry, glossy finish.
DIY Instructions:
-
- Apply a base coat, followed by alternating coral and peach polishes on the nails.
- Use a white nail art pen to draw the daisy flowers on the accent nail.
- Finish with a top coat to seal the design and protect the flowers.
Coral Glitter Glam
For those who love a bit of sparkle, this coral manicure with glitter accents is the perfect choice. The bright coral base is enhanced by a shimmering glitter overlay, creating a dynamic and eye-catching look that’s perfect for both casual and formal events.

Consumables:
-
- Coral polish: Essie’s “Sunset Sneaks.”
- Coral glitter polish: Sinful Colors’ “Pink Forever.”
- Top coat: Essie Gel Couture Top Coat for extended wear and shine.
DIY Instructions:
-
- Start with a base coat and apply two coats of coral polish.
- Apply the glitter polish as an overlay, focusing on the tips or as an all-over shimmer.
- Seal with a top coat to ensure the glitter stays in place and the manicure lasts longer.
Classic Coral Chic
This solid coral manicure is the epitome of classic elegance. The short nails, combined with the vibrant coral shade, create a timeless look that is both chic and versatile. Whether you’re heading to a formal event or just want a polished everyday look, this design delivers on all fronts.

Consumables:
-
- Coral polish: Zoya’s “Wendy.”
- Base coat: Orly Bonder Rubberized Basecoat for long-lasting wear.
- Top coat: OPI’s Top Coat for a smooth, glossy finish.
DIY Instructions:
-
- Apply a base coat to protect your nails and ensure longevity.
- Follow with two coats of coral polish, allowing each coat to dry fully.
- Finish with a top coat to enhance the shine and protect the design.
Coral and Rhinestone Chic
This coral manicure is elevated with delicate rhinestone accents that add a touch of glamour to the overall look. The almond shape is perfect for showcasing the bright coral hue, while the rhinestones offer a cute and glittering contrast. This design is perfect for those who want a sophisticated yet eye-catching manicure.

Consumables:
-
- Coral polish: OPI’s “Coral-ing Your Spirit Animal.”
- Rhinestones: Swarovski crystals for a luxurious touch.
- Top coat: Essie Gel Setter for a high-shine finish.
DIY Instructions:
-
- Apply a base coat, followed by two coats of coral polish.
- Carefully place the rhinestones along the accent nails while the polish is still tacky.
- Seal with a top coat to secure the rhinestones and add shine.
Solid Coral Simplicity
Sometimes, less is more. This solid coral manicure is simple yet stunning, making it an excellent choice for any occasion. The almond shape adds a touch of elegance to the bright, pinkish-coral hue. This design is all about letting the color speak for itself, proving that a solid color can be just as impactful as intricate art.

Consumables:
-
- Coral polish: Essie’s “Cute as a Button.”
- Base coat: Orly Bonder Rubberized Basecoat for long-lasting wear.
- Top coat: Sally Hansen Insta-Dri for a quick, glossy finish.
DIY Instructions:
-
- Start with a base coat to protect your nails.
- Apply two coats of coral polish, allowing each layer to dry completely.
- Finish with a top coat to enhance the color and ensure durability.
Coral Waves and Swirls
This design brings a fun twist to the classic coral manicure by incorporating soft, wavy art. The solid coral base is complemented by a white swirl pattern on a couple of accent nails, adding a playful yet chic element. It’s a perfect balance between bright and sophisticated, making it ideal for those who love a unique, trendy look.

Consumables:
-
- Coral polish: Zoya’s “Wendy.”
- White nail art pen: For creating precise swirls.
- Top coat: OPI’s Infinite Shine for a smooth, long-lasting finish.
DIY Instructions:
-
- Begin with a base coat and apply two coats of coral polish.
- Use the white nail art pen to draw swirls on the accent nails.
- Seal the look with a top coat to protect the art and enhance the shine.
Coral Glitter Fade
This design combines the vibrant coral color with a glitter fade effect that starts at the tips and gradually fades into the almond-shaped nails. The result is a dazzling manicure that catches the light beautifully, perfect for special occasions or whenever you want to add some sparkle to your look.

Consumables:
-
- Coral polish: Essie’s “Tart Deco.”
- Coral glitter polish: Butter London’s “Champers” for the fade effect.
- Top coat: Essie Gel Couture Top Coat for extended wear and extra shine.
DIY Instructions:
-
- Apply a base coat followed by two coats of coral polish.
- Dab the glitter polish at the tips of the nails, blending downward for a fade effect.
- Finish with a top coat to smooth the transition and add shine.
Coral and White Gradient
This manicure features a delicate gradient effect from coral to white, creating a soft and dreamy look. The solid coral transitions seamlessly into a pale, almost light white hue, making this design both elegant and trendy. Perfect for those who love a more understated yet chic look.

Consumables:
-
- Coral polish: OPI’s “A Good Man-darin is Hard to Find.”
- White polish: Essie’s “Blanc.”
- Makeup sponge: For blending the gradient.
- Top coat: Seche Vite for a quick-dry, glossy finish.
DIY Instructions:
-
- Start with a base coat, then apply coral polish at the base of the nails.
- Use a makeup sponge to blend the coral into the white polish, creating a gradient effect.
- Seal with a top coat to smooth out the gradient and add shine.
Cosmic Coral Magic
This coral manicure is out of this world with its cosmic-inspired art. The solid coral base is accentuated with black and white galaxy swirls and star accents, creating a unique and captivating look. Perfect for those who want to add a bit of cosmic flair to their coral nails.

Consumables:
-
- Coral polish: Zoya’s “Livingston.”
- Black and white nail art pen: For creating galaxy swirls and stars.
- Top coat: Essie Speed Setter for a quick-dry, high-shine finish.
DIY Instructions:
-
- Apply a base coat followed by two coats of coral polish.
- Use the nail art pens to draw swirls and stars on the accent nails.
- Finish with a top coat to seal the design and add a glossy finish.
Coral Leopard Accents
This coral manicure features a fun and playful leopard print accent, making it a perfect choice for those who love a bit of wild art on their nails. The bright coral base is contrasted beautifully with the leopard print, creating a look that is both trendy and eye-catching.

Consumables:
-
- Coral polish: China Glaze’s “Coral Star.”
- Leopard print stencil: Or a thin brush for freehand painting.
- Top coat: CND Vinylux Weekly Top Coat for a long-lasting finish.
DIY Instructions:
-
- Start with a base coat, followed by two coats of coral polish.
- Use a stencil or thin brush to create the leopard print on the accent nails.
- Seal with a top coat to protect the design and ensure longevity.
Save Pin
