
Bright nail colors are more than just a trend—they’re a statement. Whether you’re embracing a bold, neon hue for spring or looking for fun, solid colors to make your nails pop, the possibilities are endless. But how do you choose the right shade for your skin tone? How do you make sure those colors last and shine? And, more importantly, how can you recreate those stunning nail designs at home? Let’s dive into the world of bright nail colors and explore some amazing designs that suit every skin tone and style.
Neon Swirl Magic
Neon swirls on a nude base create a mesmerizing effect that’s perfect for those who love vibrant colors without overwhelming their nails. The design features a mix of bright nail colors including neon green, pink, orange, and yellow, swirled together in a way that creates a dynamic, yet balanced look. This design is particularly striking on tan skin and dark skin, as the neon hues contrast beautifully, bringing out the depth of the skin tone. The shine on these nails adds a polished finish that elevates the entire look, making it both fun and sophisticated.

Consumables:
- Base coat: OPI Natural Nail Base Coat
- Nude polish: Essie in “Bare With Me”
- Neon polishes: DND in “Neon Orange”, “Neon Pink”, “Neon Green”, “Neon Yellow”
- Top coat: Seche Vite Dry Fast Top Coat
- Nail Art Brush: Twinkled T Nail Art Brushes
- Shine-enhancing top coat: Essie Gel Setter
DIY Instructions:
- Start by applying a base coat to protect your natural nails.
- Apply two coats of nude polish and let it dry completely.
- Using a thin nail art brush, create swirling patterns with each neon polish. Alternate colors to ensure a vibrant mix.
- Finish with a shine-enhancing top coat to seal the design and add a glossy finish.
- Allow your nails to dry fully to avoid smudging the intricate swirl patterns.
Bold and Geometric
This design is a striking combination of bright colors and bold geometric lines. The mix of neon green, pink, and black, along with polka dot details, creates an edgy yet playful vibe. This look is perfect for pale skin and tan skin, as the bright colors contrast well, making the nails stand out. The solid neon shades against the neutral background make the design both eye-catching and modern. It’s a great option for those who want cute but daring nails that reflect a spring or summer palette.

Consumables:
- Base coat: CND Stickey Anchoring Base Coat
- Neon polishes: China Glaze in “Celtic Sun”, “Pink Voltage”
- Black polish: OPI in “Black Onyx”
- Dotting tool: KADS Nail Art Dotting Tools
- Striping tape: Born Pretty Nail Art Striping Tape
- Top coat: Sally Hansen Insta-Dri Top Coat
DIY Instructions:
- Apply a base coat to ensure your design lasts longer.
- Paint your nails with alternating neon colors, leaving one or two nails for the geometric designs.
- Use striping tape to create clean lines and apply black polish over them. Remove the tape carefully.
- Add polka dots with a dotting tool for a playful touch.
- Seal everything with a top coat for durability and extra shine.
Dotted French Tips
This design is a creative twist on the classic French tip, featuring bright, dotted patterns along the nail edge. The use of multiple colors, including light pastels and vibrant neons, creates a delicate yet bold look. This design works beautifully on brown skin and light skin tones, offering a fresh, modern take on a timeless style. The dots add a playful element, making it perfect for anyone who loves pretty and unique nail art. The overall shine of the nails enhances the color palette, making it suitable for both everyday wear and special occasions.

Consumables:
- Base coat: Zoya Anchor Base Coat
- Nude polish: Orly in “Bare Rose”
- Neon and pastel polishes: Gelish in “You’re So Sweet You’re Giving Me a Toothache”, “Let’s Hit the Bunny Slopes”, “Don’t Be Jelly”, “The Finer Things”
- Dotting tools: Winstonia Dotting Tools
- Top coat: Gelish Top It Off Sealer Gel
DIY Instructions:
- Apply a base coat to prep your nails.
- Use nude polish as the base color and let it dry completely.
- With a dotting tool, create small dots along the nail tips using various neon and pastel colors.
- Make sure to space the dots evenly for a neat, symmetrical look.
- Finish with a top coat to lock in the design and add a shine.
Neon Flames and Smiley Faces
This manicure is a bold combination of neon flames, smiley faces, and even a hint of zebra stripes, making it a standout design for anyone looking to make a statement. The neon pink and yellow combo is perfect for dark skin and pale skin, bringing out the vibrancy of the colors. The mix of fun elements like the smiley face and flames adds a quirky, youthful touch. This design is both cute and daring, perfect for those who want to play with bright nail colors in a creative way.

Consumables:
- Base coat: Essie Strong Start Base Coat
- Neon polishes: OPI in “Neon Pink”, “Neon Yellow”
- Black polish: Sally Hansen Hard as Nails Xtreme Wear in “Black Out”
- Nail Art Brushes: Makartt Nail Art Liner Brushes
- Top coat: INM Out The Door Top Coat
DIY Instructions:
- Begin with a base coat to protect your nails.
- Apply neon pink and yellow polish on alternating nails.
- Use a nail art brush to draw flames on one or two nails with the opposite color. Add a smiley face or zebra stripe detail on other nails for a varied look.
- Seal the design with a top coat to ensure longevity and shine.
Rainbow Flame Ombre
This is a truly artistic design that combines rainbow ombre with flame details, resulting in a manicure that’s both eye-catching and inspo-worthy. The bright nail colors blend seamlessly from one shade to another, creating a solid gradient effect that’s stunning on pale skin and tan skin alike. The addition of black flame outlines adds contrast, making the colors pop even more. This design is perfect for those who want a striking, spring look that combines the best of both cute and edgy styles.

Consumables:
- Base coat: Orly Bonder Base Coat
- Ombre polishes: Holo Taco in “Not Milky White”, “Lemon Sucker”, “Green Taffy”, “Blue Freezie”
- Black polish: Essie in “Licorice”
- Makeup sponge: Real Techniques Miracle Complexion Sponge (for blending)
- Top coat: Essie Gel Couture Top Coat
DIY Instructions:
- Apply a base coat to start.
- Use a makeup sponge to blend ombre polishes from yellow to blue, creating a rainbow gradient.
- Once the ombre is set, use a nail art brush to draw black flame outlines on the nails.
- Finish with a top coat to add shine and protect your design.
Electric Red and Pink Swirls
This nail design is all about electrifying contrasts and vibrant swirls. The neon red and pink hues create a bold, dynamic look that’s perfect for those who love to stand out. The swirling patterns are both artistic and edgy, giving your nails a playful yet sophisticated vibe. This design is especially flattering on tan skin and dark skin, where the bright colors can really pop. The shine on these nails enhances the overall look, making it a top pick for a night out or a fun event.
Consumables:
- Base coat: Orly Bonder Base Coat
- Neon red polish: DND in “Fire Truck”
- Neon pink polish: Essie in “Mod Square”
- Nail Art Brushes: Beetles Nail Art Liner Brushes
- Top coat: Seche Vite Dry Fast Top Coat
DIY Instructions:
- Apply a base coat to protect your natural nails.
- Paint your nails with a base of neon red polish and allow it to dry completely.
- Using a fine nail art brush, create swirls with the neon pink polish over the red base.
- Finish with a top coat to lock in the design and add a glossy shine.
- Allow the nails to dry fully before going about your day to avoid smudging.
Neon Leopard Print
Leopard print nails never go out of style, and this neon version brings a fresh twist to a classic design. The combination of bright orange and pink with the bold leopard spots creates a fun and fierce look. This design is perfect for pale skin as well as dark skin, as the bright colors contrast nicely with both. The solid neon colors keep the design from looking too busy, while the leopard spots add just the right amount of edge. This is a great choice for anyone looking to make a bold statement with their nails.

Consumables:
- Base coat: OPI Natural Nail Base Coat
- Neon orange polish: China Glaze in “Orange Knockout”
- Neon pink polish: Sally Hansen Insta-Dri in “Peppy Pink”
- Black polish: OPI in “Black Onyx”
- Dotting tool: Beetles Nail Art Dotting Tools
- Top coat: Essie Gel Couture Top Coat
DIY Instructions:
- Start with a base coat to ensure your nails are protected.
- Paint alternating nails with neon orange and neon pink polish.
- Use a dotting tool and black polish to create leopard spots on the orange nails.
- Seal the design with a top coat to add shine and ensure your design lasts.
- Let the nails dry thoroughly before doing any activities to prevent smudging.
Coral and Gold Waves
The combination of coral with gold accents creates a beautiful, understated look that’s perfect for both everyday wear and special occasions. The smooth, flowing wave patterns are elegant and add a touch of sophistication to the bright coral color. This design looks particularly stunning on pale skin and tan skin, where the warm coral shade complements the skin tone beautifully. The addition of gold glitter adds just the right amount of shine and glamour to the design.

Consumables:
- Base coat: Essie Strong Start Base Coat
- Coral polish: Zoya in “Sawyer”
- White polish: OPI in “Alpine Snow”
- Gold glitter polish: Butter London in “Gold Rush”
- Nail Art Brush: Winstonia Nail Art Liner Brush
- Top coat: Sally Hansen Insta-Dri Top Coat
DIY Instructions:
- Apply a base coat to start off your manicure.
- Paint your nails with coral polish as the base color.
- Use a nail art brush to paint wave patterns in white polish and then layer gold glitter along the waves.
- Finish with a top coat to seal in the design and add shine.
- Allow the nails to dry completely to avoid any smudging or damage.
Abstract Neon Mosaic
This nail design is a bold, abstract mosaic of neon colors that’s both artistic and modern. The combination of bright hues like neon green, pink, yellow, and blue, along with the intricate black detailing, creates a design that’s eye-catching and unique. This look is perfect for anyone with dark skin or pale skin, as the contrast of the colors enhances the vibrancy of the design. The shine on the nails adds a polished finish, making this a standout design for any occasion.

Consumables:
- Base coat: CND Stickey Anchoring Base Coat
- Neon polishes: China Glaze in “Sun Worshiper”, “Purple Panic”, “Pool Party”, “Celtic Sun”
- Black polish: Essie in “Licorice”
- Detail brush: Twinkled T Nail Art Brushes
- Top coat: Gelish Top It Off Sealer Gel
DIY Instructions:
- Apply a base coat to protect your nails and help the polish adhere better.
- Use various neon polishes to create abstract shapes on each nail, leaving space for the black details.
- Outline some shapes with black polish using a detail brush to add depth and contrast.
- Seal the design with a top coat to add a high-gloss shine and ensure longevity.
- Allow ample drying time to prevent any smudging of the intricate details.
Gold Accents on Neon Colors
This design blends neon colors with gold accents to create a vibrant and luxurious look. The mix of bright neon shades with bold gold streaks makes for a striking combination that’s perfect for anyone looking to add some glamour to their nails. The design is versatile and works well on tan skin and pale skin, where the neon hues and gold shine can really stand out. This manicure is ideal for those who love a fun yet chic style.

Consumables:
- Base coat: OPI Natural Nail Base Coat
- Neon polishes: DND in “Electric Orange”, “Highlighter Yellow”, “Bubblegum Pink”
- Gold foil: Born Pretty Nail Art Gold Foil
- Nail Art Brushes: Makartt Nail Art Liner Brushes
- Top coat: Essie Gel Couture Top Coat
DIY Instructions:
- Start with a base coat to protect your natural nails.
- Apply different neon polishes to each nail, mixing and matching for a colorful effect.
- Use gold foil to add streaks or accents on top of the neon base colors.
- Seal the design with a top coat to lock in the gold accents and add a glossy shine.
- Allow your nails to dry completely before engaging in any activities to keep the design intact.
Neon Green Pop
This neon green manicure is the epitome of bold and bright. The solid green color is vivid and eye-catching, making it a perfect choice for those who love to stand out. The simplicity of the design allows the color to take center stage, creating a striking look that’s both modern and edgy. This shade of green looks fantastic on tan skin and pale skin alike, offering a pop of color that’s ideal for the spring and summer seasons. The shine on these nails adds to the overall appeal, giving them a fresh, polished finish.

Consumables:
- Base coat: Orly Bonder Base Coat
- Neon green polish: Essie in “Shake Your Palm Palms”
- Top coat: Sally Hansen Miracle Gel Top Coat
DIY Instructions:
- Start with a base coat to ensure a smooth application and protect your nails.
- Apply two coats of neon green polish for full coverage and vibrant color.
- Finish with a top coat to add extra shine and seal the color, ensuring it lasts longer.
- Allow your nails to dry thoroughly before handling anything to avoid smudging.
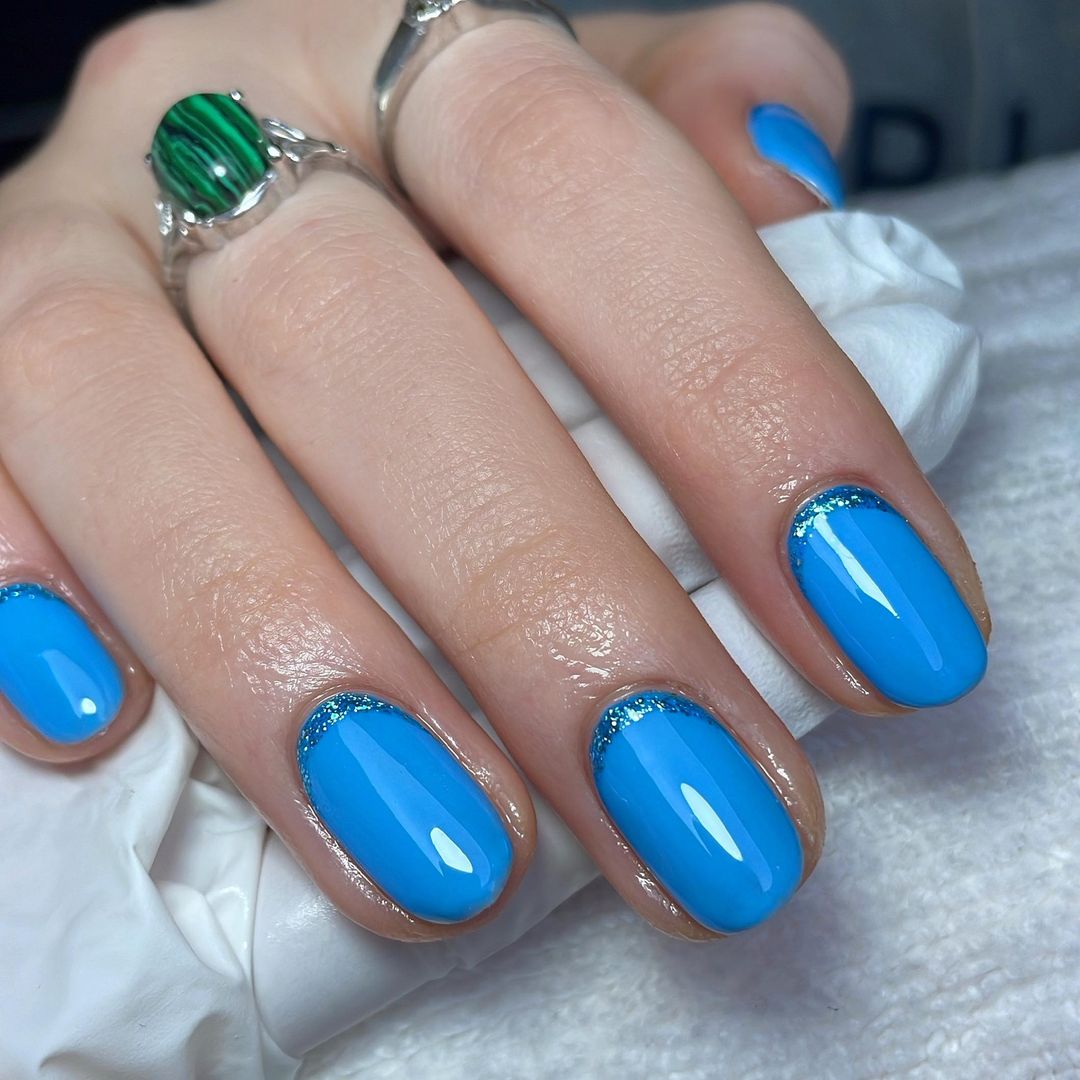
Ocean Blue with Glitter Accent
This manicure features a beautiful ocean blue base with subtle glitter accents at the cuticle, creating a sophisticated yet playful design. The rich blue color is perfect for any season and looks stunning on pale skin and dark skin tones. The added touch of glitter gives the design a fun and elegant twist, making it suitable for both casual and formal occasions. The shine from the glitter and the top coat enhances the overall look, giving your nails a polished and professional finish.

Consumables:
- Base coat: CND Stickey Anchoring Base Coat
- Ocean blue polish: OPI in “My Dogsled Is A Hybrid”
- Blue glitter polish: China Glaze in “Blue Bells Ring”
- Nail Art Brush: Beetles Nail Art Liner Brushes
- Top coat: Seche Vite Dry Fast Top Coat
DIY Instructions:
- Apply a base coat to protect your nails and help the polish adhere.
- Paint your nails with the ocean blue polish and let it dry completely.
- Using a nail art brush, apply the blue glitter polish at the base of your nails, blending upwards slightly for a gradient effect.
- Seal everything with a top coat to add shine and longevity to your manicure.
- Ensure the nails are fully dry before continuing with your day.
Neon Ombre with Charm Accent
This design is all about bold colors and unique accents. The neon ombre effect transitions smoothly from bright orange to green, with a hint of blue at the tips. The addition of a silver charm adds a touch of luxury and makes the design even more unique. This style is perfect for tan skin and dark skin, where the vibrant colors can really shine. The shine on these nails, combined with the gradient effect, creates a visually stunning look that’s ideal for those who love fun and daring nail designs.

Consumables:
- Base coat: OPI Natural Nail Base Coat
- Neon polishes: DND in “Coral Castle”, “Green Lantern”, “Blueberry Blast”
- Silver charm: Swarovski Crystal Nail Charms
- Nail Art Brushes: Makartt Nail Art Liner Brushes
- Top coat: Essie Gel Couture Top Coat
DIY Instructions:
- Start with a base coat to protect your natural nails.
- Apply the neon polishes in a gradient pattern, blending each color into the next for a seamless ombre effect.
- Attach the silver charm using a drop of clear polish or nail glue.
- Seal the design with a top coat to add shine and protect your manicure.
- Allow the nails to dry fully before doing any activities to keep the design intact.
Neon French Tips with a Twist
This design is a modern twist on the classic French tip, featuring vibrant neon green and pink stripes on a nude base. The clean lines and sharp contrasts make this look both trendy and elegant. It’s a fantastic option for pale skin and tan skin, where the bright colors can stand out against the neutral background. The shine on these nails adds a sleek finish, making the design suitable for both casual outings and more formal events.

Consumables:
- Base coat: Zoya Anchor Base Coat
- Nude polish: OPI in “Bubble Bath”
- Neon green polish: China Glaze in “I’m With the Lifeguard”
- Neon pink polish: Essie in “The Fuchsia Is Bright”
- Nail Art Brushes: Twinkled T Nail Art Brushes
- Top coat: Sally Hansen Miracle Gel Top Coat
DIY Instructions:
- Apply a base coat to your nails to protect them and provide a smooth surface.
- Use nude polish as the base color and let it dry completely.
- With a nail art brush, create thin stripes along the tips using the neon green and pink polishes.
- Finish with a top coat to seal the design and add shine.
- Allow your nails to dry fully before handling anything to avoid smudging.
Bright Florals on Nude Base
This floral design is a beautiful mix of bright orange and pink flowers on a nude base, creating a fresh and lively look. The contrast between the bright flowers and the neutral background makes this design pop, making it perfect for brown skin and tan skin. The shine on these nails enhances the brightness of the colors, making the flowers look even more vibrant. This design is ideal for spring and summer, offering a cute and feminine option that’s both fun and stylish.

Consumables:
- Base coat: Essie Strong Start Base Coat
- Nude polish: OPI in “Samoan Sand”
- Orange polish: Sally Hansen Miracle Gel in “Tribal Sun”
- Pink polish: Zoya in “Sweet”
- Nail Art Brushes: Makartt Nail Art Liner Brushes
- Top coat: Seche Vite Dry Fast Top Coat
DIY Instructions:
- Begin with a base coat to protect your nails and ensure a smooth surface for the polish.
- Apply the nude polish as your base and let it dry completely.
- Using nail art brushes, paint small flowers with the orange and pink polishes on a few accent nails.
- Finish with a top coat to seal the design and add a glossy shine.
- Let the nails dry thoroughly before doing any activities to avoid smudging or damaging the design.
Bold Red and Nude Combo
This striking nail design combines bold red with a soft nude base, creating a perfect contrast that’s both chic and modern. The addition of black lines through the red squares adds a geometric element, making the design more dynamic and visually interesting. This look is ideal for tan skin and pale skin alike, where the red can really pop against the neutral background. The shine on these nails enhances the overall elegance, making this design perfect for both day and night looks.

Consumables:
- Base coat: Zoya Anchor Base Coat
- Nude polish: Essie in “Ballet Slippers”
- Red polish: OPI in “Big Apple Red”
- Black polish: Sally Hansen Xtreme Wear in “Black Out”
- Nail Art Brushes: Makartt Nail Art Liner Brushes
- Top coat: Seche Vite Dry Fast Top Coat
DIY Instructions:
- Start with a base coat to protect your nails and ensure a smooth application.
- Apply the nude polish as your base and allow it to dry completely.
- Use a nail art brush to paint bold red squares on selected nails, then add thin black lines through the center.
- Finish with a top coat to add extra shine and seal the design.
- Allow the nails to dry thoroughly before handling anything to keep the design intact.
Rainbow French Tips
This design is a playful twist on the classic French manicure, featuring rainbow-colored tips. The mix of neon shades like pink, purple, green, yellow, and blue adds a vibrant and fun element to the nails, making them stand out without being overpowering. This look is perfect for spring and summer, and it works beautifully on pale skin and tan skin. The shine on these nails keeps the design looking fresh and polished, ideal for both casual and more formal occasions.

Consumables:
- Base coat: CND Stickey Anchoring Base Coat
- Nude polish: OPI in “Bubble Bath”
- Neon polishes: China Glaze in “Flip Flop Fantasy”, “That’s Shore Bright”, “I’m With the Lifeguard”, “Sun Worshiper”, “Turned Up Turquoise”
- Nail Art Brushes: Twinkled T Nail Art Brushes
- Top coat: Essie Gel Couture Top Coat
DIY Instructions:
- Apply a base coat to protect your natural nails.
- Use nude polish as the base color and let it dry fully.
- With a nail art brush, create thin French tips using the various neon polishes, alternating colors on each nail.
- Seal the design with a top coat to add shine and ensure the manicure lasts longer.
- Let the nails dry completely before engaging in any activities to keep the design pristine.
Tropical Ombre with Textured Finish
This vibrant design features a stunning tropical ombre effect with raised, textured details that add depth and dimension. The gradient moves smoothly from orange to yellow and then into blue, creating a beautiful sunset-like effect on the nails. The raised patterns enhance the tropical vibe, making this design perfect for summer vacations or beach days. This look is ideal for tan skin and pale skin where the bright colors can truly stand out. The shine on these nails adds to the overall luxurious feel of the design.

Consumables:
- Base coat: Orly Bonder Base Coat
- Ombre polishes: OPI in “No Tan Lines”, “I Just Can’t Cope-acabana”, “Fearlessly Alice”
- Textured top coat: China Glaze in “Sand Dolla Make You Holla”
- Nail Art Brushes: Winstonia Nail Art Liner Brushes
- Top coat: Sally Hansen Miracle Gel Top Coat
DIY Instructions:
- Start with a base coat to protect your nails.
- Apply the ombre polishes using a makeup sponge to blend the colors seamlessly.
- Once the ombre is dry, use a textured top coat to create raised patterns on the nails for added dimension.
- Finish with a top coat to seal the design and add shine.
- Allow ample drying time to prevent smudging or damaging the textured finish.
Glitter Stripe with Pink Accent
This elegant design combines a soft pink with a glittery stripe accent for a touch of sparkle. The contrast between the matte pink and the shimmering glitter creates a sophisticated look that’s perfect for both day and night. This design is particularly flattering on pale skin and tan skin, where the soft pink can enhance the natural tones of the skin. The shine from the glitter adds a glamorous finish, making this a great choice for special occasions or when you just want a little extra sparkle in your life.

Consumables:
- Base coat: Essie Strong Start Base Coat
- Pink polish: Zoya in “Sweet”
- Glitter polish: Sally Hansen Miracle Gel in “Game of Chromes”
- Nail Art Brushes: Makartt Nail Art Liner Brushes
- Top coat: Seche Vite Dry Fast Top Coat
DIY Instructions:
- Apply a base coat to protect your nails and ensure a smooth surface.
- Paint your nails with the pink polish and let them dry completely.
- Use a nail art brush to apply a glitter stripe down the center of one or more nails for an accent.
- Seal the design with a top coat to add shine and longevity.
- Allow your nails to dry thoroughly before doing any activities to keep the design intact.
Neon Animal Print
This nail design is a bold and vibrant take on animal print, featuring neon colors and intricate details. The mix of bright greens, pinks, oranges, and blues creates a wild and edgy look that’s perfect for anyone who loves to make a statement with their nails. This design is particularly stunning on tan skin and dark skin, where the neon colors can truly pop. The shine on these nails adds to the fierce, eye-catching effect, making this a great choice for those who love daring and fun nail art.

Consumables:
- Base coat: Zoya Anchor Base Coat
- Neon polishes: China Glaze in “I’m With the Lifeguard”, “Orange Knockout”, “Pool Party”, “Flip Flop Fantasy”
- Black polish: OPI in “Black Onyx”
- Nail Art Brushes: Beetles Nail Art Liner Brushes
- Top coat: Essie Gel Couture Top Coat
DIY Instructions:
- Apply a base coat to protect your natural nails.
- Use various neon polishes to create the base of the animal print design.
- With a nail art brush, add black details to create the animal print pattern.
- Seal the design with a top coat to add shine and ensure the manicure lasts longer.
- Let the nails dry completely before handling anything to avoid smudging.
Orange French Tips with Fruit Accents
This design is a refreshing twist on the classic French tip, featuring bright orange tips and cute fruit accents. The orange tips provide a vibrant contrast against the nude base, while the fruit details add a playful and summery touch. This design is perfect for tan skin and brown skin, where the orange can really stand out and complement the skin tone. The shine on these nails keeps them looking fresh and polished, making this a great choice for summer outings or beach days.

Consumables:
- Base coat: OPI Natural Nail Base Coat
- Nude polish: Essie in “Mademoiselle”
- Orange polish: Sally Hansen Miracle Gel in “Tribal Sun”
- Fruit stickers: Born Pretty Fruit Nail Stickers
- Top coat: Seche Vite Dry Fast Top Coat
DIY Instructions:
- Start with a base coat to protect your natural nails.
- Apply the nude polish as your base color and let it dry completely.
- Paint orange tips on each nail, and then apply the fruit stickers to one or two accent nails.
- Finish with a top coat to seal the design and add shine.
- Allow the nails to dry fully before engaging in any activities to keep the design pristine.
Neon Flame French Tips
This design is a bold and fiery take on the classic French tip, featuring neon flames in bright orange and pink. The flames add a dynamic and edgy element to the design, making it perfect for those who love to experiment with their nail art. This look is particularly striking on tan skin and pale skin, where the neon colors can really stand out. The shine on these nails enhances the overall effect, giving them a polished and professional finish that’s perfect for making a statement.

Consumables:
- Base coat: CND Stickey Anchoring Base Coat
- Nude polish: OPI in “Samoan Sand”
- Neon orange polish: China Glaze in “Sun Worshiper”
- Neon pink polish: Essie in “The Fuchsia Is Bright”
- Nail Art Brushes: Twinkled T Nail Art Brushes
- Top coat: Essie Gel Couture Top Coat
DIY Instructions:
- Apply a base coat to protect your nails.
- Use nude polish as the base color and let it dry fully.
- With a nail art brush, paint neon flames along the tips of each nail using the neon orange and pink polishes.
- Seal the design with a top coat to add shine and ensure the manicure lasts longer.
- Let the nails dry completely before handling anything to avoid smudging or damaging the design.
Save Pin
