
22 Cute Fall Nails Ideas: Trendy Autumn Designs and Colors for Every Occasion
As the leaves change and the air gets crisper, it’s the perfect time to update your nail game with some adorable fall-inspired designs. Fall nails are all about embracing the rich hues and cozy vibes of the season. From simple, understated looks to bold, intricate designs, there’s something for everyone. In this article, I’ll guide you through some of the cutest fall nail ideas, complete with detailed descriptions and step-by-step instructions to recreate these looks at home.
French Tips with a Twist
These nails put a modern twist on the classic French tip. The black tips are sleek and sophisticated, providing a stark contrast to the natural base color. A touch of red glitter at the base adds a hint of sparkle, making this design perfect for both everyday wear and special occasions. The coffin shape elongates the fingers, creating an elegant silhouette.

Consumables:
- Black nail polish (OPI Black Onyx)
- Red glitter polish (China Glaze Ruby Pumps)
- Base coat (Essie First Base)
- Top coat (Seche Vite Dry Fast Top Coat)
- Nail tape or guides for precise tips
Instructions:
- Apply a base coat to protect your nails.
- Use nail tape or guides to create the French tips and paint them with black polish.
- Carefully apply the red glitter polish at the base of each nail.
- Finish with a top coat to seal in your design and add shine.
Neon Orange Glam
This bold look features long, almond-shaped nails with a neon orange design that’s sure to stand out. The glittery base and vibrant orange tips create a striking contrast, perfect for those who love to make a statement. This design is not just trendy but also adds a touch of glamour to any outfit.

Consumables:
- Neon orange nail polish (Orly Glowstick)
- Glittery base polish (Zoya Trixie)
- Base coat (OPI Nail Envy)
- Top coat (Sally Hansen Miracle Gel)
- Fine nail art brush for precision
Instructions:
- Apply a base coat to each nail.
- Paint the base with a glittery polish and let it dry completely.
- Use a fine nail art brush to apply the neon orange polish to the tips.
- Seal the design with a top coat for a long-lasting finish.
Metallic Stars and Gray Tips
These cute fall nails feature gray French tips with metallic star accents, combining elegance and fun. The neutral base color allows the metallic stars to shine, making this design suitable for any fall occasion. The square shape gives a modern edge to this otherwise playful look.

Consumables:
- Gray nail polish (Essie Chinchilly)
- Metallic star stickers or decals
- Base coat (Butter London Nail Foundation)
- Top coat (Zoya Armor)
- Tweezers for placing stickers
Instructions:
- Start with a base coat to protect your nails.
- Apply gray polish to the tips, using nail tape for clean lines.
- Place the metallic star stickers on each nail with tweezers.
- Finish with a top coat to keep the stickers in place and add shine.
Subtle Waves and Neutral Tones
This design features subtle wavy lines on a neutral base, perfect for those who prefer understated elegance. The waves add a touch of whimsy without being overpowering, making these nails versatile for both casual and formal settings. The almond shape adds to the overall sophistication of the design.

Consumables:
- Nude nail polish (OPI Samoan Sand)
- White nail polish for the waves (Sally Hansen White On)
- Base coat (Deborah Lippmann Hard Rock)
- Top coat (CND Super Shiney)
- Fine nail art brush
Instructions:
- Apply a base coat to each nail.
- Paint your nails with a nude polish and let them dry.
- Use a fine nail art brush to create the wavy lines with white polish.
- Seal with a top coat for a polished finish.
Matte Blue with 3D Accents
For a unique fall look, these matte blue nails with 3D accents are a must-try. The soft blue shade is calming and stylish, while the 3D accents add a tactile element that elevates the design. This combination of matte and 3D textures makes for a chic and trendy manicure.

Consumables:
- Matte blue nail polish (OPI Matte Top Coat over Essie Bikini So Teeny)
- 3D nail art accents (Amazon 3D Nail Art Decorations)
- Base coat (Revlon Quick Dry Base Coat)
- Nail glue for accents
Instructions:
- Start with a base coat to protect your nails.
- Apply two coats of blue polish and let it dry.
- Add a matte top coat for the desired finish.
- Use nail glue to place the 3D accents on each nail.
- Finish with another layer of matte top coat to secure the accents.
Simple Beige Nails
These simple beige nails are a perfect example of how understated elegance can be incredibly chic. The short, rounded shape adds to the overall clean look, making them suitable for any occasion. This design is easy to maintain and perfect for those who prefer a minimalist approach to their manicure.

Consumables:
- Beige nail polish (Essie “Spin the Bottle”)
- Base coat (OPI Nail Envy)
- Top coat (Sally Hansen Insta-Dri)
Instructions:
- Apply a base coat to protect your nails.
- Paint two thin layers of beige polish for an even finish.
- Seal with a top coat to add shine and extend wear time.
Halloween Fun
Get into the Halloween spirit with these fun and festive nails. The combination of bright orange and nude base with black spider web and spider designs makes for a playful yet stylish look. The round shape keeps it practical, while the nail art adds a touch of whimsy.

Consumables:
- Orange nail polish (China Glaze “Orange Knockout”)
- Nude nail polish (Essie “Ballet Slippers”)
- Black nail art pen or polish (Sally Hansen “Black Out”)
- Base coat (OPI Nail Envy)
- Top coat (Seche Vite Dry Fast Top Coat)
Instructions:
- Start with a base coat.
- Apply orange polish to some nails and nude polish to others.
- Use a black nail art pen to draw spider webs and spiders.
- Finish with a top coat to protect your designs.
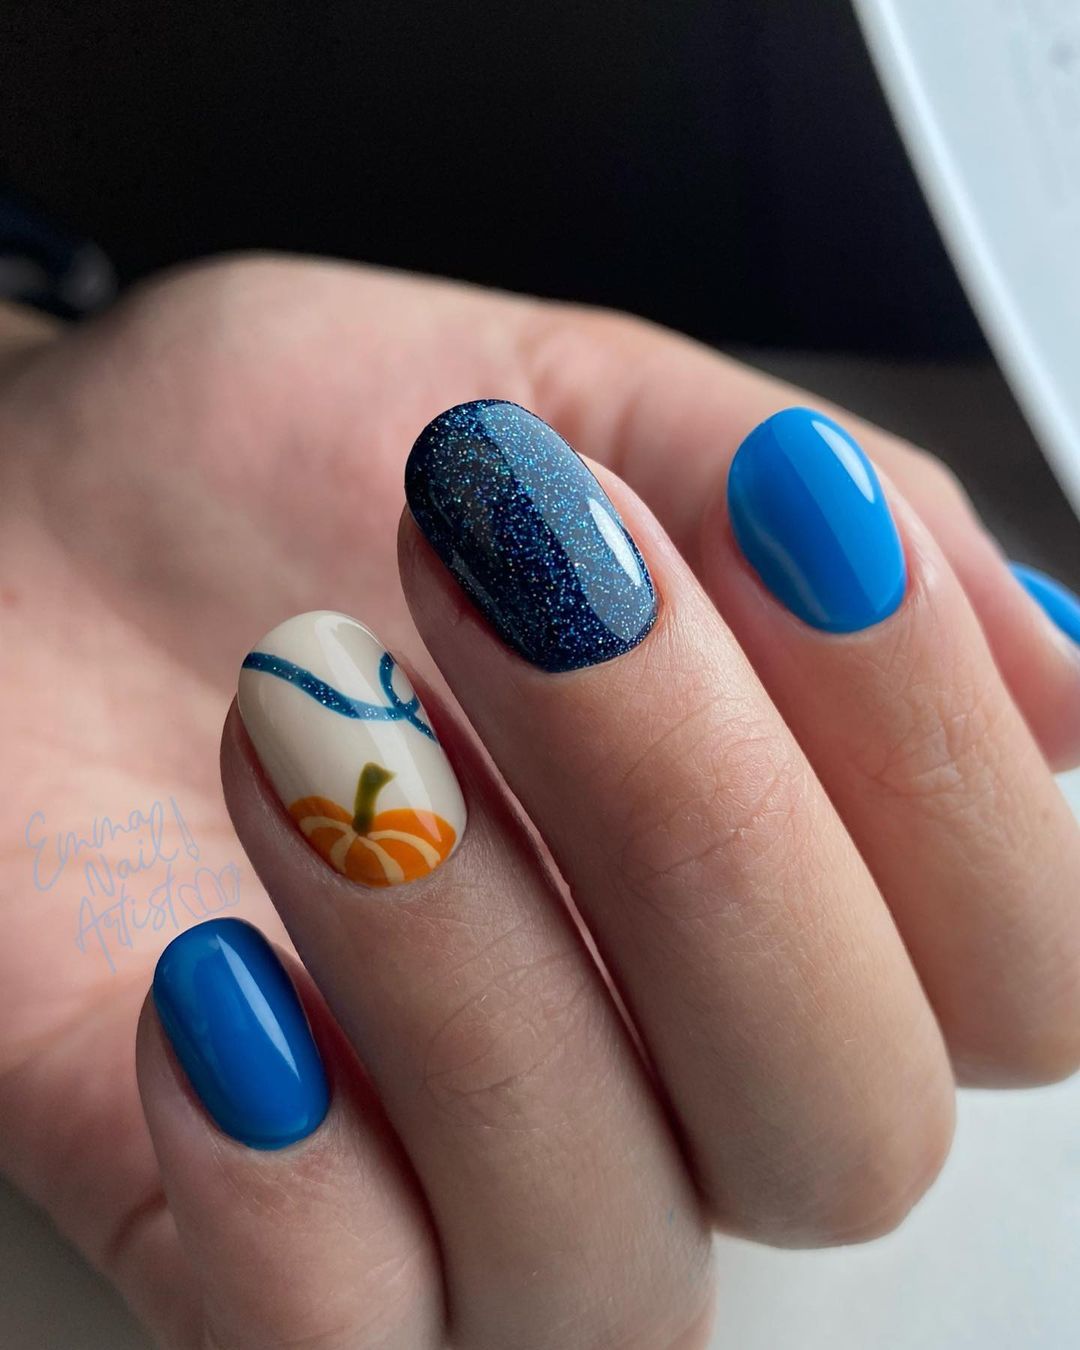
Pumpkin Patch Delight
These nails are an ode to the cozy, festive vibes of fall. The combination of navy blue, glitter, and a cute pumpkin accent nail makes this design unique and eye-catching. The round shape adds a soft touch to the bold colors.

Consumables:
- Navy blue nail polish (OPI “Russian Navy”)
- Glitter polish (Zoya “Dream”)
- Orange and green nail polish for pumpkin (OPI “A Good Man-darin is Hard to Find” and “Don’t Mess With OPI”)
- Base coat (Essie First Base)
- Top coat (CND Super Shiney)
- Fine nail art brush
Instructions:
- Apply a base coat.
- Paint some nails with navy blue polish and others with glitter polish.
- Use the fine nail art brush to paint a pumpkin on one nail.
- Seal with a top coat.
Fall Floral
This fall floral design combines earthy tones with intricate floral patterns, making it perfect for the autumn season. The matte finish gives it a modern twist, while the detailed flowers add a touch of elegance.

Consumables:
- Matte top coat (OPI Matte Top Coat)
- Orange nail polish (Essie “Playing Koi”)
- Beige nail polish (OPI “Samoan Sand”)
- Various colors for floral design (Sally Hansen “Hard as Nails Xtreme Wear” in assorted colors)
- Base coat (Butter London Nail Foundation)
- Fine nail art brushes
Instructions:
- Apply a base coat.
- Paint some nails with orange polish and others with beige.
- Use fine brushes to paint floral designs.
- Finish with a matte top coat.
Yellow and Blue Delight
These nails feature a delightful mix of yellow and blue hues with delicate leaf designs, perfect for transitioning into fall. The almond shape is both trendy and practical, making this design ideal for everyday wear.

Consumables:
- Yellow nail polish (OPI “Sun, Sea, and Sand in My Pants”)
- Blue nail polish (Essie “Butler Please”)
- White nail polish (Sally Hansen “White On”)
- Black nail art pen or polish (Sally Hansen “Black Out”)
- Base coat (Deborah Lippmann Hard Rock)
- Top coat (Zoya Armor)
- Fine nail art brush
Instructions:
- Apply a base coat.
- Paint your nails with yellow and blue polishes.
- Use a fine brush to create leaf designs with white and black polish.
- Seal with a top coat for a glossy finish.
Swirly Earth Tones
These nails are a beautiful representation of fall, featuring a mix of earthy tones with a unique swirl design. The almond shape is both elegant and functional. The speckled pink base combined with the brown and orange swirls creates a mesmerizing and artistic look, perfect for any autumn occasion.

Consumables:
- Brown nail polish (OPI “Squeaker of the House”)
- Orange glitter polish (China Glaze “I Herd That”)
- Speckled pink polish (Zoya “Dot”)
- Base coat (Essie First Base)
- Top coat (Seche Vite Dry Fast Top Coat)
- Fine nail art brush for swirls
Instructions:
- Apply a base coat to each nail.
- Paint some nails with the brown polish and others with the speckled pink polish.
- Use a fine nail art brush to create swirls with the brown and orange polishes on the speckled pink base.
- Seal with a top coat to protect your design and add shine.
Classic Pink
These classic pink nails are timeless and versatile. The short, rounded shape is practical for everyday wear, while the glossy pink finish adds a touch of femininity and elegance. This design is perfect for those who prefer a simple yet stylish look.

Consumables:
- Pink nail polish (Essie “Bachelorette Bash”)
- Base coat (OPI Nail Envy)
- Top coat (Sally Hansen Insta-Dri)
Instructions:
- Apply a base coat to each nail.
- Paint two thin layers of pink polish for an even finish.
- Seal with a top coat to add shine and extend wear time.
Giraffe Print
These giraffe print nails are bold and adventurous, perfect for making a statement this fall. The long coffin shape adds drama, while the intricate giraffe pattern brings an exotic touch. This design is sure to turn heads and showcase your wild side.

Consumables:
- Base color (OPI “Chocolate Moose”)
- Brown polish for spots (China Glaze “Desert Sun”)
- Base coat (Butter London Nail Foundation)
- Top coat (Zoya Armor)
- Fine nail art brush
Instructions:
- Apply a base coat to protect your nails.
- Paint your nails with the base color.
- Use a fine nail art brush to create the giraffe spots with the brown polish.
- Finish with a top coat to protect your design.
Starry Night
These nails feature a dreamy, starry night design that is both elegant and whimsical. The almond shape elongates the fingers, while the gradient background and gold star accents create a magical look. This design is perfect for special occasions or adding a touch of sparkle to your everyday style.
Consumables:
- Gradient base polish (OPI “Bubble Bath” and “Alpine Snow”)
- Gold star stickers or decals
- Base coat (Deborah Lippmann Hard Rock)
- Top coat (CND Super Shiney)
- Tweezers for placing stickers
Instructions:
- Start with a base coat to protect your nails.
- Create a gradient effect using a sponge to apply the base polishes.
- Place the gold star stickers on each nail using tweezers.
- Seal with a top coat to keep the stickers in place and add shine.
Bright Autumn Leaves
These bright autumn leaf nails are a vibrant celebration of the fall season. The combination of bold orange and delicate leaf patterns on a nude base creates a striking contrast. The long coffin shape enhances the overall look, making it perfect for those who love bold, trendy designs.

Consumables:
- Orange nail polish (OPI “A Good Man-darin is Hard to Find”)
- Nude nail polish (Essie “Ballet Slippers”)
- Various colors for leaf designs (Sally Hansen “Hard as Nails Xtreme Wear” in assorted colors)
- Base coat (OPI Nail Envy)
- Top coat (Seche Vite Dry Fast Top Coat)
- Fine nail art brushes
Instructions:
- Apply a base coat to each nail.
- Paint some nails with orange polish and others with nude polish.
- Use fine nail art brushes to create leaf designs on the nude base.
- Seal with a top coat to protect your design.
Plaid and Hearts
These nails feature a playful plaid design with tiny red heart accents. The combination of the grid pattern and hearts on a pink base makes these nails both cute and stylish. The short, rounded shape adds to the overall practicality of this design, making it perfect for everyday wear.

Consumables:
- Pink nail polish (OPI “Mod About You”)
- White nail polish for the grid (Essie “Blanc”)
- Red nail polish for hearts (China Glaze “Scarlet”)
- Base coat (Deborah Lippmann Hard Rock)
- Top coat (Sally Hansen Insta-Dri)
- Fine nail art brushes and dotting tool
Instructions:
- Apply a base coat to protect your nails.
- Paint your nails with pink polish and let them dry completely.
- Use a fine brush to create the white grid pattern.
- Add red hearts using a dotting tool or fine brush.
- Seal with a top coat for a polished finish.
Zebra Stripes
These nails are designed with a striking zebra stripe pattern, ideal for adding a wild touch to your look. The black and gray stripes on a matte finish create a sophisticated yet bold design. The square shape enhances the edgy feel of this nail art.

Consumables:
- Black nail polish (OPI “Black Onyx”)
- Gray nail polish (China Glaze “Recycle”)
- Matte top coat (Essie Matte About You)
- Base coat (OPI Nail Envy)
- Fine nail art brush
Instructions:
- Start with a base coat.
- Apply black polish and let it dry completely.
- Use a fine brush to paint gray zebra stripes.
- Finish with a matte top coat for the desired look.
Fall Leaves
Celebrate the autumn season with these adorable fall leaf nails. The combination of yellow, orange, and leaf accents on a nude base captures the essence of fall. The short, square shape is both practical and stylish, making these nails perfect for any occasion.

Consumables:
- Yellow nail polish (Essie “Sunshine State of Mind”)
- Orange nail polish (OPI “A Good Man-darin is Hard to Find”)
- Nude nail polish (Essie “Ballet Slippers”)
- Leaf nail stickers or decals
- Base coat (Butter London Nail Foundation)
- Top coat (Zoya Armor)
Instructions:
- Apply a base coat to protect your nails.
- Paint some nails with yellow polish, others with orange, and one with nude polish.
- Add leaf stickers to the nude base nail.
- Seal with a top coat for a glossy finish.
Pastel French Tips
These nails feature a modern twist on the classic French tip, using pastel colors for a fresh, playful look. The short, rounded shape and pastel hues make this design perfect for those who prefer a subtle yet stylish manicure.

Consumables:
- Pastel nail polishes (OPI “It’s a Boy!”, “I Am What I Amethyst”, “That’s Hula-rious!”, “Suzi Nails New Orleans”)
- Nude base polish (Essie “Mademoiselle”)
- Base coat (Deborah Lippmann Hard Rock)
- Top coat (CND Super Shiney)
- Fine nail art brush or nail tape
Instructions:
- Apply a base coat to each nail.
- Paint your nails with the nude base polish and let them dry.
- Use a fine brush or nail tape to create pastel French tips.
- Seal with a top coat to protect your design.
Lavender and Gold Foil
These nails are a perfect blend of sophistication and glamour, featuring a lavender base with gold foil accents. The almond shape elongates the fingers, adding elegance to the overall design. This look is ideal for both everyday wear and special occasions.

Consumables:
- Lavender nail polish (Essie “Lilacism”)
- Gold foil (Amazon Gold Foil Nail Art)
- Base coat (OPI Nail Envy)
- Top coat (Seche Vite Dry Fast Top Coat)
- Tweezers for applying foil
Instructions:
- Apply a base coat to each nail.
- Paint your nails with lavender polish and let them dry.
- Apply gold foil to the desired areas using tweezers.
- Finish with a top coat to secure the foil and add shine.
Coral Bliss
These coral nails are vibrant and eye-catching, perfect for adding a pop of color to your fall look. The oval shape adds a touch of elegance, while the glossy finish ensures they stand out. This design is great for those who love bold, bright colors.

Consumables:
- Coral nail polish (OPI “Cajun Shrimp”)
- Base coat (Essie First Base)
- Top coat (Sally Hansen Insta-Dri)
Instructions:
- Apply a base coat to protect your nails.
- Paint two coats of coral polish for full coverage.
- Seal with a top coat to add shine and durability.
Natural Nude
These natural nude nails are the epitome of understated elegance. The almond shape and glossy finish make them versatile for any occasion, from casual to formal. This minimalist design is perfect for those who prefer a clean, polished look.

Consumables:
- Nude nail polish (Essie “Ballet Slippers”)
- Base coat (OPI Nail Envy)
- Top coat (CND Super Shiney)
Instructions:
- Apply a base coat to each nail.
- Paint two thin layers of nude polish for an even finish.
- Seal with a top coat for a glossy shine.
Save Pin
