
22 Fall French Tip Nails Ideas: Classy, Cute, and Trendy Designs for Every Occasion
When the leaves start to turn and the air gets crisper, our beauty routines naturally shift to embrace the warm and cozy vibes of autumn. One trend that stands out during this time is the fall french tip nails. Have you ever wondered how to transition the classic French tip to reflect the rich hues and styles of fall? In this article, we will explore various fall french tip nail designs that capture the essence of the season. From cute and trendy to classy and simple, we’ve got you covered with all the inspiration and detailed guides you need to recreate these looks at home.
Lilac Dream
The first design we delve into is a stunning blend of soft lilac with a crisp white tip. This look is perfect for those who love a subtle yet elegant twist on the traditional French manicure. The lilac base adds a touch of whimsy and fun to the classic design, making it perfect for any occasion, whether it’s a casual day out or a special event. The white tips provide a beautiful contrast, creating a cute and classy look that’s hard to resist. This nail shape is ideal for those who prefer a more rounded, almond-like finish, offering both style and comfort.

Consumables for Creating the Nails
- Base Coat: OPI Nail Envy
- Lilac Polish: Essie Lilacism
- White Polish: OPI Alpine Snow
- Top Coat: Seche Vite Dry Fast Top Coat
- Nail Tape: For precise tip application
Instructions for DIY
- Start with a clean and prepped nail, applying a base coat to protect your nails.
- Apply two coats of lilac polish, allowing each layer to dry thoroughly.
- Use nail tape to create the French tip shape and paint the tips white.
- Remove the tape carefully before the white polish dries completely.
- Finish with a top coat to seal the design and add shine.
Zebra Chic
Next up, we have a bold and trendy design that features a zebra print French tip. This look is perfect for those who love to make a statement with their nails. The combination of a nude base with striking black and white zebra stripes creates a fun and eye-catching aesthetic. The square short shape adds a modern twist to the design, making it suitable for both professional and casual settings. This manicure is not only stylish but also versatile, allowing you to pair it with various outfits and accessories.

Consumables for Creating the Nails
- Base Coat: Sally Hansen Hard as Nails
- Nude Polish: Essie Bare with Me
- Black Polish: China Glaze Liquid Leather
- White Polish: OPI Alpine Snow
- Nail Art Brush: For creating zebra stripes
Instructions for DIY
- Apply a base coat to clean, prepped nails.
- Paint the nails with two coats of nude polish.
- Using a nail art brush, create zebra stripes on the tips with black and white polish.
- Allow the design to dry before sealing it with a top coat.
Gradient Glam
For a sophisticated and classy look, the gradient French tip is an excellent choice. This design features a soft transition from a nude base to a deep, autumnal brown tip. The gradient effect is subtle yet striking, perfect for those who prefer a more refined manicure. The short square shape adds a contemporary edge to this simple yet elegant design. The overall effect is neutral enough to wear with any outfit, yet unique enough to stand out.

Consumables for Creating the Nails
- Base Coat: Zoya Anchor Base Coat
- Nude Polish: Deborah Lippmann Naked
- Brown Polish: OPI Lincoln Park After Dark
- Sponge: For blending colors
- Top Coat: Essie Gel-Setter Top Coat
Instructions for DIY
- Start with a base coat to protect your nails.
- Apply a nude polish as the base color.
- Using a sponge, dab the brown polish onto the tips, creating a gradient effect.
- Blend the colors seamlessly by lightly tapping with the sponge.
- Finish with a top coat to smooth out the gradient and add shine.
Marble Magic
Marble nails have become increasingly popular, and for a good reason. This design combines a pale pink base with intricate black and white marbling on the tips. It’s a trendy and sophisticated take on the classic French manicure. The square long shape provides ample canvas for the marbling effect, allowing for more detailed artistry. This look is perfect for those who love a blend of elegance and modernity in their nail designs.

Consumables for Creating the Nails
- Base Coat: Orly Bonder
- Pale Pink Polish: Essie Ballet Slippers
- Black Polish: OPI Black Onyx
- White Polish: China Glaze White on White
- Nail Art Brush: For creating marble effect
- Top Coat: Seche Vite Dry Fast Top Coat
Instructions for DIY
- Apply a base coat to clean, prepped nails.
- Paint nails with two coats of pale pink polish.
- Using a nail art brush, create a marbled effect on the tips with black and white polish.
- Blend the colors to achieve the desired marble look.
- Seal the design with a top coat.
Ruby Sparkle
For those who love a bit of sparkle, the ruby French tip is a show-stopper. This design features a nude base with a glittery red tip, perfect for adding a touch of glam to your fall look. The short almond shape is both stylish and practical, making this design easy to wear for any occasion. The glitter adds a fun and festive touch, making it ideal for special events or just to brighten up your day.

Consumables for Creating the Nails
- Base Coat: Revlon Quick Dry Base Coat
- Nude Polish: OPI Bubble Bath
- Red Glitter Polish: China Glaze Ruby Pumps
- Top Coat: Sally Hansen Insta-Dri Anti-Chip Top Coat
- Nail Tape: For precise tip application
Instructions for DIY
- Apply a base coat to protect your nails.
- Paint nails with two coats of nude polish.
- Use nail tape to create the French tip shape and apply red glitter polish.
- Remove the tape carefully before the polish dries completely.
- Finish with a top coat to seal the glitter and add shine.
Black Elegance
This fall french tip nails design features a sophisticated blend of black tips and delicate leaf patterns on a nude base. The short almond shape adds a touch of elegance, making it perfect for any occasion. The black tips offer a stark contrast to the nude base, while the white leaf patterns add an intricate and delicate touch. This manicure is both classy and trendy, ideal for those who want to make a subtle yet stylish statement.

- Base Coat: CND Stickey Base Coat
- Nude Polish: Essie Ballet Slippers
- Black Polish: OPI Black Onyx
- White Polish: Sally Hansen White On
- Leaf Stencil: Nail vinyls or stamping kit
- Top Coat: Seche Vite Dry Fast Top Coat
Instructions for DIY
- Start with a base coat to protect your nails.
- Apply two coats of nude polish and let it dry.
- Use nail tape to create the French tip and paint it black.
- Apply white leaf patterns using stencils or a stamping kit.
- Seal the design with a top coat to add shine and longevity.
Leopard Luxe
The leopard print French tip is a fun and bold design that’s perfect for fall. This look features a nude base with striking leopard print tips, offering a unique twist on the traditional French manicure. The square long shape provides ample space for the intricate leopard design, making it a standout style. This manicure is ideal for those who want to make a fashion statement and enjoy a bit of animal print flair.

Consumables for Creating the Nails
- Base Coat: OPI Nail Envy
- Nude Polish: Zoya Avery
- Leopard Print Stickers: Sally Hansen Salon Effects
- Top Coat: Essie Gel-Setter Top Coat
Instructions for DIY
- Apply a base coat to clean, prepped nails.
- Paint nails with two coats of nude polish.
- Apply leopard print stickers to the tips.
- Seal the design with a top coat to add shine and protect the stickers.
Emerald Delight
Emerald green is a perfect color for fall, and this French tip design nails it perfectly. The green tips on a nude base create a vibrant yet sophisticated look. This simple yet striking design is ideal for those who want a pop of color without being too over-the-top. The short square shape is both practical and stylish, making it suitable for everyday wear.

Consumables for Creating the Nails
- Base Coat: Orly Bonder Base Coat
- Nude Polish: Deborah Lippmann Naked
- Green Polish: OPI Jade is the New Black
- Top Coat: Sally Hansen Miracle Gel Top Coat
- Nail Tape: For precise tip application
Instructions for DIY
- Apply a base coat to protect your nails.
- Paint nails with two coats of nude polish.
- Use nail tape to create the French tip shape and apply green polish.
- Remove the tape carefully before the polish dries completely.
- Finish with a top coat to seal the design and add shine.
Golden Glam
This design combines the elegance of black tips with the sparkle of gold glitter. The nude base provides a perfect backdrop for the black tips and gold accents, creating a cute and classy look. The square short shape is practical and stylish, making this design suitable for both everyday wear and special occasions.

Consumables for Creating the Nails
- Base Coat: Revlon Quick Dry Base Coat
- Nude Polish: OPI Bubble Bath
- Black Polish: China Glaze Liquid Leather
- Gold Glitter Polish: Essie Summit of Style
- Top Coat: Seche Vite Dry Fast Top Coat
- Nail Tape: For precise tip application
Instructions for DIY
- Apply a base coat to clean, prepped nails.
- Paint nails with two coats of nude polish.
- Use nail tape to create the French tip shape and apply black polish.
- Add gold glitter accents near the cuticles.
- Seal the design with a top coat to add shine and longevity.
Leopard Fever
This design takes the leopard print trend to the next level with long, striking tips. The nude base paired with the bold leopard print creates a fun and trendy look that’s perfect for fall. The square long shape provides plenty of space for the intricate design, making it a statement piece. This manicure is ideal for those who love to stand out and embrace their wild side.

Consumables for Creating the Nails
- Base Coat: Sally Hansen Hard as Nails
- Nude Polish: Essie Bare with Me
- Leopard Print Stickers: Kiss Nail Art Stickers
- Top Coat: Essie Gel-Setter Top Coat
Instructions for DIY
- Apply a base coat to clean, prepped nails.
- Paint nails with two coats of nude polish.
- Apply leopard print stickers to the tips.
- Seal the design with a top coat to add shine and protect the stickers.
Wild Elegance
This fall french tip nails design is a striking combination of red, black, and gold, featuring leopard print accents. The almond shape is both chic and practical, elongating the fingers and providing a sophisticated canvas for the bold colors. The red and black stripes, complemented by gold detailing, create a classy yet edgy look, perfect for those who want to make a statement this fall. The leopard print adds a touch of the wild, balancing the elegance of the design.

Consumables for Creating the Nails
- Base Coat: CND Stickey Base Coat
- Nude Polish: Essie Ballet Slippers
- Red Polish: OPI Big Apple Red
- Black Polish: China Glaze Liquid Leather
- Gold Polish: Essie Good as Gold
- Leopard Print Stickers: Kiss Nail Art Stickers
- Top Coat: Seche Vite Dry Fast Top Coat
Instructions for DIY
- Start with a base coat to protect your nails.
- Apply two coats of nude polish and let it dry.
- Use nail tape to create the French tip shape and apply red polish.
- Add black stripes and gold detailing using a nail art brush.
- Apply leopard print stickers to accent nails.
- Seal the design with a top coat to add shine and longevity.
Blue Sky Tips
This simple and elegant design features soft blue tips on a nude base. The square short shape is practical and stylish, perfect for everyday wear. The blue tips add a touch of color without being overwhelming, making it a great choice for those who prefer a subtle look. This design is both cute and versatile, suitable for any occasion.

Consumables for Creating the Nails
- Base Coat: Orly Bonder Base Coat
- Nude Polish: Deborah Lippmann Naked
- Blue Polish: OPI It’s a Boy!
- Top Coat: Sally Hansen Miracle Gel Top Coat
- Nail Tape: For precise tip application
Instructions for DIY
- Apply a base coat to protect your nails.
- Paint nails with two coats of nude polish.
- Use nail tape to create the French tip shape and apply blue polish.
- Remove the tape carefully before the polish dries completely.
- Finish with a top coat to seal the design and add shine.
Textured Teal
This unique design features textured teal tips on a nude base. The short almond shape is both trendy and practical, providing a stylish look that’s easy to maintain. The textured teal adds a tactile element to the manicure, making it a standout style for fall. This design is perfect for those who want to experiment with texture and color in their nail art.

Consumables for Creating the Nails
- Base Coat: Revlon Quick Dry Base Coat
- Nude Polish: OPI Bubble Bath
- Teal Polish: Essie Go Overboard
- Textured Top Coat: Sally Hansen Big Matte Top Coat
- Nail Tape: For precise tip application
Instructions for DIY
- Apply a base coat to clean, prepped nails.
- Paint nails with two coats of nude polish.
- Use nail tape to create the French tip shape and apply teal polish.
- Add a textured top coat to the teal tips.
- Finish with a top coat to seal the design and add longevity.
Silver Chic
This fall french tip nails design features sleek silver tips on a matte nude base. The short almond shape adds a touch of elegance, making this design perfect for both everyday wear and special occasions. The silver tips create a modern and chic look, adding a bit of sparkle to your fall manicure. This design is both classy and versatile, suitable for any outfit or occasion.

Consumables for Creating the Nails
- Base Coat: Sally Hansen Hard as Nails
- Matte Nude Polish: Essie Matte About You
- Silver Polish: OPI Turn On the Haute Light
- Top Coat: Essie Gel-Setter Top Coat
- Nail Tape: For precise tip application
Instructions for DIY
- Apply a base coat to protect your nails.
- Paint nails with two coats of matte nude polish.
- Use nail tape to create the French tip shape and apply silver polish.
- Remove the tape carefully before the polish dries completely.
- Finish with a top coat to seal the design and add shine.
Velvet Blue
This design features luxurious blue velvet tips on a white base. The square long shape provides a dramatic canvas for the rich velvet texture, making this design a true show-stopper. The combination of the white base and blue velvet tips creates a bold and fun look, perfect for those who love to experiment with textures and colors in their nail art.

Consumables for Creating the Nails
- Base Coat: Orly Bonder Base Coat
- White Polish: OPI Alpine Snow
- Blue Velvet Polish: Sally Hansen Velvet Texture in Crushed Blue
- Top Coat: Seche Vite Dry Fast Top Coat
- Nail Tape: For precise tip application
Instructions for DIY
- Apply a base coat to clean, prepped nails.
- Paint nails with two coats of white polish.
- Use nail tape to create the French tip shape and apply blue velvet polish.
- Remove the tape carefully before the polish dries completely.
- Finish with a top coat to seal the design and add shine.
Plaid Perfection
This fall french tip nails design combines classic plaid patterns with rich red tips and glitter accents, creating a visually striking manicure. The square long shape offers a substantial canvas for the intricate plaid design, while the red glitter adds a festive touch. This look is perfect for those who love to blend traditional fall patterns with a bit of sparkle, making it suitable for both casual and formal events.

Consumables for Creating the Nails
- Base Coat: OPI Nail Envy
- Nude Polish: Essie Bare with Me
- Red Polish: OPI Big Apple Red
- Black Polish: China Glaze Liquid Leather
- Red Glitter Polish: Essie Leading Lady
- Top Coat: Seche Vite Dry Fast Top Coat
- Striping Tape: For creating plaid lines
Instructions for DIY
- Start with a base coat to protect your nails.
- Apply two coats of nude polish and let it dry.
- Use striping tape to create plaid patterns and paint with black and red polish.
- Apply red glitter polish on accent nails.
- Seal the design with a top coat to add shine and longevity.
Aqua Elegance
This fall french tip nails design features bright aqua tips paired with a gradient effect on a nude base. The square long shape enhances the overall elegance and modern feel of the manicure. The vibrant aqua color is a fresh and unexpected choice for fall, making this design perfect for those who want to stand out with a fun and trendy look.

Consumables for Creating the Nails
- Base Coat: Orly Bonder Base Coat
- Nude Polish: Deborah Lippmann Naked
- Aqua Polish: Essie In the Cab-ana
- Top Coat: Sally Hansen Miracle Gel Top Coat
- Makeup Sponge: For creating gradient effect
- Nail Tape: For precise tip application
Instructions for DIY
- Apply a base coat to protect your nails.
- Paint nails with two coats of nude polish.
- Use a makeup sponge to apply aqua polish, creating a gradient effect.
- Use nail tape to create the French tip shape and apply more aqua polish.
- Remove the tape carefully before the polish dries completely.
- Finish with a top coat to seal the design and add shine.
Purple Delight
This design features a soft ombre effect transitioning to bold purple tips, perfect for fall. The square long shape provides a substantial canvas for the gradient effect and intricate floral details. This look is both classy and trendy, ideal for those who love to experiment with colors and designs in their nail art.

Consumables for Creating the Nails
- Base Coat: Sally Hansen Hard as Nails
- White Polish: OPI Alpine Snow
- Purple Polish: Essie Play Date
- Top Coat: Seche Vite Dry Fast Top Coat
- Makeup Sponge: For creating ombre effect
- Nail Tape: For precise tip application
- Floral Stickers: For accent nails
Instructions for DIY
- Apply a base coat to clean, prepped nails.
- Paint nails with two coats of white polish.
- Use a makeup sponge to apply purple polish, creating an ombre effect.
- Use nail tape to create the French tip shape and apply more purple polish.
- Add floral stickers to accent nails.
- Seal the design with a top coat to add shine and longevity.
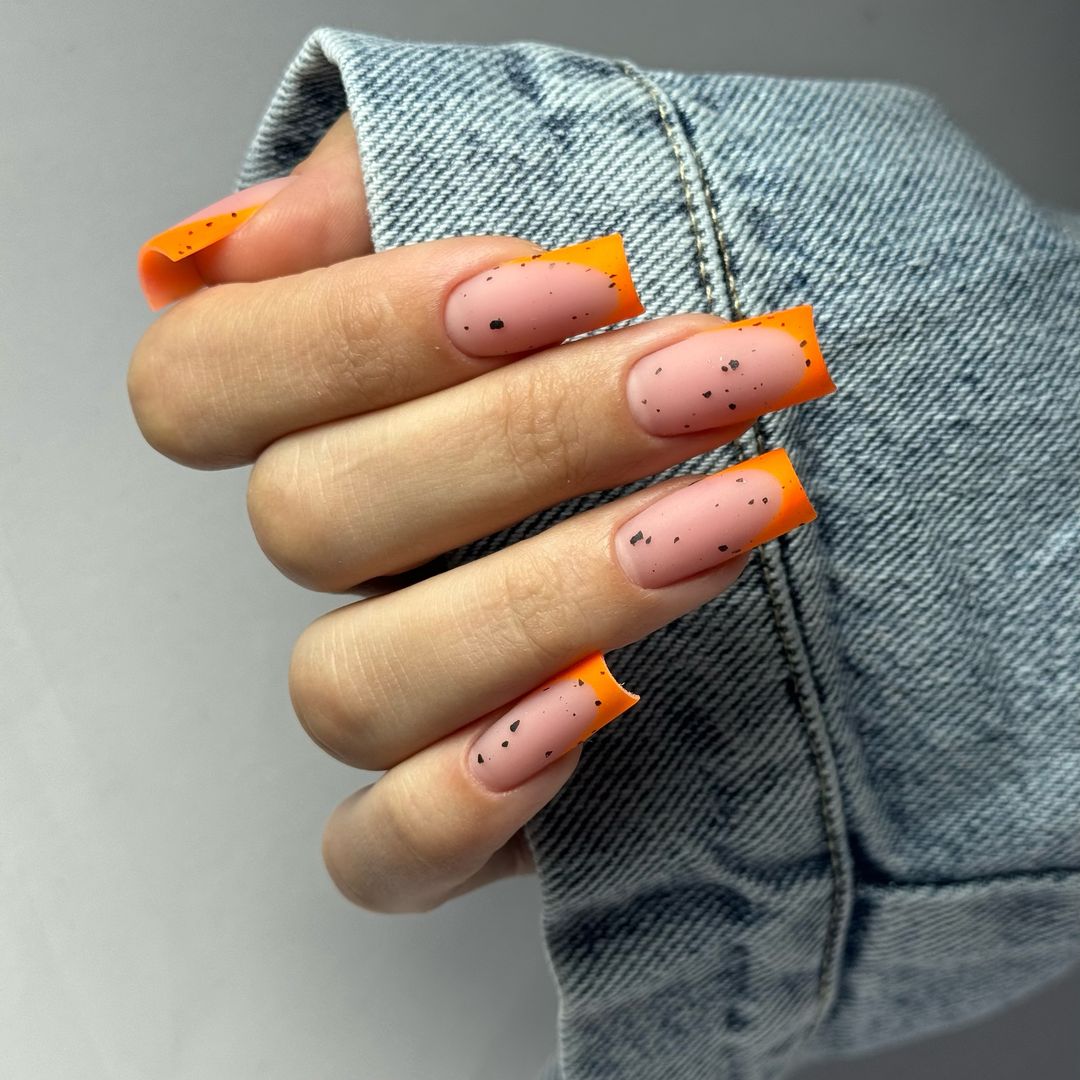
Speckled Orange
This fall french tip nails design features bright orange tips with a speckled effect on a nude base. The square long shape enhances the modern and playful feel of the manicure. The orange tips are perfect for fall, evoking the vibrant colors of autumn leaves, while the speckled effect adds a unique touch.

Consumables for Creating the Nails
- Base Coat: Revlon Quick Dry Base Coat
- Nude Polish: OPI Bubble Bath
- Orange Polish: China Glaze Orange Knockout
- Black Speckled Polish: Essie As If!
- Top Coat: Essie Gel-Setter Top Coat
- Nail Tape: For precise tip application
Instructions for DIY
- Apply a base coat to protect your nails.
- Paint nails with two coats of nude polish.
- Use nail tape to create the French tip shape and apply orange polish.
- Add speckled polish over the orange tips.
- Remove the tape carefully before the polish dries completely.
- Finish with a top coat to seal the design and add shine.
Glittering Blue
This design features striking blue tips with glitter accents on a nude base, perfect for a fun and festive look. The square long shape provides a dramatic canvas for the blue and glitter combination. This look is ideal for those who want to add a bit of sparkle to their fall manicure, making it suitable for both casual and formal occasions.

Consumables for Creating the Nails
- Base Coat: Orly Bonder Base Coat
- Nude Polish: Deborah Lippmann Naked
- Blue Polish: OPI Blue My Mind
- Glitter Polish: China Glaze Fairy Dust
- Top Coat: Seche Vite Dry Fast Top Coat
- Nail Tape: For precise tip application
Instructions for DIY
- Apply a base coat to protect your nails.
- Paint nails with two coats of nude polish.
- Use nail tape to create the French tip shape and apply blue polish.
- Add glitter polish over the blue tips.
- Remove the tape carefully before the polish dries completely.
- Finish with a top coat to seal the design and add shine.
Gray Glamour
This fall french tip nails design features sleek gray tips on a matte nude base, complemented by rhinestone accents. The square long shape enhances the modern and sophisticated feel of the manicure. The gray tips create a chic and understated look, while the rhinestones add a touch of glamour. This design is perfect for those who love a combination of elegance and sparkle in their nails.

Consumables for Creating the Nails
- Base Coat: Sally Hansen Hard as Nails
- Matte Nude Polish: Essie Matte About You
- Gray Polish: OPI Cement the Deal
- Rhinestones: Kiss Nail Art Rhinestones
- Top Coat: Essie Gel-Setter Top Coat
- Nail Tape: For precise tip application
Instructions for DIY
- Apply a base coat to protect your nails.
- Paint nails with two coats of matte nude polish.
- Use nail tape to create the French tip shape and apply gray polish.
- Add rhinestones to accent nails.
- Seal the design with a top coat to add shine and longevity.
Chocolate Charm
This design features rich chocolate brown tips on a nude base, adorned with delicate rhinestones. The square long shape enhances the luxurious feel of the manicure. The brown tips evoke the warmth and coziness of fall, making this design perfect for the season. The rhinestone accents add a touch of elegance and sparkle, suitable for both casual and formal occasions.

Consumables for Creating the Nails
- Base Coat: Revlon Quick Dry Base Coat
- Nude Polish: OPI Bubble Bath
- Brown Polish: Essie Wicked
- Rhinestones: Kiss Nail Art Rhinestones
- Top Coat: Essie Gel-Setter Top Coat
- Nail Tape: For precise tip application
Instructions for DIY
- Apply a base coat to protect your nails.
- Paint nails with two coats of nude polish.
- Use nail tape to create the French tip shape and apply brown polish.
- Add rhinestones to accent nails.
- Seal the design with a top coat to add shine and longevity.
Save Pin
