
22 Festive USA Nails Ideas for the 4th of July: Simple, Cute, and Artistic Designs
When it comes to celebrating the 4th of July, one of the best ways to show off your patriotic spirit is through festive nail art. Whether you prefer simple designs or intricate art, there’s a USA nails style for everyone. In this article, I’ll share some amazing nail designs, detailing the products you’ll need and providing step-by-step instructions to recreate these looks at home.
Festive Red, White, and Blue Manicure
This stunning manicure features a combination of red, white, and blue with an abstract design that perfectly captures the spirit of the 4th of July. The use of vibrant colors and creative patterns makes this design stand out. The art showcases skillful blending and bold accents, making it a perfect 4th of July choice.

Consumables:
- Red nail polish: OPI “Big Apple Red”
- Blue nail polish: Essie “Butler Please”
- White nail polish: Sally Hansen “White On”
- Fine detail brush
- Top coat: Seche Vite Dry Fast Top Coat
Instructions:
- Start with clean, filed nails and apply a base coat.
- Paint alternating nails with red, blue, and white polish.
- Using a fine detail brush, create abstract patterns on each nail, blending the colors slightly for a seamless look.
- Finish with a top coat to seal in your design and add shine.
Playful Patriotic Short Nails
This design is perfect for those who prefer short nails but still want to make a statement. The combination of stripes, stars, and cute accents like smiley faces and flowers adds a playful touch. It’s a simple yet effective way to celebrate the 4th of July.

Consumables:
- Red nail polish: Zoya “Sooki”
- Blue nail polish: Revlon “Royal”
- White nail polish: OPI “Alpine Snow”
- Nail art stickers (stars, stripes, smiley faces, flowers)
- Top coat: Sally Hansen Miracle Gel Top Coat
Instructions:
- Apply a base coat to protect your nails.
- Paint your nails with a mix of red, white, and blue polish.
- Apply nail art stickers to create stars, stripes, and other designs.
- Seal everything with a top coat to ensure longevity and shine.
Elegant Minimalist Patriotic Nails
For a more subtle and elegant look, this minimalist design features delicate stars and stripes on a nude base. It’s perfect for those who want a more refined take on patriotic nails. The subtle accents make it versatile for both casual and formal occasions.

Consumables:
- Nude nail polish: Essie “Ballet Slippers”
- Red and blue striping tape
- Star-shaped nail stickers
- Top coat: Essie Gel Couture Top Coat
Instructions:
- Start with a base coat and apply a nude polish.
- Use red and blue striping tape to create delicate lines on the nails.
- Add star-shaped stickers to enhance the design.
- Finish with a top coat for a polished look.
Bold and Vibrant Acrylic Nails
These vibrant acrylic nails feature a mix of patriotic symbols like stars, stripes, and even Captain America shields. The bold colors and intricate details make this design perfect for those who love to go all out for the 4th of July.

Consumables:
- Red, white, and blue acrylic powders
- Acrylic liquid monomer
- Fine detail brushes
- Nail art decals (stars, Captain America shields)
- Top coat: Kiara Sky No Wipe Top Coat
Instructions:
- Apply a base coat and build your acrylic nails using the red, white, and blue powders.
- Use fine detail brushes to paint intricate designs and add decals.
- Seal with a top coat to protect your artwork and add shine.
Fun and Whimsical Nail Art
This design combines fun elements like cherries, bows, and waves, all in red, white, and blue. It’s a whimsical take on patriotic nails that’s perfect for a summer barbecue or fireworks display.

Consumables:
- Red, white, and blue nail polish: Essie “Really Red,” “Blanc,” and “Mesmerize”
- Nail art brushes
- Cherry and bow nail stickers
- Top coat: Revlon ColorStay Gel Envy Top Coat
Instructions:
- Start with a base coat and paint your nails with red, white, and blue polish.
- Use nail art brushes to create waves and other designs.
- Apply cherry and bow stickers for a fun touch.
- Finish with a top coat to ensure your design lasts.
Playful and Patriotic Nail Art
This design is a playful take on usa nails featuring various patterns like stars, checks, and cherries. The mix of red, white, and blue colors combined with whimsical designs makes this a standout for the 4th of July. The use of art and intricate details demonstrate a high level of skills in nail design, making it both fun and fashionable.

Consumables:
- Red nail polish: OPI “Big Apple Red”
- Blue nail polish: Essie “Butler Please”
- White nail polish: Sally Hansen “White On”
- Nail art brushes
- Star and cherry nail stickers
- Top coat: Seche Vite Dry Fast Top Coat
Instructions:
- Begin with a base coat to protect your nails.
- Paint each nail with alternating red, white, and blue polish.
- Use nail art brushes to create checks and other patterns.
- Apply star and cherry stickers to enhance the design.
- Finish with a top coat to seal and protect your manicure.
Bold Patriotic French Tip
This bold manicure features a patriotic twist on the classic French tip with blue bases and red, white, and blue stars and stripes. The art american flag element on one nail adds a festive touch perfect for the 4th of July. The use of vibrant blue and intricate star details make this design eye-catching and stylish.

Consumables:
- Blue nail polish: OPI “Dating a Royal”
- Red nail polish: Essie “Fifth Avenue”
- White nail polish: China Glaze “White on White”
- Fine detail brushes
- Star nail stickers
- Top coat: Sally Hansen Miracle Gel Top Coat
Instructions:
- Apply a base coat to your nails.
- Paint each nail with a blue polish as the base color.
- Use fine detail brushes to create red and white stripes and stars on one accent nail.
- Add star stickers to complete the patriotic look.
- Seal with a top coat for a long-lasting finish.
Fun and Festive Acrylic Nails
These festive acrylic nails feature a mix of stars, stripes, and polka dots in a vibrant red, white, and blue palette. The design showcases a high level of creativity and skills, making it perfect for celebrating the 4th of July in style. The use of different patterns on each nail adds a fun and dynamic element to the overall look.

Consumables:
- Red, white, and blue acrylic powders
- Acrylic liquid monomer
- Nail art brushes
- Star and polka dot nail decals
- Top coat: Kiara Sky No Wipe Top Coat
Instructions:
- Start with a base coat and build your acrylic nails using red, white, and blue powders.
- Use nail art brushes to paint stars, stripes, and polka dots on each nail.
- Apply decals for added detail and dimension.
- Finish with a top coat to protect your design and add shine.
Vibrant Red and Blue Nails
This vibrant design combines bright red and blue nails with star accents and subtle stripes. The red and blue colors are perfect for a bold 4th of July look, while the subtle stripes add a touch of elegance. This design is great for those who want a mix of bold and subtle elements in their patriotic manicure.

Consumables:
- Red nail polish: Essie “Forever Yummy”
- Blue nail polish: OPI “Eurso Euro”
- White nail polish: Zoya “Purity”
- Star nail stickers
- Striping tape
- Top coat: Essie Gel Couture Top Coat
Instructions:
- Apply a base coat to your nails.
- Paint some nails with red polish and others with blue polish.
- Use striping tape to create subtle stripes on select nails.
- Add star stickers for a patriotic touch.
- Seal with a top coat for a glossy finish.
Star-Studded Patriotic Nails
This design features bold red, white, and blue colors with star accents. The mix of matte and glossy finishes adds depth and interest to the manicure. This design is perfect for those who want to showcase their patriotic spirit with a stylish twist.

Consumables:
- Red nail polish: OPI “Big Apple Red”
- Blue nail polish: Essie “Butler Please”
- White nail polish: Sally Hansen “White On”
- Star nail decals
- Matte top coat: Essie Matte About You
- Glossy top coat: Seche Vite Dry Fast Top Coat
Instructions:
- Apply a base coat to protect your nails.
- Paint your nails with alternating red, white, and blue polish.
- Apply star decals to each nail.
- Use a matte top coat on some nails and a glossy top coat on others to create contrast.
- Finish with a final coat of glossy top coat on the glossy nails for extra shine.
Classic Patriotic Baseball Nails
This classic patriotic design combines elements of the American flag and baseball. The bold blue and red colors with white stars and stripes make it a perfect choice for the 4th of July celebrations. The baseball stitch design adds a sporty touch, making it ideal for summer activities. The simple yet striking design captures the essence of American spirit.

Consumables:
- Blue nail polish: OPI “Dating a Royal”
- Red nail polish: Essie “Fifth Avenue”
- White nail polish: Sally Hansen “White On”
- Fine detail brushes
- Top coat: Sally Hansen Miracle Gel Top Coat
Instructions:
- Start with a base coat to protect your nails.
- Apply blue polish to the middle and ring fingers, red polish to the index and pinky fingers, and white polish to the thumb.
- Use fine detail brushes to paint stars, stripes, and baseball stitches.
- Seal with a top coat to protect and add shine to your design.
Whimsical Stars and Stripes Nails
This whimsical design features a mix of stars, stripes, and cherries in a vibrant red, white, and blue color palette. The variety of patterns makes it fun and festive, perfect for celebrating the 4th of July. The cherry and checkerboard patterns add a playful touch, making this design stand out.

Consumables:
- Red nail polish: OPI “Big Apple Red”
- Blue nail polish: Essie “Butler Please”
- White nail polish: Sally Hansen “White On”
- Nail art brushes
- Star, stripe, and cherry nail decals
- Top coat: Seche Vite Dry Fast Top Coat
Instructions:
- Apply a base coat to your nails.
- Paint each nail with alternating red, white, and blue polish.
- Use nail art brushes to create stripes and checkerboard patterns.
- Apply star and cherry decals for added detail.
- Finish with a top coat for a glossy finish.
Bold and Patriotic USA Nails
These bold nails feature the letters “USA” prominently on one nail, with stars and stripes on the others. The vibrant blue and red colors combined with the intricate star designs make this a standout manicure for any 4th of July celebration. The bold lettering adds a modern and trendy twist to the classic patriotic theme.

Consumables:
- Blue nail polish: OPI “Dating a Royal”
- Red nail polish: Essie “Fifth Avenue”
- White nail polish: China Glaze “White on White”
- Fine detail brushes
- Star and letter decals
- Top coat: Essie Gel Couture Top Coat
Instructions:
- Start with a base coat to protect your nails.
- Paint some nails blue and others red.
- Use fine detail brushes to paint stars and stripes on the blue nails.
- Apply the “USA” decals to one nail for a bold statement.
- Finish with a top coat to seal and protect your design.
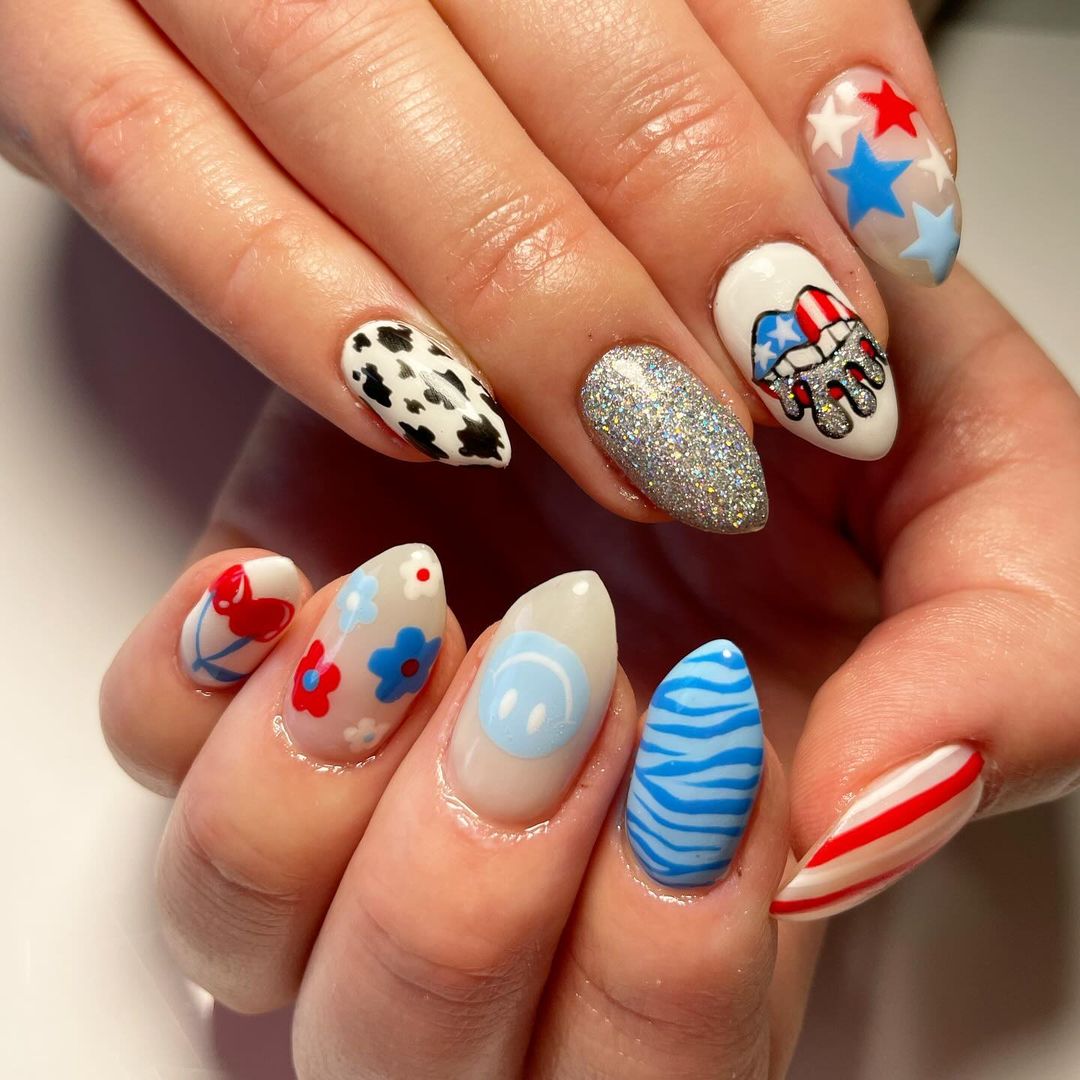
Fun and Playful Patriotic Nails
This fun and playful design features a mix of patriotic elements, including stars, stripes, and cherries. The vibrant red, white, and blue colors are complemented by unique patterns like cow prints and glitter accents. This design is perfect for those who want a quirky and festive look for the 4th of July.

Consumables:
- Red nail polish: OPI “Big Apple Red”
- Blue nail polish: Essie “Butler Please”
- White nail polish: Sally Hansen “White On”
- Nail art brushes
- Star, stripe, cherry, and cow print decals
- Glitter polish: OPI “My Voice is a Little Norse”
- Top coat: Revlon ColorStay Gel Envy Top Coat
Instructions:
- Apply a base coat to your nails.
- Paint each nail with alternating red, white, and blue polish.
- Use nail art brushes to create stripes and cow prints.
- Apply star, cherry, and glitter accents for added detail.
- Finish with a top coat to seal and protect your design.
Simple and Elegant Patriotic Nails
This simple yet elegant design features solid red, white, and blue nails with a glossy finish. The minimalist approach is perfect for those who want to celebrate the 4th of July with a more subtle look. The clean lines and bold colors make this design both stylish and patriotic.

Consumables:
- Red nail polish: Essie “Forever Yummy”
- Blue nail polish: OPI “Eurso Euro”
- White nail polish: Zoya “Purity”
- Top coat: Seche Vite Dry Fast Top Coat
Instructions:
- Apply a base coat to your nails.
- Paint your nails with alternating red, white, and blue polish.
- Apply a top coat for a glossy and long-lasting finish.


