
Blue acrylic nails are a bold and versatile choice that can range from subtle and elegant to vibrant and eye-catching. Whether you’re aiming for a classic look or something more unique, blue acrylic nails offer endless possibilities. Are you wondering how to achieve the perfect shade of blue or how to incorporate Designs that make your nails pop? This article will walk you through various styles and ideas, helping you find the ideal blue acrylic nails that suit your personality and occasion.
Bright Blue with Glitter Accents
This bright blue manicure combines solid color with a touch of glitter, creating a dazzling yet simple look that’s perfect for those who want to add a little sparkle to their everyday style. The solid blue nails contrast beautifully with the glitter accents, making this design both cute and girly while still maintaining a classy feel. The bright blue hue is perfect for any season and can easily transition from day to night.

Consumables List:
- Base Coat: OPI Natural Nail Base Coat
- Blue Polish: Essie “Butler Please”
- Glitter Top Coat: China Glaze “Fairy Dust”
- Top Coat: Seche Vite Dry Fast Top Coat
- Nail Art Brush: Winstonia Fine Nail Art Brush
DIY Instructions
- Begin by applying a base coat to protect your natural nails.
- Apply two coats of Essie “Butler Please” for an even, vibrant blue finish.
- Once dry, use a nail art brush dipped in China Glaze “Fairy Dust” to add glitter accents to the nails of your choice.
- Finish with a Seche Vite Dry Fast Top Coat for a glossy and long-lasting finish.
Two-Toned Blue French Tip
This French tip design with a two-toned blue twist is the epitome of classy and modern. The long square shape of the nails gives a sophisticated edge, while the combination of light and dark blue hues adds depth and interest. The baby blue base color is both pretty and versatile, making it a great choice for both casual and formal occasions.

Consumables List:
- Base Coat: CND Stickey Base Coat
- Light Blue Polish: Essie “Bikini So Teeny”
- Dark Blue Polish: OPI “Russian Navy”
- Striping Tape: Born Pretty Nail Art Striping Tape
- Top Coat: Sally Hansen Miracle Gel Top Coat
DIY Instructions
- Start with a CND Stickey Base Coat to prep your nails.
- Apply Essie “Bikini So Teeny” as the base color, covering the entire nail.
- Once dry, use striping tape to section off the tip of each nail, and apply OPI “Russian Navy” to create the dark blue French tip.
- Carefully remove the tape and finish with a Sally Hansen Miracle Gel Top Coat for a long-lasting shine.
Pastel Blue with Heart Accent
This design is the perfect blend of girly and unique. The soft pastel blue base is complemented by a delicate heart accent on the ring finger, making it an ideal choice for those who love cute and light designs. The long almond-shaped nails further enhance the feminine look, making this a great option for special occasions or even as a subtle holiday look.

Consumables List:
- Base Coat: Orly Bonder Base Coat
- Pastel Blue Polish: Zoya “Blu”
- White Polish: Sally Hansen Xtreme Wear “White On”
- Nail Dotting Tool: Winstonia Double-Ended Dotting Tool
- Top Coat: Glisten & Glow Top Coat
DIY Instructions
- Apply Orly Bonder Base Coat to ensure your manicure lasts.
- Use Zoya “Blu” to paint all your nails with two even coats.
- For the heart accent, dip a dotting tool in Sally Hansen “White On” and create two dots close together. Use the tool to connect the dots into a heart shape.
- Seal your design with Glisten & Glow Top Coat for a smooth and shiny finish.
Ocean Blue Waves
Inspired by the ocean, this blue acrylic nails design features wavy accents in various shades of blue. The short square nails keep the design practical yet stylish, while the mix of colors adds a unique and playful touch. This look is ideal for those who want something bold but still pretty and basic enough for everyday wear.

Consumables List:
- Base Coat: Revlon Quick Dry Base Coat
- Light Blue Polish: Essie “Borrowed & Blue”
- Dark Blue Polish: OPI “Yoga-ta Get This Blue”
- White Polish: OPI “Alpine Snow”
- Nail Art Brush: Winstonia Fine Detail Brush
- Top Coat: INM Out The Door Top Coat
DIY Instructions
- Begin with a coat of Revlon Quick Dry Base Coat.
- Apply Essie “Borrowed & Blue” as the base color.
- Use a fine detail brush to paint waves using OPI “Yoga-ta Get This Blue” and OPI “Alpine Snow”.
- Finish with INM Out The Door Top Coat for a protective, glossy layer.
Royal Blue Shine
This royal blue manicure is all about high impact with minimal effort. The long square nails are painted in a single, solid color of deep royal blue, creating a look that’s both classy and bold. The rich hue is perfect for making a statement and pairs well with any outfit, making it a versatile choice for those who want to keep things simple yet elegant.

Consumables List:
- Base Coat: Essie First Base
- Royal Blue Polish: OPI “My Car Has Navy-gation”
- Top Coat: Essie Gel Couture Top Coat
DIY Instructions
- Start by applying Essie First Base to clean, dry nails.
- Apply two coats of OPI “My Car Has Navy-gation” for full coverage.
- Finish with Essie Gel Couture Top Coat for a long-lasting, gel-like shine.
Light Blue with Floral Accents
This light blue manicure is a perfect blend of simplicity and cuteness. The short square nails are painted in a soft baby blue shade, with a playful addition of floral accents on two nails. The delicate flowers, created with varying shades of blue dots, add a girly and pretty touch, making this design perfect for anyone looking for a unique yet subtle manicure. The mix of solid color and floral accents creates a balanced look that’s both fun and elegant.

Consumables List:
- Base Coat: Sally Hansen Double Duty Base & Top Coat
- Light Blue Polish: Zoya “Blu”
- Dotting Tool: Winstonia Double-Ended Dotting Tool
- White Polish: Essie “Blanc”
- Blue Polish: OPI “No Room for the Blues”
- Top Coat: Essie Gel Couture Top Coat
DIY Instructions
- Apply Sally Hansen Double Duty Base Coat to prep your nails.
- Paint your nails with two coats of Zoya “Blu” for an even, pastel blue finish.
- Use a dotting tool to create floral accents on two nails using Essie “Blanc” and OPI “No Room for the Blues”.
- Seal the design with Essie Gel Couture Top Coat for a glossy, long-lasting finish.
Solid Baby Blue
This manicure is all about solid color and simplicity. The baby blue shade is perfect for those who prefer a clean, classy look without any extra embellishments. The short square shape enhances the elegant and basic feel of this manicure, making it versatile enough for any occasion. This design is perfect for those who want a cute yet minimalist look that’s easy to maintain.

Consumables List:
- Base Coat: OPI Natural Nail Base Coat
- Baby Blue Polish: Essie “Borrowed & Blue”
- Top Coat: Seche Vite Dry Fast Top Coat
DIY Instructions
- Start with a coat of OPI Natural Nail Base Coat.
- Apply two coats of Essie “Borrowed & Blue” for a flawless, baby blue finish.
- Finish with Seche Vite Dry Fast Top Coat for a protective, glossy layer that extends the life of your manicure.
Gradient Blue French Tip
This design takes the classic French tip and gives it a modern twist with a gradient effect. The tips transition from a light to dark blue, creating a unique and eye-catching look. The long square nails further accentuate the gradient effect, making it a classy choice for any occasion. This manicure is perfect for those who want to add a bit of inspo to the traditional French manicure while still keeping things elegant.

Consumables List:
- Base Coat: Orly Bonder Base Coat
- Light Blue Polish: China Glaze “Fade into Hue”
- Dark Blue Polish: OPI “Russian Navy”
- Makeup Sponge: Real Techniques Miracle Complexion Sponge
- Top Coat: INM Out The Door Top Coat
DIY Instructions
- Apply Orly Bonder Base Coat to prepare your nails.
- Use a makeup sponge to apply a gradient of China Glaze “Fade into Hue” and OPI “Russian Navy” on the tips of your nails.
- Once the gradient is smooth and dry, apply INM Out The Door Top Coat to seal and protect your design.
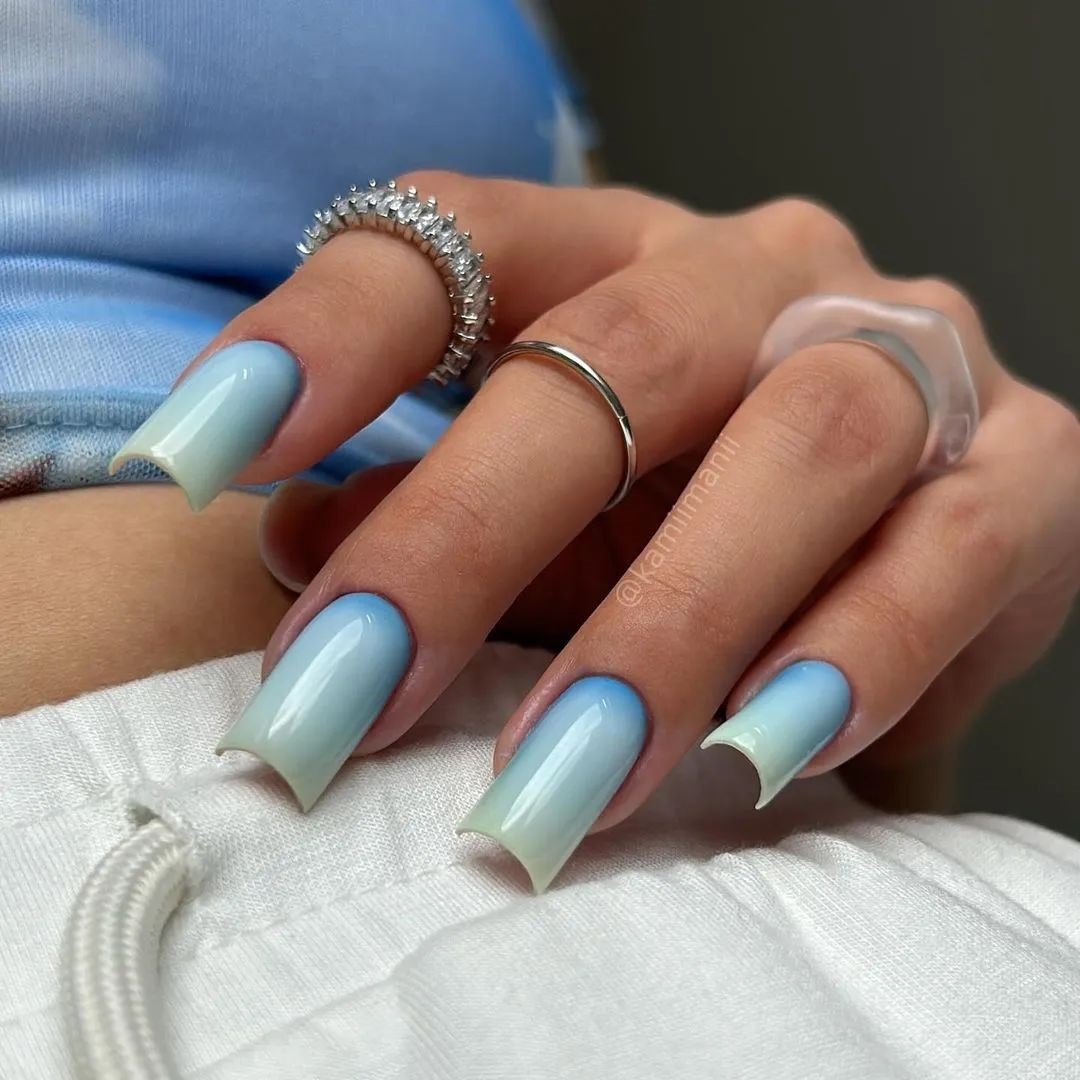
Ombre Blue with Silver Accents
This ombre blue design is a stunning blend of light and dark blue shades, creating a smooth transition that’s both bold and classy. The long almond-shaped nails provide the perfect canvas for this gradient effect, while the silver accents add a touch of glamour. This design is perfect for those who want to make a statement with their nails while still keeping the look elegant and unique.

Consumables List:
- Base Coat: Essie First Base
- Light Blue Polish: Sally Hansen “Breezy Blue”
- Dark Blue Polish: OPI “I Saw…U Saw…We Saw…Warsaw”
- Silver Foil: Born Pretty Silver Nail Foil
- Top Coat: Essie Gel Couture Top Coat
DIY Instructions
- Begin with a coat of Essie First Base to protect your nails.
- Create an ombre effect using Sally Hansen “Breezy Blue” and OPI “I Saw…U Saw…We Saw…Warsaw” with the help of a sponge.
- Apply silver foil accents for an extra touch of luxury.
- Finish with Essie Gel Couture Top Coat to seal in the design.
Wavy Blue Stripes
This bold and unique design features wavy blue stripes on a neutral base, making it a perfect choice for those who love trendy and girly nail art. The long square nails provide ample space for the intricate wavy patterns, and the vibrant blue color adds a pop of color that’s hard to ignore. This design is great for making a statement and showing off your creative side.

Consumables List:
- Base Coat: Orly Bonder Base Coat
- Neutral Base Polish: Essie “Mademoiselle”
- Blue Polish: OPI “No Room for the Blues”
- Nail Art Brush: Winstonia Fine Detail Brush
- Top Coat: Seche Vite Dry Fast Top Coat
DIY Instructions
- Apply Orly Bonder Base Coat to prep your nails.
- Paint your nails with Essie “Mademoiselle” as the neutral base.
- Use a fine detail brush to paint wavy stripes using OPI “No Room for the Blues”.
- Finish with Seche Vite Dry Fast Top Coat for a glossy and long-lasting finish.
Mint Green with Black Speckles
This mint green design with black speckles is a refreshing and unique take on the traditional blue acrylic nails. The long almond shape provides an elegant canvas for the mint green shade, which is a subtle nod to blue hues. The black speckles add an element of fun and girly charm, making this design perfect for those who want something different yet classy. This manicure is a great choice for both everyday wear and special occasions, offering a versatile and modern look.

Consumables List:
- Base Coat: Essie First Base
- Mint Green Polish: OPI “This Cost Me a Mint”
- Black Speckle Top Coat: China Glaze “Fairy Dust” (with black speckles)
- Top Coat: Seche Vite Dry Fast Top Coat
DIY Instructions
- Start with a coat of Essie First Base to protect your nails.
- Apply two coats of OPI “This Cost Me a Mint” for a smooth, minty base.
- Add a layer of China Glaze “Fairy Dust” with black speckles for a fun, textured look.
- Seal the design with Seche Vite Dry Fast Top Coat for a glossy finish.
Double Blue French Tip
This manicure takes the French tip to a whole new level by adding a double blue accent. The long almond-shaped nails are adorned with both a light and dark blue stripe, creating a dynamic and unique look. The combination of baby blue and royal blue offers a modern twist on the classic French design, making it a great option for those who want to experiment with blue acrylic nails. This design is both elegant and classy, suitable for any occasion.

Consumables List:
- Base Coat: OPI Natural Nail Base Coat
- Light Blue Polish: Essie “Bikini So Teeny”
- Dark Blue Polish: OPI “Russian Navy”
- Striping Tape: Born Pretty Nail Art Striping Tape
- Top Coat: Essie Gel Couture Top Coat
DIY Instructions
- Apply OPI Natural Nail Base Coat to start.
- Use striping tape to create two stripes at the tips of your nails, one for each shade of blue.
- Apply Essie “Bikini So Teeny” for the lighter stripe and OPI “Russian Navy” for the darker one.
- Carefully remove the tape and finish with Essie Gel Couture Top Coat for a smooth, polished look.
Solid Blue with Glitter and Plaid Accent
This manicure combines solid color with glitter and a plaid accent nail, offering a fun and girly look. The vibrant blue shade is complemented by a sparkling glitter accent and a plaid design, adding texture and interest to the long almond nails. This look is perfect for those who want something a bit more playful and cute, with just the right amount of glamour.

Consumables List:
- Base Coat: Sally Hansen Hard As Nails
- Blue Polish: China Glaze “DJ Blue My Mind”
- Glitter Polish: Zoya “Dream”
- Plaid Nail Wraps: KISS Salon Secrets Nail Art Starter Kit
- Top Coat: Seche Vite Dry Fast Top Coat
DIY Instructions
- Begin with a coat of Sally Hansen Hard As Nails to protect your nails.
- Apply two coats of China Glaze “DJ Blue My Mind” to all nails except the ring finger.
- Add Zoya “Dream” glitter polish to the ring finger for a sparkling accent.
- Use plaid nail wraps from the KISS Salon Secrets Nail Art Starter Kit on one nail.
- Finish with Seche Vite Dry Fast Top Coat for a long-lasting, glossy finish.
Wavy Blue Glitter
This design features wavy blue stripes combined with glitter accents, creating a look that is both elegant and playful. The short square shape makes it a practical choice for everyday wear, while the glitter and wavy lines add a touch of glamour. This manicure is perfect for those who love blue acrylic nails but want to add a bit of inspo to their look with some sparkle and creative design.

Consumables List:
- Base Coat: Orly Bonder Base Coat
- Light Blue Polish: Essie “Bikini So Teeny”
- Glitter Polish: China Glaze “Fairy Dust”
- Nail Art Brush: Winstonia Fine Detail Brush
- Top Coat: Seche Vite Dry Fast Top Coat
DIY Instructions
- Apply Orly Bonder Base Coat to prep your nails.
- Paint all your nails with Essie “Bikini So Teeny”.
- Use a fine detail brush to create wavy lines with China Glaze “Fairy Dust” for a glittery effect.
- Seal the design with Seche Vite Dry Fast Top Coat for a glossy, long-lasting finish.
Bold Blue Stripes
This bold manicure features bright blue solid color nails with intricate striped accents, perfect for those who love to make a statement. The short square nails are painted in a vibrant royal blue, while the striped design on two nails adds a touch of artistic flair. This look is great for those who want their blue acrylic nails to stand out, combining both classy and modern elements.

Consumables List:
- Base Coat: Essie First Base
- Royal Blue Polish: OPI “My Car Has Navy-gation”
- Nail Art Brush: Winstonia Fine Detail Brush
- Top Coat: Sally Hansen Insta-Dri Top Coat
DIY Instructions
- Start with a coat of Essie First Base to protect your nails.
- Apply two coats of OPI “My Car Has Navy-gation” for a bold, solid blue color.
- Use a fine detail brush to create stripes with the same polish for a cohesive look.
- Finish with Sally Hansen Insta-Dri Top Coat to ensure your manicure lasts.
Solid Light Blue with Almond Shape
This manicure showcases a stunning solid color in a light blue shade on long, almond-shaped nails. The simplicity of the solid hue paired with the sophisticated almond shape creates a classy and elegant look. This design is perfect for those who appreciate minimalism but still want to make a subtle statement with their blue acrylic nails. The light blue tone is versatile, making it suitable for both casual and formal settings.

Consumables List:
- Base Coat: Essie First Base
- Light Blue Polish: OPI “It’s a Boy!”
- Top Coat: Sally Hansen Insta-Dri Top Coat
DIY Instructions
- Apply Essie First Base to prepare your nails.
- Paint your nails with two coats of OPI “It’s a Boy!” for a smooth and even finish.
- Seal the design with Sally Hansen Insta-Dri Top Coat for a high-gloss finish.
Light Blue with Smiley Accent
This playful design combines a soft, light blue base with a quirky smiley face accent on one nail, making it cute and girly. The short, rounded nails are perfect for everyday wear, offering a balance between fun and practicality. The smiley face adds a touch of personality to the otherwise simple manicure, making it a great choice for those who want something unique but not too bold.

Consumables List:
- Base Coat: Orly Bonder Base Coat
- Light Blue Polish: Essie “Find Me an Oasis”
- Black Polish: Sally Hansen “Black Out”
- Nail Art Brush: Winstonia Fine Detail Brush
- Top Coat: Seche Vite Dry Fast Top Coat
DIY Instructions
- Start with Orly Bonder Base Coat to ensure long-lasting wear.
- Apply Essie “Find Me an Oasis” as the base color.
- Use a fine detail brush to paint a smiley face with Sally Hansen “Black Out” on one accent nail.
- Finish with Seche Vite Dry Fast Top Coat for a glossy, protective layer.
Baby Blue French Tip on Long Square Nails
This French tip manicure features a soft baby blue tip on long square nails, offering a modern twist on the classic French design. The clear base with a subtle nude tone enhances the classy and elegant look, making this design perfect for any occasion. The baby blue tips add a touch of color without overpowering the design, keeping it simple yet sophisticated.

Consumables List:
- Base Coat: OPI Natural Nail Base Coat
- Baby Blue Polish: Essie “Bikini So Teeny”
- Top Coat: Essie Gel Couture Top Coat
DIY Instructions
- Apply OPI Natural Nail Base Coat to start.
- Use a precision brush to apply Essie “Bikini So Teeny” to the tips of your nails in a clean line.
- Finish with Essie Gel Couture Top Coat to ensure a glossy, long-lasting finish.
Wavy Blue Design
This design features wavy blue lines on a nude base, creating a look that is both artistic and elegant. The long, almond-shaped nails provide a perfect canvas for the wavy patterns, making this design ideal for those who love blue acrylic nails with a bit of an edge. The wavy lines add movement and interest to the design, making it unique and visually appealing.

Consumables List:
- Base Coat: Orly Bonder Base Coat
- Nude Polish: OPI “Bubble Bath”
- Blue Polish: China Glaze “Sapphire Up!”
- Nail Art Brush: Winstonia Fine Detail Brush
- Top Coat: INM Out The Door Top Coat
DIY Instructions
- Start with Orly Bonder Base Coat.
- Apply OPI “Bubble Bath” as the base color for a soft, neutral background.
- Use a fine detail brush to create wavy lines with China Glaze “Sapphire Up!”.
- Finish with INM Out The Door Top Coat for a smooth and shiny finish.
Floral Blue Design with Solid Accent
This manicure combines solid blue nails with a floral accent, creating a look that is both girly and sophisticated. The almond-shaped nails are painted in a vibrant blue, with two nails featuring a delicate black floral design on a nude base. This design is perfect for those who love floral elements and want to add a touch of elegance to their blue acrylic nails.

Consumables List:
- Base Coat: Essie First Base
- Blue Polish: OPI “Rich Girls & Po-Boys”
- Black Polish: Sally Hansen “Black Out”
- Nude Polish: Essie “Mademoiselle”
- Top Coat: Seche Vite Dry Fast Top Coat
DIY Instructions
- Apply Essie First Base to prep your nails.
- Paint your nails with OPI “Rich Girls & Po-Boys”, leaving two nails bare for the floral design.
- Use a fine detail brush to create black floral designs with Sally Hansen “Black Out” on a base of Essie “Mademoiselle”.
- Finish with Seche Vite Dry Fast Top Coat for a glossy and durable finish.
Periwinkle Blue with Glitter Accent
This design features a soft periwinkle blue on short square nails with a glitter accent, offering a cute and girly look. The glitter adds a touch of sparkle, making the design perfect for both everyday wear and special occasions. The short square shape keeps the look practical while still being fun and chic.

Consumables List:
- Base Coat: OPI Natural Nail Base Coat
- Periwinkle Polish: Essie “Perennial Chic”
- Glitter Polish: Zoya “Cosmo”
- Top Coat: Sally Hansen Insta-Dri Top Coat
DIY Instructions
- Apply OPI Natural Nail Base Coat to start.
- Paint your nails with two coats of Essie “Perennial Chic”.
- Apply Zoya “Cosmo” glitter polish to one accent nail.
- Seal with Sally Hansen Insta-Dri Top Coat for a long-lasting finish.
Bold Blue with Mixed Textures
This bold manicure features a vibrant blue color across various nail designs, combining different textures for a unique and eye-catching look. The long square nails showcase a mix of solid blue, textured patterns, and glitter, creating a visually dynamic and girly appearance. The knit-like pattern on two nails adds an interesting element of texture, while the glittery accent nail brings a touch of glamour. This design is perfect for those who want their blue acrylic nails to stand out with a blend of different styles.

Consumables List:
- Base Coat: Orly Bonder Base Coat
- Solid Blue Polish: OPI “My Car Has Navy-gation”
- Textured Blue Polish: Sally Hansen “Color Therapy Blue Lagoon”
- Glitter Polish: Zoya “Dream”
- Nail Stamping Kit: Born Pretty Nail Stamping Kit
- Top Coat: Seche Vite Dry Fast Top Coat
DIY Instructions
- Apply Orly Bonder Base Coat to prep your nails.
- Paint two nails with OPI “My Car Has Navy-gation” and two others with Sally Hansen “Color Therapy Blue Lagoon”.
- Use a nail stamping kit with a knit pattern plate to create the textured effect on two nails.
- Apply Zoya “Dream” glitter polish on one accent nail for a sparkling finish.
- Seal the design with Seche Vite Dry Fast Top Coat to ensure your manicure lasts.
Save Pin
