
As we bask in the warm glow of the approaching summer, our fashion sensibilities blossom like the flowers around us. Have you wondered how to encapsulate the essence of summer on your fingertips? Are you ready to dive into the sea of vibrant hues and creative designs that define this year’s trends?
Burst of Citrus: A Summer Palette
From a professional standpoint, this nail design screams ‘summer is here!’ with its bold citrus palette. Each nail is an ode to summer’s favorite fruits, with zesty orange, bright yellow, and playful pink taking center stage. The matte finish on these long acrylic nails serves as a canvas for adorable floral accents, adding a touch of whimsy.

Consumables for this design:
-
- High-quality matte top coat
- Acrylic powder in neon orange, sunny yellow, and hot pink
- Mini floral decals
- Recommendation: Opt for a fast-drying top coat to prevent smudging of the delicate decals.
DIY Tips: Begin with clean, buffed nails. After applying your acrylic base, sweep each nail with your chosen color. Once dry, apply the floral decals with a tweezer for precision, finishing with a matte top coat to seal the design.
Deep Sea Dreams: Elegant Navy and Pink
The contrast of deep navy and soft pink in this design evokes the unexpected depths and romantic shores of the ocean. As a manicurist, I appreciate the creative interplay of glossy and matte finishes, along with the abstract silver line art that adds a modern twist.

Consumables for this design:
-
- Navy and pink acrylic powders
- Glossy and matte top coats
- Silver line decals or striping tape
- Recommendation: For crisp lines, use a fine-tip brush or pre-cut striping tape to achieve that sleek, artistic look.
DIY Tips: Apply two coats of navy polish, allowing them to dry completely. Use striping tape to outline where the pink will go, then paint and remove the tape while the pink polish is still wet. Alternate the finishes between nails for that glossy/matte contrast.
Peachy Keen Gradient: Soft and Subtle
This acrylic design showcases a beautiful gradient from peach to pink. The addition of small, precise dots creates a festive confetti effect, perfect for summer celebrations.

Consumables for this design:
-
- Peach and pink acrylic powders
- Dotting tool or a fine-tipped brush
- A light touch of sparkle with micro-glitter
- Recommendation: Practice the gradient on a makeup sponge first to perfect the fade before applying it to the nails.
DIY Tips: Sponge on the gradient, starting with the lighter color at the base. Once satisfied, dot on your sparkles. Seal with a top coat for a smooth finish that brings out the depth of the colors.
Fluttering Butterflies: Whimsy on Your Fingertips
The delicate butterfly designs set against a pale lavender background invoke a sense of serene summer gardens. Each wing is detailed with care, making the butterflies appear almost lifelike.

Consumables for this design:
-
- Pale lavender acrylic powder
- Butterfly stickers or hand-painted with fine brushes
- A clear top coat to give the butterflies their deserved shine
- Recommendation: Use a gentle hand when painting or placing stickers to maintain the intricate details of the butterflies.
DIY Tips: After your base color, apply the butterfly design carefully. Whether you’re painting or sticking, make sure the surface is smooth before sealing with a top coat.
Neon Dreams: A Spectrum of Summer
This design is all about boldness and vibrancy, featuring an array of neon colors that are bound to turn heads. The seamless transition between shades makes each finger a standalone piece of art.

Consumables for this design:
-
- Neon acrylic powders in green, orange, pink, purple, and blue
- A high-quality, high-shine top coat
- Recommendation: When working with neons, ensure your base is a pure white to make the colors truly pop.
DIY Tips: Start with a white base coat to enhance the neon colors. Apply each color with precision, and don’t be afraid to use tape to keep the lines clean.
Jungle Fever: Wild Patterns and Vibrant Greens
In my professional view, this nail design brings the untamed beauty of the jungle to life. The bold green shade represents the lush foliage, while the zebra stripes provide a striking contrast that speaks to the wildness within us. The muted pink adds a soft balance, making this design a complete story of nature’s palette.

Consumables for this design:
-
- Vibrant green and soft pink acrylic paints
- Black polish for zebra stripes
- A thin detailing brush for precision
- Recommendation: Use a glossy top coat to make the colors vibrant and the design last longer.
DIY Tips: Apply the green and pink base colors, letting each nail dry completely. With a thin brush, hand-paint the zebra stripes for that authentic wild look. Seal with a glossy top coat for a long-lasting finish.
Daisies in the Breeze: A Touch of Floral
As an aficionado of nail art, I adore how this design captures the essence of a summer field. The blue skies are mirrored in the nail color, while the daisy accents evoke the feel of a sun-drenched meadow.

Consumables for this design:
-
- Sky blue and nude acrylic paint
- White and yellow polish for daisy details
- Recommendation: Choose a top coat that enhances the sheen of the blue and the crispness of the daisy designs.
DIY Tips: Start with a nude base, adding the sky blue accent. For the daisies, use a dotting tool to place the white petals and a fine brush for the yellow centers. A steady hand and a good top coat will make this design last through any summer adventure.
Sunset Ombre: The Warmth of Summer Evenings
The warm gradient hues of this nail design remind me of the breathtaking summer sunsets. The transition from a gentle pink to a bold orange is like the sky changing colors as the sun dips below the horizon.

Consumables for this design:
-
- Pink and orange acrylic powders for the gradient
- A sponge for the ombre effect
- Recommendation: Use a non-yellowing top coat to preserve the ombre gradient’s true colors.
DIY Tips: Sponge on the gradient by blending the pink and orange on a flat surface first, then dabbing it onto the nail. Patience and layering are key to a smooth transition. Finish with a top coat that prevents fading.
Flowing Creativity: Fluid Art on Your Nails
This design is a testament to fluidity and movement, drawing inspiration from the ripples of water and the fluidity of summer waves. The combination of cool and warm tones creates a mesmerizing effect that’s both chic and playful.

Consumables for this design:
-
- Acrylic paints in navy blue, white, yellow, and pastel tones
- A small dish of water for the water-marbling technique
- Recommendation: Work quickly with the marbling to ensure a smooth, flowing design.
DIY Tips: Drop the colors into the water and use a toothpick to swirl them into a pattern. Dip your nail into the water where the pattern is most appealing, then clean up the edges before applying a top coat.
Sparkling Strawberry Fields: A Glittery Delight
Glitter always has a place in summer designs, and this one reminds me of strawberry fields sprinkled with morning dew. The sparkling flecks give a fresh and festive touch, perfect for any summer occasion.

Consumables for this design:
-
- Bright strawberry pink glitter polish
- A base coat that prevents staining
- Recommendation: Apply the glitter polish with a makeup sponge to pack on the sparkle.
DIY Tips: Start with a protective base coat. Dab the glitter on with a sponge for maximum coverage. A couple of layers may be needed, and a top coat will secure the glitter for an enduring sparkle.
Tranquil Tulips: Nature’s Embrace
In the realm of nail artistry, this design is reminiscent of delicate tulip petals dancing in the soft summer breeze. The translucent tips act as a window into a world of subtle flora, with each stroke of the brush bringing to life the gentle curves of the leaves and blooms.

Consumables for this design:
-
- Clear acrylic tips
- Pink and green acrylic paints for the floral art
- Thin detail brushes for precision
- Recommendation: Use a slow-drying acrylic medium to allow time for intricate petal shaping.
DIY Tips: Begin with a clear tip, gently painting on the tulip and leaf designs. A detail brush will help achieve the thin, crisp lines of the leaves. Let your artistry blossom, finishing with a top coat to encapsulate the design.
Vintage Vino: Richness in Simplicity
Embodying sophistication, the deep wine color of this acrylic design is a nod to timeless elegance. The glossy finish is akin to a well-aged Bordeaux, reflecting the light and drawing the eye to the depth of color.

Consumables for this design:
-
- Deep wine red acrylic paint
- High-gloss top coat for a glass-like finish
- Recommendation: Choose a self-leveling acrylic to avoid brush strokes and achieve a smooth surface.
DIY Tips: Apply the wine red paint in even strokes, ensuring full coverage. A high-gloss top coat will not only protect the color but also add that luxurious shine reminiscent of a fine varnish.
Avocado Appeal: A Playful Twist on Neutrals
As a lover of playful accents, I’m thrilled by this acrylic design’s whimsical take on the neutral trend. The creamy base adorned with avocado motifs is a cheeky celebration of summer’s bounty, making it a conversation starter at any summer soirée.
Consumables for this design:
-
- Cream acrylic base coat
- Avocado green and brown paints for the motifs
- A small dotting tool for the pits
- Recommendation: Experiment with matte and gloss finishes to add texture to the design.
DIY Tips: After applying your neutral base, delicately paint the avocado designs. Use the dotting tool to add dimension to the pits. Consider a matte top coat on the avocados for a realistic texture contrast.
Lavender Dreams: Soothing Hues for Summer Nights
In every brushstroke, this acrylic nail design encapsulates the serenity of a summer twilight. The gradient shades of lavender are like the evening sky transitioning from dusk till dawn.

Consumables for this design:
-
- A spectrum of lavender acrylic paints for the gradient
- A sponge for blending the hues
- Recommendation: Use a long-wearing top coat to maintain the gradient’s delicate balance.
DIY Tips: Blend your lavender hues on a sponge first, then press onto the nail for that perfect gradient. A light touch and patience are key as you build up the color to the desired intensity.
Citrus and Botanics: A Fusion of Flora and Freshness
This acrylic design is a true summer delight, blending the freshness of citrus tones with botanical elegance. The vibrant orange serves as a zesty backdrop for the chic leaf patterns, encapsulating the essence of a sunlit Mediterranean grove.

Consumables for this design:
-
- Bright orange acrylic paint
- Black and white paints for the leaf details
- A fine brush for the delicate leaf strokes
- Recommendation: Apply a top coat that enhances color vibrancy to make the design pop.
DIY Tips: Lay down the orange base before meticulously painting the botanical patterns. Balance is key – allow the vibrancy of the orange to complement, not overwhelm, the foliage designs.
Pastel Playgrounds: A Summer Dream
This design is a whimsical dream, а playful hint of the pastel skies of summer dawns. The lavender base combined with bright orange tangerines brings a hint of countryside to your nails, while the transparent nail segments offer a modern twist, showcasing the natural beauty underneath.

Consumables for this design:
-
- Lavender and clear acrylic powders
- Orange and green paint for the carrot details
- A dotting tool for the white accents
- Recommendation: Use a high-quality non-yellowing top coat to maintain the clarity of the transparent sections.
DIY Tips: After prepping the clear and lavender bases, use a fine brush to paint the carrots. Add the white dots last for a playful contrast and seal with a top coat for a glossy, enduring finish.
Electric Lines: Neon Nights
Reflecting the electric energy of summer nights, this nail design with its sharp neon blue and pink lines against a sheer base is a statement of boldness and confidence. It’s perfect for the vibrant soul ready to stand out at any summer party.

Consumables for this design:
-
- Sheer pink acrylic powder
- Neon blue and pink striping polish
- A precise striping brush for sharp lines
- Recommendation: Consider a matte top coat to modernize the neon shine and add an edgy finish.
DIY Tips: Lay down the sheer pink base, then with a steady hand, paint the neon lines. Allow each stripe to dry thoroughly before applying the next color to prevent bleeding.
Olive and Gold: Earthy Elegance
I’m thoroughly charmed by the earthy tones of this design. The marriage of olive green and creamy almond, accented with flecks of gold leaf, echoes the luxury of summer’s lush landscapes and golden afternoons.

Consumables for this design:
-
- Olive and almond acrylic paints
- Gold leaf flakes
- A fan brush for a light touch of gold
- Recommendation: A glossy top coat will enhance the metallic sheen of the gold leaf.
DIY Tips: Apply the olive and almond colors as your base. Then, with a fan brush, gently adhere the gold leaf flakes to the nails, focusing on creating a natural scattered effect.
Cobalt Currents: Bold and Beautiful
In this design, the bold cobalt blue mimics the deep, mysterious depths of the ocean. The high-gloss finish and the wave-like ripples across each nail make for a dynamic and captivating appearance, like the ocean’s surface shimmering under the summer sun.

Consumables for this design:
-
- Cobalt blue acrylic paint
- A glossy top coat for that wet look
- Recommendation: Use a self-leveling paint to avoid streaks and get that smooth, water-like surface.
DIY Tips: Apply two coats of cobalt blue, allowing for complete drying in between. Finish with a high-gloss top coat to achieve the look of sunlit waves.
Vivacious Violet: Matte Elegance
The striking matte violet of these nails brings a bold yet sophisticated touch to summer styles. As a nail artist, I’m drawn to the depth this shade brings, perfect for both daytime adventures and evening elegance.

Consumables for this design:
-
- Matte violet acrylic paint
- A high-quality matte top coat to seal in the color
- Recommendation: Ensure your nails are completely dry before applying the matte coat to avoid any shine.
DIY Tips: Apply two coats of the violet paint, waiting for the first layer to dry before adding the second. Finish with a matte top coat for that chic, velvety look. The key here is a smooth application to prevent any brush marks from spoiling the matte effect.
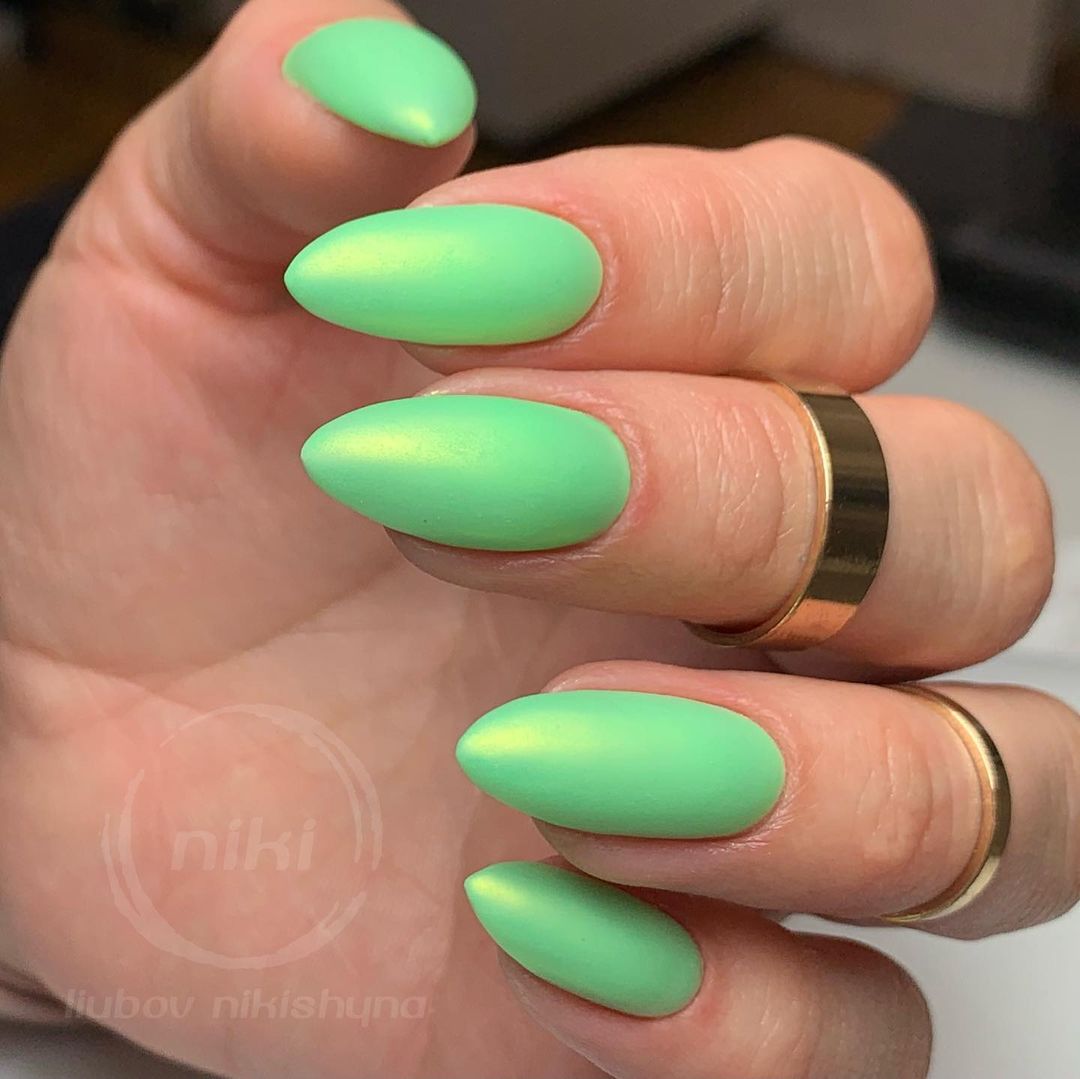
Spring Greens: Luminous and Lively
Embrace the vibrancy of spring that lingers into the summer months with these luminous green acrylic nails. The shade is fresh, embodying the new growth and bright beginnings of the season.

Consumables for this design:
-
- Neon green acrylic paint
- A glossy top coat for a radiant finish
- Recommendation: Pair with a neutral outfit to let your nails be the statement piece.
DIY Tips: Achieve this look with a base coat followed by the neon paint. Use a glossy top coat to amplify the brightness and provide a protective shield against the summer elements.
Golden Scales: The Allure of Patterns
This acrylic nail design takes inspiration from the animal kingdom, featuring a golden scale pattern that is both bold and exotic. The yellow and black contrast against each other, creating a striking visual that’s sure to catch every glance.

Consumables for this design:
-
- Yellow and black acrylic paints for the scale pattern
- A fine-tipped brush or a scale-patterned stencil
- Recommendation: Apply a top coat to enhance the design’s vibrancy and longevity.
DIY Tips: For precision, use a stencil to create the scale pattern, painting over with black and then filling in with yellow. Once dry, a top coat will add a beautiful sheen and protect your design.
Save Pin
