
22 Pastel Color Nail Ideas: Stunning Designs, French Tips, and Art Inspiration
When it comes to creating a chic and timeless look, pastel color nails are a go-to option for many nail enthusiasts. Their soft hues offer versatility, making them perfect for both spring and fall seasons, and they effortlessly blend with various fashion styles. But what makes these designs truly special is how they can be tailored to fit different moods and occasions. Whether you’re looking for something subtle and sophisticated or bold and creative, there’s a pastel nail design that fits the bill. So, what are some of the most captivating pastel color nails designs you should try? In this article, I’ll walk you through several stunning nail designs, providing detailed descriptions and tips on how to achieve them at home.
Pastel Gradient with Gold Accents
This pastel color nails design features a smooth gradient of soft pinks, purples, and nudes, elegantly transitioning from one hue to the next. Each nail is enhanced with a delicate gold stripe, adding a touch of luxury and sophistication. The almond shape of the nails further accentuates the elegance of the design, making it a perfect choice for any occasion where you want to stand out subtly.

Consumables:
-
- Gradient pastel polishes in shades of pink, purple, and nude (OPI, Essie)
- Gold striping tape or fine brush for painting stripes
- Base and top coat (Seche Vite)
- Almond-shaped nail file
Author’s Recommendations: OPI’s “Bubble Bath” and Essie’s “Lilacism” create a flawless gradient effect. Use gold striping tape for precision or a fine brush to paint the stripes manually for a more personalized touch.
Instructions for At-Home Application:
- Start by filing your nails into an almond shape.
- Apply a base coat and let it dry.
- Using a makeup sponge, dab the gradient polish onto the nails, blending each color into the next.
- Once dry, carefully apply the gold stripes using striping tape or a fine brush.
- Seal the design with a top coat to ensure longevity.
Pastel Floral Art
Embrace the beauty of nature with this pastel color nails design that showcases dainty floral accents. Each nail is painted in a different pastel shade, and tiny white and pink flowers are artfully placed, giving the nails a soft, whimsical look. This design is perfect for springtime and is an excellent example of art designs that work beautifully on short nails.

Consumables:
-
- Pastel nail polish in shades of pink, green, lavender, and nude (Zoya, Orly)
- White and pink nail polish for floral details (Sally Hansen’s “White On” and “Tickled Pink”)
- Fine detail brush or dotting tool for painting flowers
- Base and top coat (CND Vinylux)
Author’s Recommendations: Zoya’s “Dot” and Orly’s “Kiss the Bride” offer soft pastels that are perfect for this design. For the floral accents, Sally Hansen’s “White On” provides a crisp contrast against the pastels.
Instructions for At-Home Application:
- Apply a base coat and let it dry.
- Paint each nail in a different pastel shade, and allow them to dry completely.
- Using a fine brush or dotting tool, create small flowers on each nail using the white and pink polishes.
- Once the design is complete, seal it with a top coat.
Colorful French Tips with Nude Base
French tips get a modern twist with this pastel color nails french design. A nude base is complemented by vibrant pastel tips in pink, purple, and blue, giving the classic French manicure a fresh and youthful vibe. This square shape design is perfect for those who love a balance between playful and professional.

Consumables:
-
- Nude base polish (OPI’s “Samoan Sand”)
- Pastel polishes for tips in pink, purple, and blue (China Glaze)
- Square-shaped nail file
- Base and top coat (Butter London)
Author’s Recommendations: OPI’s “Samoan Sand” offers a perfect nude base, while China Glaze’s pastels provide a pop of color on the tips. A square-shaped file is essential for maintaining the shape.
Instructions for At-Home Application:
- File your nails into a square shape and apply a base coat.
- Paint the nails with a nude polish and allow them to dry.
- Using a fine brush or tape as a guide, paint the tips with pastel colors, ensuring each tip is evenly coated.
- Finish with a top coat to protect the design.
Minimalist Pastel Short Nails
This simple yet elegant design showcases pastel color nails in a minimalist style, perfect for short nails. Each nail is painted in a different pastel shade—mint green, light blue, lavender, and peach—creating a soft and harmonious palette. The clean and glossy finish highlights the beauty of the pastel colors, making this design ideal for everyday wear or a subtle pop of color.

Consumables:
-
- Pastel polishes in mint green, light blue, lavender, and peach (Essie, OPI)
- Short, rounded nail file
- Base and top coat (Seche Vite)
Author’s Recommendations: Use Essie’s “Mint Candy Apple,” “Lilacism,” and “Peach Daiquiri” for smooth, even coverage. A short, rounded nail file helps maintain the natural shape, allowing the colors to stand out.
Instructions for At-Home Application:
- File the nails into a short, rounded shape and apply a base coat.
- Paint each nail with a different pastel shade, ensuring even coverage and smooth edges.
- Seal the design with a top coat for a glossy, long-lasting finish.
Multi-Pastel Mix
For those who love a burst of color, this multi-pastel mix design is ideal. Each nail showcases a different pastel shade, creating a fun and vibrant look that’s perfect for any season. The square shape adds a modern edge, making it a go-to for anyone looking to experiment with different ideas.

Consumables:
-
- Pastel polishes in yellow, pink, purple, and mint (Essie, OPI)
- Square-shaped nail file
- Base and top coat (Sally Hansen Insta-Dri)
Author’s Recommendations: Essie’s “Mint Candy Apple” and OPI’s “Do You Lilac It?” provide a vivid pastel palette. The square shape enhances the overall modern look.
Instructions for At-Home Application:
- File the nails into a square shape.
- Apply a base coat and let it dry.
- Paint each nail in a different pastel shade, ensuring full coverage.
- Finish with a top coat to protect the colors and add shine.
Pastel French Tips with Gold Detailing
This stunning pastel color nails design incorporates a modern twist on the classic French manicure. Each nail tip is painted in a different pastel shade—pink, blue, yellow, and green—while the base remains a soft nude. The real showstopper is the delicate gold line that separates the pastel tip from the nude base, adding a touch of elegance and making this design perfect for both everyday wear and special occasions.

Consumables:
-
- Nude base polish (OPI’s “Samoan Sand”)
- Pastel polishes for tips in different shades (Essie, Zoya)
- Gold striping tape or fine gold nail polish for the line
- Almond-shaped nail file
- Base and top coat (Essie Gel Couture)
Author’s Recommendations: Use Essie’s pastel shades like “Mint Candy Apple” and “Lilacism” for the tips. The gold line can be created using striping tape for precision or a thin brush dipped in gold polish for a more artistic touch.
Instructions for At-Home Application:
- File the nails into an almond shape and apply a base coat.
- Paint the nail tips with different pastel colors, ensuring each tip is neatly shaped.
- Once the tips are dry, apply a thin gold line at the base of each tip using striping tape or a fine brush.
- Seal with a top coat to ensure the design lasts.
Floral Pastel Nail Art
This pastel color nails design is a celebration of spring, featuring a soft yellow base with delicate floral accents. Each nail showcases a hand-painted flower in shades of blue, green, and red, making the nails appear like a blooming garden. This design is ideal for anyone looking to embrace the warmth and freshness of spring in their manicure.

Consumables:
-
- Pastel yellow polish for the base (China Glaze’s “Lemon Fizz”)
- Various shades of polish for the flowers (Sally Hansen’s “Pacific Blue,” “Mint Sorbet,” and “Cherry Red”)
- Fine detail brush or dotting tool for painting flowers
- Almond-shaped nail file
- Base and top coat (Orly Bonder)
Author’s Recommendations: China Glaze’s “Lemon Fizz” offers a bright yet soft yellow base. Use Sally Hansen’s shades for the floral details, and a fine detail brush is essential for precision.
Instructions for At-Home Application:
- Start with a base coat and apply the yellow polish to each nail.
- Using a fine brush, paint small flowers on each nail in different colors, making sure they are evenly spaced.
- Once the flowers are dry, apply a top coat to protect your design.
Speckled Pastel French Tips
For a unique twist on pastel color nails, this design features pastel French tips with a playful speckled effect. The tips are painted in soft shades of pink and peach, and then speckled with tiny black dots, reminiscent of speckled eggs, making this design perfect for spring or Easter-inspired nails.

Consumables:
-
- Pastel polishes for tips in pink and peach (OPI’s “Mod About You” and “Crawfishin’ for a Compliment”)
- Black polish or a thin black pen for the speckles (OPI’s “Black Onyx”)
- Fine dotting tool or small brush for creating speckles
- Almond-shaped nail file
- Base and top coat (Sally Hansen Miracle Gel)
Author’s Recommendations: Use OPI’s soft pastel shades for a subtle yet chic look. The speckles can be created with a dotting tool or even a thin brush dipped in black polish for precision.
Instructions for At-Home Application:
- File your nails into an almond shape and apply a base coat.
- Paint the tips with your chosen pastel colors and allow them to dry.
- Use a dotting tool or small brush to add black speckles to the tips.
- Finish with a top coat to seal the design.
Minimalist Pastel Tips
This minimalist design is all about clean lines and soft colors. The tips of each nail are painted in different pastel shades, forming a geometric pattern that is both modern and subtle. The natural nail bed remains exposed, allowing the pastel colors to truly pop against the neutral background.

Consumables:
-
- Pastel polishes for tips in different shades (Essie, Deborah Lippmann)
- Fine brush or striping tape for precise application
- Almond-shaped nail file
- Base and top coat (CND Vinylux)
Author’s Recommendations: Use Deborah Lippmann’s pastels for a high-quality finish. A fine brush is key for creating those clean, crisp lines.
Instructions for At-Home Application:
- File the nails into an almond shape and apply a base coat.
- Paint each tip with a different pastel color, using a fine brush or striping tape to create clean lines.
- Once the design is complete, apply a top coat to protect the manicure.
Abstract Pastel Art with Gold Accents
This design combines soft pastel shades with abstract gold accents, creating a look that’s both artistic and elegant. The nude base serves as the perfect canvas for the pastel swirls, while the gold lines add a touch of luxury and sophistication.

Consumables:
-
- Nude base polish (OPI’s “Samoan Sand”)
- Pastel polishes for the abstract design (Zoya’s pastel collection)
- Gold striping tape or fine brush for the gold accents
- Almond-shaped nail file
- Base and top coat (Butter London)
Author’s Recommendations: Zoya’s pastel polishes provide a smooth and even coverage. Use a fine brush or striping tape to apply the gold accents with precision.
Instructions for At-Home Application:
- File the nails into an almond shape and apply a base coat.
- Using a fine brush, create abstract designs on each nail with pastel polishes.
- Add gold accents using striping tape or a fine brush for a luxurious finish.
- Apply a top coat to protect your design.
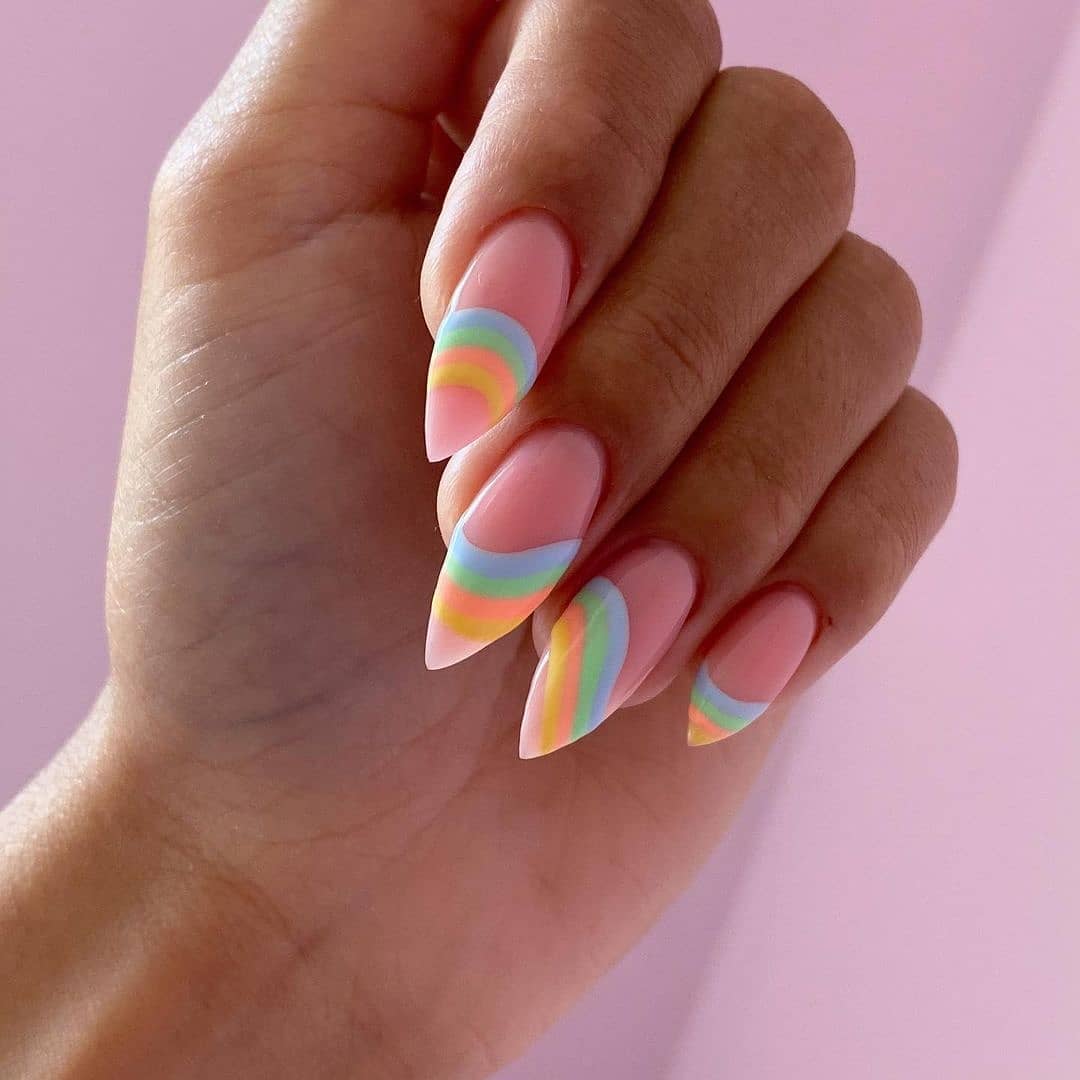
Rainbow Pastel Swirls
This design is a true celebration of color and creativity. The nails are shaped into a sleek almond style and feature a mesmerizing swirl of pastel rainbow colors across each nail. The smooth transitions between pink, blue, yellow, and green give the illusion of a soft rainbow cascading over the nails. This design is perfect for those who want to make a statement with their manicure while keeping it playful and vibrant.

Consumables:
-
- Pastel polishes in pink, blue, yellow, and green (OPI, Essie)
- Almond-shaped nail file
- Fine brush for precise swirl application
- Base and top coat (CND Vinylux)
Author’s Recommendations: Use Essie’s “Fiji,” “Mint Candy Apple,” and OPI’s “Sunrise… Bedtime!” for a smooth and vibrant swirl effect. A fine detail brush is essential for creating the seamless transitions between colors.
Instructions for At-Home Application:
- File the nails into an almond shape and apply a base coat.
- Using a fine brush, create the rainbow swirl effect by carefully applying each pastel color in a curved line across the nail.
- Finish with a top coat to seal the design and add a glossy finish.
Delicate Pastel French with Floral Accents
This pastel color nails design combines the elegance of a French manicure with the charm of delicate floral accents. The tips are painted in soft shades of pink and blue, while the natural nail bed is adorned with hand-painted flowers. The flowers add a touch of nature-inspired beauty, making this design ideal for spring or any time you want to feel connected to the outdoors.

Consumables:
-
- Pastel pink and blue polishes for the tips (Zoya, Orly)
- White, pink, and green polishes for the floral accents (Sally Hansen, China Glaze)
- Fine detail brush or dotting tool for painting flowers
- Square-shaped nail file
- Base and top coat (OPI Nail Envy)
Author’s Recommendations: Zoya’s “Blu” and Orly’s “Kiss the Bride” are perfect for creating the pastel tips. Use Sally Hansen’s “White On” for crisp, clean flowers.
Instructions for At-Home Application:
- Apply a base coat and paint the tips of your nails with pastel pink and blue polishes.
- Using a fine brush, paint small flowers on the natural nail bed, making sure they are evenly spaced.
- Seal the design with a top coat to protect the manicure.
Golden Daisy Pastel Almonds
This design features a sophisticated combination of pale yellow and pink pastel shades, with tiny white daisies and gold accents adding a touch of whimsy. The almond shape of the nails complements the soft colors, while the gold accents give the design a luxurious feel. This manicure is perfect for those who want a delicate, yet eye-catching look.

Consumables:
-
- Pastel yellow and pink polishes (Deborah Lippmann)
- White polish for daisies (Essie’s “Blanc”)
- Gold striping tape or gold polish for accents (OPI’s “Glitzerland”)
- Almond-shaped nail file
- Base and top coat (Seche Vite)
Author’s Recommendations: Deborah Lippmann’s “Lemon Drop” provides a soft yellow base that pairs beautifully with Essie’s “Blanc” for the daisy details. The gold accents can be achieved with OPI’s “Glitzerland.”
Instructions for At-Home Application:
- File the nails into an almond shape and apply a base coat.
- Paint the nails in pastel yellow and pink shades, alternating between fingers.
- Using a fine brush, add white daisies and gold accents to each nail.
- Finish with a top coat to seal the design.
Sage Green and Floral Accents
This pastel color nails design embraces the elegance of sage green, combined with a soft pink base and delicate floral accents. The mixture of green and pink pastels creates a harmonious balance, while the detailed floral art adds a touch of nature to the overall look. This design is perfect for those who prefer a more subdued yet sophisticated manicure.

Consumables:
-
- Pastel sage green and pink polishes (OPI, Essie)
- White and yellow polishes for the floral accents (Sally Hansen, Orly)
- Fine brush for detailed floral painting
- Almond-shaped nail file
- Base and top coat (CND Vinylux)
Author’s Recommendations: Use OPI’s “Sagebrush” and Essie’s “Fiji” for the base colors. For the floral accents, Sally Hansen’s “White On” and Orly’s “Glowstick” work beautifully.
Instructions for At-Home Application:
- File the nails into an almond shape and apply a base coat.
- Paint the nails in alternating sage green and pink shades.
- Use a fine brush to create small floral accents on the pink nails, incorporating white and yellow for contrast.
- Apply a top coat to protect the design and ensure a glossy finish.
Modern Pastel Lines
This design is a modern take on pastel color nails, featuring sleek, minimalist lines in different pastel shades. The nude base allows the lines to stand out, creating a chic and sophisticated look that’s perfect for any occasion. This design is great for those who love a minimalist aesthetic with a touch of color.
Consumables:
-
- Nude base polish (Essie’s “Ballet Slippers”)
- Pastel polishes in pink, yellow, and blue (China Glaze, Zoya)
- Fine striping brush for precise line application
- Almond-shaped nail file
- Base and top coat (Butter London)
Author’s Recommendations: Essie’s “Ballet Slippers” provides a clean base, while China Glaze’s pastel collection offers vibrant yet soft hues for the lines. A fine striping brush is essential for achieving the precise lines.
Instructions for At-Home Application:
- File the nails into an almond shape and apply a base coat.
- Using a striping brush, carefully paint thin lines in different pastel colors across each nail.
- Seal with a top coat to protect the design and add a glossy finish.
Ombre Pastel Gradient
This elegant pastel color nails design features a seamless ombre gradient transitioning between soft pastel shades of pink, yellow, blue, and green. The almond shape accentuates the smooth blend of colors, creating a dreamy and ethereal look. This design is perfect for those who appreciate subtlety and elegance in their nail art.

Consumables:
-
- Pastel polishes in pink, yellow, blue, and green (OPI, Essie)
- Makeup sponge for blending the ombre effect
- Almond-shaped nail file
- Base and top coat (Zoya Naked Manicure)
Author’s Recommendations: Use OPI’s “Mod About You” and Essie’s “Mint Candy Apple” for a soft and smooth gradient. A makeup sponge is essential for achieving the seamless blend of colors.
Instructions for At-Home Application:
- File the nails into an almond shape and apply a base coat.
- Using a makeup sponge, apply the pastel polishes to create the gradient, blending each color into the next.
- Finish with a top coat to seal the design and add a glossy finish.
Pastel French Tips with a Modern Twist
This design brings a fresh and modern twist to the classic French manicure. The tips are painted in different pastel shades, including soft pink, blue, and mint green, while the base remains a nude tone. The square shape of the nails gives the design a clean and contemporary feel, perfect for everyday wear.

Consumables:
-
- Pastel polishes for tips in pink, blue, and mint green (Zoya, Orly)
- Square-shaped nail file
- Base and top coat (CND Vinylux)
Author’s Recommendations: Zoya’s pastel collection is perfect for creating the colorful tips. A square-shaped nail file helps maintain the crisp edges that make this design stand out.
Instructions for At-Home Application:
- File the nails into a square shape and apply a base coat.
- Carefully paint the tips in different pastel shades, ensuring each tip is neat and even.
- Seal with a top coat to protect the design.
Floral Pastel Accents on Short Nails
This design combines the charm of floral accents with the simplicity of short nails. The base is a soft pastel pink, with delicate flowers hand-painted on the accent nails. The flowers are highlighted with subtle pastel shades, making this design perfect for spring or any time you want to add a touch of nature to your look.

Consumables:
-
- Pastel pink polish for the base (Essie’s “Fiji”)
- Various pastel polishes for the flowers (OPI, Sally Hansen)
- Fine detail brush for painting flowers
- Short nail file
- Base and top coat (Butter London)
Author’s Recommendations: Essie’s “Fiji” provides a perfect base, while OPI’s “Pastel Purple” and Sally Hansen’s “Mint Sorbet” are great for the floral details. A fine brush is essential for achieving the delicate flower designs.
Instructions for At-Home Application:
- File the nails into a short, neat shape and apply a base coat.
- Paint the nails with a pastel pink polish, then use a fine brush to add floral accents.
- Finish with a top coat to protect the manicure.
Textured Pastel Green Nails
This bold and modern design features a single pastel green shade with a unique textured pattern. The nails are kept short and square, with the texture adding depth and dimension to the design. This look is perfect for those who want to make a statement with their nails while keeping the color palette soft and pastel.

Consumables:
-
- Pastel green polish (OPI’s “Sagebrush”)
- Texturing tool or fine brush for creating the pattern
- Short, square-shaped nail file
- Base and top coat (Sally Hansen Miracle Gel)
Author’s Recommendations: OPI’s “Sagebrush” offers a smooth and even coverage. Use a fine brush or texturing tool to create the raised pattern that adds an artistic touch to the design.
Instructions for At-Home Application:
- File the nails into a short, square shape and apply a base coat.
- Paint the nails with the pastel green polish, allowing them to dry.
- Use a texturing tool or fine brush to create the pattern on each nail.
- Apply a top coat to seal the design.
Floral Pastel and Mint Green Combo
This design combines pastel pink and mint green, with delicate floral accents on the nails. The combination of colors creates a fresh and feminine look, perfect for spring or any occasion where you want to add a touch of elegance to your manicure.

Consumables:
-
- Pastel pink and mint green polishes (Essie, OPI)
- Fine brush for detailed floral painting
- Square-shaped nail file
- Base and top coat (CND Vinylux)
Author’s Recommendations: Essie’s “Mint Candy Apple” and OPI’s “Mod About You” provide a soft, pastel palette for this design. A fine brush is essential for creating the delicate floral accents.
Instructions for At-Home Application:
- File the nails into a square shape and apply a base coat.
- Paint alternating nails with pastel pink and mint green polishes.
- Use a fine brush to add floral accents to the pink nails.
- Finish with a top coat to protect the design.
3D Pastel Daisy Design
This playful and fun design features 3D daisies in different pastel shades, adding texture and dimension to the nails. The daisies are placed on a soft pink base, with alternating nails featuring a simple pastel French tip. This design is perfect for those who love to experiment with texture in their nail art.

Consumables:
-
- Pastel pink polish for the base (OPI’s “Bubble Bath”)
- 3D daisy embellishments in different pastel colors (available from nail art suppliers)
- Pastel polishes for the French tips (Essie, Zoya)
- Almond-shaped nail file
- Base and top coat (Seche Vite)
Author’s Recommendations: OPI’s “Bubble Bath” is the perfect base color for this design. The 3D daisies can be purchased from nail art suppliers, and a good adhesive is necessary to ensure they stay in place.
Instructions for At-Home Application:
- File the nails into an almond shape and apply a base coat.
- Paint the nails with a pastel pink polish, then apply the 3D daisies to the accent nails.
- On the remaining nails, create pastel French tips using a fine brush.
- Seal the design with a top coat to secure the daisies and protect the polish.
Gem-Embellished Pastel Ombre
This luxurious design features an ombre effect transitioning between various pastel shades, with each nail adorned with sparkling gems. The long, square shape of the nails adds a glamorous touch, making this design perfect for special occasions where you want to stand out.

Consumables:
-
- Pastel polishes for the ombre effect (China Glaze, OPI)
- Gems and rhinestones for embellishment (available from nail art suppliers)
- Long, square-shaped nail file
- Base and top coat (Sally Hansen Miracle Gel)
Author’s Recommendations: China Glaze’s pastel collection provides a vibrant yet soft palette for the ombre effect. Use a good-quality adhesive to secure the gems and rhinestones, ensuring they stay in place.
Instructions for At-Home Application:
- File the nails into a long, square shape and apply a base coat.
- Using a makeup sponge, create the ombre effect by blending different pastel shades.
- Once the ombre is complete, carefully apply the gems to each nail.
- Finish with a top coat to secure the embellishments and protect the design.
Save Pin
