
Summer is the perfect time to experiment with fresh and vibrant nail designs. Whether you’re a beginner or a seasoned nail art enthusiast, finding easy summer nails that are both cute and trendy can be a delightful challenge. Are you ready to discover some fabulous nail designs that you can recreate at home? Let’s dive into some easy summer nails ideas that are sure to make your nails pop this season!
Funky Cow Print Nails with a Pop of Pink
One of my favorite easy summer nails designs is this funky cow print with a playful pink accent. The base is a nude polish that provides a subtle backdrop for the bold cow print and vibrant pink wave. The design is both fun and chic, perfect for those who love to make a statement with their nails. The cow print is created using black polish on a white base, while the pink wavy line adds a touch of summer brightness.

Consumables:
-
- Nude base polish (e.g., OPI “Bubble Bath”)
- White polish (e.g., Essie “Blanc”)
- Black polish for spots (e.g., Sally Hansen “Black Out”)
- Pink polish for the wave (e.g., Orly “Beach Cruiser”)
- Fine detail brush
- Glossy top coat (e.g., Seche Vite)
How to Create:
- Apply a nude base coat and let it dry completely.
- Use the white polish to create the cow print spots with a fine detail brush.
- Once the spots are dry, add the pink wavy line using another fine brush.
- Seal the design with a glossy top coat to add shine and longevity.
Pastel Ombre Delight
Pastels are always in style for summer, and this ombre design is no exception. The smooth gradient from light purple to sky blue is both soothing and stylish, making it an ideal choice for easy summer nails. The transition between colors is seamless, creating a dreamy, ethereal look that is perfect for any summer occasion.

- Consumables:
- Light purple polish (e.g., Zoya “Abby”)
- Sky blue polish (e.g., China Glaze “Boho Blues”)
- Makeup sponge for blending
- Clear top coat (e.g., Essie “Good to Go”)
How to Create:
- Start with a base coat to protect your nails.
- Apply light purple polish to half of the makeup sponge and sky blue to the other half.
- Dab the sponge gently onto your nails to create the gradient effect.
- Once dry, apply a clear top coat to blend the colors further and add shine.
Bold Green Statement Nails
Green nails are a bold choice that screams confidence. This design features solid green nails with a few nude-based nails accented with green tips, creating a modern and stylish look. The glossy finish enhances the boldness of the green, making your nails stand out.

Consumables:
-
- Solid green polish (e.g., OPI “Envy the Adventure”)
- Nude base polish (e.g., Essie “Topless & Barefoot”)
- Fine detail brush
- Glossy top coat (e.g., CND “Vinylux Long Wear Top Coat”)
How to Create:
- Apply a nude base coat on a few nails and solid green on the rest.
- Use the fine detail brush to paint green tips on the nude-based nails.
- Finish with a glossy top coat to add shine and protect the design.
Pink Dreamy Clouds
This dreamy pink nail design captures the essence of a summer sunset. The transition from light to dark pink creates a mesmerizing effect that is both elegant and eye-catching. This design is perfect for those who love a softer, more romantic nail look.

Consumables:
-
- Light pink polish (e.g., OPI “Mod About You”)
- Dark pink polish (e.g., Essie “Bachelorette Bash”)
- Makeup sponge for blending
- Glossy top coat (e.g., Seche Vite)
How to Create:
- Apply a base coat to protect your nails.
- Use the makeup sponge to blend the light and dark pink polishes.
- Dab the sponge onto your nails to create the gradient effect.
- Seal the design with a glossy top coat.
Minimalist Dot Design
Sometimes, simplicity is the ultimate sophistication. This minimalist dot design on a nude base is perfect for those who prefer understated elegance. The tiny colorful dots add a touch of fun without overwhelming the overall look, making it perfect for everyday wear.

Consumables:
-
- Nude base polish (e.g., OPI “Bubble Bath”)
- Various colored polishes for dots (e.g., Essie “Butler Please”, OPI “Charged Up Cherry”)
- Tiny dotting tool
- Clear top coat (e.g., Sally Hansen “Insta-Dri”)
How to Create:
- Apply a nude base coat and let it dry.
- Use the dotting tool to create small dots in various colors along the center of each nail.
- Finish with a clear top coat to add shine and protect the design.
Vibrant Daisy Nails
This vibrant daisy nail design is perfect for a playful summer look. Each nail features a bright color—orange, green, or red—accentuated with a charming white daisy. The almond shape of the nails adds elegance to the fun design, making it a versatile choice for any summer outing. The daisies are carefully placed to ensure they stand out against the bold background colors.

Consumables:
-
- Orange polish (e.g., OPI “A Good Man-darin is Hard to Find”)
- Green polish (e.g., Essie “Mojito Madness”)
- Red polish (e.g., Sally Hansen “Cherry Red”)
- White polish for daisies (e.g., OPI “Alpine Snow”)
- Yellow polish for daisy centers (e.g., Essie “Hay There”)
- Fine detail brush
- Glossy top coat (e.g., Seche Vite)
How to Create:
- Apply the chosen bright color as the base coat on each nail.
- Use a fine detail brush to paint white daisies on each nail.
- Add a yellow dot in the center of each daisy.
- Finish with a glossy top coat to protect the design and add shine.
Coral and Daisy Delight
This coral nail design with delicate daisy accents is a delightful choice for summer. The square shape of the nails provides a modern touch, while the small white daisies add a cute and whimsical element. The coral base color is both vibrant and stylish, making these nails perfect for any casual or semi-formal occasion.

Consumables:
-
- Coral polish (e.g., Essie “Tart Deco”)
- White polish for daisies (e.g., Zoya “Snow White”)
- Yellow polish for daisy centers (e.g., China Glaze “Lemon Fizz”)
- Fine detail brush
- Matte top coat (e.g., OPI “Matte Top Coat”)
How to Create:
- Apply the coral polish as the base color.
- Use a fine detail brush to create small white daisies on each nail.
- Add a tiny yellow dot in the center of each daisy.
- Seal the design with a matte top coat for a modern finish.
Bold Orange Simplicity
Sometimes, a single bold color is all you need. This vibrant orange nail design is both striking and straightforward, making it an excellent choice for easy summer nails. The smooth, glossy finish and almond shape give these nails a polished and professional look, perfect for anyone who loves a bold statement.

Consumables:
-
- Orange polish (e.g., OPI “Juice Bar Hopping”)
- Glossy top coat (e.g., Essie “Good to Go”)
How to Create:
- Apply two coats of the orange polish for full coverage.
- Finish with a glossy top coat to enhance the color and add shine.
Neon Flower Power
These neon nails are a fun and colorful choice for summer. The clear base is adorned with bright neon flower decals, creating a playful and eye-catching design. The square shape of the nails adds a modern edge, while the small rhinestones provide a touch of sparkle. This design is perfect for festivals, parties, or any event where you want to stand out.

Consumables:
-
- Clear base polish (e.g., Essie “Allure”)
- Neon flower decals (available at most beauty supply stores)
- Small rhinestones
- Clear top coat (e.g., Seche Vite)
How to Create:
- Apply a clear base coat to your nails.
- Place the neon flower decals on the nails, arranging them as desired.
- Add small rhinestones for extra sparkle.
- Finish with a clear top coat to secure the decals and rhinestones.
Subtle Shimmer
For a more understated summer look, these nails offer a subtle shimmer that is both elegant and sophisticated. The light pink base is complemented by a delicate shimmer, creating a natural and refined appearance. This design is perfect for those who prefer a more minimalist approach to their summer nails.

Consumables:
-
- Light pink polish (e.g., OPI “Bubble Bath”)
- Shimmer top coat (e.g., Essie “Pure Pearlfection”)
- Glossy top coat (e.g., Sally Hansen “Insta-Dri”)
How to Create:
- Apply the light pink polish as the base color.
- Add a layer of the shimmer top coat for a subtle sparkle.
- Finish with a glossy top coat to enhance the shimmer and add shine.
Bright Neon Waves
These bright neon wave nails are perfect for making a bold statement this summer. The combination of vibrant pink and orange with delicate white waves creates a lively and dynamic design. The almond shape adds elegance, while the glossy finish ensures the colors pop. This look is ideal for those who love to stand out and embrace bold, fun easy summer nails.

Consumables:
-
- Neon pink polish (e.g., Orly “Beach Cruiser”)
- Neon orange polish (e.g., China Glaze “Orange Knockout”)
- White polish for waves (e.g., Essie “Blanc”)
- Fine detail brush
- Glossy top coat (e.g., Seche Vite)
How to Create:
- Apply a clear base coat to protect your nails.
- Paint the tips with neon pink and neon orange, alternating colors.
- Use a fine detail brush to create white wave patterns on each nail.
- Finish with a glossy top coat to add shine and durability.
Tropical Floral Elegance
This tropical floral nail design combines soft yellow tips with bold red hibiscus flowers. The nude base keeps the look elegant and understated, while the detailed flowers add a pop of color and tropical vibe. This design is perfect for beach vacations or simply bringing a touch of the tropics to your everyday life.

Consumables:
-
- Nude base polish (e.g., OPI “Samoan Sand”)
- Yellow polish for tips (e.g., Zoya “Pippa”)
- Red polish for flowers (e.g., Essie “Fifth Avenue”)
- Fine detail brush
- Glossy top coat (e.g., Sally Hansen “Insta-Dri”)
How to Create:
- Apply the nude base polish and let it dry.
- Paint the tips with yellow polish.
- Use a fine detail brush to draw red hibiscus flowers on each nail.
- Finish with a glossy top coat to protect the design and add shine.
Pastel Glitter Mix
These pastel glitter nails are a perfect blend of soft colors and shimmering accents. The almond shape enhances the elegance of the design, while the mix of pink, green, and purple adds a playful touch. The glitter polish on the green and purple nails brings a festive sparkle, making this design great for summer parties.

Consumables:
-
- Pastel pink polish (e.g., OPI “Mod About You”)
- Pastel green glitter polish (e.g., China Glaze “Fairy Dust”)
- Pastel purple glitter polish (e.g., Zoya “Carter”)
- Glossy top coat (e.g., Essie “Gel Setter”)
How to Create:
- Apply the pastel pink polish on a few nails.
- Paint other nails with pastel green and purple glitter polishes.
- Apply a glossy top coat to all nails to enhance the shine and protect the design.
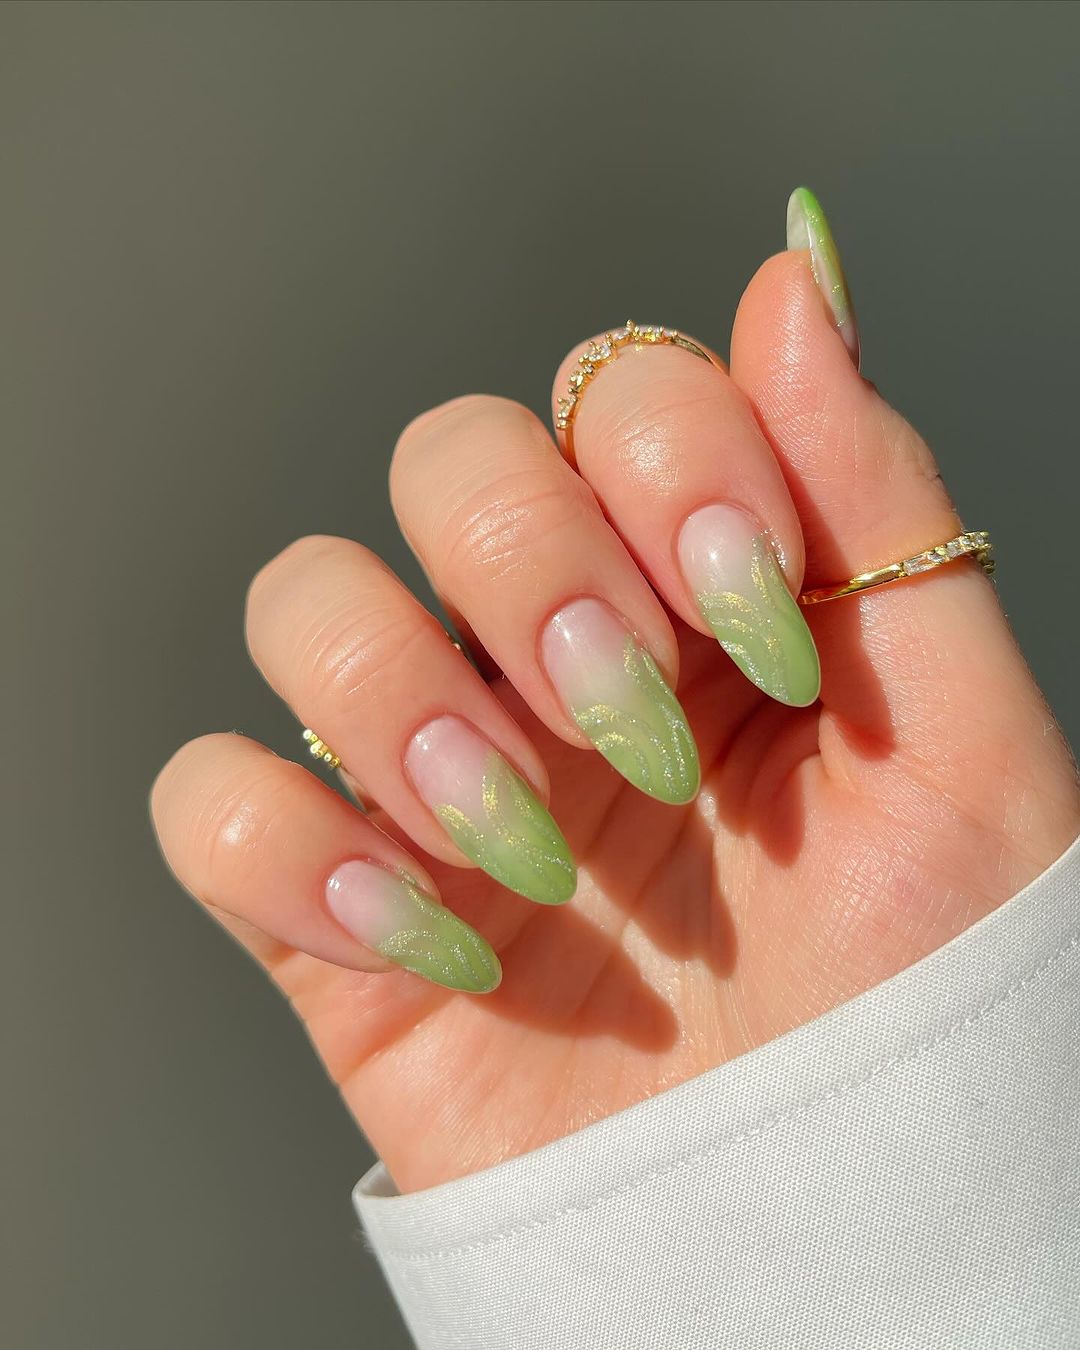
Green Gradient Elegance
This green gradient design features a soft transition from nude to a beautiful green with delicate gold details. The almond shape and subtle gradient make this design elegant and perfect for any occasion. The gold details add a touch of luxury, making these nails both sophisticated and stylish.

Consumables:
-
- Nude base polish (e.g., Essie “Ballet Slippers”)
- Green polish (e.g., OPI “Envy the Adventure”)
- Gold detail polish (e.g., Essie “Good as Gold”)
- Makeup sponge for blending
- Glossy top coat (e.g., CND “Vinylux Long Wear Top Coat”)
How to Create:
- Apply the nude base polish and let it dry.
- Use a makeup sponge to blend the green polish from the tips towards the base.
- Add gold details with a fine brush for an elegant touch.
- Finish with a glossy top coat to seal and protect the design.
Color Block Perfection
This color block design features a mix of pastel pink, purple, and orange with white lines separating each color. The almond shape adds a chic touch, while the small rhinestones provide a bit of sparkle. This design is playful yet sophisticated, perfect for those who love a bit of color in their easy summer nails.

Consumables:
-
- Pastel pink polish (e.g., Essie “Fiji”)
- Pastel purple polish (e.g., OPI “Do You Lilac It?”)
- Pastel orange polish (e.g., Zoya “Clementine”)
- White polish for lines (e.g., Sally Hansen “White On”)
- Small rhinestones
- Glossy top coat (e.g., Seche Vite)
How to Create:
- Apply a clear base coat.
- Paint sections of each nail with pastel pink, purple, and orange.
- Use a fine brush to paint white lines separating the colors.
- Add small rhinestones for extra sparkle.
- Finish with a glossy top coat to seal the design.
Green Marble Tips
These green marble tip nails are an elegant and unique design for summer. The nude base is complemented by the intricate green marble effect at the tips, creating a sophisticated yet natural look. The detailed marble design adds depth and texture, making these nails perfect for those who want something subtle yet eye-catching.

Consumables:
-
- Nude base polish (e.g., Essie “Ballet Slippers”)
- Green polish (e.g., OPI “Stay Off the Lawn”)
- Fine detail brush
- Glossy top coat (e.g., Seche Vite)
How to Create:
- Apply the nude base polish and let it dry completely.
- Use a fine detail brush to create the green marble effect at the tips.
- Add more depth by layering different shades of green.
- Finish with a glossy top coat to seal the design and add shine.
Pastel Heart Accents
This pastel heart design is perfect for a soft and charming summer look. The nude base is adorned with colorful heart accents, each detailed with tiny dots for added texture. The pastel colors create a whimsical and playful vibe, making these nails ideal for a lighthearted summer style.

Consumables:
-
- Nude base polish (e.g., OPI “Samoan Sand”)
- Pastel polishes for hearts (e.g., Essie “Lilacism”, “Fiji”, “Lemon Fizz”)
- Fine detail brush
- Matte top coat (e.g., OPI “Matte Top Coat”)
How to Create:
- Apply the nude base polish and allow it to dry.
- Use a fine detail brush to paint pastel hearts on each nail.
- Add tiny dots within the hearts for extra detail.
- Finish with a matte top coat to protect the design.
Neon Pink Ombre
Neon pink ombre nails are a bold and vibrant choice for summer. The smooth transition from nude to neon pink creates a striking contrast that is both modern and playful. This design is perfect for those who love to embrace bright colors and make a statement with their easy summer nails.

Consumables:
-
- Nude base polish (e.g., Essie “Topless & Barefoot”)
- Neon pink polish (e.g., Orly “Beach Cruiser”)
- Makeup sponge for blending
- Glossy top coat (e.g., Seche Vite)
How to Create:
- Apply the nude base polish and let it dry.
- Use a makeup sponge to blend the neon pink polish from the tips towards the base.
- Apply multiple layers for a smoother gradient.
- Finish with a glossy top coat to enhance the color transition and add shine.
Shimmering Nude Elegance
These shimmering nude nails offer a sophisticated and elegant look for summer. The nude base is enhanced with a subtle shimmer, creating a refined and polished appearance. The shimmer catches the light beautifully, making these nails perfect for any occasion, from casual outings to formal events.

Consumables:
-
- Nude base polish (e.g., OPI “Bubble Bath”)
- Shimmer polish (e.g., Essie “Shine of the Times”)
- Glossy top coat (e.g., Sally Hansen “Insta-Dri”)
How to Create:
- Apply the nude base polish and let it dry.
- Add a layer of shimmer polish for a subtle sparkle.
- Finish with a glossy top coat to seal the design and enhance the shimmer.
Minimalist Green Dot
For a minimalist and modern look, these nails feature a nude base with simple green dot accents. The design is clean and understated, perfect for those who prefer a subtle yet stylish manicure. The single green dot adds just the right amount of detail without overwhelming the overall look.

Consumables:
-
- Nude base polish (e.g., Essie “Topless & Barefoot”)
- Green polish for dots (e.g., OPI “Stay Off the Lawn”)
- Dotting tool
- Glossy top coat (e.g., Seche Vite)
How to Create:
- Apply the nude base polish and allow it to dry.
- Use a dotting tool to place a single green dot on each nail.
- Finish with a glossy top coat to protect the design and add shine.
Pastel Swirl Delight
These pastel swirl nails are a playful and colorful design for summer. The combination of pastel colors creates a fun and vibrant look that is perfect for any casual outing. The swirling patterns add a dynamic and whimsical element, making these nails a great choice for those who love creative and unique designs.

Consumables:
-
- Pastel polishes (e.g., Essie “Fiji”, “Lilacism”, “Mint Candy Apple”)
- Fine detail brush
- Glossy top coat (e.g., Seche Vite)
How to Create:
- Apply a clear base coat.
- Use a fine detail brush to create swirling patterns with the pastel polishes.
- Layer the colors to create a smooth and blended look.
- Finish with a glossy top coat to enhance the design and add shine.
Red Heart Accents
These red heart accent nails are perfect for adding a touch of romance to your summer look. The nude base is complemented by small red hearts, creating a cute and charming design. The hearts are positioned near the tips, adding a delicate and playful touch to the overall look.

Consumables:
-
- Nude base polish (e.g., OPI “Samoan Sand”)
- Red polish for hearts (e.g., Essie “Fifth Avenue”)
- Fine detail brush
- Glossy top coat (e.g., Sally Hansen “Insta-Dri”)
How to Create:
- Apply the nude base polish and let it dry.
- Use a fine detail brush to paint small red hearts near the tips of each nail.
- Finish with a glossy top coat to protect the design and add shine.
Save Pin
