
When it comes to autumn, nothing beats the warm and cozy vibes of brown fall nails. Whether you prefer a simple design or something more elaborate, brown nails can be versatile and stylish. In this article, I’ll walk you through some of the most beautiful brown nail designs for fall, complete with detailed descriptions and professional tips. Let’s explore these gorgeous brown fall nails ideas that will make you fall in love with the season all over again.
Rich Chocolate Elegance
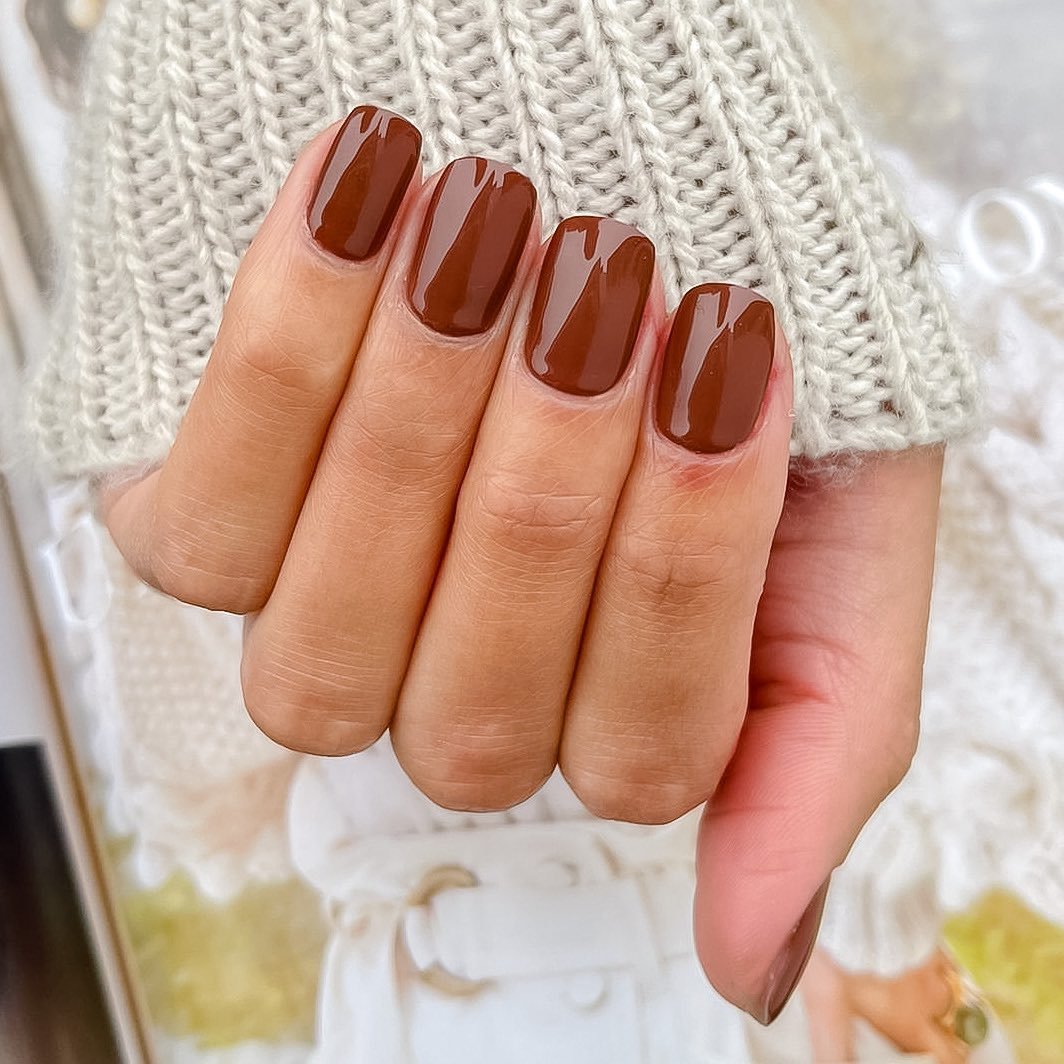
The rich chocolate brown on these nails exudes elegance and sophistication, making it perfect for any autumn occasion. The glossy finish adds a touch of luxury, while the square shape keeps the look modern and chic.

Professional Opinion
These brown fall nails are a prime example of how a dark, rich color can transform a simple design into something truly classy. The high-gloss finish enhances the depth of the color, making it stand out even more. The square shape is not only stylish but also practical, providing a durable and flattering look for any hand shape.
Consumables:
- Dark brown nail polish (e.g., OPI “Espresso Your Inner Self”)
- Glossy top coat (e.g., Seche Vite Dry Fast Top Coat)
- Nail file and buffer
- Base coat (e.g., Essie First Base Base Coat)
DIY Instructions:
- Start by filing and buffing your nails to your desired shape.
- Apply a base coat to protect your natural nails.
- Paint your nails with two coats of dark brown nail polish, allowing each coat to dry fully.
- Finish with a glossy top coat to seal in the color and add shine.
Autumn Starry Night
These nails feature a stunning combination of a light brown base with dark brown French tips and gold star accents. The stiletto shape adds drama and elongates the fingers, making this design perfect for those who love a bold look.

Professional Opinion
The contrast between the light brown base and the dark brown French tips creates a striking visual effect. The addition of gold star accents adds a touch of whimsy and sparkle, perfect for fall nights out. The stiletto shape is bold and edgy, making it a statement look for those who love to stand out.
Consumables:
- Light brown nail polish (e.g., Sally Hansen “Sand Storm”)
- Dark brown nail polish (e.g., Essie “Wicked”)
- Gold star nail stickers or decals
- Nail glue (for stickers/decals)
- Base and top coat
DIY Instructions:
- Prep your nails by filing and buffing them into a stiletto shape.
- Apply a base coat.
- Paint your nails with two coats of light brown polish and let dry.
- Create French tips with the dark brown polish.
- Add gold star stickers or decals and secure them with nail glue.
- Finish with a top coat to seal and protect the design.
Brown Butterfly Accents
This design features a nude base with brown French tips and delicate butterfly accents. The added rhinestones provide a touch of bling, making this a perfect design for special occasions.

Professional Opinion
Combining nude and brown shades creates a subtle yet sophisticated look. The butterfly accents add an element of fun and creativity, while the rhinestones bring a touch of glamour. This design is versatile and can be customized with different accent colors or shapes.
Consumables:
- Nude nail polish (e.g., Essie “Ballet Slippers”)
- Brown nail polish (e.g., OPI “Squeaker of the House”)
- Butterfly nail stickers or decals
- Small rhinestones
- Nail glue
- Base and top coat
DIY Instructions:
- Shape and prep your nails.
- Apply a base coat.
- Paint your nails with two coats of nude polish and let dry.
- Add brown French tips.
- Apply butterfly stickers and rhinestones with nail glue.
- Finish with a top coat for shine and protection.
Glittery Brown Glam
A combination of dark brown polish with a glitter accent nail creates a glam look perfect for fall. The coffin shape adds a modern twist, making this design both trendy and elegant.

Professional Opinion
The glitter accent nail adds a pop of sparkle without overpowering the overall look. The dark brown shade is rich and luxurious, perfect for the fall season. The coffin shape elongates the fingers and provides a contemporary edge to the design.
Consumables:
- Dark brown nail polish (e.g., Zoya “Codie”)
- Glitter nail polish (e.g., China Glaze “Fairy Dust”)
- Nail file and buffer
- Base and top coat
DIY Instructions:
- File and buff your nails into a coffin shape.
- Apply a base coat.
- Paint all nails except the ring finger with dark brown polish, using two coats.
- Apply glitter polish to the ring finger.
- Finish with a top coat to seal in the color and glitter.
Matte Brown with Leopard Print
This design combines a matte brown polish with a single accent nail featuring leopard print. The almond shape adds a touch of femininity, making this design both fierce and elegant.

Professional Opinion
Matte nails are a great alternative to the traditional glossy look, providing a unique texture and finish. The leopard print accent adds a fun and wild touch, perfect for those who want to make a statement. The almond shape is flattering and elongates the fingers.
Consumables:
- Matte brown nail polish (e.g., Butter London “Yummy Mummy”)
- Leopard print nail stickers or decals
- Base coat
- Matte top coat
DIY Instructions:
- Shape your nails into an almond shape and buff the surface.
- Apply a base coat.
- Paint your nails with two coats of matte brown polish.
- Add leopard print stickers to one accent nail.
- Finish with a matte top coat to seal the design.
Gold Flakes on Brown
These short square nails feature a rich brown base adorned with gold flakes, giving them a luxurious and sophisticated look. The glossy finish enhances the elegance, making them perfect for any autumn occasion.

Professional Opinion
The combination of the rich brown base and the gold flakes creates a stunning and classy look. The short square shape is both practical and stylish, offering durability and ease of maintenance. This design is perfect for those who prefer a simple yet elegant manicure for the fall season.
Consumables:
- Brown nail polish (e.g., OPI “Shh…It’s Top Secret!”)
- Gold foil flakes
- Nail glue
- Base and top coat
DIY Instructions:
- File and buff your nails into a short square shape.
- Apply a base coat to protect your natural nails.
- Paint your nails with two coats of brown polish, letting each coat dry completely.
- Apply gold foil flakes using nail glue, gently pressing them onto the nails.
- Seal the design with a glossy top coat for a finished look.
Marble and Brown
These nails showcase a mix of brown and nude shades with a marble effect on some nails. The coffin shape adds a modern twist, making this design both trendy and elegant.

Professional Opinion
The marble effect adds a touch of creativity and sophistication to the classic brown and nude combination. The coffin shape elongates the fingers and provides a contemporary edge to the design. This manicure is perfect for those looking to experiment with textures and patterns this fall.
Consumables:
- Brown nail polish (e.g., Essie “Mink Muffs”)
- Nude nail polish (e.g., Zoya “Rue”)
- White nail polish for the marble effect
- Thin nail art brush
- Base and top coat
DIY Instructions:
- Shape your nails into a coffin shape and buff the surface.
- Apply a base coat.
- Paint your nails with the brown and nude polishes, alternating colors on each nail.
- Create the marble effect using a thin brush and white polish, gently swirling the colors.
- Finish with a top coat to seal and protect the design.
Sweater Weather Nails
These nails feature various shades of brown with intricate white sweater patterns. The combination of glossy and matte finishes adds depth and interest to the design.

Professional Opinion
This design captures the cozy essence of fall with its warm brown tones and sweater-inspired patterns. The mix of glossy and matte finishes provides a unique texture, making the nails stand out. The intricate patterns add a touch of elegance and sophistication to the overall look.
Consumables:
- Multiple shades of brown nail polish (e.g., OPI “Brown to Earth”, Zoya “Desiree”)
- White nail polish for the patterns
- Matte top coat
- Thin nail art brush
- Base coat
DIY Instructions:
- File and buff your nails into your desired shape.
- Apply a base coat.
- Paint your nails with the different shades of brown, alternating colors on each nail.
- Use a thin brush to create the white sweater patterns on some nails.
- Apply a matte top coat to the patterned nails and a glossy top coat to the others.
Leopard Print French Tips
These nails combine nude and brown shades with leopard print French tips. The almond shape adds a touch of femininity, making this design both fierce and elegant.

Professional Opinion
Leopard print is a timeless design that adds a wild and fun element to any manicure. The combination of nude and brown shades creates a subtle yet striking contrast. The almond shape is flattering and elongates the fingers, making it a popular choice for many.
Consumables:
- Nude nail polish (e.g., Essie “Ballet Slippers”)
- Brown nail polish for the leopard print (e.g., OPI “You Don’t Know Jacques!”)
- Black nail polish for detailing
- Thin nail art brush
- Base and top coat
DIY Instructions:
- Shape your nails into an almond shape and buff the surface.
- Apply a base coat.
- Paint your nails with the nude polish and let dry.
- Create the leopard print French tips using the brown polish and a thin brush for the black detailing.
- Finish with a top coat to seal the design.
Marbled Pumpkin Spice
These nails feature a light brown base with a marbled effect in darker shades and hints of orange. The long coffin shape adds a trendy and stylish flair to the design.

Professional Opinion
The marbled effect in these brown fall nails adds a creative and artistic touch, reminiscent of the swirling patterns in a pumpkin spice latte. The combination of light and dark brown shades with hints of orange makes this design perfect for autumn. The long coffin shape is fashionable and elongates the fingers.
Consumables:
- Light brown nail polish (e.g., Essie “Sand Tropez”)
- Dark brown and orange nail polish for the marbling
- Thin nail art brush
- Base and top coat
DIY Instructions:
- Shape your nails into a long coffin shape and buff the surface.
- Apply a base coat.
- Paint your nails with the light brown polish.
- Create the marbled effect by swirling dark brown and orange polish with a thin brush while the base color is still wet.
- Finish with a top coat to seal and protect the design.
Tortoiseshell Accents
These nails combine a rich dark brown with tortoiseshell accents. The short, square shape makes the design practical for everyday wear while still being stylish and sophisticated.

Professional Opinion
The tortoiseshell design adds a unique and trendy element to these brown fall nails. The dark brown base color complements the tortoiseshell accents perfectly, creating a balanced and eye-catching look. The short square shape is both fashionable and functional, making it ideal for those who prefer a low-maintenance yet chic manicure.
Consumables:
- Dark brown nail polish (e.g., Essie “Wicked”)
- Tortoiseshell nail wraps or polish
- Base and top coat
DIY Instructions:
- File and buff your nails into a short square shape.
- Apply a base coat.
- Paint all nails except the accent nails with dark brown polish.
- Apply tortoiseshell wraps or polish to the accent nails.
- Seal the design with a top coat for added shine and durability.
Glittery Taupe
These almond-shaped nails feature a glittery taupe color that shimmers beautifully in the light. The subtle sparkle makes them perfect for both everyday wear and special occasions.

Professional Opinion
The glittery taupe shade is a stunning choice for brown fall nails. It offers a delicate sparkle that adds elegance without being too overpowering. The almond shape is flattering and elongates the fingers, making it a popular choice for many.
Consumables:
- Glittery taupe nail polish (e.g., Zoya “Tomoko”)
- Base and top coat
DIY Instructions:
- Shape your nails into an almond shape and buff the surface.
- Apply a base coat.
- Paint your nails with two coats of glittery taupe polish, allowing each coat to dry fully.
- Finish with a top coat to seal in the color and add extra shine.
Subtle Brown French Tips
These nails feature a nude base with subtle brown French tips. The combination is understated yet elegant, perfect for a classy and sophisticated look.

Professional Opinion
The nude base with brown French tips creates a subtle and refined look. This design is perfect for those who prefer a minimalist aesthetic but still want their nails to look polished and stylish. The almond shape adds a touch of femininity and elegance to the overall design.
Consumables:
- Nude nail polish (e.g., OPI “Bubble Bath”)
- Brown nail polish for the tips (e.g., Essie “Mink Muffs”)
- Base and top coat
DIY Instructions:
- File and buff your nails into an almond shape.
- Apply a base coat.
- Paint your nails with the nude polish and let dry.
- Add brown French tips using a fine brush or French tip guides.
- Seal with a top coat for a glossy finish.
Rich Chocolate Gloss
These nails are painted in a rich, glossy chocolate brown. The short length and rounded shape make them both practical and stylish for everyday wear.

Professional Opinion
The rich chocolate brown color is perfect for fall, offering a warm and inviting look. The glossy finish adds a touch of luxury, making these nails suitable for both casual and formal occasions. The short length and rounded shape are practical for those who need a low-maintenance yet chic manicure.
Consumables:
- Chocolate brown nail polish (e.g., OPI “Shh…It’s Top Secret!”)
- Base and top coat
DIY Instructions:
- File and buff your nails into a short, rounded shape.
- Apply a base coat.
- Paint your nails with two coats of chocolate brown polish.
- Finish with a top coat to add shine and protect the color.
Marbled White and Brown
These almond-shaped nails feature a white base with marbled brown accents. The addition of gold details adds a touch of elegance and sophistication to the design.

Professional Opinion
The marbled effect is a stunning choice for brown fall nails, offering a unique and artistic look. The combination of white and brown with gold accents creates a sophisticated and luxurious design. The almond shape is flattering and elongates the fingers, making it a popular choice for many.
Consumables:
- White nail polish (e.g., Essie “Blanc”)
- Brown nail polish for marbling (e.g., OPI “You Don’t Know Jacques!”)
- Gold nail polish for accents
- Thin nail art brush
- Base and top coat
DIY Instructions:
- Shape your nails into an almond shape and buff the surface.
- Apply a base coat.
- Paint your nails with the white polish and let dry.
- Create the marbled effect using brown polish and a thin brush, adding gold accents.
- Seal with a top coat for added shine and protection.
Mixed Brown and Nude Designs
This design features a variety of brown and nude shades with different textures and patterns, including matte, glossy, and rhinestone accents. The coffin shape adds a dramatic flair to this eclectic look.

Professional Opinion
The combination of different shades, textures, and accents makes this design stand out. The matte and glossy finishes provide a rich contrast, while the rhinestones add a touch of bling. This design is perfect for those who want to experiment with different elements and create a unique, personalized look.
Consumables:
- Matte brown nail polish (e.g., Butter London “Yummy Mummy”)
- Glossy brown nail polish (e.g., Essie “Wicked”)
- Nude nail polish (e.g., OPI “Bubble Bath”)
- Rhinestones
- Nail glue
- Base and top coat
DIY Instructions:
- File and buff your nails into a coffin shape.
- Apply a base coat.
- Paint your nails with the various shades and finishes, alternating colors on each nail.
- Add rhinestones using nail glue.
- Seal with a top coat to protect the design.
Modern French Tips
These almond-shaped nails feature a modern twist on the classic French tip with a rich brown color. The clean lines and glossy finish make this design sleek and stylish.

Professional Opinion
This modern take on the French tip is both sophisticated and trendy. The rich brown tips provide a striking contrast to the nude base, creating a polished look. The almond shape is flattering and elongates the fingers, making it a great choice for a chic manicure.
Consumables:
- Nude nail polish (e.g., Essie “Ballet Slippers”)
- Brown nail polish for the tips (e.g., OPI “You Don’t Know Jacques!”)
- Base and top coat
DIY Instructions:
- Shape your nails into an almond shape and buff the surface.
- Apply a base coat.
- Paint your nails with the nude polish and let dry.
- Create the French tips using brown polish and a fine brush.
- Seal with a top coat for a glossy finish.
Pumpkin Spice Accents
These nails feature a light nude base with intricate pumpkin and leaf accents in brown and gold. The long coffin shape adds a trendy and festive touch to this autumn design.

Professional Opinion
The pumpkin and leaf accents are perfect for the fall season, adding a fun and festive element to the manicure. The combination of brown and gold creates a warm and inviting look, while the long coffin shape adds a modern edge. This design is ideal for those who want to celebrate the autumn season in style.
Consumables:
- Nude nail polish (e.g., OPI “Bubble Bath”)
- Brown nail polish for accents (e.g., Essie “Wicked”)
- Gold nail polish for details
- Nail art brush
- Base and top coat
DIY Instructions:
- File and buff your nails into a long coffin shape.
- Apply a base coat.
- Paint your nails with the nude polish and let dry.
- Create the pumpkin and leaf accents using brown and gold polish and a fine brush.
- Seal with a top coat to protect the design.
Abstract Brown Swirls
These nails feature a nude base with abstract brown swirls, creating a modern and artistic design. The almond shape adds a touch of elegance to this minimalist look.

Professional Opinion
The abstract swirls add a creative and artistic element to the classic nude manicure. The rich brown color provides a striking contrast, making the design stand out. The almond shape is both elegant and flattering, perfect for a sophisticated and stylish look.
Consumables:
- Nude nail polish (e.g., Essie “Ballet Slippers”)
- Brown nail polish for swirls (e.g., OPI “You Don’t Know Jacques!”)
- Nail art brush
- Base and top coat
DIY Instructions:
- Shape your nails into an almond shape and buff the surface.
- Apply a base coat.
- Paint your nails with the nude polish and let dry.
- Create the abstract swirls using brown polish and a fine brush.
- Seal with a top coat for a glossy finish.
Marbled Amber Accent
These almond-shaped nails feature a marbled amber accent nail, adding a unique and luxurious touch to the design. The rest of the nails are kept simple with a nude base.

Professional Opinion
The marbled amber accent nail adds a touch of luxury and sophistication to the manicure. The combination of nude and amber creates a beautiful and harmonious look. The almond shape is elegant and elongates the fingers, making it a great choice for a refined and polished design.
Consumables:
- Nude nail polish (e.g., OPI “Bubble Bath”)
- Amber-colored nail polish for the accent nail
- Nail art brush
- Base and top coat
DIY Instructions:
- Shape your nails into an almond shape and buff the surface.
- Apply a base coat.
- Paint your nails with the nude polish and let dry.
- Create the marbled effect on the accent nail using amber-colored polish and a fine brush.
- Seal with a top coat to protect the design.
Classic Brown Ombre
These nails feature a classic brown ombre design, transitioning from a light nude base to a rich brown tip. The long coffin shape adds a trendy and stylish flair to this timeless look.

Professional Opinion
The ombre effect is a timeless design that adds depth and dimension to the manicure. The transition from nude to brown creates a beautiful gradient, perfect for the fall season. The long coffin shape is fashionable and elongates the fingers, making it a popular choice for many.
Consumables:
- Nude nail polish (e.g., Essie “Ballet Slippers”)
- Brown nail polish for the ombre effect (e.g., OPI “You Don’t Know Jacques!”)
- Makeup sponge
- Base and top coat
DIY Instructions:
- File and buff your nails into a long coffin shape.
- Apply a base coat.
- Paint your nails with the nude polish and let dry.
- Create the ombre effect by dabbing brown polish onto a makeup sponge and gently pressing it onto the tips of the nails.
- Seal with a top coat for a glossy finish.
Glitter and Floral Accents
These nails feature a mix of matte and glossy finishes with glitter and floral accents. The long length and intricate details make this design perfect for those who love to stand out.

Professional Opinion
The combination of matte and glossy finishes with glitter and floral accents creates a stunning and eye-catching design. The long length allows for intricate detailing, making this manicure a statement look. This design is perfect for special occasions and those who love a bit of bling.
Consumables:
- Matte nude nail polish (e.g., Butter London “Yummy Mummy”)
- Glossy brown nail polish (e.g., Essie “Wicked”)
- Glitter polish for accents (e.g., China Glaze “Fairy Dust”)
- Nail art brush
- Base and top coat
DIY Instructions:
- File and buff your nails into a long shape.
- Apply a base coat.
- Paint your nails with the nude and brown polishes, alternating finishes on each nail.
- Add glitter and floral accents using a fine brush.
- Seal with a top coat to protect the design.
Save Pin
