
Fall is the perfect time to refresh your nail game with chic and trendy designs. Coffin nails, with their elegant shape and ample space for creativity, are ideal for showcasing stunning autumn-themed nail art. Whether you prefer short, simple, or bold designs, fall coffin nails offer endless possibilities. Let’s dive into some captivating ideas to elevate your fall manicure.
Earthy Elegance
This set of fall coffin nails showcases a harmonious blend of earthy tones and delicate accents. The matte brown base color serves as a sophisticated canvas for intricate leaf designs and gold foil details. The subtle transition from dark to light brown adds depth and dimension, making this design both simple and elegant.

Consumables
- Matte brown nail polish: OPI “You Don’t Know Jacques”
- Gold foil flakes: Born Pretty Gold Foil Flakes
- Leaf nail stickers: Whats Up Nails Autumn Leaf Stickers
- Matte top coat: Essie Matte About You
- Nail art brush set: Beetles Gel Polish Nail Art Brushes
DIY Instructions
- Apply a base coat to protect your nails.
- Paint all nails with the matte brown polish, ensuring an even coat.
- Once dry, use a fine nail art brush to apply the gold foil flakes sparingly.
- Place the leaf stickers on accent nails for added detail.
- Seal the design with a matte top coat to finish.
Playful Patterns
Embrace the playful side of fall with this design featuring a mix of patterns and colors. The combination of checkerboard, smiley faces, and abstract swirls in shades of brown and nude creates a cute and trendy look. This design is perfect for those who love to experiment with simple yet eye-catching patterns.

Consumables
- Nude nail polish: Sally Hansen “Bare It All”
- Brown nail polish: Essie “Wicked”
- White nail polish: OPI “Alpine Snow”
- Fine nail art brush: Beetles Gel Polish Nail Art Brushes
- Dotting tool: PUEEN Dotting Tool Set
DIY Instructions
- Apply a base coat to all nails.
- Paint each nail with the nude polish as the base color.
- Use the fine nail art brush to create the checkerboard pattern and smiley faces with the brown and white polishes.
- Add abstract swirls on some nails for variety.
- Seal the design with a top coat.
Metallic Accents
Metallic accents elevate these fall coffin nails to a new level of sophistication. The nude and peach base colors are complemented by gold and silver foil stripes, creating a luxurious yet understated look. This design is ideal for those who prefer simple yet striking details.

Consumables
- Nude nail polish: Essie “Topless & Barefoot”
- Peach nail polish: OPI “Crawfishin’ for a Compliment”
- Gold and silver foil tape: Born Pretty Nail Foil Tape
- Clear top coat: Seche Vite Dry Fast Top Coat
DIY Instructions
- Start with a base coat to protect your nails.
- Paint all nails with the nude and peach polishes, alternating colors.
- Once dry, apply the gold and silver foil tape in diagonal stripes on each nail.
- Trim any excess tape and seal the design with a clear top coat.
Bold Black and White
For a bold and graphic look, this black and white coffin nail design is perfect. The sharp contrast between the black and white polishes creates a striking effect, while the geometric patterns add a modern twist. This design is a great example of how simple colors can make a big impact.

Consumables
- Black nail polish: OPI “Black Onyx”
- White nail polish: Essie “Blanc”
- Nail striping tape: Born Pretty Nail Striping Tape
- Clear top coat: Seche Vite Dry Fast Top Coat
DIY Instructions
- Apply a base coat to protect your nails.
- Paint alternating nails with black and white polish.
- Use striping tape to create geometric patterns on the nails.
- Paint over the tape with the contrasting color (black or white).
- Carefully remove the tape to reveal crisp lines and seal with a top coat.
Delicate Gold Details
This delicate design features a soft pink base with gold accents, perfect for those who love a simple yet sophisticated look. The gold foil and star decals add a touch of luxury without overwhelming the design, making it ideal for any occasion.

Consumables
- Soft pink nail polish: Essie “Ballet Slippers”
- Gold foil flakes: Born Pretty Gold Foil Flakes
- Star nail stickers: Whats Up Nails Gold Star Stickers
- Clear top coat: Seche Vite Dry Fast Top Coat
DIY Instructions
- Apply a base coat to all nails.
- Paint nails with the soft pink polish, ensuring full coverage.
- Apply gold foil flakes and star stickers to accent nails.
- Seal the design with a clear top coat.
Shimmering Blue Waves
This mesmerizing set of fall coffin nails features a striking blue iridescent wave design on a natural nude base. The shimmering blue adds a touch of magic, making these nails perfect for anyone looking to make a statement. The intricate waves reflect light beautifully, giving off different hues of blue and purple as the nails move.

Consumables
- Nude base nail polish: Essie “Topless & Barefoot”
- Iridescent blue nail polish: ILNP “Electric Carnival”
- Nail art brush set: Beetles Gel Polish Nail Art Brushes
- Clear top coat: Seche Vite Dry Fast Top Coat
DIY Instructions
- Apply a base coat to protect your nails.
- Paint all nails with the nude base polish.
- Using a fine nail art brush, create the wave designs with the iridescent blue polish.
- Seal the design with a clear top coat to enhance the shine and longevity.
Glittering Orange Delight
This design screams autumn with its vibrant orange glitter and warm nude base. The addition of rhinestones and intricate designs on some nails makes this set perfect for those who love a bit of bling. The combination of matte and glossy finishes adds depth and texture, making these nails an eye-catching choice for the season.

Consumables
- Nude base nail polish: OPI “Dulce de Leche”
- Orange glitter nail polish: China Glaze “I Sea the Point”
- Rhinestones: Born Pretty Rhinestone Nail Art Kit
- Matte top coat: Essie Matte About You
- Clear top coat: Seche Vite Dry Fast Top Coat
DIY Instructions
- Apply a base coat to all nails.
- Paint some nails with the nude polish and others with the orange glitter polish.
- Add rhinestones to accent nails using nail glue.
- Seal the glitter nails with a clear top coat and the nude nails with a matte top coat for contrast.
Autumn Leaf Accents
This playful design features a mix of autumn leaves, glitter, and bold colors. The clear nails with leaf decals add a whimsical touch, while the orange and black nails provide a striking contrast. The combination of textures and colors makes this set ideal for showcasing your fall spirit.

Consumables
- Orange nail polish: Essie “Playing Koi”
- Black glitter nail polish: Sally Hansen “Blacky O”
- Leaf nail stickers: Whats Up Nails Autumn Leaf Stickers
- Nail glue: Makartt Nail Rhinestone Glue
- Clear top coat: Seche Vite Dry Fast Top Coat
DIY Instructions
- Apply a base coat to protect your nails.
- Paint nails with orange and black glitter polishes.
- Apply leaf stickers to clear nails for a fun, autumnal touch.
- Use nail glue to secure any additional decorations.
- Seal the design with a clear top coat.
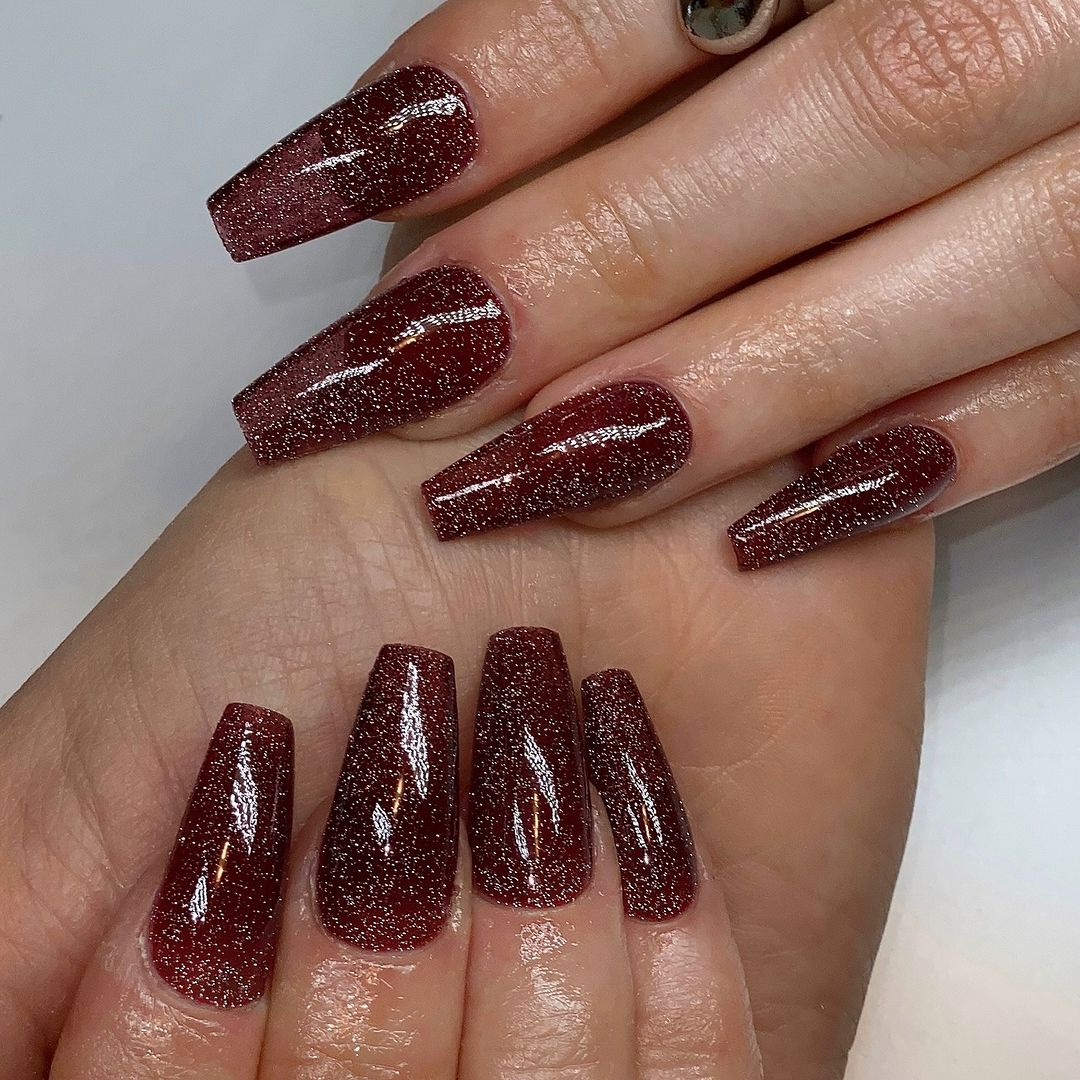
Sparkling Burgundy
These burgundy fall coffin nails are a perfect blend of elegance and sparkle. The deep burgundy color is ideal for the season, and the fine glitter adds a touch of glamour. This design is simple yet sophisticated, making it suitable for both everyday wear and special occasions.

Consumables
- Burgundy nail polish: OPI “Malaga Wine”
- Fine glitter top coat: Zoya “Leia”
- Clear top coat: Seche Vite Dry Fast Top Coat
DIY Instructions
- Apply a base coat to all nails.
- Paint nails with the burgundy polish, ensuring full coverage.
- Apply a fine glitter top coat for a sparkling finish.
- Seal the design with a clear top coat.
Marbled Green Elegance
This design features a stunning green marble effect on fall coffin nails. The natural green tones and the marbled effect give a luxurious and earthy feel, perfect for the fall season. The combination of green and nude creates a balanced and elegant look.

Consumables
- Nude nail polish: OPI “Be There in a Prosecco”
- Green nail polish: Essie “Going Guru”
- Nail art brush set: Beetles Gel Polish Nail Art Brushes
- Clear top coat: Seche Vite Dry Fast Top Coat
DIY Instructions
- Apply a base coat to all nails.
- Paint nails with the nude polish as a base.
- Create the marble effect using the green polish and a fine nail art brush, blending the colors gently.
- Seal the design with a clear top coat to enhance the marble effect.
Classic French Tip
This timeless design showcases the classic French tip, but with a modern twist. The crisp white tips contrast beautifully against the natural, glossy nude base, creating an elegant and clean look. This design is perfect for those who prefer a sophisticated and minimalist style, making it ideal for both casual and formal occasions.

Consumables
- Nude base nail polish: Essie “Mademoiselle”
- White nail polish: OPI “Alpine Snow”
- Nail art brush set: Beetles Gel Polish Nail Art Brushes
- Clear top coat: Seche Vite Dry Fast Top Coat
DIY Instructions
- Apply a base coat to all nails.
- Paint nails with the nude polish to create a natural-looking base.
- Use a fine nail art brush to apply the white polish to the tips, forming the French tip.
- Seal the design with a clear top coat to enhance the shine and durability.
Deep Burgundy Elegance
This stunning set of fall coffin nails features a rich, deep burgundy color, perfect for the autumn season. The glossy finish adds a touch of sophistication, making these nails suitable for any occasion. The deep, dark hue is both bold and elegant, capturing the essence of fall perfectly.

Consumables
- Burgundy nail polish: OPI “Malaga Wine”
- Clear top coat: Seche Vite Dry Fast Top Coat
DIY Instructions
- Apply a base coat to all nails.
- Paint nails with the burgundy polish, ensuring even coverage.
- Seal the design with a clear top coat for a glossy finish and added protection.
Neutral Gradient
This design features a beautiful gradient of neutral tones, from light beige to deep brown. The subtle shift in colors creates a visually appealing and harmonious look. The added white leaf detail on each nail gives it an artistic touch, making this design perfect for those who love a natural and earthy aesthetic.

Consumables
- Beige nail polish: Essie “Topless & Barefoot”
- Brown nail polish: OPI “Chocolate Moose”
- White nail polish: Essie “Blanc”
- Nail art brush set: Beetles Gel Polish Nail Art Brushes
- Clear top coat: Seche Vite Dry Fast Top Coat
DIY Instructions
- Apply a base coat to all nails.
- Paint nails with the beige polish as the base color.
- Gradually blend the brown polish from the tip to the middle of each nail.
- Use a fine nail art brush to add the white leaf detail.
- Seal the design with a clear top coat.
Pink Marble
This elegant set of fall coffin nails combines a soft pink base with a delicate marble effect. The mix of pink and white creates a subtle, yet striking design that exudes femininity and grace. The added shimmer provides a touch of glamour, making these nails perfect for any fall event.

Consumables
- Pink nail polish: Essie “Ballet Slippers”
- White nail polish: OPI “Alpine Snow”
- Clear top coat: Seche Vite Dry Fast Top Coat
- Nail art brush set: Beetles Gel Polish Nail Art Brushes
DIY Instructions
- Apply a base coat to all nails.
- Paint nails with the pink polish as the base color.
- Use a fine nail art brush to create the marble effect with the white polish.
- Add a touch of shimmer for extra sparkle.
- Seal the design with a clear top coat.
Brown Marble Accent
This chic design features a solid brown color with a marble accent on a few nails. The combination of the dark brown polish with the intricate marble detail in white and beige creates a sophisticated and stylish look. This design is perfect for those who love a mix of simplicity and elegance.

Consumables
- Brown nail polish: OPI “Chocolate Moose”
- White nail polish: Essie “Blanc”
- Beige nail polish: Essie “Topless & Barefoot”
- Clear top coat: Seche Vite Dry Fast Top Coat
- Nail art brush set: Beetles Gel Polish Nail Art Brushes
DIY Instructions
- Apply a base coat to all nails.
- Paint some nails with the brown polish for a solid base.
- Use the white and beige polishes to create the marble effect on the accent nails with a fine nail art brush.
- Seal the design with a clear top coat.
Gold and Clear Elegance
This stunning design features a combination of clear and nude bases with gold foil accents, creating a luxurious and elegant look. The gold French tips add a sophisticated touch, while the clear nails with gold foil provide a modern twist. This design is perfect for anyone looking to make a statement this fall with fall coffin nails.

Consumables
- Nude base nail polish: Essie “Topless & Barefoot”
- Gold foil flakes: Born Pretty Gold Foil Flakes
- Clear nail polish: Sally Hansen “Hard as Nails”
- Clear top coat: Seche Vite Dry Fast Top Coat
- Nail art brush set: Beetles Gel Polish Nail Art Brushes
DIY Instructions
- Apply a base coat to all nails.
- Paint some nails with the nude polish and others with the clear polish.
- Apply gold foil flakes to the clear nails using a fine nail art brush.
- Add gold French tips to the nude nails.
- Seal the design with a clear top coat for added shine and durability.
Brown and Nude Mix
This intricate design features a mix of brown and nude tones with various textures and patterns. The nails display a range of designs, from geometric patterns to marble effects and 3D floral accents. This creative and bold look is perfect for showcasing fall coffin nails ideas with designs that are both cute and inspo.

Consumables
- Brown nail polish: OPI “Chocolate Moose”
- Nude nail polish: Essie “Topless & Barefoot”
- White nail polish: Essie “Blanc”
- 3D nail art decorations: Born Pretty 3D Nail Art
- Nail art brush set: Beetles Gel Polish Nail Art Brushes
- Clear top coat: Seche Vite Dry Fast Top Coat
DIY Instructions
- Apply a base coat to all nails.
- Paint nails with the brown and nude polishes, alternating colors.
- Use a fine nail art brush to create geometric patterns, marble effects, and floral accents.
- Apply 3D decorations to accent nails.
- Seal the design with a clear top coat.
Glitter and Plaid
This glamorous design combines glitter, plaid patterns, and delicate floral accents. The nails feature a blend of gold glitter, black and white plaid, and clear nails with autumn leaves. The addition of a small charm adds an extra touch of elegance, making this design perfect for those who love intricate and detailed fall coffin nails.

Consumables
- Gold glitter nail polish: China Glaze “Golden Enchantment”
- Black and white nail polish: OPI “Black Onyx” and Essie “Blanc”
- Autumn leaf nail stickers: Whats Up Nails Autumn Leaf Stickers
- Small nail charms: Born Pretty Nail Charms
- Clear top coat: Seche Vite Dry Fast Top Coat
- Nail art brush set: Beetles Gel Polish Nail Art Brushes
DIY Instructions
- Apply a base coat to all nails.
- Paint nails with the gold glitter, black, and white polishes, creating plaid patterns on some nails.
- Apply autumn leaf stickers to clear nails.
- Attach small charms using nail glue.
- Seal the design with a clear top coat.
Orange Ombre with Florals
This vibrant design features a warm orange ombre effect with 3D floral accents and glitter. The gradient from deep orange to yellow creates a stunning backdrop for the intricate flower details, making these nails perfect for autumn. The glitter adds a touch of sparkle, enhancing the overall look of these fall coffin nails.

Consumables
- Orange nail polish: Essie “Playing Koi”
- Yellow nail polish: OPI “Sun, Sea, and Sand in My Pants”
- 3D flower nail art: Born Pretty 3D Flower Nail Art
- Glitter top coat: Zoya “Leia”
- Clear top coat: Seche Vite Dry Fast Top Coat
- Nail art brush set: Beetles Gel Polish Nail Art Brushes
DIY Instructions
- Apply a base coat to all nails.
- Create an ombre effect using the orange and yellow polishes, blending the colors seamlessly.
- Apply 3D flower decorations to accent nails.
- Add a glitter top coat for extra sparkle.
- Seal the design with a clear top coat.
Matte Green Simplicity
This simple yet striking design features a matte green finish that is perfect for the fall season. The solid green color is bold and sophisticated, making these nails a great choice for those who prefer a more understated look. The matte finish adds a modern touch, highlighting the fall coffin nails matte trend.

Consumables
- Green nail polish: Essie “Sew Psyched”
- Matte top coat: Essie Matte About You
DIY Instructions
- Apply a base coat to all nails.
- Paint nails with the green polish, ensuring even coverage.
- Apply a matte top coat to achieve the desired finish.
Blue French Tip
This design features a fresh take on the classic French tip, using a light blue polish instead of the traditional white. The soft blue color against the nude base creates a calm and serene look, perfect for transitioning into fall. This design is a great way to add a subtle pop of color to your fall coffin nails.

Consumables
- Nude base nail polish: OPI “Be There in a Prosecco”
- Light blue nail polish: Essie “Bikini So Teeny”
- Clear top coat: Seche Vite Dry Fast Top Coat
DIY Instructions
- Apply a base coat to all nails.
- Paint nails with the nude polish to create a natural-looking base.
- Use a fine nail art brush to apply the light blue polish to the tips, forming a French tip.
- Seal the design with a clear top coat.
Brown and Beige Stripes
This chic design features a mix of brown and beige stripes on a nude base. The matte finish and the alternating stripe patterns create a modern and sophisticated look. This design is perfect for those who want to showcase fall coffin nails with a unique and stylish twist.

Consumables
- Nude nail polish: Essie “Ballet Slippers”
- Brown nail polish: OPI “Chocolate Moose”
- Beige nail polish: Essie “Topless & Barefoot”
- Matte top coat: Essie Matte About You
- Nail art brush set: Beetles Gel Polish Nail Art Brushes
DIY Instructions
- Apply a base coat to all nails.
- Paint nails with the nude polish as a base.
- Use a fine nail art brush to create alternating stripe patterns with the brown and beige polishes.
- Apply a matte top coat to finish the look.
Save Pin
