
Fall is here, bringing with it a rich tapestry of colors and styles that can inspire your next manicure. From warm hues to intricate designs, fall nail ideas are all about embracing the beauty of the season. But how do you choose the perfect look? In this article, we’ll explore some stunning fall nail designs, complete with detailed descriptions and tips on how to achieve them at home. Whether you’re a fan of short nails, prefer acrylics, or love the almond shape, we’ve got you covered.
Autumn Elegance: The Matte Red Coffin Nails
As a professional manicurist, I can’t help but admire the elegance of matte red coffin nails. This design perfectly captures the essence of fall with its deep, rich red hue and sophisticated matte finish. The length and shape add a touch of drama, making it a perfect choice for those who love to stand out.

Consumables:
-
- Matte red nail polish: OPI’s “I’m Not Really a Waitress”
- Coffin-shaped acrylic nails
- Matte top coat: Essie’s “Matte About You”
How to Create:
-
- Apply a base coat to your nails.
- Attach the coffin-shaped acrylic nails.
- Apply two coats of matte red nail polish.
- Finish with a matte top coat for a smooth finish.
Funky Fall Swirls: The Orange and Silver French Tips
This modern twist on French tips features vibrant orange swirls with a touch of silver, creating a playful yet chic look. The clear base highlights the swirls, making the design pop. It’s a perfect autumn manicure for those who enjoy a bit of fun in their nail art.

Consumables:
-
- Orange nail polish: Sally Hansen’s “Sun Kissed”
- Silver nail polish: Zoya’s “Trixie”
- Nail art brush for swirls
- Clear base coat: Orly’s “Bonder”
How to Create:
-
- Apply a clear base coat.
- Using a nail art brush, paint orange swirls on the tips.
- Add silver accents to the swirls.
- Seal with a clear top coat.
Playful Patterns: Yellow and Orange Art
These nails are all about embracing the playful side of autumn with bright yellow and orange patterns. Each nail features a unique design, from stars to checkerboards, adding a whimsical touch to your manicure.

Consumables:
-
- Yellow nail polish: China Glaze’s “Happy Go Lucky”
- Orange nail polish: Essie’s “Tangerine Tease”
- Nail art stickers for stars and patterns
- Clear top coat: Seche Vite’s “Dry Fast Top Coat”
How to Create:
-
- Apply a base coat.
- Paint each nail with a different design using yellow and orange polishes.
- Use nail art stickers for intricate patterns.
- Finish with a clear top coat.
Nature’s Palette: The Multicolor Leaf Design
Inspired by the changing leaves, this design uses a blend of green, yellow, and red to create a stunning leaf pattern. The almond shape of the nails adds elegance, making it a versatile design for any occasion.

Consumables:
-
- Green nail polish: OPI’s “Green Come True”
- Yellow nail polish: OPI’s “Sun, Sea, and Sand in My Pants”
- Red nail polish: OPI’s “Big Apple Red”
- Nail art brush for leaves
- Clear base coat: Butter London’s “Nail Foundation”
How to Create:
-
- Apply a base coat.
- Using a nail art brush, paint leaf patterns in green, yellow, and red.
- Layer the colors for a more natural look.
- Seal with a clear top coat.
Earthy Tones: Brown and Beige Combination
For a more subdued autumn look, this design features a combination of earthy browns and beiges. The mix of solid colors and patterns creates a sophisticated yet understated manicure perfect for any fall outfit.

Consumables:
-
- Brown nail polish: Zoya’s “Louise”
- Beige nail polish: Essie’s “Sand Tropez”
- Nail art brush for patterns
- Matte top coat: OPI’s “Matte Top Coat”
How to Create:
-
- Apply a base coat.
- Paint each nail with brown and beige polishes in alternating patterns.
- Use a nail art brush for detailed designs.
- Finish with a matte top coat.
Mystical Waves: Purple and Gold Swirl Nails
These mesmerizing swirl nails combine purple, gold, and teal in a stunning, wavy pattern. The shimmering effect of each color adds depth and dimension, making this design perfect for autumn evenings and special occasions. The almond shape complements the flowing design, enhancing the overall elegance.

Consumables:
-
- Purple nail polish: ILNP’s “Dream Girl”
- Gold nail polish: Sally Hansen’s “Golden-I”
- Teal nail polish: Essie’s “In The Cab-ana”
- Fine nail art brush
- Clear top coat: Seche Vite’s “Dry Fast Top Coat”
How to Create:
-
- Apply a base coat.
- Use the fine nail art brush to paint wavy lines in purple, gold, and teal.
- Allow each color to dry before adding the next to avoid smudging.
- Finish with a clear top coat to seal the design.
Fiery Autumn: Metallic Orange Almond Nails
These metallic orange nails scream autumn with their fiery hue and glossy finish. The addition of gold leaf accents on a few nails adds a touch of luxury and sophistication. The sharp almond shape enhances the dramatic effect, making this a standout design for fall.

Consumables:
-
- Metallic orange nail polish: OPI’s “Worth a Pretty Penne”
- Gold leaf flakes
- Clear top coat: Zoya’s “Armor Top Coat”
How to Create:
-
- Apply a base coat.
- Paint your nails with the metallic orange polish.
- While the polish is still tacky, place gold leaf flakes on desired nails.
- Finish with a clear top coat to secure the gold leaf and add shine.
Autumn Leaves: Green and Gold Fall Accents
Celebrate fall with this intricate design featuring green and gold accents, encapsulating the essence of autumn leaves. The combination of deep green and warm gold creates a balanced, earthy look perfect for the season. The coffin shape provides a modern twist to this classic autumn theme.

Consumables:
-
- Deep green nail polish: Essie’s “Off Tropic”
- Gold glitter polish: Orly’s “Luxe”
- Clear nail polish: Butter London’s “Hardwear Shine UV Topcoat”
- Nail art brush for precise application
How to Create:
-
- Apply a base coat.
- Paint each nail with deep green polish.
- Use the nail art brush to apply gold glitter polish in leaf-like patterns.
- Seal the design with a clear top coat.
Classic Elegance: Pink and White Ombre Coffin Nails
These pink and white ombre nails offer a fresh, elegant look for fall. The gradient effect is subtle yet striking, transitioning seamlessly from a natural base to soft pink tips. This design is perfect for those who prefer a more understated, chic manicure.

Consumables:
-
- Light pink nail polish: OPI’s “Bubble Bath”
- White nail polish: Essie’s “Blanc”
- Sponge for blending
- Clear top coat: Seche Vite’s “Dry Fast Top Coat”
How to Create:
-
- Apply a base coat.
- Dab light pink and white polishes onto a sponge.
- Gently press the sponge onto each nail to create the ombre effect.
- Repeat until the desired opacity is achieved.
- Finish with a clear top coat.
Bold and Edgy: Red and Black Flame Stiletto Nails
For a bold statement, these red and black flame stiletto nails are the perfect choice. The sharp, pointed tips add an edgy vibe, while the flame design in red and black creates a fiery, eye-catching look. This design is ideal for those looking to make a dramatic impression this fall.

Consumables:
-
- Red nail polish: China Glaze’s “Scarlet”
- Black nail polish: Essie’s “Licorice”
- Fine nail art brush
- Clear top coat: Zoya’s “Armor Top Coat”
How to Create:
-
- Apply a base coat.
- Paint nails with a red base color.
- Use a fine nail art brush to draw flame patterns with black polish.
- Finish with a clear top coat to seal the design.
Nature’s Palette: Green and Copper Leaf Nails
These nails blend the natural beauty of green polish with the luxe touch of copper leaf accents. The combination of earthy tones and metallic highlights creates a stunning autumn manicure that’s perfect for any occasion. The balance between the solid green nails and the clear ones with copper leaf gives a dynamic and sophisticated look.

Consumables:
-
- Green nail polish: OPI’s “Stay Off the Lawn!”
- Copper leaf flakes
- Clear base coat: Essie’s “All In One”
- Clear top coat: Sally Hansen’s “Insta-Dri”
How to Create:
-
- Apply a clear base coat to all nails.
- Paint alternating nails with green polish and leave the rest clear.
- Apply copper leaf flakes to the clear nails while the base coat is still tacky.
- Seal all nails with a clear top coat to secure the design and add shine.
Sparkling Burgundy: Glitter Short Square Nails
For a touch of glamour, these short square nails feature a rich burgundy base adorned with glitter. The depth of the burgundy paired with the sparkle makes this a stunning choice for fall, perfect for both day and night.

Consumables:
-
- Burgundy nail polish: Essie’s “Bordeaux”
- Burgundy glitter polish: China Glaze’s “Ruby Pumps”
- Clear top coat: Seche Vite’s “Dry Fast Top Coat”
How to Create:
-
- Apply a base coat.
- Paint nails with two coats of burgundy polish.
- Apply a coat of burgundy glitter polish.
- Finish with a clear top coat to add extra shine and protection.
Multicolor Fall Hues: Mixed Shades Almond Nails
This design embraces a variety of fall hues, from earthy browns to vibrant oranges and cool grays. Each nail is painted a different color, creating a harmonious yet eye-catching look. The almond shape adds a touch of elegance to this playful manicure.

Consumables:
-
- Brown nail polish: Zoya’s “Louise”
- Orange nail polish: OPI’s “It’s a Piazza Cake”
- Gray nail polish: Essie’s “Chinchilly”
- White nail polish: OPI’s “Alpine Snow”
- Clear top coat: Butter London’s “Hardwear Shine UV Topcoat”
How to Create:
-
- Apply a base coat.
- Paint each nail a different color.
- Apply a clear top coat to seal and protect the design.
Classic Red: Deep Red French Tips
These nails feature a classic deep red French tip design with a modern twist. The sharp, clean lines and bold color make this manicure a timeless choice for fall. The deep red paired with the natural nail color creates a striking contrast.

Consumables:
-
- Deep red nail polish: OPI’s “Big Apple Red”
- Clear base coat: Essie’s “First Base”
- Clear top coat: Seche Vite’s “Dry Fast Top Coat”
How to Create:
-
- Apply a clear base coat.
- Paint deep red French tips on each nail.
- Finish with a clear top coat for a glossy finish.
Autumn Leaves: Festive Fall Nail Art
This design captures the essence of fall with intricate leaf patterns and a mix of warm autumn colors. The combination of glitter, solid colors, and detailed artwork makes these nails a festive and eye-catching choice for the season.

Consumables:
-
- Orange nail polish: OPI’s “A Good Man-darin is Hard to Find”
- Nude nail polish: Essie’s “Sand Tropez”
- Gold glitter polish: Orly’s “Luxe”
- Nail art brush for leaf patterns
- Clear top coat: Sally Hansen’s “Insta-Dri”
How to Create:
-
- Apply a base coat.
- Paint nails with a mix of nude and orange polish.
- Use a nail art brush to create leaf patterns with gold glitter polish.
- Finish with a clear top coat to secure the design.
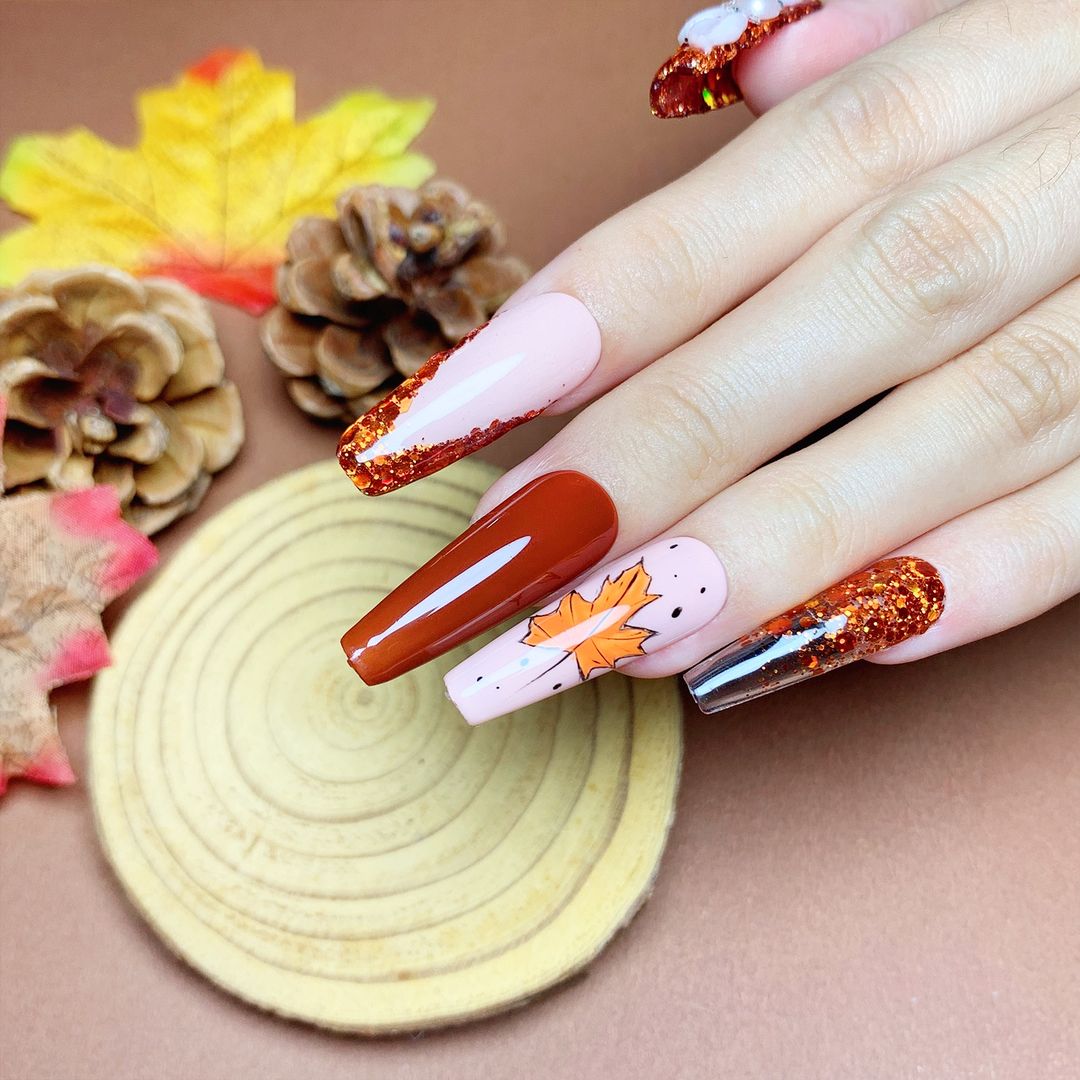
Subtle Elegance: Nude and Brown Coffin Nails with Glitter
These coffin nails feature a sophisticated palette of nude and brown tones, enhanced with a touch of glitter. The combination of solid colors and glitter stripes creates a balanced and elegant design perfect for fall. This manicure is both understated and glamorous, making it a versatile choice for any occasion.

Consumables:
-
- Nude nail polish: Essie’s “Topless & Barefoot”
- Brown nail polish: OPI’s “Chocolate Moose”
- Silver glitter polish: China Glaze’s “Glistening Snow”
- Fine nail art brush
- Clear top coat: Seche Vite’s “Dry Fast Top Coat”
How to Create:
-
- Apply a base coat.
- Paint nails with alternating nude and brown polishes.
- Use a fine nail art brush to apply glitter stripes on selected nails.
- Seal with a clear top coat to secure the design and add shine.
Warm Neutrals: Mixed Beige and Brown Almond Nails
This nail design features a mix of beige and brown shades with a fun twist—leopard print accents. The almond shape adds elegance, while the variety of colors and patterns keep it playful and interesting. This look is perfect for those who love experimenting with different styles.

Consumables:
-
- Beige nail polish: OPI’s “Samoan Sand”
- Brown nail polish: Essie’s “Mink Muffs”
- White nail polish: OPI’s “Alpine Snow”
- Black nail polish: Essie’s “Licorice”
- Nail art brush for leopard print
- Clear top coat: Sally Hansen’s “Insta-Dri”
How to Create:
-
- Apply a base coat.
- Paint nails with alternating beige, brown, and white polishes.
- Use a nail art brush to create leopard print accents with black polish.
- Finish with a clear top coat to seal the design.
Enchanted Forest: Green Glitter and Textured Nails
These nails capture the essence of a mystical forest with a blend of green glitter, solid green, and textured patterns. The combination of different finishes and textures adds depth and interest, making this design perfect for the fall season.

Consumables:
-
- Dark green nail polish: OPI’s “Here Today… Aragon Tomorrow”
- Green glitter polish: Zoya’s “Ivanka”
- Textured green polish: China Glaze’s “Don’t Let the Dead Bite”
- Clear top coat: Essie’s “Good To Go”
How to Create:
-
- Apply a base coat.
- Paint nails with alternating dark green, green glitter, and textured green polishes.
- Apply a clear top coat to seal and protect the design.
Woodland Whimsy: Fox and Forest Nails
Celebrate the playful side of fall with these adorable fox and forest-themed nails. The design features intricate hand-painted foxes and trees on a nude base, complemented by solid green nails. This whimsical manicure is perfect for nature lovers and adds a touch of fun to your fall look.

Consumables:
-
- Nude nail polish: OPI’s “Samoan Sand”
- Green nail polish: Essie’s “Mojito Madness”
- Various colors for the fox design (orange, white, black)
- Fine nail art brush for details
- Clear top coat: Seche Vite’s “Dry Fast Top Coat”
How to Create:
-
- Apply a base coat.
- Paint nails with alternating nude and green polishes.
- Use a fine nail art brush to paint foxes and forest designs on the nude nails.
- Finish with a clear top coat to protect the artwork.
Frosty Fall: Brown to Gray Ombre Coffin Nails
These ombre nails transition from a warm brown to a cool gray, creating a frosty effect perfect for the later fall months. The coffin shape adds a modern twist, while the subtle gradient makes this design versatile and stylish.

Consumables:
-
- Brown nail polish: OPI’s “You Don’t Know Jacques!”
- Gray nail polish: Essie’s “Chinchilly”
- Sponge for blending
- Clear top coat: Butter London’s “Hardwear Shine UV Topcoat”
How to Create:
-
- Apply a base coat.
- Dab brown and gray polishes onto a sponge.
- Gently press the sponge onto each nail to create the ombre effect.
- Repeat until the desired opacity is achieved.
- Seal with a clear top coat.
Sophisticated Florals: Matte Plum and Floral Accent Nails
These nails combine a matte plum base with intricate floral accents, creating a sophisticated and elegant look. The matte finish adds a modern touch, while the detailed flowers bring a hint of classic beauty, making this design perfect for any fall occasion.

Consumables:
-
- Plum matte nail polish: OPI’s “Lincoln Park After Dark”
- Nude nail polish for base: Essie’s “Ballet Slippers”
- Various colors for floral designs (pink, orange, brown)
- Fine nail art brush for details
- Matte top coat: Zoya’s “Matte Velvet Topcoat”
How to Create:
-
- Apply a base coat.
- Paint nails with alternating plum matte and nude polishes.
- Use a fine nail art brush to paint floral designs on the nude nails.
- Seal the design with a matte top coat.
Geometric Grays: Matte and Glossy Gray Nails
This design features a mix of matte and glossy gray nails with geometric patterns, creating a sleek and modern look. The combination of different finishes and clean lines makes this design both stylish and versatile, perfect for the fall season.

Consumables:
-
- Matte gray nail polish: Essie’s “Power Clutch”
- Glossy gray nail polish: OPI’s “Suzi Takes the Wheel”
- Fine nail art brush for geometric patterns
- Clear top coat: Butter London’s “Hardwear Shine UV Topcoat”
How to Create:
-
- Apply a base coat.
- Paint nails with alternating matte and glossy gray polishes.
- Use a fine nail art brush to paint geometric patterns on selected nails.
- Finish with a clear top coat to protect the design.
Save Pin
