
As the leaves change color, so should your nails! Fall ombre nails are the perfect way to embrace the autumn season with style and flair. In this article, we’ll explore some of the most captivating fall ombre nail designs, offering detailed descriptions, essential tools, and step-by-step instructions for creating these stunning looks at home.
Elegant Orange Ombre
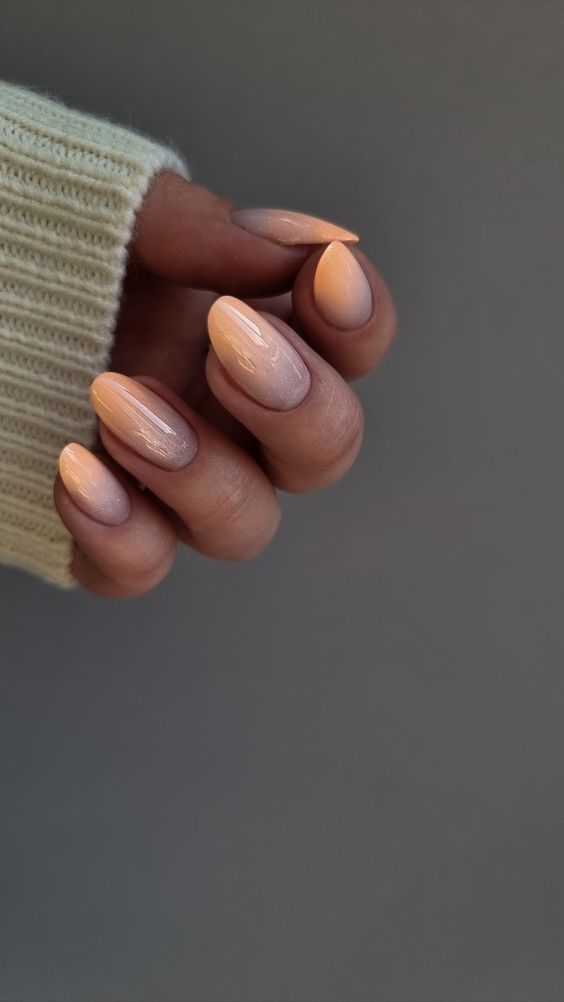
Fall ombre nails are all about capturing the essence of autumn, and this elegant orange ombre design does just that. The gradient transitions from a soft peach at the base to a vibrant orange at the tips, perfectly mimicking the fall foliage. The smooth blend of colors creates a sophisticated and warm look that is both cute and trendy. This nail shape, characterized by almond tips, enhances the overall elegance of the design, making it a perfect choice for those who love a refined yet eye-catching manicure.

Consumables and Recommendations
- Base Coat: OPI Natural Nail Base Coat
- Peach Polish: Essie Peach Side Babe
- Orange Polish: OPI A Good Man-darin Is Hard to Find
- Top Coat: Seche Vite Dry Fast Top Coat
- Sponge: Beauty Blender Micro Mini
- Clean-up Brush: ELF Small Smudge Brush
Creating the Design at Home
- Apply the base coat to protect your nails.
- Paint your nails with the peach polish as the base color.
- Using the Beauty Blender Micro Mini, dab the orange polish onto the tips, gradually blending it towards the base to create the ombre effect.
- Clean up the edges with the ELF Small Smudge Brush.
- Seal the design with a top coat for a glossy finish.
Sophisticated Brown and Nude Gradient
This sophisticated brown and nude gradient design is perfect for those who prefer subtle elegance. The ombre effect transitions seamlessly from a rich brown to a soft nude, creating a refined and classy look. The almond shape of the nails adds to the sophistication, making it suitable for both everyday wear and special occasions. The combination of these fall colors brings warmth and depth to your nails, capturing the essence of the season.

Consumables and Recommendations
- Base Coat: Sally Hansen Hard As Nails
- Nude Polish: Zoya Taylor
- Brown Polish: OPI That’s What Friends Are Thor
- Top Coat: Essie Gel Setter
- Sponge: Real Techniques Miracle Complexion Sponge
- Clean-up Brush: Morphe M213 Smudger
Creating the Design at Home
- Start with a protective base coat.
- Apply the nude polish as the base color.
- Using the Real Techniques Miracle Complexion Sponge, apply the brown polish to the tips, blending towards the base.
- Clean up any excess polish with the Morphe M213 Smudger.
- Finish with a top coat for a smooth and durable finish.
Bold Burgundy and Black Ombre
For a bold and dramatic look, this burgundy and black ombre design is the way to go. The rich burgundy base transitions into deep black tips, creating a striking contrast that is perfect for the fall season. The coffin nail shape enhances the edgy feel of this design, making it ideal for those who love to make a statement with their nails. This look is particularly trendy and pairs well with autumn outfits.

Consumables and Recommendations
- Base Coat: Orly Bonder Base Coat
- Burgundy Polish: China Glaze Fifth Avenue
- Black Polish: Essie Licorice
- Top Coat: Revlon Extra Life No Chip Top Coat
- Sponge: Wedge Makeup Sponge
- Clean-up Brush: Sigma E05 Eyeliner Brush
Creating the Design at Home
- Apply the base coat to ensure long-lasting wear.
- Paint your nails with the burgundy polish as the base color.
- Use a wedge makeup sponge to apply the black polish to the tips, blending towards the base.
- Clean up around the nails with the Sigma E05 Eyeliner Brush.
- Seal the design with a top coat to enhance shine and durability.
Soft Grey and White Ombre
This soft grey and white ombre design exudes a calm and serene vibe, perfect for the cozy fall season. The gradient from a light grey to a crisp white creates a delicate and sophisticated look. The almond shape of the nails further enhances the elegance of this design, making it suitable for both casual and formal occasions. The neutral tones of grey and white are timeless and versatile, ensuring your nails look chic all season long.

Consumables and Recommendations
- Base Coat: Deborah Lippmann Hard Rock Base and Top Coat
- Grey Polish: Zoya Dove
- White Polish: OPI Alpine Snow
- Top Coat: Sally Hansen Miracle Gel Top Coat
- Sponge: Cosmetic Wedge Sponge
- Clean-up Brush: EcoTools Detailed Lip Brush
Creating the Design at Home
- Begin with a base coat to protect your nails.
- Apply the grey polish as the base color.
- Use a cosmetic wedge sponge to apply the white polish to the tips, blending it towards the base.
- Clean up any excess polish with the EcoTools Detailed Lip Brush.
- Finish with a top coat for a polished look.
Mysterious Dark Grey Ombre
This mysterious dark grey ombre design is perfect for those who love a bit of drama. The gradient transitions from a light grey at the base to a dark grey at the tips, creating a smoky and intriguing look. The stiletto nail shape adds to the boldness of this design, making it a great choice for evening events or when you want your nails to stand out. The contrast between the light and dark shades adds depth and interest, making this design a trendy choice for the fall season.

Consumables and Recommendations
- Base Coat: Essie Here to Stay Base Coat
- Light Grey Polish: Essie Chinchilly
- Dark Grey Polish: OPI Suzi Skis in the Pyrenees
- Top Coat: Butter London Hardwear Shine UV Topcoat
- Sponge: Triangular Makeup Sponge
- Clean-up Brush: Real Techniques Detailer Brush
Creating the Design at Home
- Start with a base coat to ensure longevity.
- Apply the light grey polish as the base color.
- Use a triangular makeup sponge to apply the dark grey polish to the tips, blending towards the base.
- Clean up the edges with the Real Techniques Detailer Brush.
- Seal with a top coat for a glossy finish.
Burgundy and Nude Ombre with French Tips
This design combines the elegance of burgundy ombre with the sophistication of French tips. The gradient transitions from a deep burgundy to a soft nude, with white French tips adding a touch of classic style. The almond shape of the nails complements the overall look, making it a perfect choice for a chic autumn manicure. This design is both trendy and timeless, capturing the essence of fall with its warm tones.

Consumables and Recommendations
- Base Coat: OPI Natural Nail Base Coat
- Burgundy Polish: Essie Bordeaux
- Nude Polish: OPI Bubble Bath
- White Polish: Sally Hansen White On
- Top Coat: Seche Vite Dry Fast Top Coat
- Sponge: Beauty Blender Micro Mini
- Clean-up Brush: ELF Small Smudge Brush
Creating the Design at Home
- Apply the base coat to protect your nails.
- Paint your nails with the nude polish as the base color.
- Using the Beauty Blender Micro Mini, dab the burgundy polish onto the tips, gradually blending it towards the base to create the ombre effect.
- Apply the white polish to the tips for the French manicure look.
- Clean up the edges with the ELF Small Smudge Brush.
- Seal the design with a top coat for a glossy finish.
Glittery Brown Ombre
This glittery brown ombre design is perfect for adding a bit of sparkle to your fall manicure. The gradient transitions from a rich brown at the base to a glittery tip, creating a glamorous look. The almond shape of the nails enhances the elegance of the design, making it suitable for both everyday wear and special occasions. The glitter adds a festive touch, making this design perfect for autumn parties and events.

Consumables and Recommendations
- Base Coat: Sally Hansen Hard As Nails
- Brown Polish: OPI You Don’t Know Jacques!
- Glitter Polish: Essie Summit of Style
- Top Coat: Essie Gel Setter
- Sponge: Real Techniques Miracle Complexion Sponge
- Clean-up Brush: Morphe M213 Smudger
Creating the Design at Home
- Start with a protective base coat.
- Apply the brown polish as the base color.
- Using the Real Techniques Miracle Complexion Sponge, apply the glitter polish to the tips, blending it towards the base.
- Clean up any excess polish with the Morphe M213 Smudger.
- Finish with a top coat for a smooth and durable finish.
Matte Black Ombre
This matte black ombre design exudes sophistication and mystery. The gradient transitions from a nude base to a matte black tip, creating a bold and stylish look. The square shape of the nails adds a modern touch to the design, making it perfect for those who love a sleek and contemporary manicure. This look is particularly trendy and pairs well with autumn outfits.

Consumables and Recommendations
- Base Coat: Orly Bonder Base Coat
- Nude Polish: Zoya Taylor
- Black Matte Polish: Essie Matte About You
- Top Coat: Revlon Extra Life No Chip Top Coat
- Sponge: Wedge Makeup Sponge
- Clean-up Brush: Sigma E05 Eyeliner Brush
Creating the Design at Home
- Apply the base coat to ensure long-lasting wear.
- Paint your nails with the nude polish as the base color.
- Use a wedge makeup sponge to apply the black matte polish to the tips, blending towards the base.
- Clean up around the nails with the Sigma E05 Eyeliner Brush.
- Seal the design with a top coat to enhance the matte finish.
Blue and Nude Ombre
This blue and nude ombre design brings a refreshing twist to fall nails. The gradient transitions from a nude base to a bright blue tip, creating a striking contrast. The coffin shape of the nails adds to the edgy feel of this design, making it ideal for those who love to make a statement with their nails. This look is particularly trendy and pairs well with both casual and formal autumn outfits.

Consumables and Recommendations
- Base Coat: Deborah Lippmann Hard Rock Base and Top Coat
- Nude Polish: Zoya Dove
- Blue Polish: OPI My Pal Joey
- Top Coat: Sally Hansen Miracle Gel Top Coat
- Sponge: Cosmetic Wedge Sponge
- Clean-up Brush: EcoTools Detailed Lip Brush
Creating the Design at Home
- Begin with a base coat to protect your nails.
- Apply the nude polish as the base color.
- Use a cosmetic wedge sponge to apply the blue polish to the tips, blending it towards the base.
- Clean up any excess polish with the EcoTools Detailed Lip Brush.
- Finish with a top coat for a polished look.
Bright Orange Ombre
This bright orange ombre design is perfect for adding a pop of color to your fall manicure. The gradient transitions from a pink base to a vibrant orange tip, creating a lively and energetic look. The square shape of the nails complements the boldness of the design, making it a great choice for those who love to stand out. The bright colors add a festive touch, making this design perfect for autumn celebrations.

Consumables and Recommendations
- Base Coat: Essie Here to Stay Base Coat
- Pink Polish: Essie Muchi Muchi
- Orange Polish: OPI A Good Man-darin Is Hard to Find
- Top Coat: Butter London Hardwear Shine UV Topcoat
- Sponge: Triangular Makeup Sponge
- Clean-up Brush: Real Techniques Detailer Brush
Creating the Design at Home
- Start with a base coat to ensure longevity.
- Apply the pink polish as the base color.
- Use a triangular makeup sponge to apply the orange polish to the tips, blending towards the base.
- Clean up the edges with the Real Techniques Detailer Brush.
- Seal with a top coat for a glossy finish.
Delicate Blue Ombre with Rhinestones
This delicate blue ombre design transitions from a soft white base to a rich blue tip, creating a serene and elegant look. The almond shape of the nails adds to the sophistication, while the subtle addition of rhinestones near the cuticle enhances the overall aesthetic. This design is perfect for those who want to add a touch of glamour to their fall nails without being overly flashy.

Consumables and Recommendations
- Base Coat: OPI Natural Nail Base Coat
- White Polish: Essie Blanc
- Blue Polish: OPI My Pal Joey
- Top Coat: Seche Vite Dry Fast Top Coat
- Rhinestones: Swarovski Flatback Crystals
- Sponge: Beauty Blender Micro Mini
- Clean-up Brush: ELF Small Smudge Brush
Creating the Design at Home
- Apply the base coat to protect your nails.
- Paint your nails with the white polish as the base color.
- Using the Beauty Blender Micro Mini, dab the blue polish onto the tips, gradually blending it towards the base to create the ombre effect.
- Apply rhinestones near the cuticle using a small amount of top coat as adhesive.
- Clean up the edges with the ELF Small Smudge Brush.
- Seal the design with a top coat for a glossy finish.
Lavender Ombre with Glitter
This lavender ombre design is both whimsical and elegant, transitioning from a soft nude base to a vibrant lavender tip. The addition of silver glitter near the cuticles adds a touch of sparkle, making this design perfect for any festive occasion. The almond shape of the nails enhances the overall look, making it a trendy choice for the fall season.

Consumables and Recommendations
- Base Coat: Sally Hansen Hard As Nails
- Nude Polish: Zoya Taylor
- Lavender Polish: Essie Lilacism
- Silver Glitter: China Glaze Fairy Dust
- Top Coat: Essie Gel Setter
- Sponge: Real Techniques Miracle Complexion Sponge
- Clean-up Brush: Morphe M213 Smudger
Creating the Design at Home
- Start with a protective base coat.
- Apply the nude polish as the base color.
- Using the Real Techniques Miracle Complexion Sponge, apply the lavender polish to the tips, blending it towards the base.
- Add silver glitter near the cuticles for extra sparkle.
- Clean up any excess polish with the Morphe M213 Smudger.
- Finish with a top coat for a smooth and durable finish.
Autumn Brown and Orange Ombre
This autumn-inspired brown and orange ombre design captures the essence of fall perfectly. The gradient transitions from a rich brown at the base to a warm orange at the tips, creating a cozy and inviting look. The short, natural nail shape makes this design practical for everyday wear, while still being trendy and eye-catching.

Consumables and Recommendations
- Base Coat: Orly Bonder Base Coat
- Brown Polish: OPI You Don’t Know Jacques!
- Orange Polish: Essie Meet Me at Sunset
- Top Coat: Revlon Extra Life No Chip Top Coat
- Sponge: Wedge Makeup Sponge
- Clean-up Brush: Sigma E05 Eyeliner Brush
Creating the Design at Home
- Apply the base coat to ensure long-lasting wear.
- Paint your nails with the brown polish as the base color.
- Use a wedge makeup sponge to apply the orange polish to the tips, blending towards the base.
- Clean up around the nails with the Sigma E05 Eyeliner Brush.
- Seal the design with a top coat to enhance the finish.
Neutral Ombre with Gold Flakes
This neutral ombre design is both elegant and sophisticated, featuring a gradient from a soft nude to a delicate grey. The addition of gold flakes adds a touch of luxury, making this design perfect for any special occasion. The square nail shape complements the overall look, making it a versatile choice for the fall season.

Consumables and Recommendations
- Base Coat: Deborah Lippmann Hard Rock Base and Top Coat
- Nude Polish: Zoya Dove
- Grey Polish: Essie Chinchilly
- Gold Flakes: Ciaté London Metallic Nail Foils
- Top Coat: Sally Hansen Miracle Gel Top Coat
- Sponge: Cosmetic Wedge Sponge
- Clean-up Brush: EcoTools Detailed Lip Brush
Creating the Design at Home
- Begin with a base coat to protect your nails.
- Apply the nude polish as the base color.
- Use a cosmetic wedge sponge to apply the grey polish to the tips, blending it towards the base.
- Add gold flakes to the design for a touch of elegance.
- Clean up any excess polish with the EcoTools Detailed Lip Brush.
- Finish with a top coat for a polished look.
Gold-Tipped Ombre
This gold-tipped ombre design is perfect for adding a touch of glamour to your fall manicure. The gradient transitions from a soft pink base to a shimmering gold tip, creating a luxurious and sophisticated look. The almond shape of the nails enhances the elegance of the design, making it suitable for both casual and formal occasions.

Consumables and Recommendations
- Base Coat: Essie Here to Stay Base Coat
- Pink Polish: Essie Ballet Slippers
- Gold Polish: OPI Glitzerland
- Top Coat: Butter London Hardwear Shine UV Topcoat
- Sponge: Triangular Makeup Sponge
- Clean-up Brush: Real Techniques Detailer Brush
Creating the Design at Home
- Start with a base coat to ensure longevity.
- Apply the pink polish as the base color.
- Use a triangular makeup sponge to apply the gold polish to the tips, blending towards the base.
- Clean up the edges with the Real Techniques Detailer Brush.
- Seal with a top coat for a glossy finish.
Red and Nude Ombre
This vibrant red and nude ombre design is perfect for capturing the warm hues of autumn. The gradient transitions from a soft nude at the base to a bold red at the tips, creating a striking contrast. The almond shape of the nails adds to the sophistication, making it an ideal choice for a chic and elegant fall look. This design is both trendy and eye-catching, perfect for making a statement.

Consumables and Recommendations
- Base Coat: OPI Natural Nail Base Coat
- Nude Polish: Essie Ballet Slippers
- Red Polish: OPI Big Apple Red
- Top Coat: Seche Vite Dry Fast Top Coat
- Sponge: Beauty Blender Micro Mini
- Clean-up Brush: ELF Small Smudge Brush
Creating the Design at Home
- Apply the base coat to protect your nails.
- Paint your nails with the nude polish as the base color.
- Using the Beauty Blender Micro Mini, dab the red polish onto the tips, gradually blending it towards the base to create the ombre effect.
- Clean up the edges with the ELF Small Smudge Brush.
- Seal the design with a top coat for a glossy finish.
Burgundy and Black Ombre
This burgundy and black ombre design exudes mystery and elegance. The gradient transitions from a deep burgundy at the base to a bold black at the tips, creating a dramatic and sophisticated look. The stiletto shape of the nails adds to the edgy feel of this design, making it perfect for those who love to make a bold statement. This look is particularly trendy and pairs well with autumn outfits.

Consumables and Recommendations
- Base Coat: Sally Hansen Hard As Nails
- Burgundy Polish: Essie Bordeaux
- Black Polish: OPI Lincoln Park After Dark
- Top Coat: Essie Gel Setter
- Sponge: Real Techniques Miracle Complexion Sponge
- Clean-up Brush: Morphe M213 Smudger
Creating the Design at Home
- Start with a protective base coat.
- Apply the burgundy polish as the base color.
- Using the Real Techniques Miracle Complexion Sponge, apply the black polish to the tips, blending it towards the base.
- Clean up any excess polish with the Morphe M213 Smudger.
- Finish with a top coat for a smooth and durable finish.
Purple and Nude Ombre
This purple and nude ombre design combines elegance with a touch of playfulness. The gradient transitions from a soft nude at the base to a vibrant purple at the tips, creating a beautiful and eye-catching look. The almond shape of the nails enhances the overall aesthetic, making it a versatile choice for both casual and formal occasions. This design is perfect for those who want to add a pop of color to their fall manicure.

Consumables and Recommendations
- Base Coat: Orly Bonder Base Coat
- Nude Polish: Zoya Taylor
- Purple Polish: Essie Play Date
- Top Coat: Revlon Extra Life No Chip Top Coat
- Sponge: Wedge Makeup Sponge
- Clean-up Brush: Sigma E05 Eyeliner Brush
Creating the Design at Home
- Apply the base coat to ensure long-lasting wear.
- Paint your nails with the nude polish as the base color.
- Use a wedge makeup sponge to apply the purple polish to the tips, blending towards the base.
- Clean up around the nails with the Sigma E05 Eyeliner Brush.
- Seal the design with a top coat to enhance the finish.
Peach and Nude Ombre
This peach and nude ombre design is perfect for those who prefer a softer and more understated look. The gradient transitions from a light nude at the base to a delicate peach at the tips, creating a subtle yet beautiful effect. The almond shape of the nails adds to the elegance, making this design suitable for both everyday wear and special occasions. This look is particularly cute and trendy for the fall season.

Consumables and Recommendations
- Base Coat: Deborah Lippmann Hard Rock Base and Top Coat
- Nude Polish: Essie Topless & Barefoot
- Peach Polish: OPI A Good Man-darin Is Hard to Find
- Top Coat: Sally Hansen Miracle Gel Top Coat
- Sponge: Cosmetic Wedge Sponge
- Clean-up Brush: EcoTools Detailed Lip Brush
Creating the Design at Home
- Begin with a base coat to protect your nails.
- Apply the nude polish as the base color.
- Use a cosmetic wedge sponge to apply the peach polish to the tips, blending it towards the base.
- Clean up any excess polish with the EcoTools Detailed Lip Brush.
- Finish with a top coat for a polished look.
Bold Blue Ombre
This bold blue ombre design is perfect for making a statement. The gradient transitions from a soft white at the base to a rich blue at the tips, creating a striking and eye-catching look. The almond shape of the nails adds to the sophistication, making this design suitable for both casual and formal occasions. This look is particularly trendy and perfect for adding a pop of color to your fall wardrobe.

Consumables and Recommendations
- Base Coat: Essie Here to Stay Base Coat
- White Polish: Essie Blanc
- Blue Polish: OPI My Pal Joey
- Top Coat: Butter London Hardwear Shine UV Topcoat
- Sponge: Triangular Makeup Sponge
- Clean-up Brush: Real Techniques Detailer Brush
Creating the Design at Home
- Start with a base coat to ensure longevity.
- Apply the white polish as the base color.
- Use a triangular makeup sponge to apply the blue polish to the tips, blending towards the base.
- Clean up the edges with the Real Techniques Detailer Brush.
- Seal with a top coat for a glossy finish.
Grey and Orange Ombre
This grey and orange ombre design captures the essence of autumn with its unique color combination. The gradient transitions from a cool grey at the base to a warm orange at the tips, creating a striking contrast that is both trendy and eye-catching. The almond shape of the nails adds to the overall elegance, making it a great choice for those who love bold and unconventional designs.

Consumables and Recommendations
- Base Coat: Sally Hansen Hard As Nails
- Grey Polish: Zoya Dove
- Orange Polish: Essie Meet Me at Sunset
- Top Coat: Essie Gel Setter
- Sponge: Real Techniques Miracle Complexion Sponge
- Clean-up Brush: Morphe M213 Smudger
Creating the Design at Home
- Start with a protective base coat.
- Apply the grey polish as the base color.
- Using the Real Techniques Miracle Complexion Sponge, apply the orange polish to the tips, blending it towards the base.
- Clean up any excess polish with the Morphe M213 Smudger.
- Finish with a top coat for a smooth and durable finish.
Red and Yellow Ombre
This red and yellow ombre design is perfect for capturing the vibrant hues of fall. The gradient transitions from a bold red at the base to a bright yellow at the tips, creating a warm and inviting look. The almond shape of the nails adds to the sophistication, making it an ideal choice for a chic and elegant fall manicure. This design is both trendy and eye-catching, perfect for making a statement.

Consumables and Recommendations
- Base Coat: OPI Natural Nail Base Coat
- Red Polish: Essie Geranium
- Yellow Polish: OPI Need Sunglasses?
- Top Coat: Seche Vite Dry Fast Top Coat
- Sponge: Beauty Blender Micro Mini
- Clean-up Brush: ELF Small Smudge Brush
Creating the Design at Home
- Apply the base coat to protect your nails.
- Paint your nails with the red polish as the base color.
- Using the Beauty Blender Micro Mini, dab the yellow polish onto the tips, gradually blending it towards the base to create the ombre effect.
- Clean up the edges with the ELF Small Smudge Brush.
- Seal the design with a top coat for a glossy finish.
Save Pin
