
22 Stunning Fall Wedding Nails Ideas for Brides, Bridesmaids, and Guests
When it comes to planning the perfect fall wedding, every detail counts, including your nails. Whether you’re the bride, a bridesmaid, or a guest, your manicure should reflect the beauty and elegance of the season. In this article, we’ll explore some of the most exquisite fall wedding nail designs, perfect for everyone attending the big day. Let’s dive into the details and discover how you can achieve these stunning looks.
Classic French with a Twist
This classic French manicure features a modern twist with nude nails and soft pink tips. The elegant and understated design is perfect for any wedding role, whether you’re the bride, bridesmaid, or a guest. The glossy finish adds a touch of sophistication to this timeless look.

Consumables:
-
- Base coat: Essie All In One Base
- Nude polish: OPI Nail Lacquer in “Samoan Sand”
- Pink polish: Essie Nail Polish in “Mademoiselle”
- Top coat: Seche Vite Dry Fast Top Coat
- Nail guides: French Manicure Nail Art Stickers
Creating the Look at Home:
-
- Apply a base coat to protect your nails.
- Apply two coats of nude polish and let it dry completely.
- Use nail guides to create the French tip with pink polish.
- Remove the guides carefully and apply a top coat to seal the design.
Elegant Burgundy Tips
These elegant nails feature a nude base with rich burgundy tips and a touch of gold glitter, creating a sophisticated and classy look. This design is ideal for the bride, bridesmaids, or even the mother of the bride. The almond shape adds a delicate and feminine touch to the overall design.

Consumables:
-
- Base coat: Sally Hansen Double Duty Base & Top Coat
- Nude polish: Essie Nail Polish in “Ballet Slippers”
- Burgundy polish: OPI Nail Lacquer in “Malaga Wine”
- Gold glitter: China Glaze Nail Lacquer in “Golden Enchantment”
- Top coat: Essie Good to Go Top Coat
Creating the Look at Home:
-
- Apply a base coat and let it dry.
- Apply two coats of nude polish and let each coat dry.
- Use a fine nail art brush to apply burgundy polish on the tips.
- Add a touch of gold glitter at the base of the tips.
- Finish with a top coat to seal and protect the design.
Bold Autumn Stiletto Nails
These bold stiletto nails feature a vibrant burnt orange base with gold foil accents, perfect for making a statement at any fall wedding. The striking design is ideal for a bride who wants to showcase her unique style or a guest looking to stand out.

Consumables:
-
- Base coat: OPI Natural Nail Base Coat
- Burnt orange polish: Essie Nail Polish in “Playing Koi”
- Gold foil: Born Pretty Gold Foil Nail Art Stickers
- Top coat: Seche Vite Dry Fast Top Coat
Creating the Look at Home:
-
- Apply a base coat and let it dry.
- Apply two coats of burnt orange polish and let each coat dry.
- Use tweezers to apply gold foil accents to the tips of each nail.
- Finish with a top coat to seal and add shine.
Floral French Manicure
This floral French manicure is a cute and elegant choice, perfect for a bridesmaid or guest. The design features a nude base with delicate floral accents along the tips, adding a touch of whimsy and charm to the traditional French manicure.

Consumables:
-
- Base coat: Essie All In One Base
- Nude polish: OPI Nail Lacquer in “Samoan Sand”
- Floral decals: Born Pretty Store Floral Water Decals
- Top coat: Seche Vite Dry Fast Top Coat
Creating the Look at Home:
-
- Apply a base coat and let it dry.
- Apply two coats of nude polish and let each coat dry completely.
- Use tweezers to place floral decals on the tips of each nail.
- Seal the design with a top coat for a glossy finish.
Geometric Elegance
These nails feature a unique geometric design with rich brown tones and gold accents. The modern and stylish look is perfect for a bridesmaid or guest who wants to add a touch of sophistication to their wedding attire. The combination of colors and shapes makes this design both trendy and elegant.

Consumables:
-
- Base coat: Zoya Anchor Base Coat
- Brown polish: Essie Nail Polish in “Playing Koi”
- Gold striping tape: Born Pretty Store
- Top coat: OPI Top Coat
Creating the Look at Home:
-
- Apply a base coat and let it dry.
- Apply two coats of brown polish and let each coat dry thoroughly.
- Use gold striping tape to create geometric patterns on each nail.
- Finish with a top coat to seal and protect the design.
Autumn Leaf Art
This design captures the essence of fall with its intricate autumn leaf art. The nails feature a clear base with bronze and gold leaves, giving a nod to the changing foliage of the season. The leaves are accented with subtle glitter, adding a touch of sparkle that catches the light beautifully.

Consumables:
-
- Base coat: Essie All In One Base
- Clear polish: OPI Nail Lacquer in “Funny Bunny”
- Bronze and gold leaf stickers: Born Pretty Autumn Leaf Stickers
- Glitter top coat: Seche Vite Dry Fast Top Coat
- Nail art brush: Winstonia Nail Art Brushes
Creating the Look at Home:
-
- Apply a base coat to your nails.
- Apply a clear polish as the base and let it dry.
- Use a nail art brush to apply the leaf stickers strategically.
- Finish with a glitter top coat to seal the design and add shine.
Mix and Match Fall Shades
For those who love variety, this mix and match design features different fall shades on each nail. From deep green to dusty pink and glittery bronze, this look is perfect for showcasing the rich colors of the season. Each nail is unique, yet they all come together for a cohesive and stylish manicure.

Consumables:
-
- Base coat: Zoya Anchor Base Coat
- Deep green polish: Essie Nail Polish in “Off Tropic”
- Dusty pink polish: OPI Nail Lacquer in “Tickle My France-y”
- Glitter bronze polish: China Glaze Nail Lacquer in “Harvest Moon”
- Top coat: OPI Top Coat
Creating the Look at Home:
-
- Apply a base coat to protect your nails.
- Paint each nail with a different fall shade, using two coats for full opacity.
- Finish with a top coat to ensure longevity and shine.
Trendy Fall Stiletto Nails
Stiletto nails are bold and make a statement, and this design incorporates fall elements like gold foil and marbled effects. The transparent base allows the intricate details to stand out, creating a look that is both trendy and unique.

Consumables:
-
- Base coat: OPI Natural Nail Base Coat
- Clear polish: Sally Hansen Hard as Nails Xtreme Wear in “Invisible”
- Gold foil: Born Pretty Gold Foil Nail Art Stickers
- Marbling polish: Sinful Colors Nail Polish in “Snow Me White” and “Black on Black”
- Top coat: Essie Good to Go Top Coat
Creating the Look at Home:
-
- Apply a base coat and let it dry.
- Apply a clear polish as the base.
- Use a nail art brush to create marbled effects with white and black polish.
- Apply gold foil accents strategically.
- Finish with a top coat to seal the design.
Leafy Almond Nails
These leafy almond nails are perfect for bridesmaids or guests looking for a subtle yet elegant fall-inspired design. The almond shape elongates the fingers, while the delicate leaf art in gold and orange hues adds a touch of nature’s beauty.

Consumables:
-
- Base coat: Essie All In One Base
- Nude polish: OPI Nail Lacquer in “Samoan Sand”
- Gold and orange leaf decals: Born Pretty Store
- Top coat: Seche Vite Dry Fast Top Coat
- Nail art brush: Winstonia Nail Art Brushes
Creating the Look at Home:
-
- Apply a base coat to protect your nails.
- Apply two coats of nude polish and let it dry.
- Use a nail art brush to apply the leaf decals.
- Seal the design with a top coat for a glossy finish.
Marble and Mauve Nails
This design combines marble art with mauve tones for a sophisticated and modern look. The marble effect adds depth and interest, while the mauve polish keeps the design chic and understated. This look is ideal for anyone wanting a trendy yet classy manicure for a fall wedding.

Consumables:
-
- Base coat: Zoya Anchor Base Coat
- Mauve polish: Essie Nail Polish in “Angora Cardi”
- White and grey polishes for marbling: Sally Hansen Hard as Nails Xtreme Wear in “White On” and “Wet Cement”
- Thin striping tape: Born Pretty Store
- Top coat: OPI Top Coat
Creating the Look at Home:
-
- Apply a base coat and let it dry.
- Paint most nails with mauve polish, leaving one or two for marble design.
- For the marble effect, apply a white polish base and use a nail art brush to create thin grey lines, blending slightly.
- Add thin striping tape accents if desired.
- Finish with a top coat to seal and protect the design.
Gilded Glamour
These gilded nails are a luxurious choice for a fall wedding. The nails feature a gradient from a natural nude base to gold glitter tips, with intricate jewel accents on select nails. This opulent design is perfect for the bride seeking a statement look that combines elegance with a touch of bling.

Consumables:
-
- Base coat: Orly Bonder Base Coat
- Nude polish: OPI Nail Lacquer in “Samoan Sand”
- Gold glitter: Sally Hansen Xtreme Wear in “Golden-I”
- Jewel accents: Swarovski Crystal Elements
- Nail glue: KISS Maximum Speed Nail Glue
- Top coat: Seche Vite Dry Fast Top Coat
Creating the Look at Home:
-
- Start with a base coat and let it dry.
- Apply the nude polish as the base and let it dry completely.
- Using a sponge, dab the gold glitter onto the tips of the nails to create a gradient effect.
- Apply jewel accents with nail glue on select nails.
- Finish with a top coat to seal and add shine.
Floral Fantasy
These floral nails are ideal for a bridesmaid or a guest. The design features a clear base with delicate floral decals and gold flecks, creating a whimsical and romantic look. This design is versatile and adds a subtle touch of nature to any fall wedding attire.

Consumables:
-
- Base coat: Essie All In One Base
- Clear polish: OPI Nail Lacquer in “Funny Bunny”
- Floral decals: Born Pretty Store Floral Water Decals
- Gold flecks: Zoya Nail Polish in “Gilty”
- Top coat: Sally Hansen Miracle Gel Top Coat
Creating the Look at Home:
-
- Apply a base coat and let it dry.
- Apply a clear polish as the base and let it dry.
- Use tweezers to place floral decals on each nail.
- Add gold flecks for extra sparkle.
- Seal the design with a top coat.
Speckled Elegance
For a simple yet elegant look, these speckled nails are perfect. Featuring a pale grey base with subtle gold speckles, this design is understated and chic. Ideal for a mother of the bride or a guest looking for a classy manicure that complements any outfit.

Consumables:
-
- Base coat: Zoya Anchor Base Coat
- Grey polish: Essie Nail Polish in “Chinchilly”
- Gold speckles: China Glaze Nail Lacquer in “I’m Not Lion”
- Top coat: OPI Top Coat
Creating the Look at Home:
-
- Apply a base coat and let it dry.
- Apply two coats of grey polish and let each coat dry thoroughly.
- Add gold speckles using a small brush or a dotting tool.
- Finish with a top coat to seal and protect the design.
Subtle Sparkle
These nails offer a subtle yet sophisticated look with a nude base and a single accent nail featuring gold glitter. This design is perfect for a bride or a bridesmaid who prefers a minimalist approach but still wants a touch of glamour.

Consumables:
-
- Base coat: Sally Hansen Double Duty Base & Top Coat
- Nude polish: Essie Nail Polish in “Ballet Slippers”
- Gold glitter polish: OPI Nail Lacquer in “All Sparkly and Gold”
- Top coat: Essie Good to Go Top Coat
Creating the Look at Home:
-
- Apply a base coat and let it dry.
- Apply two coats of nude polish to all nails.
- Paint the accent nail with gold glitter polish.
- Finish with a top coat to ensure longevity.
Marble Swirls
These marble nails are a stunning option for a bride looking for a trendy yet elegant design. The mix of nude and purple marble swirls creates a sophisticated and unique look, perfect for standing out on the big day.

Consumables:
-
- Base coat: OPI Natural Nail Base Coat
- Nude polish: Sally Hansen Hard as Nails Xtreme Wear in “Bare It All”
- Purple polish: China Glaze Nail Lacquer in “Coconut Kiss”
- Nail art brush: Winstonia Nail Art Brushes
- Top coat: Seche Vite Dry Fast Top Coat
Creating the Look at Home:
-
- Apply a base coat and let it dry.
- Apply the nude polish as the base.
- Use a nail art brush to create purple marble swirls on each nail.
- Finish with a top coat to seal the design and add shine.
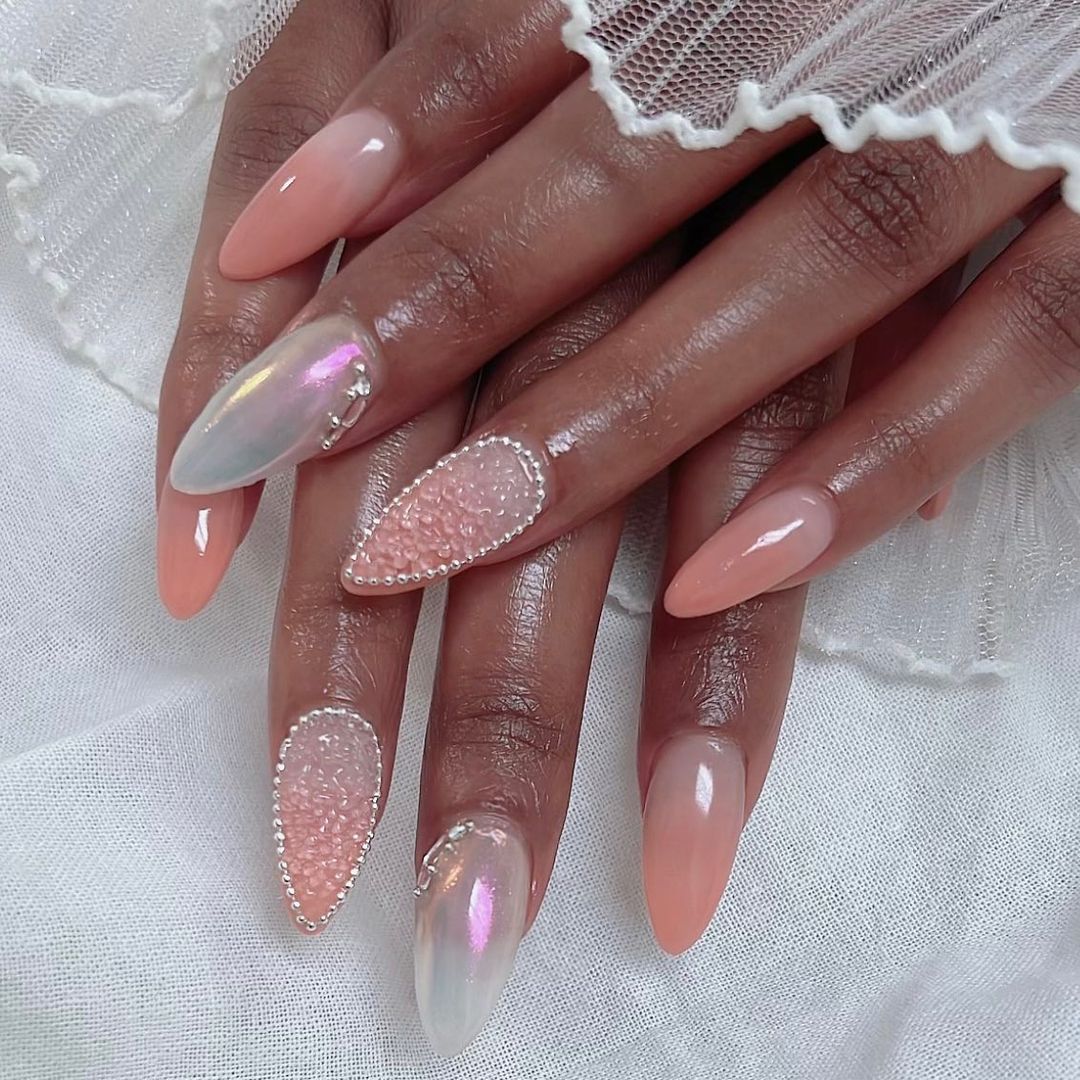
Pearl Perfection
These elegant nails feature a mix of pearlescent and textured designs, perfect for the bride looking to add a touch of sophistication to her look. The iridescent effect on select nails catches the light beautifully, while the textured design adds an element of interest and depth.

Consumables:
-
- Base coat: Essie All In One Base
- Pearlescent polish: Essie Nail Polish in “Pearly White”
- Textured polish: OPI Nail Lacquer in “Gaining Mole-Mentum”
- Pearl accents: Swarovski Pearl Nail Art
- Top coat: Seche Vite Dry Fast Top Coat
- Nail art brush: Winstonia Nail Art Brushes
Creating the Look at Home:
-
- Apply a base coat and let it dry.
- Apply pearlescent polish to select nails and textured polish to others.
- Use a nail art brush to apply pearl accents around the edges of the nails.
- Finish with a top coat to seal and protect the design.
Nude Elegance with Gold Foil
This design showcases a nude base with gold foil accents, creating a sophisticated and classy look. It’s perfect for the bride or mother of the bride who wants a chic and timeless manicure.

Consumables:
-
- Base coat: Sally Hansen Double Duty Base & Top Coat
- Nude polish: OPI Nail Lacquer in “Dulce de Leche”
- Gold foil: Born Pretty Gold Foil Nail Art Stickers
- Top coat: Essie Good to Go Top Coat
Creating the Look at Home:
-
- Apply a base coat to protect your nails.
- Apply two coats of nude polish and let it dry completely.
- Use tweezers to apply gold foil accents to the tips of each nail.
- Finish with a top coat to seal and add shine.
Clear Gold Foil Stilettos
For a bold and glamorous look, these stiletto nails feature a clear base with gold foil embedded throughout. This design is perfect for a bride who wants to make a statement with her manicure.

Consumables:
-
- Base coat: OPI Natural Nail Base Coat
- Clear polish: Sally Hansen Hard as Nails Xtreme Wear in “Invisible”
- Gold foil: Born Pretty Gold Foil Nail Art Stickers
- Top coat: Seche Vite Dry Fast Top Coat
Creating the Look at Home:
-
- Apply a base coat and let it dry.
- Apply a clear polish as the base and let it dry completely.
- Use tweezers to place gold foil pieces strategically on each nail.
- Finish with a top coat to seal the design.
Sparkling Short Nails
These nails feature a soft pink base with sparkling glitter accents, perfect for a bridesmaid or guest. The short length makes them practical, while the glitter adds a festive touch suitable for a wedding.

Consumables:
-
- Base coat: Essie All In One Base
- Pink polish: Essie Nail Polish in “Ballet Slippers”
- Glitter top coat: China Glaze Nail Lacquer in “Fairy Dust”
- Top coat: Sally Hansen Miracle Gel Top Coat
Creating the Look at Home:
-
- Apply a base coat and let it dry.
- Apply two coats of pink polish and let each coat dry completely.
- Apply a glitter top coat to add sparkle.
- Seal with a top coat for durability.
Gold Flake Simplicity
This design is simple yet elegant, featuring a nude base with scattered gold flakes. It’s perfect for a guest looking for a minimalist but stylish manicure for a fall wedding.

Consumables:
-
- Base coat: Zoya Anchor Base Coat
- Nude polish: OPI Nail Lacquer in “Samoan Sand”
- Gold flakes: Born Pretty Gold Flake Nail Art
- Top coat: Essie Good to Go Top Coat
Creating the Look at Home:
-
- Apply a base coat and let it dry.
- Apply two coats of nude polish and let each coat dry.
- Use tweezers to apply gold flakes randomly on each nail.
- Finish with a top coat to seal the design.
Ombre French with Floral Accents
These nails offer a modern twist on the classic French manicure, featuring an ombre effect with white tips and delicate floral accents. This design is ideal for a bride who wants a blend of traditional and contemporary styles.

Consumables:
-
- Base coat: OPI Natural Nail Base Coat
- Pink polish: Essie Nail Polish in “Mademoiselle”
- White polish: OPI Nail Lacquer in “Alpine Snow”
- Floral decals: Born Pretty Store
- Top coat: Seche Vite Dry Fast Top Coat
Creating the Look at Home:
-
- Apply a base coat and let it dry.
- Create an ombre effect by blending pink and white polish on a sponge and dabbing it onto the nails.
- Apply floral decals to the base of the nails.
- Finish with a top coat to seal and protect the design.
Colorful Floral Stilettos
These vibrant stiletto nails feature a nude base with colorful floral designs, perfect for a bridesmaid or a bold guest. The bright colors and intricate details make this design stand out beautifully.

Consumables:
-
- Base coat: Essie All In One Base
- Nude polish: OPI Nail Lacquer in “Samoan Sand”
- Nail art paints: Various colors from Born Pretty Store
- Top coat: Seche Vite Dry Fast Top Coat
- Nail art brush: Winstonia Nail Art Brushes
Creating the Look at Home:
-
- Apply a base coat and let it dry.
- Apply the nude polish as the base and let it dry completely.
- Use nail art brushes to paint floral designs on each nail.
- Finish with a top coat to seal the design.
Save Pin
