
22 Stunning Ideas Fall Burnt Orange Nail Designs: Short, Acrylic, and Gel Nails
When it comes to autumn-inspired manicures, fall burnt orange nail designs are a top choice. The rich, warm hues of burnt orange capture the essence of fall, making them a perfect choice for your nails. Whether you prefer simple and classic looks or more elaborate designs, there’s something for everyone. Let’s dive into some stunning fall burnt orange nail designs for 2024 that will elevate your manicure game.
Burnt Orange Classic Gel Nails
For a timeless and sophisticated look, these fall burnt orange nails are perfect. The glossy finish adds a touch of elegance, making them suitable for any occasion. The rich, burnt orange color is reminiscent of autumn leaves, providing a warm and cozy feel.

This design is all about simplicity and elegance. The glossy gel finish gives it a high-shine look that is both classy and versatile. The color itself is deep and vibrant, perfect for the fall season.
Consumables:
-
- Burnt orange gel polish (e.g., OPI GelColor in “My Italian is a Little Rusty”)
- Base coat (e.g., OPI GelColor Base Coat)
- Top coat (e.g., OPI GelColor Top Coat)
- UV/LED lamp for curing
Creation Instructions:
-
- Start with a clean, manicured nail.
- Apply a base coat and cure under a UV/LED lamp.
- Apply two coats of burnt orange gel polish, curing each layer.
- Finish with a top coat and cure.
- Wipe off any sticky residue with a lint-free wipe soaked in alcohol.
Matte Burnt Orange with Black Accents
For those who love a bold statement, this matte burnt orange nail design with black celestial accents is a showstopper. The matte finish combined with intricate black designs adds a touch of mystery and sophistication.

This design is perfect for those who want to make a bold statement. The matte finish gives it a unique texture, while the black celestial accents add a trendy and artistic flair.
Consumables:
-
- Matte burnt orange nail polish (e.g., Essie Matte in “Playing Koi”)
- Black nail art pen or brush (e.g., Sally Hansen Nail Art Pen in Black)
- Matte top coat (e.g., OPI Matte Top Coat)
Creation Instructions:
-
- Apply a base coat to your clean nails.
- Apply two coats of matte burnt orange polish, allowing each to dry thoroughly.
- Using a black nail art pen, draw celestial designs (stars, moons) on each nail.
- Seal the design with a matte top coat.
Burnt Orange Ombre Coffin Nails
For a chic and modern look, these burnt orange ombre nails are perfect. The gradient effect from light to dark burnt orange adds depth and dimension, making them a stunning choice for fall.

Ombre nails are always in style, and this burnt orange gradient is perfect for fall. The coffin shape adds a modern twist, making these nails stand out.
Consumables:
-
- Light and dark burnt orange nail polishes (e.g., OPI in “Crawfishin’ for a Compliment” and “It’s a Piazza Cake”)
- Makeup sponge for blending
- Base and top coat (e.g., Seche Vite Base Coat and Top Coat)
Creation Instructions:
-
- Apply a base coat to your nails.
- Paint the light burnt orange polish on the top half of the makeup sponge and the dark burnt orange on the bottom half.
- Dab the sponge on your nails to create the ombre effect, blending the colors seamlessly.
- Apply a top coat to smooth out the gradient and add shine.
Intricate Burnt Orange and Gold Acrylic Nails
For those who love intricate designs, these burnt orange and gold acrylic nails are a masterpiece. The combination of burnt orange polish, gold glitter, and detailed line work creates a luxurious and eye-catching look.

This design is all about luxury and detail. The gold accents complement the burnt orange base beautifully, creating a manicure that is both festive and elegant.
Consumables:
-
- Burnt orange acrylic powder (e.g., Mia Secret Acrylic Powder in “Burnt Orange”)
- Gold glitter (e.g., Young Nails Gold Dust)
- Acrylic liquid and brush
- Base and top coat (e.g., Kiara Sky Base Coat and Top Coat)
Creation Instructions:
-
- Apply a base coat and let it dry.
- Using the acrylic liquid and powder, sculpt the burnt orange nails.
- Apply gold glitter to the tips or as an accent.
- Seal the design with a top coat.
Burnt Orange Stiletto Gel Nails
For a fierce and bold look, these burnt orange stiletto nails are perfect. The sharp stiletto shape combined with the glossy gel finish makes a strong statement.

Stiletto nails are perfect for making a bold statement. The burnt orange color is vibrant and eye-catching, and the glossy finish adds an extra touch of glam.
Consumables:
-
- Burnt orange gel polish (e.g., Gelish in “All About the Pout”)
- Base and top coat (e.g., Gelish Foundation and Top It Off)
- UV/LED lamp for curing
Creation Instructions:
-
- Apply a base coat and cure.
- Apply two coats of burnt orange gel polish, curing each layer.
- Finish with a top coat and cure.
Burnt Orange Gel Nails with a Cozy Feel
These short, glossy fall burnt orange nails are perfect for a cozy autumn day. The rich color and smooth finish create a polished and elegant look, ideal for everyday wear or special occasions.

The warm, burnt orange hue is striking against the natural nail, and the glossy gel finish adds a sophisticated touch. This simple yet chic design is versatile and easy to maintain.
Consumables:
-
- Burnt orange gel polish (e.g., OPI GelColor in “It’s a Piazza Cake”)
- Base coat (e.g., OPI GelColor Base Coat)
- Top coat (e.g., OPI GelColor Top Coat)
- UV/LED lamp for curing
Creation Instructions:
-
- Clean and prep your nails.
- Apply a base coat and cure under a UV/LED lamp.
- Apply two coats of burnt orange gel polish, curing each layer.
- Finish with a top coat and cure.
- Wipe off any sticky residue with a lint-free wipe soaked in alcohol.
Glossy Burnt Orange Nails
These fall burnt orange nails short are perfect for those who prefer a classic and glossy look. The intense shine and vibrant color make them stand out, adding a touch of elegance to any outfit.

The high-gloss finish of these nails is perfect for showcasing the deep, rich burnt orange color. This design is both timeless and trendy, making it a great choice for fall.
Consumables:
-
- Burnt orange nail polish (e.g., Essie Gel Couture in “Spool Me Over”)
- Base coat (e.g., Seche Clear Base Coat)
- Top coat (e.g., Seche Vite Top Coat)
Creation Instructions:
-
- Prep your nails with a base coat.
- Apply two coats of burnt orange polish, allowing each to dry thoroughly.
- Seal with a high-gloss top coat.
Autumn Leaves and Glitter
This design features fall burnt orange nails accented with autumn leaves and glitter. The combination of solid burnt orange nails and decorative accent nails creates a festive and fun look perfect for fall.

This design captures the essence of fall with its vibrant burnt orange base and glittery leaf accents. It’s a playful yet sophisticated look that’s perfect for the season.
Consumables:
-
- Burnt orange nail polish (e.g., Sally Hansen Miracle Gel in “Per-Suede”)
- Gold glitter polish (e.g., Zoya in “Astra”)
- Leaf nail stickers or decals
- Base and top coat (e.g., Essie All In One Base and Top Coat)
Creation Instructions:
-
- Apply a base coat to your nails.
- Paint most nails with burnt orange polish, leaving a few for accent designs.
- Apply gold glitter polish to the accent nails.
- Add leaf stickers or decals to the glitter nails.
- Seal everything with a top coat.
Burnt Orange Ombre Nails
These burnt orange ombre nails feature a smooth gradient from a lighter to a darker shade of burnt orange. The ombre effect adds depth and dimension, making the nails look chic and modern.

Ombre nails are always a stylish choice, and the burnt orange gradient is perfect for fall. This design is both subtle and striking, making it a versatile option for any occasion.
Consumables:
-
- Light and dark burnt orange nail polishes (e.g., OPI in “It’s a Piazza Cake” and “Spare Me a French Quarter”)
- Makeup sponge for blending
- Base and top coat (e.g., Essie All In One Base and Top Coat)
Creation Instructions:
-
- Apply a base coat to your nails.
- Paint the light burnt orange polish on the top half of the makeup sponge and the dark burnt orange on the bottom half.
- Dab the sponge on your nails to create the ombre effect, blending the colors seamlessly.
- Apply a top coat to smooth out the gradient and add shine.
Glossy Burnt Orange Almond Nails
These glossy burnt orange nails are shaped into a flattering almond shape, providing a modern and elegant look. The rich color and shiny finish make them a standout choice for fall.

The almond shape is both flattering and stylish, while the glossy burnt orange color adds a warm and sophisticated touch. This design is perfect for those who want a chic yet simple look.
Consumables:
-
- Burnt orange nail polish (e.g., CND Vinylux in “Uninhibited”)
- Base coat (e.g., CND Vinylux Long Wear Base Coat)
- Top coat (e.g., CND Vinylux Long Wear Top Coat)
Creation Instructions:
-
- Shape your nails into an almond shape.
- Apply a base coat and let it dry.
- Apply two coats of burnt orange polish, allowing each to dry thoroughly.
- Finish with a glossy top coat.
Minimalist Burnt Orange Waves
These fall burnt orange nail designs feature delicate, wavy lines on a nude base, creating a minimalist yet eye-catching look. The simplicity of the design makes it versatile and suitable for any occasion.

The nude base combined with burnt orange waves gives a chic and understated look. It’s perfect for those who prefer a minimalist design but still want to embrace the fall aesthetic.
Consumables:
-
- Nude base coat (e.g., Essie in “Ballet Slippers”)
- Burnt orange nail art pen or brush (e.g., Sally Hansen Nail Art Pen in Orange)
- Top coat (e.g., Seche Vite Top Coat)
Creation Instructions:
-
- Apply a base coat and let it dry.
- Using the burnt orange nail art pen, draw wavy lines on each nail.
- Seal the design with a top coat.
Glossy Burnt Orange and Gold Foil
These nails showcase a vibrant burnt orange color with a glossy finish, accented by a clear nail with gold foil details. The combination of bold color and delicate gold accents creates a striking look.

The bright burnt orange polish is perfectly complemented by the gold foil accent, adding a touch of luxury and elegance to the manicure. This design is perfect for those who love a bit of glam.
Consumables:
-
- Burnt orange nail polish (e.g., OPI in “A Good Man-darin is Hard to Find”)
- Gold foil (e.g., Born Pretty Gold Foil)
- Base and top coat (e.g., Essie All In One Base and Top Coat)
Creation Instructions:
-
- Apply a base coat to your nails.
- Paint most nails with burnt orange polish, leaving one or two accent nails clear.
- Apply gold foil to the clear accent nails.
- Seal everything with a top coat.
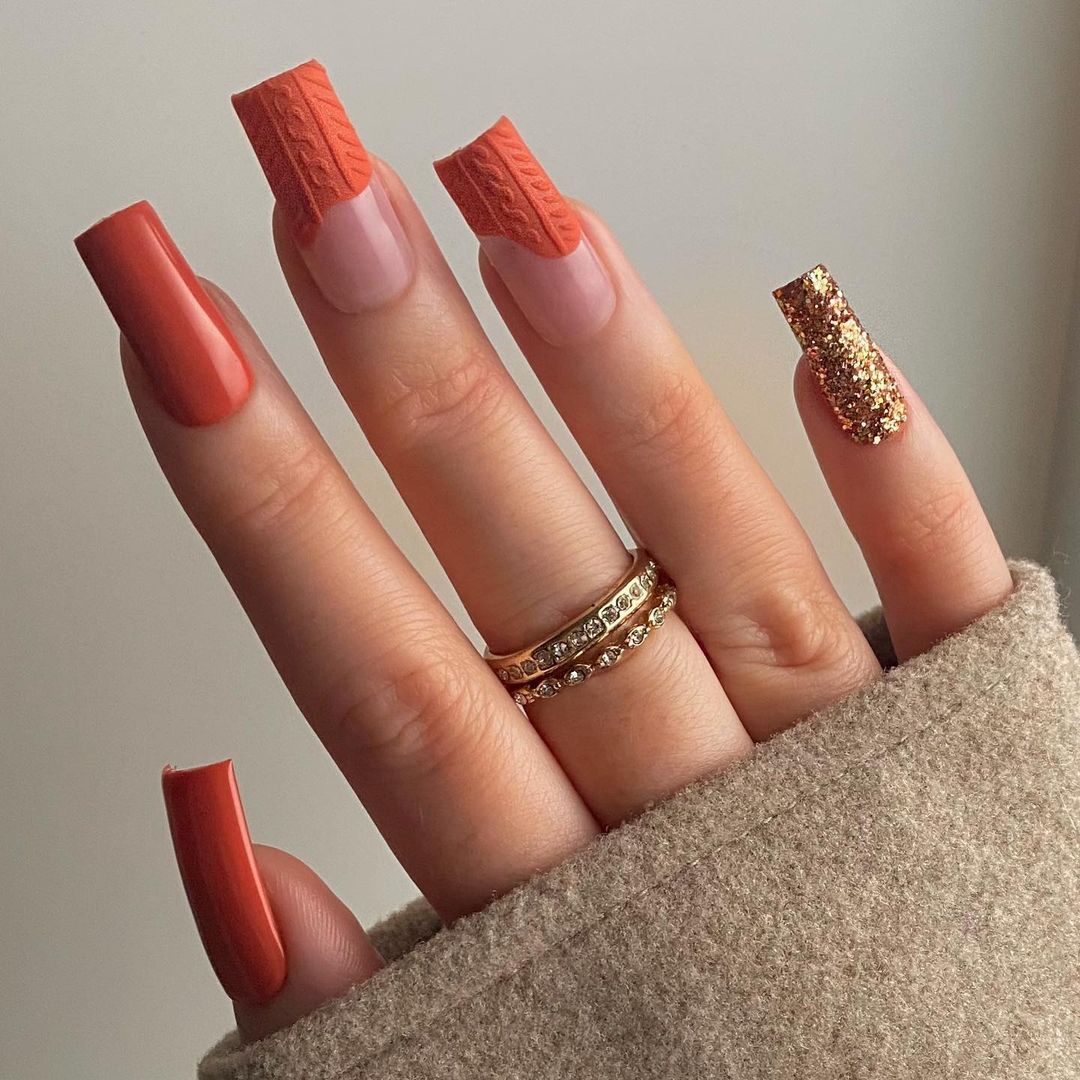
Burnt Orange Sweater Nails
These fall burnt orange nails are inspired by cozy sweaters, featuring a textured sweater design on a couple of nails, along with a glitter accent nail. The combination of textures and colors makes this design unique and festive.

The textured sweater design adds a fun and cozy element to this manicure. Paired with the glitter accent, it creates a playful yet sophisticated look that’s perfect for fall.
Consumables:
-
- Burnt orange nail polish (e.g., Zoya in “Autumn”)
- Textured sweater nail art tools or stickers
- Gold glitter polish (e.g., Deborah Lippmann in “Boom Boom Pow”)
- Base and top coat (e.g., Essie All In One Base and Top Coat)
Creation Instructions:
-
- Apply a base coat to your nails.
- Paint most nails with burnt orange polish.
- Use textured sweater tools or stickers to create the sweater design on a couple of nails.
- Apply gold glitter polish to one accent nail.
- Seal everything with a top coat.
Burnt Orange and Speckled Nails
These nails feature a mix of solid burnt orange, speckled yellow, and black and white spotted designs. The combination of different patterns and colors creates a playful and unique look.

This design is a fun mix of colors and patterns, making it perfect for someone who loves to experiment with their manicure. The speckled and spotted accents add a trendy touch.
Consumables:
-
- Burnt orange nail polish (e.g., China Glaze in “Life Preserved”)
- Yellow polish with speckles (e.g., Ciaté in “Big Yellow Taxi”)
- Black and white polish for spots (e.g., Sinful Colors in “Black on Black” and “Snow Me White”)
- Base and top coat (e.g., Sally Hansen Complete Care)
Creation Instructions:
-
- Apply a base coat to your nails.
- Paint each nail with the different polishes as desired.
- Use a dotting tool to create black and white spots on one nail.
- Seal everything with a top coat.
Long Burnt Orange Ombre Nails
These long nails feature a smooth gradient from a lighter to a darker shade of burnt orange. The ombre effect adds depth and dimension, making the nails look chic and modern.

Ombre nails are always a stylish choice, and the burnt orange gradient is perfect for fall. This design is both subtle and striking, making it a versatile option for any occasion.
Consumables:
-
- Light and dark burnt orange nail polishes (e.g., OPI in “It’s a Piazza Cake” and “Spare Me a French Quarter”)
- Makeup sponge for blending
- Base and top coat (e.g., Essie All In One Base and Top Coat)
Creation Instructions:
-
- Apply a base coat to your nails.
- Paint the light burnt orange polish on the top half of the makeup sponge and the dark burnt orange on the bottom half.
- Dab the sponge on your nails to create the ombre effect, blending the colors seamlessly.
- Apply a top coat to smooth out the gradient and add shine.
Burnt Orange with Gold Stars
These fall burnt orange nails feature a mix of solid burnt orange and nude nails with delicate gold star accents. The combination of bold color and subtle sparkle creates a balanced and elegant look.

The contrast between the solid burnt orange and the delicate gold stars on the nude base creates a harmonious and sophisticated design. This manicure is perfect for adding a touch of elegance to your fall look.
Consumables:
-
- Burnt orange nail polish (e.g., OPI in “A Good Man-darin is Hard to Find”)
- Nude nail polish (e.g., Essie in “Ballet Slippers”)
- Gold star decals or nail art stickers
- Base and top coat (e.g., Seche Vite Top Coat)
Creation Instructions:
-
- Apply a base coat to your nails.
- Paint some nails with burnt orange polish and others with nude polish.
- Apply gold star decals to the nude nails.
- Seal everything with a top coat.
Burnt Orange Glitter Nails
These nails feature a rich burnt orange color with a shimmery glitter finish, accented by a single gold leaf detail. The sparkle adds a festive touch to the classic autumn hue.

The glitter finish on these burnt orange nails adds a festive and luxurious touch, while the gold leaf accent provides a unique and elegant detail. This design is perfect for special occasions or adding some sparkle to your everyday look.
Consumables:
-
- Burnt orange glitter polish (e.g., Zoya in “Tosh”)
- Gold leaf nail art
- Base and top coat (e.g., Essie Gel Couture Top Coat)
Creation Instructions:
-
- Apply a base coat to your nails.
- Paint all nails with burnt orange glitter polish.
- Apply gold leaf to an accent nail.
- Seal everything with a top coat.
Burnt Orange French Tips
These nails feature a modern twist on the classic French manicure, with bright burnt orange tips on a nude base. The vibrant tips add a pop of color to the sophisticated design.

The burnt orange French tips provide a fresh and contemporary take on a classic look. This design is perfect for those who want a subtle yet striking manicure.
Consumables:
-
- Burnt orange nail polish (e.g., China Glaze in “Life Preserved”)
- Nude nail polish (e.g., Essie in “Topless & Barefoot”)
- French tip guides or a steady hand
- Base and top coat (e.g., Orly Bonder Base Coat and Orly Sec ‘N Dry Top Coat)
Creation Instructions:
-
- Apply a base coat to your nails.
- Paint nails with nude polish.
- Use French tip guides to apply burnt orange polish to the tips.
- Seal everything with a top coat.
Burnt Orange Floral Accents
These nails feature a cheerful burnt orange color with white floral accents. The combination of the vibrant base color and delicate floral details creates a fun and feminine look.

The floral accents on these burnt orange nails add a playful and charming touch. This design is great for those who want to add a bit of whimsy to their manicure.
Consumables:
-
- Burnt orange nail polish (e.g., Essie in “Playing Koi”)
- White nail polish (e.g., OPI in “Alpine Snow”)
- Dotting tool or nail art brush for floral designs
- Base and top coat (e.g., Sally Hansen Complete Care)
Creation Instructions:
-
- Apply a base coat to your nails.
- Paint nails with burnt orange polish.
- Use a dotting tool or brush to create white floral designs on accent nails.
- Seal everything with a top coat.
Burnt Orange Marble Tips
These nails feature a nude base with marble burnt orange tips, creating a sophisticated and modern look. The marble effect adds an artistic touch to the classic French manicure style.

The marble tips add a unique and artistic element to the classic French manicure. This design is perfect for those who want to elevate their nail game with a modern twist.
Consumables:
-
- Burnt orange nail polish (e.g., OPI in “It’s a Piazza Cake”)
- Nude nail polish (e.g., Essie in “Mademoiselle”)
- Fine nail art brush or marble nail tool
- Base and top coat (e.g., Essie Gel Couture Top Coat)
Creation Instructions:
-
- Apply a base coat to your nails.
- Paint nails with nude polish.
- Use a fine brush or marble tool to create marble tips with burnt orange polish.
- Seal everything with a top coat.
Bright Burnt Orange Nails
These bright burnt orange nails are perfect for those who love bold and vibrant colors. The glossy finish adds a touch of elegance to the striking hue.

The bold and vibrant burnt orange color is perfect for making a statement. The glossy finish adds a polished and sophisticated touch to this simple yet striking design.
Consumables:
-
- Burnt orange nail polish (e.g., OPI in “A Good Man-darin is Hard to Find”)
- Base and top coat (e.g., Seche Vite Top Coat)
Creation Instructions:
-
- Apply a base coat to your nails.
- Paint nails with two coats of burnt orange polish, allowing each to dry thoroughly.
- Seal with a glossy top coat.
Burnt Orange Short Almond Nails
These fall burnt orange nails are styled in a short almond shape, offering a chic and sophisticated look. The glossy finish enhances the deep burnt orange color, making these nails perfect for everyday wear or special occasions.

The short almond shape is both practical and stylish, providing a sleek and polished appearance. The glossy finish on the burnt orange color adds a touch of elegance, making this design versatile and sophisticated.
Consumables:
-
- Burnt orange nail polish (e.g., OPI in “My Italian is a Little Rusty”)
- Base and top coat (e.g., Seche Vite Base Coat and Top Coat)
Creation Instructions:
-
- Shape your nails into a short almond shape.
- Apply a base coat to protect your nails.
- Paint nails with two coats of burnt orange polish, allowing each coat to dry thoroughly.
- Finish with a glossy top coat to seal and add shine.
Save Pin
