
When it comes to nail art, adding glitter can elevate even the simplest designs to something truly spectacular. But with so many options out there, how do you choose the perfect glitter nail color? In this article, we’ll dive into some of the most eye-catching nail colors glitter ideas, complete with detailed descriptions, consumable lists, and practical tips for recreating these designs at home. Whether you’re aiming for a subtle shimmer or a full-on sparkling masterpiece, we’ve got you covered.
Subtle Pink Glitter Ombre
This elegant pink ombre design features a soft, babyboomer gradient that transitions from a delicate blush pink to a nearly transparent tip, enhanced by a touch of iridescent glitter. The combination of subtle pink tones with shiny specks creates a classy yet playful look, perfect for any occasion. The almond french shape adds an extra touch of sophistication, making this design suitable for both daily wear and special events.

Consumables
- Base coat: DND Gel Base Coat
- Pink polish: DND Gel Polish in “Pink Peony”
- Glitter topcoat: OPI Glitter Top Coat in “Northern Lights”
- Nail brush: Gelish Ombre Brush
- LED/UV lamp: Gelish 18G LED Lamp
Creation Steps
- Apply a base coat to all nails and cure under an LED lamp.
- Use a sponge to create the ombre effect, starting with DND Gel Polish in “Pink Peony” at the base and fading out towards the tip.
- Once dry, apply the OPI Glitter Top Coat for a sparkle finish, focusing more on the tips.
- Seal with a top coat and cure once more.
Glittering French and Sparkle Accents
For those who love a bold French tip, this design takes it up a notch with sparkling glitter accents. The mix of babyboom pink, shiny white, and glitter overlays create a luxurious and trendy manicure. The combination of gel and glitter polish ensures a long-lasting finish, making it perfect for festive occasions or a glamorous night out.

Consumables
- French white polish: OPI GelColor in “Funny Bunny”
- Pink base: OPI GelColor in “Bubble Bath”
- Glitter: Swarovski Crystal Pixie Dust
- Top coat: Essie Gel Couture Top Coat
- Nail brush: Zoya Detailer Brush
- LED/UV lamp: Gelish 18G LED Lamp
Creation Steps
- Start by applying the pink base coat to all nails and curing it under an LED lamp.
- Use a fine nail brush to paint the French tips with OPI “Funny Bunny,” then cure.
- Apply Swarovski Crystal Pixie Dust along the tips and accent nails for a sparkling finish.
- Seal everything with Essie Gel Couture Top Coat and cure one last time.
Pink and White Glitter Floral Design
This design perfectly balances cute and elegant with pink and white glitter accents, combined with delicate floral patterns. The short square nails are ideal for those who prefer a more practical length while still wanting to make a statement. The gel polish ensures the design stays vibrant and intact, while the glitter adds a touch of shine that catches the light beautifully.

Consumables
- Base coat: Gelish Foundation Base Coat
- Pink polish: Essie Gel Couture in “Fairy Tailor”
- White polish: OPI GelColor in “Alpine Snow”
- Glitter: Kiara Sky Dip Powder in “Pixie Dust”
- Floral decals: Whats Up Nails Floral Nail Art Stickers
- Top coat: CND Vinylux Weekly Top Coat
- LED/UV lamp: SUNUV LED Nail Lamp
Creation Steps
- Apply the Gelish Foundation Base Coat and cure it under the LED lamp.
- Paint the nails with Essie Gel Couture in “Fairy Tailor” for a soft pink base.
- Add a French tip using OPI GelColor in “Alpine Snow,” then cure.
- Apply the Kiara Sky Dip Powder to the tips for a glittery sparkle.
- Add floral decals to accent nails and finish with the CND Vinylux Weekly Top Coat before curing.
Purple Glitter French Tips
For a more sophisticated twist on a classic look, these purple glitter French tips are a perfect choice. The short nails keep the design practical, while the glitter adds a layer of luxury. The purple shade is striking yet subtle, making this design ideal for both everyday wear and special occasions.

Consumables
- Base coat: Gelish Foundation Base Coat
- Purple polish: DND Gel Polish in “Plum Wine”
- Glitter: CND Additives in “Amethyst Sparkle”
- Nail brush: Beetles Detail Nail Art Brush
- Top coat: Gelish Top It Off Top Coat
- LED/UV lamp: MelodySusie UV LED Lamp
Creation Steps
- Start by applying a base coat and cure it under the LED lamp.
- Paint a thin line of DND Gel Polish in “Plum Wine” along the tips of each nail, creating a classic French tip.
- Apply CND Additives “Amethyst Sparkle” over the purple tips for a shimmering effect.
- Finish with Gelish Top It Off Top Coat and cure once again to seal in the shine.
Nude Glitter Almond Tips
These almond french nails are both subtle and sparkling, thanks to the nude base and glittery tips. This design is perfect for someone who wants to add a bit of shine without going overboard. The gel polish and almond shape give the nails a sleek and elegant look, ideal for any occasion from a day at the office to a night out.

Consumables
- Base coat: CND Stickey Base Coat
- Nude polish: OPI GelColor in “Samoan Sand”
- Glitter: Young Nails “Mission Control Gel” in “Halo”
- Nail brush: PANA Detailer Brush
- Top coat: Essie Gel Couture Top Coat
- LED/UV lamp: Makartt Nail Lamp
Creation Steps
- Apply the CND Stickey Base Coat and cure it under the LED lamp.
- Paint the nails with OPI GelColor in “Samoan Sand” and cure.
- Using a detail brush, apply Young Nails “Mission Control Gel” in “Halo” to the tips for a sparkling effect.
- Seal with Essie Gel Couture Top Coat and cure to lock in the shine.
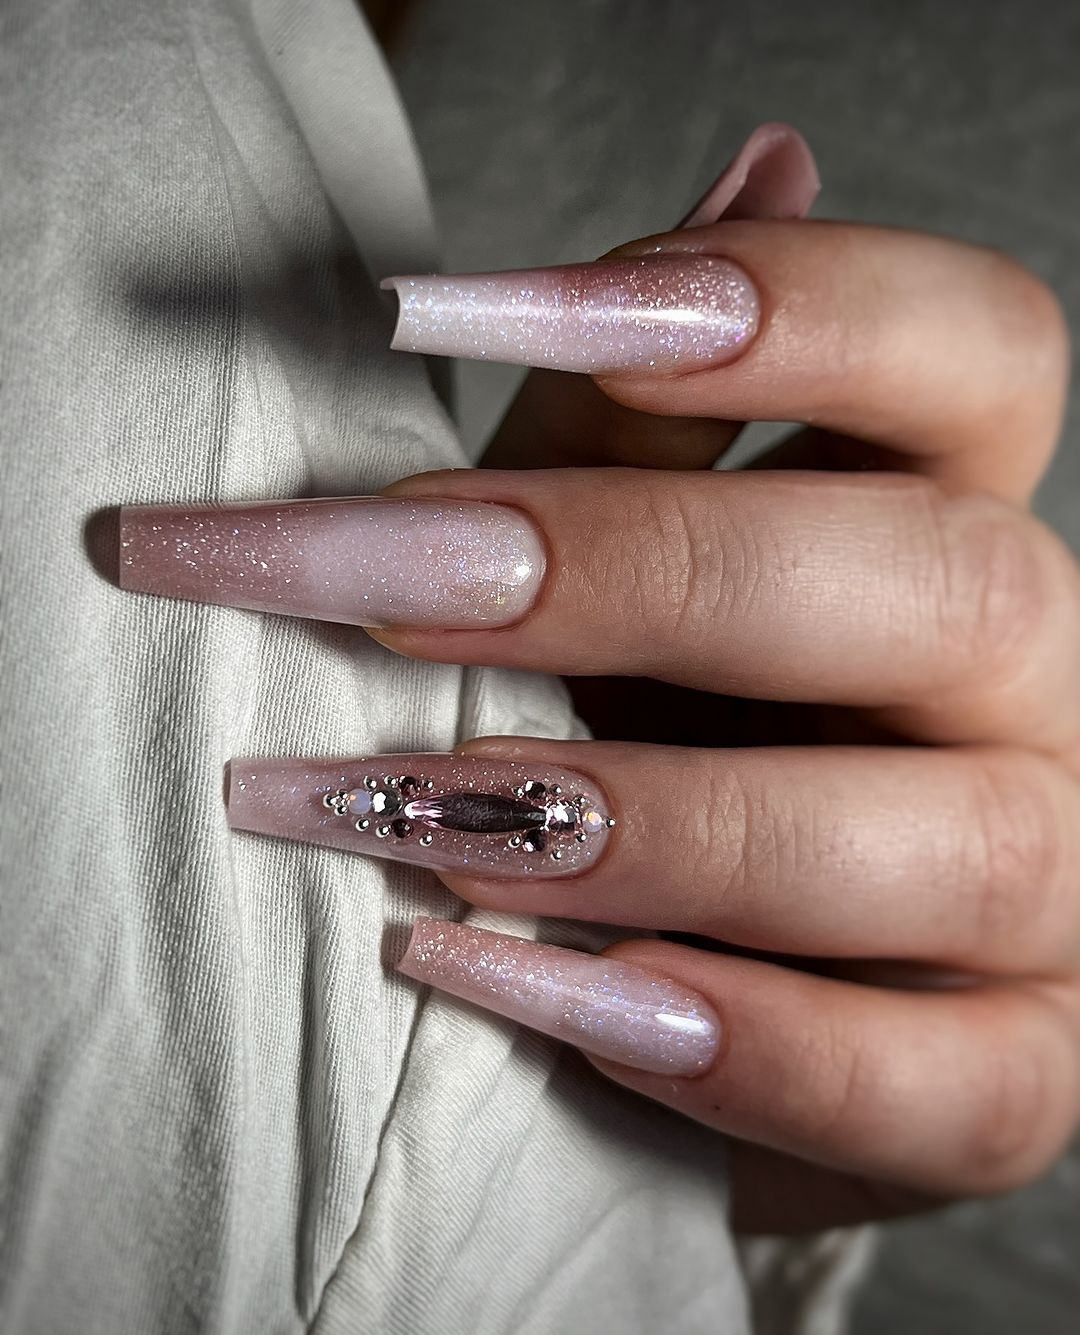
Pink Glitter with Rhinestone Accents
This pink glitter manicure is all about sparkle and glamour. The short nails feature a combination of glittery pink and a smooth, glossy finish, enhanced with rhinestone accents that add a touch of elegance. The simplicity of the design paired with the eye-catching details makes it a versatile option, perfect for any event, from casual outings to more formal settings.

Consumables
- Base coat: Essie Gel Couture Base Coat
- Pink glitter polish: DND Gel Polish in “Pink Diamond”
- Rhinestones: Swarovski Crystal AB Rhinestones
- Top coat: Sally Hansen Miracle Gel Top Coat
- Nail brush: Pana Nail Art Brush
- LED/UV lamp: SUNUV LED Nail Lamp
Creation Steps
- Apply the Essie Gel Couture Base Coat to all nails and cure under the LED lamp.
- Use DND Gel Polish in “Pink Diamond” for the glittery nails and cure.
- Apply the rhinestones to the accent nails while the polish is still tacky, then cure.
- Seal with Sally Hansen Miracle Gel Top Coat and cure to secure the rhinestones and add shine.
Black Glitter French Tips with Rhinestones
This design combines the elegance of a French manicure with the boldness of black glitter and rhinestone accents. The result is a dramatic and trendy look that’s sure to turn heads. The ombre effect created by the black glitter tips contrasts beautifully with the nude base, making this design perfect for a night out or any event where you want to make a statement.

Consumables
- Base coat: Gelish Foundation Base Coat
- Nude polish: OPI GelColor in “Samoan Sand”
- Black glitter: Kiara Sky Dip Powder in “Midnight Kiss”
- Rhinestones: Swarovski Black Diamond Rhinestones
- Top coat: Gelish Top It Off Top Coat
- Nail brush: Pana Nail Art Brush
- LED/UV lamp: MelodySusie UV LED Lamp
Creation Steps
- Start with the Gelish Foundation Base Coat and cure under the LED lamp.
- Apply OPI GelColor in “Samoan Sand” for the nude base and cure.
- Use Kiara Sky Dip Powder in “Midnight Kiss” for the black glitter tips and create a French design, then cure.
- Add Swarovski Black Diamond Rhinestones along the cuticles for extra glamour, then finish with Gelish Top It Off Top Coat and cure for a shiny finish.
Teal Glitter Wave Design
This shiny and mesmerizing teal wave design brings a fresh and vibrant look to your nails. The almond shape enhances the flowing lines of the glittery teal, which contrasts beautifully with the soft nude base. This design is not only eye-catching but also trendy and cute, perfect for those who want a manicure that stands out.

Consumables
- Base coat: CND Stickey Base Coat
- Nude polish: Essie Gel Couture in “Matter of Fiction”
- Teal glitter polish: OPI GelColor in “Teal the Cows Come Home”
- Nail art brush: Beetles Detailer Brush
- Top coat: Essie Gel Couture Top Coat
- LED/UV lamp: SUNUV LED Nail Lamp
Creation Steps
- Begin by applying the CND Stickey Base Coat and curing under the LED lamp.
- Apply Essie Gel Couture in “Matter of Fiction” as the nude base and cure.
- Using the Beetles Detailer Brush, paint the teal wave design with OPI GelColor in “Teal the Cows Come Home,” then cure.
- Finish with Essie Gel Couture Top Coat and cure for a sparkling and durable finish.
Blue Marbled Glitter French Tips
This cute and sophisticated design features marbled blue glitter French tips that create a stunning contrast with the nude base. The swirling patterns of the blue glitter evoke a sense of movement, adding depth and complexity to the manicure. This design is perfect for someone looking to make a statement with a trendy and sparkling nail look.

Consumables
- Base coat: Essie First Base Coat
- Nude polish: OPI GelColor in “Bubble Bath”
- Blue glitter: China Glaze Nail Lacquer in “Blue Iguana”
- Nail art brush: Zoya Nail Art Brush
- Top coat: CND Vinylux Weekly Top Coat
- LED/UV lamp: Gelish 18G LED Lamp
Creation Steps
- Start with Essie First Base Coat and cure under the LED lamp.
- Apply OPI GelColor in “Bubble Bath” for the nude base and cure.
- Create the marbled effect using China Glaze Nail Lacquer in “Blue Iguana” for the French tips, and cure.
- Seal the design with CND Vinylux Weekly Top Coat and cure for a shiny and durable finish.
Red and Gold Glitter Diagonal French Tips
For a trendy and bold look, these red and gold glitter diagonal French tips offer a stunning combination. The warm tones of red paired with shiny gold glitter create a festive and luxurious manicure. This design is perfect for special occasions, especially around the holidays when you want your nails to sparkle and stand out.

Consumables
- Base coat: Gelish Foundation Base Coat
- Nude polish: Essie Gel Couture in “Spool Me Over”
- Red polish: OPI GelColor in “Big Apple Red”
- Gold glitter: Young Nails “Mission Control” in “Gold Rush”
- Nail art brush: Pana Detail Brush
- Top coat: Gelish Top It Off Top Coat
- LED/UV lamp: MelodySusie UV LED Lamp
Creation Steps
- Apply the Gelish Foundation Base Coat and cure under the LED lamp.
- Paint the nails with Essie Gel Couture in “Spool Me Over” as the nude base and cure.
- Use OPI GelColor in “Big Apple Red” for the diagonal French tips and add Young Nails “Mission Control” in “Gold Rush” along the edge for a sparkling accent, then cure.
- Finish with Gelish Top It Off Top Coat and cure for a long-lasting and shiny finish.
Pink Glitter with Statement Rhinestones
This manicure takes cute and shiny to the next level with its combination of soft pink glitter polish and large, statement-making rhinestones. The babyboomer effect on the accent nail adds a touch of subtle elegance, while the clustered rhinestones bring a bold and glamorous look. This design is perfect for special occasions where you want your nails to be the center of attention.

Consumables
- Base coat: Essie Gel Couture Base Coat
- Pink glitter polish: OPI Nail Lacquer in “Princesses Rule!”
- Rhinestones: Swarovski Crystal AB Mixed Shapes
- Top coat: CND Vinylux Weekly Top Coat
- Nail art brush: Pana Detail Brush
- LED/UV lamp: Gelish 18G LED Lamp
Creation Steps
- Apply the Essie Gel Couture Base Coat and cure under an LED lamp.
- Paint all nails with OPI Nail Lacquer in “Princesses Rule!” and cure.
- Apply the rhinestones to the accent nail while the polish is still tacky, arranging them in a stylish cluster, then cure.
- Seal with CND Vinylux Weekly Top Coat and cure for a sparkling and long-lasting finish.
Shimmering Nude Babyboomer with Rhinestones
This design features a babyboomer style, blending a nude base into a shimmering white tip. The shiny effect of the glitter adds depth and dimension to the nails, while the rhinestone accents on the middle finger create a focal point that is both elegant and eye-catching. This trendy look is perfect for anyone who loves a sophisticated yet glamorous manicure.

Consumables
- Base coat: CND Stickey Base Coat
- Nude polish: OPI GelColor in “Bare My Soul”
- Glitter polish: Essie Gel Couture in “Set in Stones”
- Rhinestones: Swarovski Crystal AB Mix
- Top coat: Sally Hansen Miracle Gel Top Coat
- Nail brush: Pana Detail Brush
- LED/UV lamp: MelodySusie UV LED Lamp
Creation Steps
- Apply the CND Stickey Base Coat and cure under an LED lamp.
- Create the babyboomer effect by applying OPI GelColor in “Bare My Soul” at the base and fading into Essie Gel Couture in “Set in Stones” towards the tip, then cure.
- Add the rhinestones to the middle finger while the polish is still tacky and cure.
- Finish with Sally Hansen Miracle Gel Top Coat and cure for a durable and sparkling finish.
Silver Glitter French Tips
These French tips take on a modern twist with silver glitter that adds a shiny and glamorous finish to the classic nude base. The clean lines and sparkling tips make this design versatile enough for both everyday wear and special occasions. The combination of gel polish ensures that the manicure lasts longer without chipping, keeping your nails looking fresh and cute.

Consumables
- Base coat: Gelish Foundation Base Coat
- Nude polish: OPI GelColor in “Samoan Sand”
- Silver glitter polish: China Glaze Nail Lacquer in “Fairy Dust”
- Top coat: Gelish Top It Off Top Coat
- Nail brush: Beetles Detailer Brush
- LED/UV lamp: SUNUV LED Nail Lamp
Creation Steps
- Begin with Gelish Foundation Base Coat and cure under the LED lamp.
- Apply OPI GelColor in “Samoan Sand” as the nude base and cure.
- Using China Glaze Nail Lacquer in “Fairy Dust,” create silver glitter French tips and cure.
- Finish with Gelish Top It Off Top Coat and cure for a long-lasting and sparkling finish.
Gold Glitter Ombre
This shiny gold glitter ombre design is perfect for those who want a touch of luxury on their nails. The almond french shape accentuates the gradient effect, transitioning from a clear base to the rich, sparkling gold tips. This manicure is ideal for festive occasions or any time you want to add a bit of glam to your look.

Consumables
- Base coat: CND Stickey Base Coat
- Clear polish: OPI GelColor in “Alpine Snow”
- Gold glitter: Young Nails “Mission Control” in “Gold Rush”
- Top coat: Essie Gel Couture Top Coat
- Nail brush: Pana Detailer Brush
- LED/UV lamp: Gelish 18G LED Lamp
Creation Steps
- Apply CND Stickey Base Coat and cure under the LED lamp.
- Paint the nails with OPI GelColor in “Alpine Snow” for a clear base and cure.
- Apply Young Nails “Mission Control” in “Gold Rush” to the tips, blending it downward to create an ombre effect, then cure.
- Seal with Essie Gel Couture Top Coat and cure for a shiny finish that will last.
White and Purple Glitter Combo
This trendy and cute design combines the elegance of white nails with the playful sparkle of purple glitter. The mixture of textures creates a dynamic look that is both sophisticated and fun. The gel polish ensures the colors remain vibrant, while the glitter adds an extra dimension of shine.

Consumables
- Base coat: Essie First Base Coat
- White polish: OPI GelColor in “Funny Bunny”
- Purple glitter: China Glaze Nail Lacquer in “Liquid Crystal”
- Top coat: Gelish Top It Off Top Coat
- Nail art brush: Pana Detail Brush
- LED/UV lamp: MelodySusie UV LED Lamp
Creation Steps
- Start with Essie First Base Coat and cure under the LED lamp.
- Apply OPI GelColor in “Funny Bunny” for the white base and cure.
- Use China Glaze Nail Lacquer in “Liquid Crystal” to apply the purple glitter to the accent nails, then cure.
- Finish with Gelish Top It Off Top Coat and cure for a durable and shiny finish.
Iridescent Blue Glitter on Short Nails
This short nail design showcases a mesmerizing iridescent blue glitter that shifts beautifully under different lighting. The compact length makes it a practical choice, while the shiny and sparkling finish ensures that it still makes a bold statement. The gradient of colors from blue to a hint of green adds a magical touch, making this design perfect for those who want their nails to pop without the need for complex patterns or accents.

Consumables
- Base coat: Essie Gel Couture Base Coat
- Iridescent blue polish: ILNP Nail Polish in “Frosted Glaze”
- Top coat: CND Vinylux Weekly Top Coat
- Nail brush: Beetles Detailer Brush
- LED/UV lamp: SUNUV LED Nail Lamp
Creation Steps
- Start by applying the Essie Gel Couture Base Coat and curing under the LED lamp.
- Paint the nails with ILNP Nail Polish in “Frosted Glaze” to achieve the iridescent effect, then cure.
- Seal with CND Vinylux Weekly Top Coat and cure for a long-lasting and sparkling finish.
Gold Glitter French Tips on Dark Skin
These French tips add a unique twist by incorporating gold glitter, perfectly complementing the rich tones of dark skin. The sharp contrast between the nude base and the glittering tips makes this design both elegant and trendy. The almond shape enhances the overall look, making it suitable for both everyday wear and special occasions.

Consumables
- Base coat: Gelish Foundation Base Coat
- Nude polish: OPI GelColor in “Dulce de Leche”
- Gold glitter: Young Nails “Mission Control” in “Gold Rush”
- Top coat: Gelish Top It Off Top Coat
- Nail brush: Pana Detail Brush
- LED/UV lamp: MelodySusie UV LED Lamp
Creation Steps
- Begin with Gelish Foundation Base Coat and cure under the LED lamp.
- Apply OPI GelColor in “Dulce de Leche” as the base and cure.
- Using Young Nails “Mission Control” in “Gold Rush,” paint the gold glitter tips and cure.
- Finish with Gelish Top It Off Top Coat and cure for a shiny and durable finish.
Pink Glitter Ombre with Star Accents
This cute pink glitter ombre design is elevated with the addition of whimsical star accents. The soft pink base transitions into a sparkling glitter tip, while the star decals add a playful yet elegant touch. This manicure is ideal for those looking to combine trendy with a bit of shine in their everyday look.

Consumables
- Base coat: Essie First Base Coat
- Pink polish: OPI GelColor in “Let Me Bayou a Drink”
- Pink glitter: Kiara Sky Dip Powder in “Twinkle Toes”
- Star decals: Whats Up Nails Star Stickers
- Top coat: CND Vinylux Weekly Top Coat
- LED/UV lamp: Gelish 18G LED Lamp
Creation Steps
- Apply Essie First Base Coat and cure under the LED lamp.
- Use OPI GelColor in “Let Me Bayou a Drink” for the pink base and cure.
- Create the ombre effect by applying Kiara Sky Dip Powder in “Twinkle Toes” to the tips and blending upwards, then cure.
- Apply the star decals to the accent nails, finish with CND Vinylux Weekly Top Coat, and cure for a shiny and sparkling finish.
Simple Nude with a Touch of Glitter
This manicure focuses on a simple nude base with a single glitter accent nail, making it a perfect choice for those who prefer minimalistic designs with a touch of shine. The subtle sparkle of the glitter nail adds just the right amount of glamour without overwhelming the overall look, making it ideal for both casual and formal settings.

Consumables
- Base coat: Gelish Foundation Base Coat
- Nude polish: Essie Gel Couture in “Spool Me Over”
- Glitter polish: OPI GelColor in “Pirouette My Whistle”
- Top coat: Sally Hansen Miracle Gel Top Coat
- Nail brush: Beetles Detailer Brush
- LED/UV lamp: MelodySusie UV LED Lamp
Creation Steps
- Begin with Gelish Foundation Base Coat and cure under the LED lamp.
- Apply Essie Gel Couture in “Spool Me Over” as the nude base and cure.
- Paint the glitter accent nail with OPI GelColor in “Pirouette My Whistle” and cure.
- Finish with Sally Hansen Miracle Gel Top Coat and cure for a long-lasting and shiny finish.
Copper Glitter Gradient with Floral Accents
This design combines a shiny copper glitter gradient with delicate floral accents for a look that’s both elegant and trendy. The gradient effect transitions from a nude base to sparkling copper tips, while the tiny flowers add a feminine touch. This manicure is perfect for those looking to blend natural tones with a bit of sparkle.
Consumables
- Base coat: Essie First Base Coat
- Nude polish: OPI GelColor in “Samoan Sand”
- Copper glitter: Young Nails “Mission Control” in “Copper Rose”
- Floral decals: Whats Up Nails Floral Stickers
- Top coat: Gelish Top It Off Top Coat
- LED/UV lamp: SUNUV LED Nail Lamp
Creation Steps
- Start with Essie First Base Coat and cure under the LED lamp.
- Apply OPI GelColor in “Samoan Sand” for the nude base and cure.
- Create the copper glitter gradient using Young Nails “Mission Control” in “Copper Rose,” blending it from the tips downward, then cure.
- Add floral decals for a delicate touch, seal with Gelish Top It Off Top Coat, and cure for a shiny finish.
Teal Holographic Glitter
This teal holographic glitter manicure is perfect for those who want their nails to stand out. The short length keeps it practical, while the shiny and sparkling finish ensures that the nails catch the light from every angle. This design is perfect for those who love bold colors and a trendy look.

Consumables
- Base coat: CND Stickey Base Coat
- Teal holographic polish: ILNP Nail Polish in “Peacock Feathers”
- Top coat: Essie Gel Couture Top Coat
- Nail brush: Pana Detail Brush
- LED/UV lamp: Gelish 18G LED Lamp
Creation Steps
- Start with CND Stickey Base Coat and cure under the LED lamp.
- Apply ILNP Nail Polish in “Peacock Feathers” to achieve the teal holographic effect, then cure.
- Finish with Essie Gel Couture Top Coat and cure for a shiny and long-lasting finish.
Golden Chrome Finish
For those who love a metallic look, this gold chrome finish is the perfect choice. The shiny and reflective surface gives the nails a luxurious feel, making this design ideal for special occasions or whenever you want to add a bit of sparkle to your look. The gel polish ensures a durable finish that lasts.
Consumables
- Base coat: Gelish Foundation Base Coat
- Gold chrome polish: OPI GelColor in “Gold Digger”
- Top coat: Gelish Top It Off Top Coat
- Nail brush: Beetles Detailer Brush
- LED/UV lamp: MelodySusie UV LED Lamp
Creation Steps
- Begin with Gelish Foundation Base Coat and cure under the LED lamp.
- Apply OPI GelColor in “Gold Digger” to achieve the golden chrome finish, then cure.
- Finish with Gelish Top It Off Top Coat and cure for a shiny and durable finish.
Save Pin
