
When it comes to nail art, nothing says summer like vibrant, tropical designs. Perfect for beach vacations and sunny days, these nail styles bring a touch of paradise to your fingertips. Let’s dive into some stunning tropical nail designs that will make your nails the center of attention this summer.
Flamingo Fantasy
The flamingo nail design is a delightful mix of bright pink and tropical green, evoking the essence of a tropical paradise. The pink flamingo on a pastel background adds a whimsical touch, while the green leaves provide a refreshing contrast.

Consumables:
- Bright pink nail polish (OPI “Strawberry Margarita”)
- Pastel pink nail polish (Essie “Romper Room”)
- Green nail polish (China Glaze “Tree Hugger”)
- Nail art brush
- Top coat (Seche Vite)
Steps to Create:
- Base Color: Apply the pastel pink polish as the base color.
- Flamingo Art: Using a nail art brush, draw a flamingo on the ring finger with the bright pink polish.
- Leaf Details: Add green leaves on the thumb and pinky nails for a tropical touch.
- Finish: Seal the design with a high-shine top coat to keep the colors vibrant and protect the artwork.
Tropical Toucan
This vibrant design features bold orange nails complemented by detailed tropical foliage and a cute toucan. It’s an eye-catching look perfect for beach vacations.

Consumables:
- Bright orange nail polish (OPI “A Good Man-darin is Hard to Find”)
- Green nail polish (Essie “Off Tropic”)
- Black and yellow nail polish for the toucan (Sally Hansen “Black Out” and “Mellow Yellow”)
- Nail art brush
- Top coat (CND Vinylux)
Steps to Create:
- Base Color: Paint all nails with the bright orange polish.
- Foliage Art: Use the green polish to create leaves on the index and pinky nails.
- Toucan Details: On the ring finger, use the nail art brush to draw the toucan with black and yellow polish.
- Seal: Apply the top coat to ensure longevity and shine.
Neon Hibiscus
Neon hibiscus flowers bring a bright color and energetic vibe to this tropical nail design. It’s perfect for those who want their nails to stand out during their beach summer.

Consumables:
- Neon pink and yellow polishes (China Glaze “Flip Flop Fantasy” and “Sun Worshiper”)
- White polish for accents (OPI “Alpine Snow”)
- Nail art brush
- Top coat (Essie “Good to Go”)
Steps to Create:
- Base Color: Apply a neutral base color.
- Flower Art: Use neon pink and yellow to create hibiscus flowers on each nail.
- Accents: Add white dots and lines to detail the flowers.
- Seal: Finish with a top coat to protect the neon colors and design.
Pineapple Paradise
This playful design features bright green and yellow colors with adorable pineapple accents, ideal for a fun beach vacation.

Consumables:
- Bright green polish (OPI “I’m Sooo Swamped!”)
- Yellow polish (Zoya “Pippa”)
- Green polish for leaves (Essie “Mojito Madness”)
- Nail art brush
- Top coat (CND “Super Shiney”)
Steps to Create:
- Base Color: Apply the bright green polish.
- Pineapple Art: Use the yellow polish to create pineapples on a few accent nails.
- Detailing: Add green leaves and outline the pineapples.
- Seal: Protect the design with a top coat.
Tropical Floral Delight
This design features a vibrant mix of orange and pink hues, adorned with delicate hibiscus flowers. The gradient background transitions from a soft orange to a deeper shade, creating a beautiful canvas for the detailed floral artwork.

Consumables:
- Orange nail polish (OPI “No Tan Lines”)
- Pink nail polish (Essie “Haute in the Heat”)
- Nail art brush
- Rhinestones for accents
- Top coat (Seche Vite)
Steps to Create:
- Base Color: Apply the orange polish as a base, fading it into a deeper shade towards the tips.
- Flower Art: Using the pink polish and nail art brush, draw hibiscus flowers on each nail.
- Details: Add rhinestones to the center of each flower for extra sparkle.
- Finish: Seal with a top coat to protect the design and add shine.
Neon Tropical Paradise
This design is a burst of neon colors and intricate floral patterns. The bright green, pink, and orange hues make this a standout look for any beach vacation.

Consumables:
- Neon green polish (China Glaze “I’m With the Lifeguard”)
- Neon pink polish (Zoya “Ali”)
- Neon orange polish (Orly “Tropical Pop”)
- Nail stamping kit for floral patterns
- Top coat (Sally Hansen “Insta-Dri”)
Steps to Create:
- Base Color: Paint each nail with a different neon color.
- Stamping: Use the nail stamping kit to add intricate floral patterns over the base colors.
- Finish: Apply a top coat to protect the design and ensure it lasts through your beach vacation.
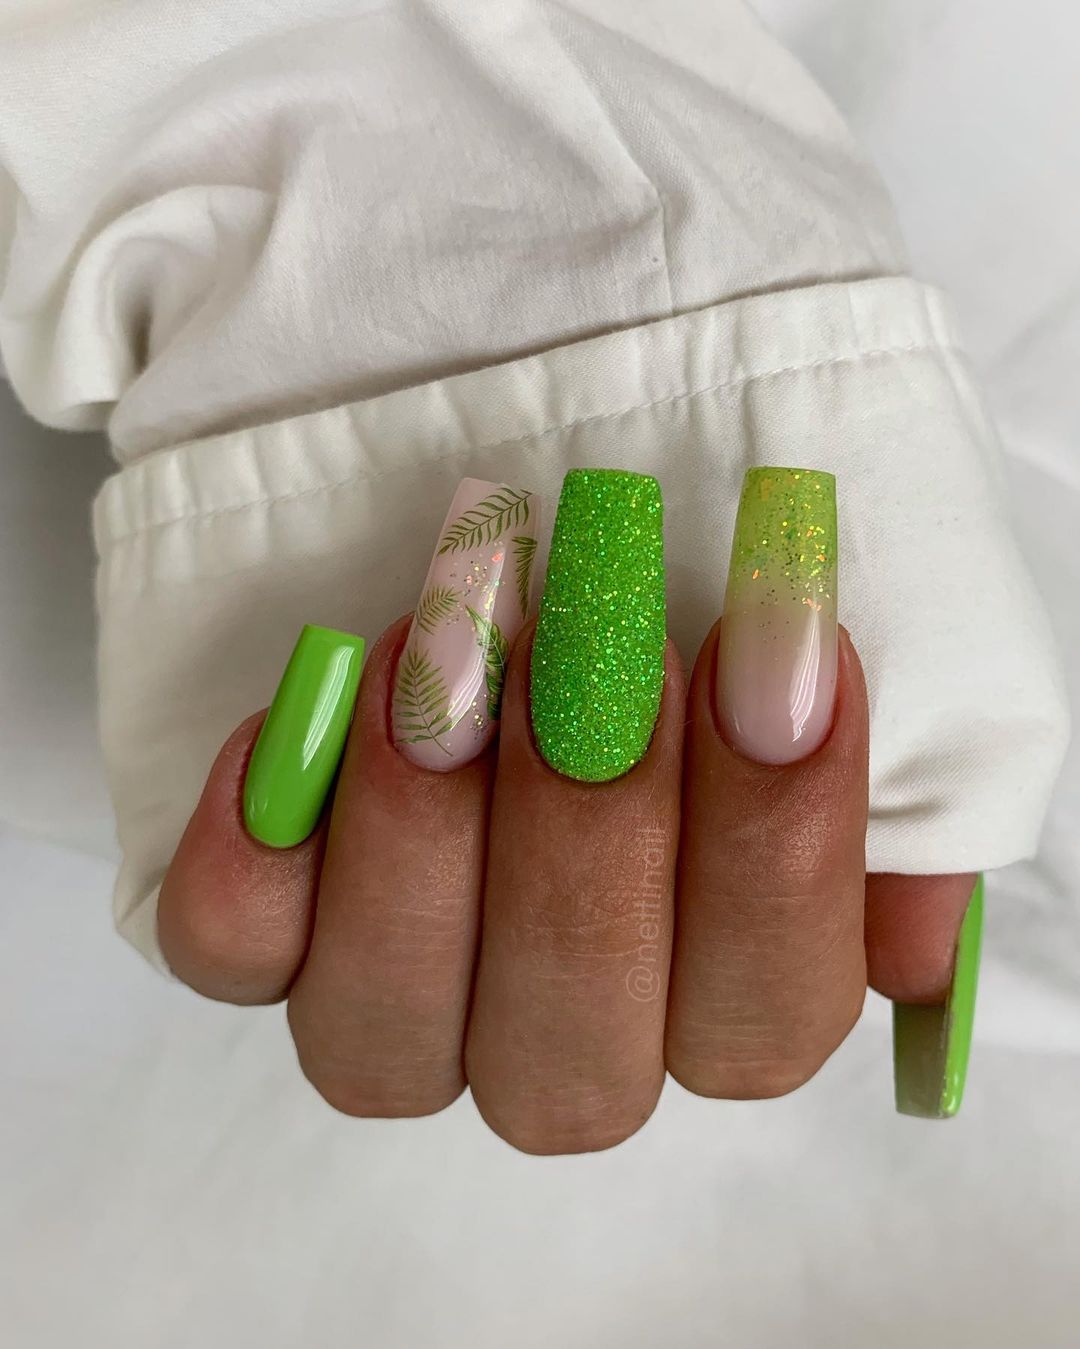
Glittery Green Tropics
This design combines a fresh green hue with glitter and delicate leaf patterns, making it a perfect choice for a tropical look that’s both subtle and eye-catching.

Consumables:
- Green polish (OPI “I’m Sooo Swamped!”)
- Glitter polish (Essie “Summit of Style”)
- Nude polish (Essie “Ballet Slippers”)
- Nail art brush
- Top coat (CND “Super Shiney”)
Steps to Create:
- Base Color: Apply the green polish on some nails and the nude polish on others.
- Glitter: Add a layer of glitter polish to the green nails.
- Leaf Patterns: Use the nail art brush to draw delicate leaves on the nude nails.
- Finish: Seal with a top coat for a long-lasting shine.
Sunset Palm Trees
This design captures the beauty of a tropical sunset with a gradient from pink to white and a delicate palm tree accent. It’s a perfect look for beach vacations.

Consumables:
- Pink polish (OPI “Pink-ing of You”)
- White polish (OPI “Alpine Snow”)
- Black polish for palm tree details (Sally Hansen “Black Out”)
- Nail art brush
- Top coat (Essie “Good to Go”)
Steps to Create:
- Base Color: Apply the pink polish, creating a gradient effect towards the tips with white.
- Palm Tree Art: Use the black polish and nail art brush to draw palm trees on the accent nails.
- Finish: Seal the design with a top coat for durability.
Vibrant Parrot Nails
This striking design features brightly colored parrots, making it a bold choice for those who love bright colors and detailed artwork.

Consumables:
- Multiple bright polishes (Essie “Butler Please”, “Saturday Disco Fever”, “The More The Merrier”)
- Nail art brush
- Top coat (CND “Super Shiney”)
Steps to Create:
- Base Color: Apply a bright color on each nail.
- Parrot Art: Using various bright polishes and a nail art brush, draw detailed parrots on each nail.
- Details: Add fine details to the parrots with contrasting colors.
- Finish: Apply a top coat to protect the intricate design.
Tropical Sunset Tips
This design blends neon pink and orange with tropical palm tree accents, creating a striking gradient effect that’s perfect for a beach sunset vibe. The addition of a parrot on one nail adds an extra touch of the tropics.

Consumables:
- Neon pink polish (China Glaze “Flip Flop Fantasy”)
- Neon orange polish (Orly “Tropical Pop”)
- Black polish for details (Sally Hansen “Black Out”)
- Blue and yellow polishes for the parrot (OPI “Rich Girls & Po-Boys” and “Mellow Yellow”)
- Nail art brush
- Top coat (CND “Super Shiney”)
Steps to Create:
- Base Color: Apply the neon pink and orange polishes in a gradient pattern.
- Palm Tree and Parrot Art: Use the black polish and nail art brush to draw palm trees and a parrot on accent nails.
- Details: Add the blue and yellow details for the parrot.
- Finish: Apply a top coat to protect and enhance the design.
Hibiscus Orange Nails
This design features bright orange nails with delicate white hibiscus flowers, creating a vibrant and tropical look that’s perfect for summer.

Consumables:
- Orange polish (Essie “Meet Me At Sunset”)
- White polish for hibiscus (OPI “Alpine Snow”)
- Nail art brush
- Top coat (Essie “Good to Go”)
Steps to Create:
- Base Color: Apply the orange polish to all nails.
- Hibiscus Art: Use the white polish and nail art brush to draw hibiscus flowers on each nail.
- Details: Add fine white details to enhance the floral design.
- Finish: Apply a top coat to seal and protect the artwork.
Pastel Ombre with Pearls
This elegant design features a pastel ombre from pink to blue, adorned with pearl accents and delicate floral patterns, perfect for a sophisticated beach look.

Consumables:
- Pink polish (Essie “Fiji”)
- Blue polish (OPI “It’s a Boy!”)
- White polish for flowers (Essie “Blanc”)
- Nail art brush
- Small adhesive pearls
- Top coat (Sally Hansen “Insta-Dri”)
Steps to Create:
- Base Color: Create an ombre effect using the pink and blue polishes.
- Flower Art: Use the white polish and nail art brush to draw delicate flowers.
- Pearl Accents: Apply small adhesive pearls to enhance the design.
- Finish: Seal with a top coat to protect the design and pearls.
Pink and Animal Print
Combining bright pink nails with animal print accents, this design is bold and playful, perfect for adding a tropical twist to your manicure.

Consumables:
- Bright pink polish (Zoya “Barbie”)
- Black polish for animal print (OPI “Black Onyx”)
- Yellow polish for accents (Essie “Hay There”)
- Nail art brush
- Top coat (CND “Super Shiney”)
Steps to Create:
- Base Color: Apply the bright pink polish to all nails except the accent nail.
- Animal Print Art: Use the black polish and nail art brush to create animal print on the accent nail.
- Details: Add yellow accents to the animal print design.
- Finish: Seal with a top coat for longevity and shine.
Tropical Fruit Tips
This fun design features different tropical fruits on each nail tip, making it a colorful and playful option for summer.

Consumables:
- Nude base polish (Essie “Ballet Slippers”)
- Various bright polishes for fruits (OPI “Red Hot Rio”, “Green-wich Village”, “Need Sunglasses?”)
- Nail art brush
- Top coat (Seche Vite)
Steps to Create:
- Base Color: Apply the nude polish as the base color.
- Fruit Art: Using various bright polishes and a nail art brush, draw different fruits on each nail tip.
- Details: Add fine details to the fruits to enhance their realism.
- Finish: Apply a top coat to protect and preserve the colorful design.
Tropical Sunset Gradient
This vibrant design features a gradient background transitioning from yellow to blue, with black palm tree silhouettes. It captures the essence of a tropical sunset, making it perfect for beach vacations.

Consumables:
- Yellow polish (Essie “Hay There”)
- Blue polish (OPI “Rich Girls & Po-Boys”)
- Black polish for details (Sally Hansen “Black Out”)
- Nail art brush
- Top coat (Seche Vite)
Steps to Create:
- Base Color: Create a gradient effect using the yellow and blue polishes.
- Palm Tree Art: Use the black polish and nail art brush to draw palm trees and birds.
- Finish: Apply a top coat to seal and protect the design.
Pastel Petals
This design showcases delicate pastel petals on a nude base, creating a soft and elegant look perfect for any occasion, especially during spring and summer.

Consumables:
- Nude base polish (Essie “Ballet Slippers”)
- Pastel purple and blue polishes (OPI “Do You Lilac It?”, Essie “Bikini So Teeny”)
- Nail art brush
- Top coat (CND “Super Shiney”)
Steps to Create:
- Base Color: Apply the nude polish as the base color.
- Petal Art: Use the pastel polishes and nail art brush to create petal designs on each nail.
- Details: Add fine details to the petals for a more realistic look.
- Finish: Apply a top coat to protect and enhance the design.
Mint and Pink Florals
This design features a beautiful combination of mint green and pink, with delicate floral accents that make it perfect for a fresh and feminine look.

Consumables:
- Mint green polish (Essie “Mint Candy Apple”)
- Pink polish (OPI “Pink-ing of You”)
- Yellow polish for details (Sally Hansen “Mellow Yellow”)
- Nail art brush
- Top coat (Essie “Good to Go”)
Steps to Create:
- Base Color: Apply the mint green polish on some nails and pink on others.
- Floral Art: Use the yellow polish and nail art brush to create floral designs on the pink nails.
- Details: Add fine details to enhance the floral patterns.
- Finish: Seal with a top coat for a long-lasting shine.
Neon Leafy Vibes
This design combines neon yellow and green with intricate leaf patterns, making it a bold choice for those who love vibrant, tropical looks.
Consumables:
- Neon yellow polish (China Glaze “Celtic Sun”)
- Green polish (OPI “I’m Sooo Swamped!”)
- Nude polish for base (Essie “Ballet Slippers”)
- Nail art brush
- Top coat (Sally Hansen “Insta-Dri”)
Steps to Create:
- Base Color: Apply the nude polish as the base color.
- Leaf Art: Use the neon yellow and green polishes and nail art brush to create leaf patterns.
- Details: Add fine details to the leaves for a more intricate look.
- Finish: Apply a top coat to protect the design.
Citrus Stripes
This design features bold stripes and citrus accents, making it a fresh and fun choice for summer nails.

Consumables:
- Pink polish for stripes (Essie “Mod Square”)
- Holographic polish for stripes (China Glaze “IDK”)
- Yellow polish for citrus (OPI “Need Sunglasses?”)
- Nail art brush
- Top coat (CND “Super Shiney”)
Steps to Create:
- Base Color: Apply the holographic polish as the base color.
- Stripe Art: Use the pink polish and nail art brush to create bold stripes.
- Citrus Details: Add citrus accents using the yellow polish.
- Finish: Seal with a top coat for durability and shine.
Tropical Leafy Elegance
This design features a clean white base adorned with green tropical leaves and gold foil accents. It’s a sophisticated yet simple look, perfect for those who love a touch of nature on their nails.

Consumables:
- White base polish (Essie “Blanc”)
- Green polish for leaves (OPI “Green-wich Village”)
- Gold foil accents
- Nail art brush
- Top coat (Seche Vite)
Steps to Create:
- Base Color: Apply the white polish as the base color.
- Leaf Art: Use the green polish and nail art brush to create detailed leaf patterns on each nail.
- Gold Foil: Apply gold foil accents for an extra touch of elegance.
- Finish: Seal with a top coat to protect the design and add shine.
Neon Tropical Mix
This playful design combines neon green, pink, and glitter accents with intricate white tropical leaf patterns. It’s a vibrant and fun look perfect for summer and beach vacations.

Consumables:
- Neon green polish (China Glaze “Celtic Sun”)
- Pink polish (Essie “Mod Square”)
- White polish for leaf patterns (OPI “Alpine Snow”)
- Pink glitter polish (Zoya “Astra”)
- Nail art brush
- Top coat (CND “Super Shiney”)
Steps to Create:
- Base Colors: Apply the neon green and pink polishes to different nails.
- Leaf Patterns: Use the white polish and nail art brush to create intricate leaf patterns on selected nails.
- Glitter Accent: Apply the pink glitter polish on one accent nail.
- Finish: Seal with a top coat to protect and enhance the design.
Sunset Palm Nails
This design captures the serene beauty of a tropical sunset with a gradient background transitioning from peach to orange, accented with black palm tree silhouettes and small rhinestones.

Consumables:
- Peach polish (Essie “Tart Deco”)
- Orange polish (China Glaze “Sun Worshiper”)
- Black polish for palm trees (Sally Hansen “Black Out”)
- Small rhinestones
- Nail art brush
- Top coat (Essie “Good to Go”)
Steps to Create:
- Base Color: Create a gradient effect using the peach and orange polishes.
- Palm Tree Art: Use the black polish and nail art brush to draw palm trees on the accent nails.
- Rhinestones: Apply small rhinestones for added sparkle.
- Finish: Seal with a top coat to protect the design and ensure longevity.
Save Pin
