
When it comes to nail art, brown color nails have taken the spotlight as a versatile and sophisticated choice for all seasons. Whether you’re aiming for a subtle, neutral look or something more daring with glitter and art designs, brown hues can be as dynamic as you want them to be. But how do you choose the right shade, shape, and designs to match your personal style? In this article, we’ll explore some inspiring brown color nails ideas, with each design accompanied by a detailed guide on how to achieve it at home. From almond shapes to square designs, and from simple to glitter-accented, these ideas will elevate your manicure game. Let’s dive into the world of brown nails and discover the perfect style for you.
Deep Chocolate Elegance
This chocolate brown nail design is a true embodiment of elegance and simplicity. The solid brown shade offers a deep, rich color that is both classic and modern. The almond shape nails provide a soft, feminine look, while the glitter accents add a touch of glamour without overwhelming the design. This combination makes it perfect for any season, as the dark brown color can transition effortlessly from fall to winter, and even into the warmer months with the right styling.

Consumables:
- Nail polish: OPI Nail Lacquer in “Chocolate Moose”
- Glitter top coat: Essie “Summit of Style”
- Base coat: ORLY Bonder Rubberized Basecoat
- Top coat: Seche Vite Dry Fast Top Coat
- Nail file: Deborah Lippmann Smooth Operator Buffer Nail File
Instructions to Create:
- Start with a clean nail bed and apply the ORLY Bonder Rubberized Basecoat to ensure your polish adheres well.
- Apply two coats of OPI’s “Chocolate Moose” polish, allowing each coat to dry thoroughly.
- Once the polish is dry, apply Essie’s “Summit of Style” glitter top coat to the tips for a subtle sparkle.
- Finish with a Seche Vite Dry Fast Top Coat to seal in the design and add a brilliant shine.
- Use the Deborah Lippmann Smooth Operator Buffer Nail File to shape the nails into a soft almond tip, perfecting the overall look.
Subtle and Chic in Taupe
For those who appreciate a more understated look, these taupe brown nails are the epitome of chic. The polish has a light brown undertone that pairs beautifully with a variety of outfits. The nail type is short and square, giving a practical yet stylish vibe. What makes this design stand out is the subtle leopard print accent on one nail, which adds a hint of art without being too bold. This simple yet sophisticated look is ideal for anyone looking to embrace brown color nails in a modern and fashionable way.

Consumables:
- Nail polish: Sally Hansen Color Therapy in “Taupe to Go”
- Accent polish: OPI Nail Lacquer in “Never Have Too Mani Friends!”
- Leopard print stencil or stamp
- Base coat: Essie First Base Base Coat
- Top coat: Sally Hansen Miracle Gel Top Coat
Instructions to Create:
- Apply Essie First Base Base Coat to each nail to prepare for the polish.
- Paint all nails with Sally Hansen’s “Taupe to Go,” applying two even coats for full coverage.
- For the accent nail, use a leopard print stencil or stamp to apply OPI’s “Never Have Too Mani Friends!” over the taupe base.
- Seal in the design with Sally Hansen Miracle Gel Top Coat for a long-lasting finish.
- Gently file the nails into a square shape to maintain the clean and modern appearance.
Almond Caramel Delight
This almond shape nail design is a delightful blend of caramel brown and natural tones. The polish has a warm undertone that flatters all skin tones, making it a versatile choice for any occasion. The simplicity of this design is its strength—no art or glitter is needed to make these nails stand out. The smooth, creamy finish is perfect for those who prefer a more neutral and solid manicure, yet want to stay on trend with brown color nails.

Consumables:
- Nail polish: Zoya Nail Polish in “Caramel”
- Base coat: CND Stickey Base Coat
- Top coat: Essie Gel Couture Top Coat
- Nail buffer: OPI Flex Nail Buffer
Instructions to Create:
- Begin by applying the CND Stickey Base Coat to clean nails.
- Apply two coats of Zoya’s “Caramel” nail polish, ensuring each coat is fully dry before applying the next.
- Seal the manicure with Essie Gel Couture Top Coat for a durable, high-shine finish.
- Use the OPI Flex Nail Buffer to maintain the smooth almond shape of the nails, which complements the caramel tone perfectly.
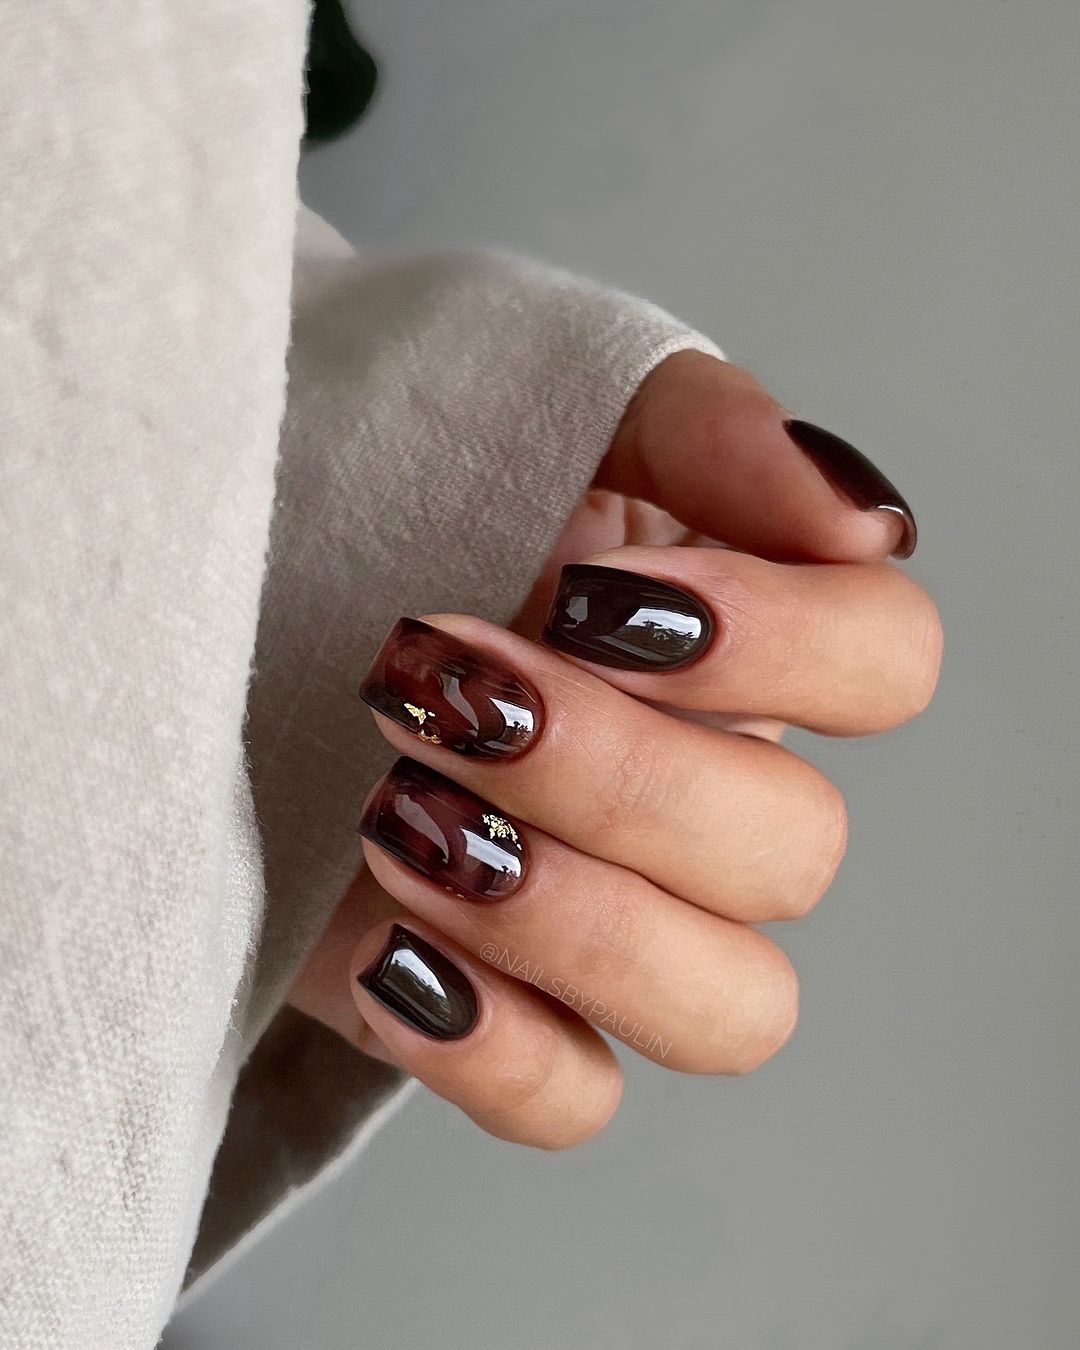
Earthy Brown with a Glossy Finish
For a dark and mysterious look, these earthy brown nails offer a deep, rich color that exudes confidence. The solid brown polish is beautifully glossy, making the nails appear almost liquid in texture. This look is ideal for those who want to make a statement with their brown color nails without adding additional art or glitter. The nail shape here is long and squared, giving a bold and modern edge to the classic brown polish.

Consumables:
- Nail polish: ORLY Breathable Treatment + Color in “Espresso Yourself”
- Base coat: Zoya Anchor Base Coat
- Top coat: Sally Hansen Insta-Dri Anti-Chip Top Coat
- Nail file: Revlon Shape ‘N’ Buff Nail File
Instructions to Create:
- Start by applying Zoya Anchor Base Coat to the nails.
- Apply two coats of ORLY Breathable Treatment + Color in “Espresso Yourself” for a deep, rich color.
- Finish with Sally Hansen Insta-Dri Anti-Chip Top Coat to lock in the shine and color.
- Shape the nails into a long square using the Revlon Shape ‘N’ Buff Nail File, ensuring the edges are smooth and even.
Minimalist Neutral Tones
For those who favor a minimalist approach, these khaki and beige-toned nails are a perfect example of how less can be more. The nail shape is a long coffin, which elongates the fingers and adds a touch of elegance to the overall look. The brown color nails in this design are soft and neutral, making them suitable for any occasion, from the office to a night out. The subtle accents created by using different shades of brown and beige add depth and dimension to the manicure without overwhelming the simplicity of the design.

Consumables:
- Nail polish: Essie Nail Polish in “Sandy Beige”
- Accent polish: Butter London Patent Shine 10X Nail Lacquer in “Yummy Mummy”
- Base coat: OPI Natural Nail Base Coat
- Top coat: Essie Gel Couture Top Coat
- Nail file: Tweezerman Nail File Collection
Instructions to Create:
- Apply OPI Natural Nail Base Coat to protect and prepare your nails.
- Paint the nails with Essie’s “Sandy Beige” and Butter London’s “Yummy Mummy” on alternating nails for a balanced look.
- Apply Essie Gel Couture Top Coat to seal the design and add a high-shine finish.
- Shape the nails into a coffin shape using the Tweezerman Nail File Collection for precise, smooth edges.
Glitter Accented Brown Nails
This nail design is a stunning combination of brown color nails with a luxurious touch of glitter. The coffin-shaped nails are beautifully elongated, featuring a gradient from a light nude base to a deep, rich brown at the tips. The highlight of this design is the heavy glitter accents on a few nails, adding a glamorous and festive feel. The glitter transitions smoothly into the brown polish, creating a cohesive and eye-catching look. This design is perfect for those who want a sophisticated manicure with a bit of sparkle, making it ideal for special occasions.

Consumables:
- Nail polish: Essie Nail Polish in “Mink Muffs”
- Glitter polish: OPI Nail Lacquer in “Glamourous Glitter”
- Base coat: OPI Natural Nail Base Coat
- Top coat: Seche Vite Dry Fast Top Coat
- Nail file: ORLY Black Board Professional File
Instructions to Create:
- Apply the OPI Natural Nail Base Coat to ensure a smooth and even base.
- Paint the nails with two coats of Essie’s “Mink Muffs,” focusing on creating a gradient effect with the polish transitioning from light nude at the base to dark brown at the tips.
- Apply OPI’s “Glamourous Glitter” polish on the accent nails, starting from the tips and blending upwards for a gradient glitter effect.
- Finish with Seche Vite Dry Fast Top Coat to lock in the design and add a high-shine finish.
- Shape the nails into a coffin style using the ORLY Black Board Professional File to achieve clean, crisp edges.
Swirled Brown Nail Art
This nail art design showcases a playful and artistic take on brown color nails. The almond-shaped nails feature a mix of warm brown tones and neutral nude shades, accented with organic, flowing swirls. The swirls are perfectly balanced, creating a dynamic yet harmonious look that draws the eye. The combination of different shades of brown adds depth and dimension to the design, making it both stylish and unique. This look is perfect for someone who loves creative and trendy nail art while keeping the color palette sophisticated.

Consumables:
- Nail polish: OPI Nail Lacquer in “Cinnamon Sweet”
- Nail polish: Essie Nail Polish in “Topless & Barefoot”
- Nail art brush: Thin detail brush
- Base coat: CND Stickey Base Coat
- Top coat: Sally Hansen Miracle Gel Top Coat
Instructions to Create:
- Apply the CND Stickey Base Coat to each nail.
- Paint the nails with two coats of Essie’s “Topless & Barefoot” as the base color.
- Using a thin detail brush, create swirls on each nail with OPI’s “Cinnamon Sweet,” following the natural curve of the nails.
- Seal the design with Sally Hansen Miracle Gel Top Coat for a glossy and durable finish.
- Shape the nails into an almond shape for a soft and elegant appearance, ensuring the swirls flow seamlessly across the nails.
Extravagant Brown and Nude Nails with Rhinestones
This nail design is all about extravagance and luxury. The long, coffin-shaped nails are adorned with intricate art designs that mix brown color nails with nude tones, creating a striking contrast. The design features multiple elements, including rhinestones, glitter, and abstract patterns, making it a true work of art. The rhinestones are carefully placed to enhance the design without overpowering it, adding a touch of glamour and sophistication. This look is perfect for those who love bold and statement-making manicures that are sure to turn heads.

Consumables:
- Nail polish: Zoya Nail Polish in “Alyssa”
- Rhinestones: Swarovski Crystal Pixie Edge in “Citrus Orange”
- Nail art brush: Fine detail brush for intricate designs
- Base coat: ORLY Bonder Rubberized Basecoat
- Top coat: Essie Gel Couture Top Coat
Instructions to Create:
- Apply ORLY Bonder Rubberized Basecoat to ensure the polish adheres well to the nails.
- Paint the nails with Zoya’s “Alyssa” as the base color, alternating with nude shades for variety.
- Using a fine detail brush, create abstract designs on the nails, incorporating the nude and brown tones seamlessly.
- Carefully place Swarovski Crystal Pixie Edge rhinestones along the design for added glamour.
- Seal the manicure with Essie Gel Couture Top Coat to ensure the rhinestones stay in place and the design lasts.
Floral Brown Nail Art
This nail art design features delicate floral accents that bring a touch of whimsy to brown color nails. The nails are almond-shaped and painted in varying shades of brown, from light to dark, creating a natural and earthy palette. The tiny flowers, painted in contrasting colors, add a playful and feminine touch to the otherwise neutral tones. This design is perfect for those who want to add a bit of nature-inspired beauty to their manicure while keeping the overall look subtle and elegant.

Consumables:
- Nail polish: OPI Nail Lacquer in “Samoan Sand”
- Nail polish: Essie Nail Polish in “Chocolate Cakes”
- Nail art brush: Small dotting tool for floral details
- Base coat: OPI Natural Nail Base Coat
- Top coat: Seche Vite Dry Fast Top Coat
Instructions to Create:
- Start with OPI Natural Nail Base Coat to protect your nails.
- Paint each nail with alternating shades of OPI’s “Samoan Sand” and Essie’s “Chocolate Cakes” for a gradient effect.
- Using a small dotting tool, create small floral designs on each nail, focusing on the tips for a balanced look.
- Apply Seche Vite Dry Fast Top Coat to seal the design and give the nails a high-gloss finish.
- Shape the nails into an almond shape to complement the soft floral design, ensuring each flower stands out against the brown base.
Autumnal Floral Nails
This floral nail art design is perfect for the season with its warm, autumnal shades of brown. The almond-shaped nails are painted in a mix of light nude and dark brown tones, each adorned with a bold floral pattern. The flowers, painted in contrasting light shades, create a striking contrast against the brown base, making the design pop. This manicure is ideal for those who want to embrace the autumn season with a stylish and seasonal look, combining the beauty of nature with the elegance of brown color nails.

Consumables:
- Nail polish: Essie Nail Polish in “Rock the Runway”
- Nail polish: Butter London Nail Lacquer in “Toff”
- Nail art brush: Detail brush for floral designs
- Base coat: CND Stickey Base Coat
- Top coat: Essie Gel Couture Top Coat
Instructions to Create:
- Begin by applying the CND Stickey Base Coat to all nails.
- Paint the nails with a mix of Essie’s “Rock the Runway” and Butter London’s “Toff” for a rich autumnal palette.
- Use a detail brush to paint floral designs on each nail, focusing on creating a contrast between the light and dark shades.
- Finish with Essie Gel Couture Top Coat to add shine and protect the design.
- Shape the nails into a soft almond shape to enhance the natural look of the floral design, ensuring the flowers are the focal point.
Floral Brown Extravaganza
This design is a perfect blend of elegance and artistry with a focus on brown color nails. The coffin-shaped nails feature a combination of smooth, glossy brown shades with intricate 3D floral art designs. The addition of glitter on some nails adds a sparkling contrast, making the design both luxurious and eye-catching. The extended length of the nails gives ample space for the detailed work, while the flowers and glitter accents create a beautiful play of texture and shine. This manicure is ideal for those who love elaborate, statement-making nails.

Consumables:
- Nail polish: Essie Nail Polish in “Lady Godiva”
- 3D Flower Decorations: 3D Nail Art Flower Mold by Born Pretty
- Glitter polish: OPI Nail Lacquer in “Champagne for Breakfast”
- Base coat: ORLY Bonder Rubberized Basecoat
- Top coat: Seche Vite Dry Fast Top Coat
Instructions to Create:
- Start with the ORLY Bonder Rubberized Basecoat to protect the nails and ensure the polish adheres well.
- Apply two coats of Essie’s “Lady Godiva” for a rich brown base.
- Use a 3D Nail Art Flower Mold to create the floral decorations and place them on the accent nails.
- Apply OPI’s “Champagne for Breakfast” glitter polish to the designated nails, blending it with the brown polish.
- Seal the design with Seche Vite Dry Fast Top Coat for durability and shine.
- Shape the nails into a coffin style to enhance the length and design, making sure the 3D flowers are securely attached.
Elegant Brown and Gold Waves
This design combines the classic elegance of brown color nails with a touch of modernity through gold accents. The short nails feature a mix of solid brown polish, delicate gold waves, and French tips. The combination of these elements creates a sophisticated yet understated look, perfect for someone who enjoys a polished and refined manicure. The gold detailing adds a luxurious touch, making the nails appear both elegant and trendy.

Consumables:
- Nail polish: OPI Nail Lacquer in “You Don’t Know Jacques!”
- Gold nail striping tape: Born Pretty Nail Striping Tape
- Base coat: Essie First Base Base Coat
- Top coat: Sally Hansen Miracle Gel Top Coat
Instructions to Create:
- Begin by applying Essie First Base Base Coat to prepare the nails.
- Paint the nails with OPI’s “You Don’t Know Jacques!” for a chic brown base.
- Use Born Pretty Nail Striping Tape to create the gold wave patterns on selected nails.
- Finish with Sally Hansen Miracle Gel Top Coat to protect the design and add a glossy finish.
- Shape the nails into a short square shape for a clean and classic look that complements the gold accents.
Matte Chocolate Textures
This design brings a new dimension to brown color nails with a matte finish and textured detailing. The coffin-shaped nails are coated in a deep, rich chocolate brown polish, with some nails featuring a raised, textured pattern that adds depth and interest. The matte finish gives the design a modern, edgy feel, while the textured accents provide a unique twist on traditional brown nails. This look is perfect for those who want to experiment with textures while keeping their manicure elegant and sophisticated.

Consumables:
- Nail polish: Zoya Nail Polish in “Louise”
- Matte top coat: OPI Matte Top Coat
- Textured nail polish: China Glaze Texture in “Bump in the Night”
- Base coat: CND Stickey Base Coat
- Nail file: Revlon Emery Board Nail File
Instructions to Create:
- Apply CND Stickey Base Coat to all nails to ensure a smooth base.
- Paint the nails with Zoya’s “Louise” for a rich chocolate brown color.
- Use China Glaze’s “Bump in the Night” to create textured patterns on selected nails.
- Apply OPI Matte Top Coat to achieve a sophisticated matte finish.
- Shape the nails into a coffin style to enhance the length and highlight the textured design.
Short Glitter Brown Nails
This design is a classic take on brown color nails with a glittery twist. The short, square-shaped nails are painted in a deep brown shade, with a subtle glitter overlay that adds a hint of sparkle. The simplicity of the design is balanced by the rich color and the shimmering effect, making it a versatile manicure for both everyday wear and special occasions. This look is ideal for those who appreciate a classic manicure with a touch of glamour.

Consumables:
- Nail polish: Essie Nail Polish in “Wicked”
- Glitter polish: China Glaze Nail Lacquer in “Fairy Dust”
- Base coat: ORLY Bonder Rubberized Basecoat
- Top coat: Seche Vite Dry Fast Top Coat
Instructions to Create:
- Apply the ORLY Bonder Rubberized Basecoat to protect the nails and ensure the polish lasts longer.
- Paint the nails with two coats of Essie’s “Wicked” for a deep, rich brown color.
- Apply China Glaze’s “Fairy Dust” glitter polish over the brown base for a subtle sparkle.
- Finish with Seche Vite Dry Fast Top Coat to add shine and seal the glitter in place.
- Shape the nails into a short square shape for a classic and chic look.
Warm Brown Almond Nails
This design features a warm brown hue on almond-shaped nails, creating a cozy and inviting look. The polish has a slight orange undertone, making it perfect for the autumn season. The solid color is both simple and striking, with a high-gloss finish that adds elegance. This manicure is ideal for those who prefer a minimalist approach while still wanting to embrace the richness of brown color nails.

Consumables:
- Nail polish: OPI Nail Lacquer in “A Good Man-Darin is Hard to Find”
- Base coat: Essie First Base Base Coat
- Top coat: Sally Hansen Insta-Dri Top Coat
- Nail file: Tweezerman Nail File Collection
Instructions to Create:
- Begin by applying the Essie First Base Base Coat to all nails.
- Paint the nails with OPI’s “A Good Man-Darin is Hard to Find,” applying two coats for full coverage.
- Seal the design with Sally Hansen Insta-Dri Top Coat to achieve a high-gloss finish.
- Shape the nails into an almond shape using the Tweezerman Nail File Collection to enhance the warm brown color and create a soft, elegant look.
Elegant Swirled Brown Nails
This nail design is a perfect blend of elegance and creativity, featuring brown color nails with a unique swirl pattern. The coffin-shaped nails are elongated, providing a perfect canvas for the intricate swirls that dance across the nails in varying shades of brown and nude. The subtle rhinestones add a touch of sparkle, making this design both sophisticated and eye-catching. The balance between the swirls and the rhinestones creates a harmonious look that is perfect for any occasion, from a formal event to a casual day out.

Consumables:
- Nail polish: OPI Nail Lacquer in “Café Au Lait”
- Nail polish: Essie Nail Polish in “Chocolate Cakes”
- Rhinestones: Swarovski Flatback Crystals
- Nail art brush: Fine detail brush for swirls
- Base coat: CND Stickey Base Coat
- Top coat: Sally Hansen Miracle Gel Top Coat
Instructions to Create:
- Apply CND Stickey Base Coat to all nails to prepare the surface.
- Paint the nails with OPI’s “Café Au Lait” as the base color.
- Using a fine detail brush, create swirls with Essie’s “Chocolate Cakes,” following the natural curve of the nails.
- Apply Swarovski Flatback Crystals along the swirls for added sparkle.
- Finish with Sally Hansen Miracle Gel Top Coat to seal the design and give a glossy finish.
- Shape the nails into a coffin style to enhance the length and elegance of the design.
Minimalist Brown French Tips with Heart Accent
This nail design offers a minimalist take on brown color nails with elegant French tips and a cute heart accent. The short, square-shaped nails are painted with a nude base, while the tips are adorned with a crisp brown line. One nail features a small, delicate heart, adding a touch of charm to the overall design. This manicure is perfect for those who prefer a simple yet stylish look, combining the classic French tip with a modern twist.

Consumables:
- Nail polish: OPI Nail Lacquer in “Bare My Soul”
- Nail polish: Essie Nail Polish in “Wicked”
- Nail art brush: Thin detail brush for the French tips and heart
- Base coat: Essie First Base Base Coat
- Top coat: Seche Vite Dry Fast Top Coat
Instructions to Create:
- Apply Essie First Base Base Coat to protect the nails and ensure longevity.
- Paint the nails with OPI’s “Bare My Soul” as the base color.
- Use a thin detail brush to paint the French tips with Essie’s “Wicked.”
- Create a small heart on the accent nail using the same brown polish and detail brush.
- Finish with Seche Vite Dry Fast Top Coat for a shiny, long-lasting finish.
- Shape the nails into a short square to maintain a clean and classic appearance.
Glossy Marble Brown Nails
This nail design showcases a modern and sophisticated take on brown color nails with a glossy marble effect. The short, square-shaped nails feature a deep brown base with subtle, marbled accents that create a rich, luxurious look. The marble design is achieved using different shades of brown, blending seamlessly to create a natural stone-like appearance. This manicure is ideal for those who appreciate classic elegance with a contemporary twist, perfect for both everyday wear and special occasions.

Consumables:
- Nail polish: Essie Nail Polish in “Chocolate Cakes”
- Nail polish: Zoya Nail Polish in “Louise”
- Nail art brush: Marbleizing tool or fine detail brush
- Base coat: ORLY Bonder Rubberized Basecoat
- Top coat: Seche Vite Dry Fast Top Coat
Instructions to Create:
- Start with the ORLY Bonder Rubberized Basecoat to ensure the polish adheres well.
- Paint the nails with Essie’s “Chocolate Cakes” as the base color.
- Use a marbleizing tool or fine detail brush to blend Zoya’s “Louise” into the base, creating a marble effect.
- Apply Seche Vite Dry Fast Top Coat to seal the design and add a glossy finish.
- Shape the nails into a short square to highlight the marble effect, ensuring a sleek and polished look.
Swirled Brown and Gold Almond Nails
This almond-shaped nail design is a delightful mix of brown color nails with elegant gold accents. The nails feature a soft, nude base with flowing swirls of brown and gold, creating a dynamic and luxurious look. The gold glitter adds a touch of sparkle, making the design perfect for those who want to combine elegance with a bit of glam. This manicure is suitable for any season, offering a timeless look that can be dressed up or down depending on the occasion.

Consumables:
- Nail polish: OPI Nail Lacquer in “Be There in a Prosecco”
- Nail polish: Essie Nail Polish in “Chocolate Cakes”
- Gold glitter: Loose cosmetic glitter or glitter polish
- Nail art brush: Fine detail brush for swirls
- Base coat: CND Stickey Base Coat
- Top coat: Sally Hansen Miracle Gel Top Coat
Instructions to Create:
- Begin with CND Stickey Base Coat to protect the nails.
- Apply OPI’s “Be There in a Prosecco” as the base color.
- Use a fine detail brush to create swirls with Essie’s “Chocolate Cakes” and add gold glitter to accentuate the design.
- Seal the manicure with Sally Hansen Miracle Gel Top Coat for a shiny and long-lasting finish.
- Shape the nails into an almond shape to complement the flowing swirls, enhancing the overall elegance of the design.
Crocodile Skin Brown Nails
This unique nail design mimics the texture of crocodile skin, bringing a bold and adventurous twist to brown color nails. The short, square-shaped nails are painted with a deep brown base, and the crocodile pattern is created using a darker brown polish for a textured effect. The result is a striking and edgy manicure that is sure to stand out. This look is perfect for those who want to make a statement with their nails while embracing the richness of brown tones.

Consumables:
- Nail polish: Zoya Nail Polish in “Louise”
- Nail polish: OPI Nail Lacquer in “You Don’t Know Jacques!”
- Nail art brush: Fine detail brush for creating the crocodile pattern
- Base coat: ORLY Bonder Rubberized Basecoat
- Top coat: Seche Vite Dry Fast Top Coat
Instructions to Create:
- Apply ORLY Bonder Rubberized Basecoat to protect the nails.
- Paint the nails with Zoya’s “Louise” as the base color.
- Use a fine detail brush to create the crocodile pattern with OPI’s “You Don’t Know Jacques!” ensuring the pattern looks textured and natural.
- Seal the design with Seche Vite Dry Fast Top Coat for a high-shine finish.
- Shape the nails into a short square to highlight the crocodile pattern, ensuring the design is bold and edgy.
Mixed Brown Patterns
This eclectic nail design features a mix of patterns and shades, making it a fun and creative take on brown color nails. The almond-shaped nails are painted with different brown hues, each featuring a unique pattern such as cow print, stripes, and checkerboard. The result is a playful yet stylish look that is perfect for someone who loves to experiment with nail art. This design is versatile and can be tailored to suit any personal style, making it a great choice for those who enjoy bold and trendy manicures.

Consumables:
- Nail polish: Essie Nail Polish in “Mink Muffs”
- Nail polish: OPI Nail Lacquer in “Chocolate Moose”
- Nail art brush: Fine detail brush for creating patterns
- Base coat: CND Stickey Base Coat
- Top coat: Seche Vite Dry Fast Top Coat
Instructions to Create:
- Begin by applying CND Stickey Base Coat to protect the nails.
- Paint the nails with alternating shades of Essie’s “Mink Muffs” and OPI’s “Chocolate Moose.”
- Use a fine detail brush to create various patterns such as cow print, stripes, and checkerboard on each nail.
- Apply Seche Vite Dry Fast Top Coat to seal the design and add a glossy finish.
- Shape the nails into an almond shape to enhance the playful and creative nature of the design, ensuring each pattern is showcased beautifully.
Caramel and Chocolate French Tips
This nail design is a modern take on the classic French tip, featuring brown color nails in caramel and chocolate tones. The coffin-shaped nails are painted with a nude base, and the tips are adorned with a gradient of caramel to chocolate brown. One nail features a gold heart accent, adding a touch of whimsy to the overall design. This manicure is perfect for someone who loves the elegance of French tips but wants to add a contemporary and stylish twist.

Consumables:
- Nail polish: OPI Nail Lacquer in “Dulce de Leche”
- Nail polish: Essie Nail Polish in “Chocolate Cakes”
- Gold heart accent: Nail charm or decal
- Base coat: Essie First Base Base Coat
- Top coat: Sally Hansen Miracle Gel Top Coat
Instructions to Create:
- Start with Essie First Base Base Coat to ensure the polish adheres well.
- Paint the nails with OPI’s “Dulce de Leche” as the base color.
- Create the French tips using Essie’s “Chocolate Cakes,” blending from caramel to chocolate for a gradient effect.
- Apply a gold heart accent on one nail for a cute and unique touch.
- Seal the design with Sally Hansen Miracle Gel Top Coat for a glossy and long-lasting finish.
- Shape the nails into a coffin style to complement the French tips and gold accent, ensuring a chic and polished look.
Save Pin
