
22 trendy and stylish 4th of July nail design ideas for a festive holiday look
When it comes to celebrating the 4th of July, your nails can be just as festive as your outfit. Whether you’re attending a barbecue, watching fireworks, or just enjoying the summer vibes, a patriotic manicure is the perfect accessory. In this article, we’ll explore a variety of 4th of July nail designs that range from subtle and classy to bold and trendy. Let’s dive into the world of red, white, and blue nail art!
Star-Spangled Elegance
This elegant nail design features a deep blue base color adorned with white stars and red stripes, creating a sophisticated yet festive look. The design captures the essence of the American flag, with a smooth, glossy finish that adds a touch of class. The intricate detailing on the accent nails highlights the craftsmanship, making this design perfect for those who want to show their patriotism in a subtle yet impactful way.

Consumables:
- Deep blue nail polish (e.g., OPI Infinite Shine in “Less is Norse”)
- White nail polish for stars (e.g., Essie Nail Polish in “Blanc”)
- Red nail polish for stripes (e.g., Sally Hansen Miracle Gel in “Red Eye”)
- Star-shaped nail stencils or stickers
- Thin nail art brush for precise detailing
- Top coat for a glossy finish (e.g., Seche Vite Dry Fast Top Coat)
Instructions:
- Apply a base coat to protect your natural nails.
- Paint all nails with two coats of deep blue polish.
- Use a thin nail art brush and white polish to create stars on accent nails.
- Add red stripes with the same brush, ensuring even spacing.
- Seal the design with a glossy top coat to prevent chipping.
Patriotic Stripes and Stars
This bold and vibrant nail design showcases red and white stripes alongside blue accents with white stars. The mix of patterns on each nail creates a dynamic and eye-catching look. Perfect for those who want to make a statement, this design is both playful and patriotic. The glossy finish enhances the colors, making the nails look polished and professional.

Consumables:
- Red nail polish (e.g., Essie Nail Polish in “Really Red”)
- White nail polish (e.g., OPI Nail Lacquer in “Alpine Snow”)
- Blue nail polish (e.g., China Glaze Nail Lacquer in “First Mate”)
- Star-shaped nail stencils or stickers
- Striping tape for clean lines
- Top coat for a shiny finish (e.g., Essie Gel Couture Top Coat)
Instructions:
- Apply a base coat to your nails.
- Paint alternating nails with red and white polish.
- Use striping tape to create clean lines for the stripes.
- Paint the remaining nails blue and add white stars using stencils or a nail art brush.
- Finish with a top coat to seal and protect the design.
Fireworks and Stars
This design features a unique combination of red, blue, and white with star and fireworks accents. The bright red nails contrast beautifully with the intricate blue and white designs, making it a standout choice for 4th of July celebrations. The matte finish gives it a trendy and modern look, perfect for those who love to experiment with nail art.

Consumables:
- Bright red nail polish (e.g., Zoya Nail Polish in “Sooki”)
- Blue nail polish (e.g., Deborah Lippmann Gel Lab Pro in “Blue Orchid”)
- White nail polish (e.g., SinfulColors Nail Polish in “Snow Me White”)
- Matte top coat (e.g., OPI Matte Top Coat)
- Fireworks nail decals or stamps
- Nail art brush for detailing
Instructions:
- Start with a base coat to protect your nails.
- Apply two coats of bright red polish on select nails.
- Paint the remaining nails blue and white.
- Use a nail art brush to create fireworks designs on accent nails.
- Apply a matte top coat to achieve the trendy matte finish.
Sparkling French Tips
This classy nail design combines the timeless French tip with a patriotic twist. The tips feature red, white, and blue glitter, creating a sparkling effect that is both elegant and festive. This design is perfect for those who prefer a more subtle approach to their 4th of July nails but still want to add a touch of sparkle.

Consumables:
- Clear base coat (e.g., Orly Bonder Base Coat)
- Red, white, and blue glitter nail polish (e.g., ILNP in “Fireworks”)
- Thin nail art brush
- Clear top coat for sealing (e.g., Sally Hansen Insta-Dri Top Coat)
Instructions:
- Apply a clear base coat to your nails.
- Using a thin brush, apply red, white, and blue glitter polish to the tips of your nails.
- Ensure each color blends seamlessly into the next.
- Finish with a clear top coat to seal the glitter and add shine.
Bold and Festive
For those who love bold and daring nail designs, this look is perfect. Featuring long stiletto nails with a combination of stripes, stars, and abstract designs, this manicure is sure to turn heads. The mix of glossy and matte finishes adds depth and interest to the design, making it ideal for a standout 4th of July look.

Consumables:
- Red nail polish (e.g., OPI Nail Lacquer in “Big Apple Red”)
- White nail polish (e.g., Essie Nail Polish in “Blanc”)
- Blue nail polish (e.g., OPI Infinite Shine in “Do You Sea What I Sea?”)
- Matte top coat (e.g., Essie Matte About You)
- Nail art brush for detailed designs
- Striping tape for clean lines
- Star-shaped nail stencils or stickers
Instructions:
- Apply a base coat to your nails.
- Paint each nail with a different base color (red, white, or blue).
- Use striping tape and a nail art brush to create stripes, stars, and abstract designs.
- Apply a mix of glossy and matte top coats to different nails for a varied finish.
Glittery Patriotic Nails
This design is all about sparkle and shine, perfect for those who want their nails to be the highlight of their 4th of July ensemble. The nails feature a combination of blue glitter, red glitter, and white stripes with a glossy finish. The blue nails are adorned with white stars, creating a striking contrast that captures the spirit of the American flag. The use of glitter adds a festive and celebratory feel to the design.

Consumables:
- Blue glitter nail polish (e.g., KBShimmer in “Set in Ocean”)
- Red glitter nail polish (e.g., ILNP in “Cherry Luxe”)
- White nail polish for stripes (e.g., Essie Nail Polish in “Blanc”)
- Star-shaped nail stencils or stickers
- Top coat for a glossy finish (e.g., Seche Vite Dry Fast Top Coat)
Instructions:
- Apply a base coat to protect your natural nails.
- Paint alternating nails with blue glitter and red glitter polish.
- Use a thin brush to create white stripes on the red glitter nails.
- Add white stars to the blue glitter nails using stencils or stickers.
- Seal the design with a glossy top coat to enhance the sparkle.
Fun and Playful Independence Day Nails
This playful nail design incorporates various elements of Americana, from the stars and stripes to patriotic symbols like ice cream cones and watermelon slices. The pastel base colors give the design a cute and whimsical feel, perfect for a fun 4th of July celebration. The mix of detailed illustrations and classic patriotic patterns makes this design unique and eye-catching.

Consumables:
- Pastel pink, blue, and red nail polish (e.g., Essie Nail Polish in “Fiji”, “Bikini So Teeny”, and “Forever Yummy”)
- White nail polish (e.g., OPI Nail Lacquer in “Alpine Snow”)
- Nail art pens or brushes for detailed illustrations
- Top coat for a shiny finish (e.g., Sally Hansen Insta-Dri Top Coat)
Instructions:
- Apply a base coat to your nails.
- Paint each nail with a different pastel color.
- Use nail art pens or brushes to draw stars, stripes, and patriotic symbols on each nail.
- Seal the design with a top coat to protect the artwork.
Bold and Patriotic Lips and Stripes
This bold design features a striking combination of blue nails with a detailed lip illustration on a white base, and the classic stars and stripes pattern. The lips, painted in red, white, and blue, add a fun and trendy twist to the traditional 4th of July nails. This design is perfect for those who love to experiment with bold and unique nail art.

Consumables:
- Blue nail polish (e.g., Zoya Nail Polish in “Song”)
- White nail polish (e.g., Essie Nail Polish in “Blanc”)
- Red nail polish for the lips (e.g., OPI Nail Lacquer in “Big Apple Red”)
- Thin nail art brushes for detailed work
- Top coat for a glossy finish (e.g., Essie Gel Couture Top Coat)
Instructions:
- Apply a base coat to your nails.
- Paint alternating nails with blue and white polish.
- Use a thin brush to paint the lips and stripes on the white base nails.
- Add small white stars to the blue nails using stencils or a brush.
- Finish with a glossy top coat to seal the design.
Classic Stars and Stripes French Tip
This design combines the elegance of a French tip manicure with patriotic stars and stripes. The blue nails with white stars add a bold contrast, while the red and white striped tips keep it classic and understated. This look is perfect for those who want a more refined and classy 4th of July manicure.

Consumables:
- Blue nail polish (e.g., OPI Infinite Shine in “Do You Sea What I Sea?”)
- White nail polish (e.g., Essie Nail Polish in “Blanc”)
- Red nail polish for stripes (e.g., Sally Hansen Miracle Gel in “Red Eye”)
- Thin nail art brush for detailing
- Top coat for a glossy finish (e.g., Seche Vite Dry Fast Top Coat)
Instructions:
- Apply a base coat to your nails.
- Paint two nails blue and add white stars using a thin brush or stencil.
- Create red and white striped tips on the remaining nails.
- Seal the design with a glossy top coat to enhance the look.
Rhinestone Embellished Patriotic Nails
This eye-catching design features long nails with blue stars, red rhinestones, and a glossy finish. The use of rhinestones adds a touch of glamour and luxury to the classic stars and stripes pattern. This design is perfect for those who love a bit of sparkle and want their nails to stand out during the 4th of July celebrations.

Consumables:
- Blue nail polish (e.g., Deborah Lippmann Gel Lab Pro in “Blue Orchid”)
- White nail polish (e.g., SinfulColors Nail Polish in “Snow Me White”)
- Red rhinestones for nail art
- Nail glue for rhinestones
- Top coat for a glossy finish (e.g., Sally Hansen Insta-Dri Top Coat)
Instructions:
- Apply a base coat to your nails.
- Paint two nails blue and add white stars using a thin brush or stencil.
- Paint the remaining nails white and add red rhinestones in a striped pattern using nail glue.
- Finish with a glossy top coat to seal the design and secure the rhinestones.
Bold Stars and Stripes Manicure
This vibrant manicure features bold stars and stripes on alternating nails, showcasing a patriotic theme with a glossy finish. The design uses a rich blue base color with white stars and contrasting red stripes, capturing the essence of the American flag. The mix of solid colors and detailed patterns creates a dynamic and eye-catching look perfect for any 4th of July celebration.

Consumables:
- Red nail polish (e.g., OPI Nail Lacquer in “Big Apple Red”)
- White nail polish (e.g., Essie Nail Polish in “Blanc”)
- Blue nail polish (e.g., Sally Hansen Miracle Gel in “Midnight Mod”)
- Star-shaped nail stencils or stickers
- Striping tape for clean lines
- Top coat for a glossy finish (e.g., Seche Vite Dry Fast Top Coat)
Instructions:
- Apply a base coat to protect your nails.
- Paint alternating nails with red and blue polish.
- Use striping tape to create clean white stripes on red nails.
- Apply star stencils on the blue nails and fill in with white polish.
- Seal the design with a glossy top coat to ensure longevity.
Classic Patriotic Stars
This classic design features a deep blue polish on most nails, with accent nails showcasing clear bases with red, white, and blue stars. The glossy finish enhances the vibrant colors, making the stars pop against the clear background. This design is perfect for those who prefer a simple yet festive look for the 4th of July.

Consumables:
- Blue nail polish (e.g., OPI Infinite Shine in “Indignantly Indigo”)
- Clear nail polish for base (e.g., Essie Nail Polish in “Mademoiselle”)
- Red, white, and blue star-shaped nail stickers
- Top coat for shine (e.g., Sally Hansen Insta-Dri Top Coat)
Instructions:
- Apply a clear base coat to your nails.
- Paint most nails with blue polish.
- Apply star-shaped stickers on the clear accent nails.
- Finish with a top coat to seal the design and add a glossy shine.
Polka Dot Patriotism
This fun and whimsical design incorporates polka dots with traditional stars and stripes, offering a playful twist on classic patriotic nails. The blue nails are dotted with white, while the accent nails feature red stripes and star patterns, creating a cohesive and lively look perfect for summer festivities.

Consumables:
- Blue nail polish (e.g., China Glaze Nail Lacquer in “First Mate”)
- Red nail polish (e.g., Zoya Nail Polish in “America”)
- White nail polish (e.g., OPI Nail Lacquer in “Alpine Snow”)
- Dotting tool for polka dots
- Star-shaped nail stickers
- Striping tape for stripes
- Top coat for a smooth finish (e.g., Seche Vite Dry Fast Top Coat)
Instructions:
- Apply a base coat to protect your nails.
- Paint alternating nails blue and white.
- Use a dotting tool to create white polka dots on blue nails.
- Create red and white stripes on white nails using striping tape.
- Add star-shaped stickers to the accent nails.
- Seal the design with a top coat for a polished look.
Glittering Blue Elegance
This design features long stiletto nails with a glittery blue base and a single accent nail displaying red and white stripes with polka dots. The glitter adds a festive sparkle, making the nails perfect for an elegant yet fun 4th of July celebration. The combination of the solid glittery blue with the detailed accent nail creates a striking contrast.

Consumables:
- Blue glitter nail polish (e.g., ILNP in “Private Reserve”)
- Red and white nail polish (e.g., Essie Nail Polish in “Really Red” and “Blanc”)
- Dotting tool for polka dots
- Striping tape for clean lines
- Top coat for a glossy finish (e.g., Seche Vite Dry Fast Top Coat)
Instructions:
- Apply a base coat to your nails.
- Paint most nails with blue glitter polish.
- Create red and white stripes on the accent nail using striping tape.
- Add white polka dots using a dotting tool.
- Seal the design with a glossy top coat to enhance the glitter.
Sparkling Patriotic Nails
This design combines red, white, and blue glitter polishes with star patterns to create a sparkling, festive look. The long nails allow for more detailed designs, with alternating patterns of stars and stripes. The glitter finish makes these nails perfect for anyone looking to add some sparkle to their 4th of July celebrations.

Consumables:
- Blue glitter nail polish (e.g., KBShimmer in “Set in Ocean”)
- Red glitter nail polish (e.g., ILNP in “Cherry Luxe”)
- White nail polish (e.g., Essie Nail Polish in “Blanc”)
- Star-shaped nail stickers or stencils
- Striping tape for clean lines
- Top coat for a glossy finish (e.g., Sally Hansen Insta-Dri Top Coat)
Instructions:
- Apply a base coat to your nails.
- Paint alternating nails with blue and red glitter polish.
- Use striping tape to create clean white stripes on red nails.
- Apply star stencils on blue nails and fill in with white polish.
- Seal the design with a glossy top coat to enhance the sparkle.
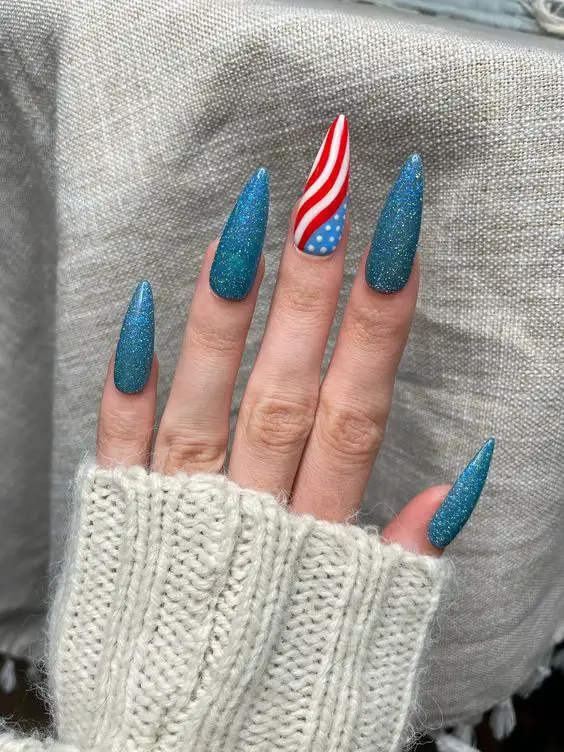
Bold and Sleek Stars and Stripes
This striking design features long, sleek stiletto nails with a patriotic theme. The red nails have white stripes running vertically, creating a sleek and elegant look. The blue nails, adorned with white stars, add a bold contrast. The glossy finish enhances the overall appearance, making these nails perfect for a dramatic 4th of July statement.

Consumables:
- Red nail polish (e.g., OPI Nail Lacquer in “Big Apple Red”)
- White nail polish (e.g., Essie Nail Polish in “Blanc”)
- Blue nail polish (e.g., China Glaze Nail Lacquer in “First Mate”)
- Star-shaped nail stencils or stickers
- Striping tape for clean lines
- Top coat for a glossy finish (e.g., Seche Vite Dry Fast Top Coat)
Instructions:
- Apply a base coat to protect your nails.
- Paint alternating nails with red and blue polish.
- Use striping tape to create clean white stripes on red nails.
- Apply star stencils on the blue nails and fill in with white polish.
- Seal the design with a glossy top coat to ensure longevity.
Patriotic Glamour
This glamorous design features long nails with a mix of glitter, stars, stripes, and rhinestone embellishments. The nails showcase a variety of patriotic elements, including a sparkling blue base, red glitter, white stripes, and intricate detailing. The addition of rhinestones adds a touch of luxury and sophistication, making this design perfect for those who love a bit of bling.

Consumables:
- Blue glitter nail polish (e.g., ILNP in “Private Reserve”)
- Red glitter nail polish (e.g., ILNP in “Cherry Luxe”)
- White nail polish (e.g., Essie Nail Polish in “Blanc”)
- Rhinestones for nail art
- Nail glue for rhinestones
- Star-shaped nail stickers
- Top coat for a glossy finish (e.g., Sally Hansen Insta-Dri Top Coat)
Instructions:
- Apply a base coat to your nails.
- Paint each nail with a different base color or pattern.
- Use striping tape and nail art brushes to create stripes and star patterns.
- Apply rhinestones using nail glue for added sparkle.
- Finish with a glossy top coat to seal the design.
Patriotic Stiletto Nails
This design features long stiletto nails with a variety of patriotic elements, including blue nails with white stars, red glitter, and red and white striped nails. The mix of glitter and matte finishes adds depth and interest to the design. This look is perfect for those who want a bold and dramatic 4th of July manicure.

Consumables:
- Blue nail polish (e.g., Zoya Nail Polish in “Song”)
- Red glitter nail polish (e.g., OPI Nail Lacquer in “Big Apple Red”)
- White nail polish (e.g., OPI Nail Lacquer in “Alpine Snow”)
- Star-shaped nail stencils or stickers
- Striping tape for clean lines
- Top coat for a glossy finish (e.g., Seche Vite Dry Fast Top Coat)
Instructions:
- Apply a base coat to your nails.
- Paint each nail with a different base color or pattern.
- Use striping tape to create clean white stripes on red nails.
- Apply star stencils on the blue nails and fill in with white polish.
- Seal the design with a glossy top coat to enhance the look.
Glittering Patriotic Elegance
This design features a combination of red, blue, and silver glitter polishes, creating a sparkling and festive look. The long stiletto nails allow for more detailed designs, with alternating colors and a glossy finish. This look is perfect for those who love glitter and want their nails to shine during the 4th of July celebrations.

Consumables:
- Red glitter nail polish (e.g., ILNP in “Cherry Luxe”)
- Blue glitter nail polish (e.g., KBShimmer in “Set in Ocean”)
- Silver glitter nail polish (e.g., Zoya Nail Polish in “Trixie”)
- Top coat for a glossy finish (e.g., Sally Hansen Insta-Dri Top Coat)
Instructions:
- Apply a base coat to your nails.
- Paint alternating nails with red, blue, and silver glitter polish.
- Seal the design with a glossy top coat to enhance the sparkle.
Matte Patriotic Nails
This design combines matte red nails with white wavy lines and a blue accent nail with white stars. The matte finish gives the design a modern and sophisticated look, perfect for those who prefer a more understated yet festive manicure. The contrasting colors and patterns make this design stand out.

Consumables:
- Red matte nail polish (e.g., Essie Matte About You Top Coat over a red base)
- Blue nail polish (e.g., OPI Infinite Shine in “Indignantly Indigo”)
- White nail polish (e.g., Essie Nail Polish in “Blanc”)
- Thin nail art brush for detailing
- Star-shaped nail stickers
- Matte top coat (e.g., Essie Matte About You)
Instructions:
- Apply a base coat to your nails.
- Paint most nails with matte red polish.
- Paint the accent nail blue and add white stars using a thin brush or stickers.
- Create white wavy lines on the red nails using a nail art brush.
- Finish with a matte top coat to seal the design.
Sparkling Fireworks Design
This design features a stunning combination of red, white, and blue polishes with sparkling glitter accents. The long stiletto nails are adorned with intricate designs resembling fireworks, creating a festive and eye-catching look perfect for Independence Day celebrations. The addition of rhinestones adds extra sparkle and dimension.

Consumables:
- Red nail polish (e.g., OPI Nail Lacquer in “Big Apple Red”)
- Blue nail polish (e.g., China Glaze Nail Lacquer in “First Mate”)
- White nail polish (e.g., Essie Nail Polish in “Blanc”)
- Silver glitter polish (e.g., Zoya Nail Polish in “Trixie”)
- Rhinestones for nail art
- Nail glue for rhinestones
- Nail art brushes for detailing
- Top coat for a glossy finish (e.g., Seche Vite Dry Fast Top Coat)
Instructions:
- Apply a base coat to your nails.
- Paint each nail with a different base color (red, white, or blue).
- Use nail art brushes to create intricate fireworks designs with glitter polish.
- Add rhinestones using nail glue for extra sparkle.
- Seal the design with a glossy top coat.
Subtle Patriotic Elegance
This design features long nails with a mix of white, silver, blue with stars, and red with stripes. The subtle yet elegant design combines glossy and metallic finishes, creating a sophisticated look perfect for those who prefer a more understated patriotic manicure. The use of different finishes adds depth and interest to the design.

Consumables:
- White nail polish (e.g., OPI Nail Lacquer in “Alpine Snow”)
- Silver metallic polish (e.g., Zoya Nail Polish in “Trixie”)
- Blue nail polish (e.g., China Glaze Nail Lacquer in “First Mate”)
- Red nail polish (e.g., Essie Nail Polish in “Really Red”)
- Star-shaped nail stencils or stickers
- Striping tape for clean lines
- Top coat for a glossy finish (e.g., Sally Hansen Insta-Dri Top Coat)
Instructions:
- Apply a base coat to your nails.
- Paint each nail with a different base color or pattern.
- Use striping tape to create clean white stripes on red nails.
- Apply star stencils on the blue nails and fill in with white polish.
- Finish with a glossy top coat to enhance the design.
Save Pin
