
22 Trendy Fall Nails Glitter Designs: Ombre, Accent, and Simple Sparkle Ideas
As the leaves turn and the air becomes crisp, it’s time to refresh our nail game with the latest fall nails glitter trends. From Ombre fades to Accent nails, there’s a glittery design for every style. But what makes a glitter manicure perfect for fall? Is it the Brown, Neutral, and Orange tones, or perhaps the Dark and mysterious hues? In this article, we’ll explore stunning fall nails glitter ideas, focusing on unique Designs that embody the essence of the season. Whether you’re into Simple elegance or Trendy sparkles, these nail designs are sure to inspire. Let’s dive into the world of autumn glitter nails, where each design tells a story of warmth, style, and sophistication.
Autumn Sparkle: A Classic Glitter French Manicure
In this sophisticated twist on the classic French manicure, the tips are adorned with fine silver glitter, creating a delicate and Sparkle-infused look. The nails feature a neutral base, perfectly complementing the Accent glitter on the tips. This design is ideal for those who prefer Simple elegance with a touch of glam, offering a versatile look suitable for both casual and formal occasions.

Consumables:
-
- Base coat: Essie Ridge Filling Base Coat
- Nude polish: OPI Nail Lacquer in “Bubble Bath”
- Silver glitter polish: Sally Hansen “Disco Ball”
- Top coat: Seche Vite Dry Fast Top Coat
DIY Instructions:
-
- Start with a base coat to protect your nails.
- Apply two thin layers of the nude polish, letting each layer dry completely.
- Using a thin brush, apply the silver glitter polish to the tips, creating a French tip effect.
- Seal the design with a top coat to ensure long-lasting Sparkle and shine.
Ombre Elegance: Gradient Glitter Nails
This Ombre design showcases a beautiful gradient from a soft nude base to a dazzling glitter tip. The subtle shift from neutral to glitter creates a mesmerizing effect that’s both Cute and Trendy. It’s a perfect choice for those looking to add a bit of Sparkle to their fall look without overwhelming their style.

Consumables:
-
- Base coat: Orly Bonder Rubberized Basecoat
- Nude polish: Zoya Nail Polish in “Rue”
- Glitter polish: China Glaze “Fairy Dust”
- Sponge for blending
- Top coat: Sally Hansen Miracle Gel Top Coat
DIY Instructions:
-
- Apply the base coat to protect your nails.
- Paint the entire nail with the nude polish and let it dry.
- Dab a small amount of glitter polish onto a sponge and gently apply it to the tips, blending upward for the Ombre effect.
- Finish with a top coat to lock in the design and add a beautiful shine.
Metallic Moon: Chic Glitter Half-Moons
In this chic and Trendy design, glitter half-moons at the base of each nail add a touch of elegance. The rest of the nail is kept neutral, allowing the glitter to shine as the focal point. This look is perfect for those who love a Simple yet sophisticated style with a bit of Sparkle.

Consumables:
-
- Base coat: Deborah Lippmann “Hard Rock”
- Neutral polish: Essie “Ballet Slippers”
- Silver glitter polish: ILNP “Mega”
- Half-moon nail guides
- Top coat: CND Vinylux Weekly Top Coat
DIY Instructions:
-
- Apply the base coat to prepare your nails.
- Place the half-moon guides at the base of each nail.
- Apply the neutral polish, covering the entire nail except the guided area. Remove guides after polish sets.
- Fill the half-moon area with the silver glitter polish.
- Seal with a top coat to protect the design and add durability.
Wavy Glam: Elegant Glitter Waves
Featuring delicate glitter waves over a nude base, this design is perfect for a sophisticated yet Cute fall look. The Dark silver waves add a touch of elegance, making it suitable for both day and evening wear. It’s a stylish option for those who want to try something Trendy yet subtle.

Consumables:
-
- Base coat: OPI Nail Envy
- Nude polish: Butter London “Mum’s the Word”
- Silver glitter liner: Kiss Nail Art Paint in “Silver Glitter”
- Fine brush for detailing
- Top coat: Revlon Quick Dry Top Coat
DIY Instructions:
-
- Begin with a base coat to ensure a smooth surface.
- Apply the nude polish as the base color.
- Use the fine brush to draw silver glitter waves across the nails.
- Allow the design to dry, then apply the top coat to seal and protect the manicure.
Glitter Glam: Bold Pink and Plaid
This bold design combines bright pink glitter with a trendy plaid Accent nail, offering a striking contrast. The playful use of glitter and pattern creates a standout look perfect for fall parties and events. The combination of Pink, Brown, and Neutral tones with Black and white plaid makes it versatile and Cute.

Consumables:
-
- Base coat: CND Stickey Anchoring Base Coat
- Pink glitter polish: Essie “A Cut Above”
- Black and white striping polish: LA Colors Art Deco
- Top coat: Orly Glosser
DIY Instructions:
-
- Start with the base coat to protect your nails.
- Apply the pink glitter polish to all nails except the ring finger.
- On the ring finger, use the striping polish to create a plaid pattern.
- Finish with a top coat to enhance the shine and durability of the design.
Golden Glitter Tips: Classic Elegance
This design features a sophisticated nude base with Golden Glitter tips, creating an elegant and timeless look. The almond-shaped nails add a touch of grace, while the golden glitter elevates the manicure, making it perfect for formal occasions. The glitter tips are both subtle and stunning, adding a hint of Sparkle without overpowering the overall look.

Consumables:
-
- Base coat: Nailtiques Formula 2
- Nude polish: Zoya “Jenna”
- Gold glitter polish: Orly “Luxe”
- Top coat: Essie Gel Setter
DIY Instructions:
-
- Apply a base coat to prepare your nails.
- Paint the entire nail with the nude polish and let it dry.
- Carefully apply the gold glitter polish to the tips, using a nail guide for a clean edge.
- Finish with a top coat to seal in the design and add a glossy finish.
Lilac Dreams: Pastel Glitter Delight
This adorable design features a pastel lilac base adorned with fine glitter, creating a dreamy and delicate look. The glitter adds a Sparkle that makes the pastel color pop, perfect for those who love Simple yet eye-catching nails. The short, rounded shape adds to the overall cuteness, making it a great option for everyday wear.

Consumables:
-
- Base coat: OPI Natural Nail Base Coat
- Lilac polish: Sally Hansen “Laven-Dear”
- Fine glitter top coat: China Glaze “Fairy Dust”
- Top coat: INM Out the Door
DIY Instructions:
-
- Start with a base coat to protect your nails.
- Apply two coats of the lilac polish, allowing each coat to dry.
- Add a layer of the fine glitter top coat for a subtle shimmer.
- Seal with a top coat to ensure a long-lasting finish.
Pink Glitter Tips: Bold and Beautiful
This bold design features clear nails with chunky pink glitter tips, creating a striking contrast. The glitter adds a playful Accent to the nails, making them perfect for a night out or a special event. The clear base allows the glitter to stand out, adding a touch of Trendy flair to the look.

Consumables:
-
- Base coat: Zoya Anchor Base Coat
- Clear polish: Sally Hansen “Clear’d for Takeoff”
- Chunky pink glitter: OPI “Pinking of You”
- Top coat: Revlon Extra Life No Chip Top Coat
DIY Instructions:
-
- Begin with a base coat to protect your nails.
- Apply a clear polish base.
- Dip the tips into the chunky pink glitter, ensuring even coverage.
- Finish with a top coat to lock in the glitter and add shine.
Leopard Glitter: Wild Fall Glam
This unique design combines a nude base with gold glitter and leopard print accents, creating a wild and glamorous look. The Brown and nude tones are perfect for fall, while the glitter and leopard spots add a bold Accent. This design is ideal for those looking to make a statement with their nails.

Consumables:
-
- Base coat: Deborah Lippmann “All About That Base”
- Nude polish: OPI “Dulce de Leche”
- Gold glitter polish: Butter London “West End Wonderland”
- Black nail art pen: Sally Hansen I Love Nail Art
- Top coat: Seche Vite
DIY Instructions:
-
- Apply the base coat to prep your nails.
- Use the nude polish as the base color and let it dry.
- Create leopard spots with the black nail art pen, and add gold glitter accents.
- Seal the design with a top coat for a glossy finish.
Pastel Glitter Mix: Soft and Sweet
This sweet and delicate design features a mix of pastel shades with a touch of gold glitter on the ring finger. The combination of Pink, lavender, and nude creates a soft and Cute look, while the gold glitter adds a hint of glam. This design is perfect for a Simple and understated fall look.

Consumables:
-
- Base coat: CND Stickey Base Coat
- Pink polish: Essie “Fiji”
- Lavender polish: OPI “Do You Lilac It?”
- Gold glitter polish: Sinful Colors “All About You”
- Top coat: Sally Hansen Insta-Dri
DIY Instructions:
-
- Start with a base coat to ensure smooth application.
- Paint each nail with the chosen pastel shade, alternating colors as desired.
- Add gold glitter to the ring finger for a pop of Sparkle.
- Finish with a top coat to protect the design and add shine.
Golden Glow: Subtle Shimmer
This design features a delicate golden glitter Ombre effect on a clear nude base. The soft transition from nude to glitter creates a warm and elegant look, perfect for a subtle yet festive fall nails glitter style. The almond shape adds sophistication, making this a versatile design for both everyday wear and special occasions.

Consumables:
-
- Base coat: Essie All In One
- Nude polish: OPI “Samoan Sand”
- Gold glitter powder: Kiara Sky “Fairy Dust”
- Top coat: Gelish Top It Off
DIY Instructions:
-
- Start with a base coat to protect your nails.
- Apply the nude polish and let it dry completely.
- Use a sponge to apply the gold glitter powder, focusing on the tips and blending upwards for an Ombre effect.
- Finish with a top coat to seal the design and add shine.
Black and Gold Elegance: Modern French Manicure
This chic design combines a classic French manicure with a modern twist. The black tips are highlighted with a thin gold line, and an accent nail features a delicate black floral pattern. The combination of Black and gold makes this design both Trendy and sophisticated, ideal for a bold yet elegant fall look.

Consumables:
-
- Base coat: Butter London Nail Foundation
- Nude polish: Essie “Mademoiselle”
- Black polish: Sally Hansen “Black Out”
- Gold striping tape
- Black nail art pen: Migi Nail Art
- Top coat: Essie Good To Go
DIY Instructions:
-
- Apply the base coat to prepare your nails.
- Use the nude polish as a base and let it dry.
- Apply the black polish to the tips, and use the gold striping tape for a clean line.
- Add the floral pattern with the nail art pen on the accent nail.
- Seal with a top coat for a glossy finish and long-lasting wear.
Rose Gold Glam: Soft and Shimmering
This design showcases a beautiful rose gold glitter polish on the ring and middle fingers, paired with a soft nude polish on the rest. The Sparkle of the glitter complements the nude tones, creating a delicate and romantic look. This Simple yet stunning design is perfect for those who prefer a more understated style with a touch of glam.

Consumables:
-
- Base coat: OPI Nail Envy
- Nude polish: Essie “Topless & Barefoot”
- Rose gold glitter polish: Zoya “Ginni”
- Top coat: Seche Vite Dry Fast Top Coat
DIY Instructions:
-
- Begin with a base coat to protect your nails.
- Apply the nude polish to all nails except the ring and middle fingers.
- Paint the ring and middle fingers with the rose gold glitter polish.
- Finish with a top coat to add a glossy shine and protect the design.
Galaxy Glitter: Cosmic Fall Vibes
This cosmic-inspired design features a stunning mix of blue, silver, and purple glitter on a clear nude base. The chunky glitter pieces create a galaxy effect, making it a bold and eye-catching choice for fall. The use of cool tones adds a Dark and mysterious element, perfect for those who love a unique and Trendy look.

Consumables:
-
- Base coat: Nail Tek Foundation
- Clear polish: OPI “Top Coat”
- Chunky blue and silver glitter: Color Club “Blue Heaven”
- Top coat: Glisten & Glow Top Coat
DIY Instructions:
-
- Apply a base coat to ensure a smooth surface.
- Use the clear polish as a base and let it dry.
- Apply the chunky glitter polish, focusing on the base and blending upward.
- Finish with a top coat to secure the glitter and add shine.
Matte Glitter: Frosted Elegance
This design features a matte finish with fine silver glitter, creating a frosted and elegant look. The long, stiletto shape adds drama, while the matte finish softens the overall appearance. The Simple and Neutral tones make this design versatile and perfect for any fall occasion.

Consumables:
-
- Base coat: CND Stickey Base Coat
- Nude matte polish: Essie “Matte About You”
- Fine silver glitter: Ciaté London “Snow Globe”
- Top coat: Essie Matte About You Top Coat
DIY Instructions:
-
- Apply the base coat to protect your nails.
- Paint the nails with the nude matte polish and let it dry.
- Add a layer of fine silver glitter polish for a subtle Sparkle.
- Finish with a matte top coat to complete the frosted look.
Festive Red and Gold: Bold and Glamorous
This design features a vibrant red polish paired with bold gold glitter accent nails. The combination of red and gold exudes a festive and luxurious vibe, perfect for fall celebrations. The glossy finish and square shape add a modern touch, making this design ideal for those who love to make a statement with their nails.

Consumables:
-
- Base coat: OPI Nail Lacquer Base Coat
- Red polish: Essie “Forever Yummy”
- Gold glitter polish: Deborah Lippmann “Boom Boom Pow”
- Top coat: INM Out The Door
DIY Instructions:
-
- Start with a base coat to protect your nails.
- Apply the red polish on all nails except the ring finger.
- Use the gold glitter polish on the ring fingers for an accent.
- Seal the design with a top coat to enhance shine and longevity.
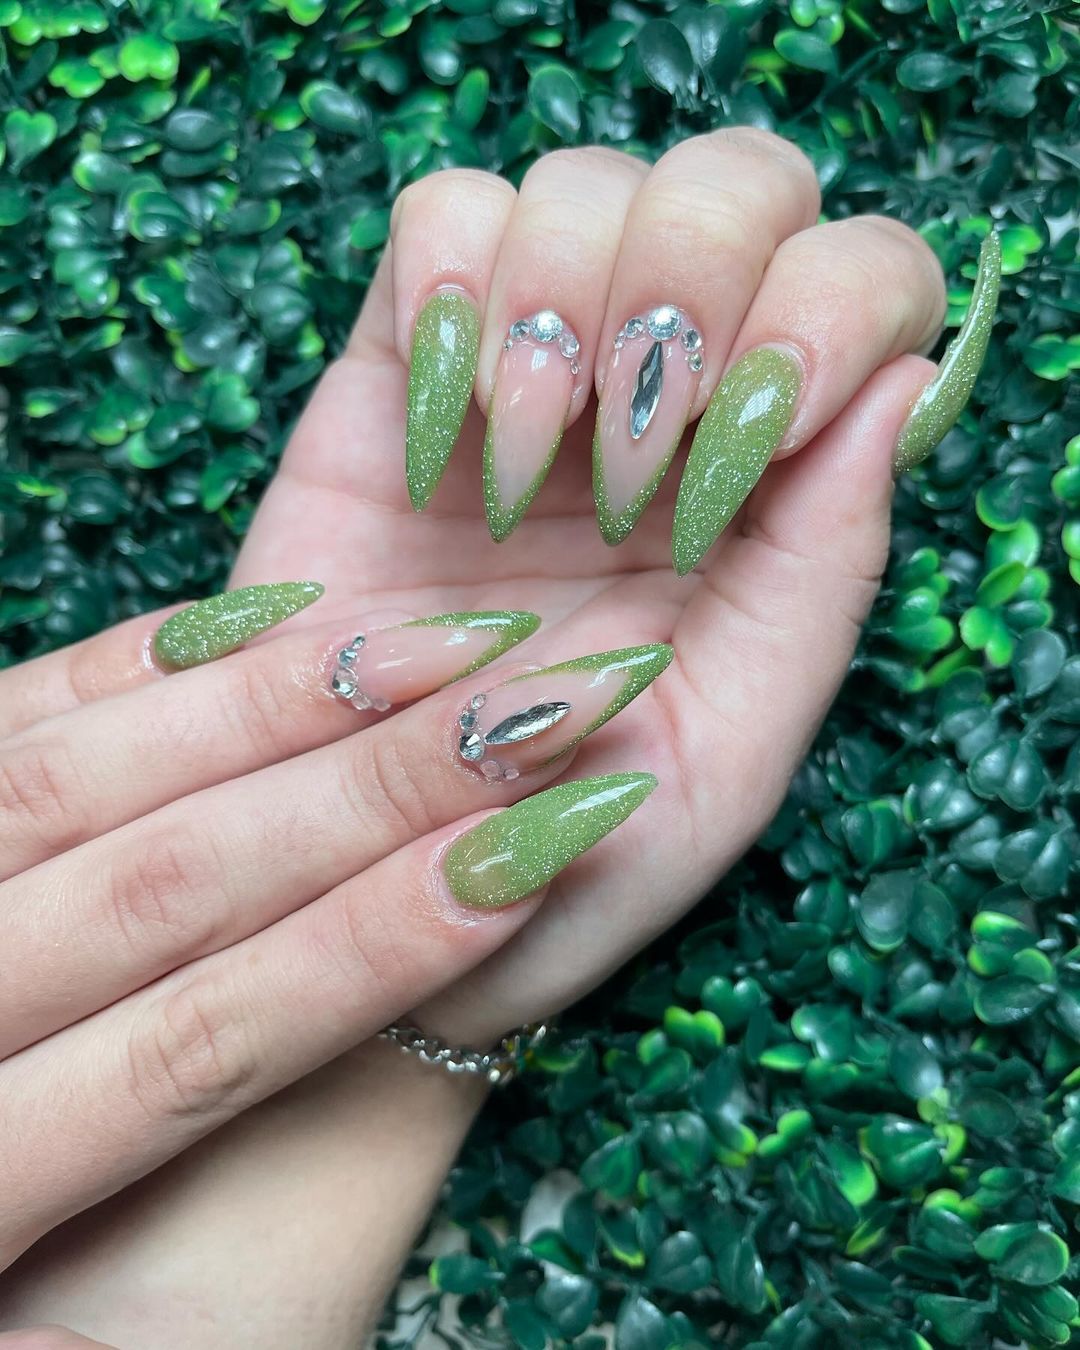
Green Jewel: Elegant and Regal
This design showcases a rich green glitter polish with jewel accents, creating a regal and luxurious look. The almond shape and clear base accentuate the glitter and jewels, making the design stand out. The use of large jewels adds a dramatic touch, perfect for a special occasion or a night out.

Consumables:
-
- Base coat: Zoya Anchor Base Coat
- Green glitter polish: OPI “Jade Is The New Black”
- Nail jewels: Swarovski Crystals
- Nail glue
- Top coat: Seche Vite
DIY Instructions:
-
- Apply the base coat to prep your nails.
- Use the green glitter polish on the entire nail.
- Place the nail jewels near the cuticle area and secure them with nail glue.
- Finish with a top coat to keep the jewels in place and add a glossy finish.
White and Gold Florals: Soft and Delicate
This delicate design features a white French tip with subtle gold glitter accents and hand-painted white floral details. The combination of soft pink, white, and gold creates a gentle and feminine look. The almond shape and minimalist design make it versatile for both everyday wear and special occasions.

Consumables:
-
- Base coat: Essie First Base
- Soft pink polish: OPI “Bubble Bath”
- White polish: Sally Hansen “White On”
- Gold glitter polish: China Glaze “Goldie But Goodie”
- Nail art brush
- Top coat: Essie Gel Couture
DIY Instructions:
-
- Start with a base coat to protect your nails.
- Apply the soft pink polish as the base color.
- Create the French tips using the white polish and add gold glitter accents.
- Use the nail art brush to paint white floral designs.
- Seal with a top coat for a glossy finish.
Blue and Silver Waves: Elegant and Modern
This modern design features a combination of blue and silver glitter waves over a soft lavender base. The use of Blue glitter adds a cool tone, while the silver glitter adds a touch of sparkle. The design is both elegant and stylish, making it a great choice for a chic and polished look.

Consumables:
-
- Base coat: Orly Bonder
- Lavender polish: Zoya “Malia”
- Blue glitter polish: Essie “Aruba Blue”
- Silver glitter polish: OPI “Pirouette My Whistle”
- Fine brush for detailing
- Top coat: Sally Hansen Hard As Nails
DIY Instructions:
-
- Apply the base coat to ensure a smooth surface.
- Use the lavender polish as the base color and let it dry.
- Create wave patterns using the blue and silver glitter polishes.
- Finish with a top coat to protect the design and add shine.
Blush Pink and White Florals: Subtle and Sophisticated
This design features a blush pink base with delicate white floral accents and subtle glitter. The soft, muted colors and intricate floral details create a sophisticated and understated look. The almond shape and minimalistic design make this manicure perfect for those who prefer subtle elegance.

Consumables:
-
- Base coat: CND Stickey Base Coat
- Blush pink polish: Butter London “Teddy Girl”
- White polish: Essie “Blanc”
- Fine glitter polish: Zoya “PixieDust”
- Nail art brush
- Top coat: Orly Glosser
DIY Instructions:
-
- Start with a base coat to protect your nails.
- Apply the blush pink polish as the base color.
- Use the white polish to paint delicate floral patterns.
- Add a touch of fine glitter for a subtle sparkle.
- Finish with a top coat for a polished look.
Glitter French Tips: Classic with a Twist
This classic French manicure is given a modern twist with the addition of chunky iridescent glitter on the ring fingers. The white tips and clear base create a clean and sophisticated look, while the glitter adds a fun and playful element. This design is perfect for those who love a timeless yet trendy look.

Consumables:
-
- Base coat: Essie All In One
- Clear polish: OPI “Top Coat”
- White polish: Sally Hansen “White Out”
- Iridescent glitter polish: Sinful Colors “Hottie”
- Top coat: Revlon Quick Dry Top Coat
DIY Instructions:
-
- Apply the base coat to protect your nails.
- Paint the nails with a clear polish and create French tips using the white polish.
- Add iridescent glitter to the ring fingers.
- Finish with a top coat to seal the design and add shine.
Silver Elegance: Simple and Chic
This design features a combination of silver glitter, white polish, and delicate silver detailing on a soft pink base. The contrast between the Simple white polish and the glitter creates a chic and elegant look. The short, almond shape adds to the overall sophistication, making this a versatile design for any occasion.

Consumables:
-
- Base coat: OPI Nail Envy
- Soft pink polish: Essie “Ballet Slippers”
- White polish: Zoya “Purity”
- Silver glitter polish: ILNP “Mega”
- Fine brush for detailing
- Top coat: Seche Vite Dry Fast Top Coat
DIY Instructions:
-
- Start with a base coat to ensure smooth application.
- Apply the soft pink polish as the base color.
- Use the white polish on the middle nail and add silver glitter to the others.
- Finish with a top coat to protect the design and add a glossy finish.
Save Pin
