
22 Trendy Ideas Coffin Acrylic Nail Designs: Inspo for Every Style and Occasion
Are you looking to elevate your nail game with a touch of elegance and edge? Coffin acrylic nails, known for their sleek and sophisticated shape, are the perfect canvas for a variety of stunning designs. Whether you prefer plain styles or intricate designs, coffin acrylic nails offer versatility that can be tailored to any aesthetic. But how do you choose the right look? And what’s the best way to achieve these styles at home? Let’s dive into the world of coffin acrylic nails and explore the endless possibilities.
Subtle White and Grey Coffin Nails
This coffin acrylic nails design exudes elegance with its subtle combination of milky white and grey shades. The gentle swirls of grey against the white base create a sophisticated, almost marble-like effect, perfect for someone who prefers a classy and neutral look. The design is versatile enough to be worn for both formal and casual occasions, making it a great choice for those who love understated beauty.

Consumables:
-
- Base Coat: Essie First Base Coat
- White Polish: OPI “Alpine Snow”
- Grey Polish: China Glaze “Recycle”
- Nail Art Brushes: Pana Kolinsky Nail Art Brush Set
- Top Coat: Seche Vite Dry Fast Top Coat
How to Create This Look at Home:
-
- Apply a base coat to protect your nails.
- Use the milky white polish as the base color, then add soft grey swirls using a fine nail art brush.
- Finish with a glossy top coat to enhance the marble effect and protect the design.
Glossy Black and Green Geometric Nails
These coffin acrylic nails are the epitome of modern elegance with a sleek matte black base and glossy green geometric accents. The contrast between the finishes adds depth and intrigue to the design, making it perfect for those who want a trendy and bold manicure. This look is ideal for evening events or for making a statement in your everyday style.

Consumables:
-
- Base Coat: CND Stickey Base Coat
- Matte Black Polish: Essie “Licorice”
- Green Polish: OPI “Green-Wich Village”
- Nail Art Tape: Line Art Striping Tape
- Glossy Top Coat: Seche Vive Gel Effect Top Coat
How to Create This Look at Home:
-
- Start with a base coat to prepare your nails.
- Paint your nails with matte black polish, allowing them to dry completely.
- Use nail art tape to create geometric patterns, filling them in with green polish.
- Apply a glossy top coat over the green areas to create a striking contrast.
Vibrant Blue and Green Swirl Coffin Nails
These coffin acrylic nails bring a vibrant and playful vibe with their bold blue and green swirls. The colors transition smoothly, creating a mesmerizing wave-like pattern that’s sure to catch everyone’s eye. This design is perfect for those who love a trendy and baddie look that stands out. Whether for a summer outing or a casual day out, these nails will add a pop of color to your style.

Consumables:
-
- Base Coat: Orly Bonder Base Coat
- Light Blue Polish: Essie “Bikini So Teeny”
- Green Polish: OPI “Wasabi is Extra”
- Nail Art Brushes: Beetles Nail Art Liner Brush Set
- Top Coat: Sally Hansen Insta-Dri Top Coat
How to Create This Look at Home:
-
- Start with a base coat to ensure your nails are prepped.
- Apply light blue polish as the base and use a fine brush to create swirling patterns with green polish.
- Seal the design with a top coat to keep the colors vibrant and shiny.
Leopard Print with Golden Accents
This coffin acrylic nails design is for the wild at heart, featuring a bold leopard print paired with luxurious golden accents. The pink base provides a soft backdrop that makes the leopard spots and gold details pop. This design is perfect for those who love a trendy, baddie style with a touch of luxury. It’s ideal for nights out, parties, or any occasion where you want your nails to be the center of attention.

Consumables:
-
- Base Coat: Zoya Naked Base Coat
- Pink Polish: OPI “Suzi Shops & Island Hops”
- Black Polish: Sally Hansen Insta-Dri “Black to Black”
- Gold Foil: Ejiubas Gold Foil Nail Art Stickers
- Top Coat: Essie Gel Couture Top Coat
How to Create This Look at Home:
-
- Apply a base coat to protect your nails.
- Use the pink polish as the base color, and create leopard spots using a dotting tool and black polish.
- Add gold foil accents to a few nails for a luxurious finish.
- Seal the design with a top coat to add shine and protect the nail art.
Glossy Baby Pink with Crystal Accents
For a soft and feminine touch, these coffin acrylic nails feature a glossy baby pink shade that’s both delicate and elegant. The addition of crystal accents adds a touch of glamour, making this design perfect for weddings, proms, or any special occasion. The glossy finish enhances the pink hue, giving your nails a fresh and polished look that’s simple yet classy.

Consumables:
-
- Base Coat: Essie Here to Stay Base Coat
- Baby Pink Polish: Zoya “Gigi”
- Crystals: Swarovski Nail Crystals
- Top Coat: Seche Vive Gel Effect Top Coat
How to Create This Look at Home:
-
- Start with a base coat to prep your nails.
- Apply baby pink polish for a soft and glossy finish.
- Place crystal accents on one or two nails for a touch of sparkle.
- Finish with a top coat to secure the crystals and add a glossy shine.
Baby Blue French Tips with a Glossy Finish
This design is a refreshing take on the classic French tip, featuring baby blue accents on coffin acrylic nails. The light blue shade at the tips contrasts beautifully with the natural nude base, creating a soft and elegant look. The glossy finish adds a layer of sophistication, making these nails suitable for both casual and formal occasions. The smooth transitions between the colors highlight the precision in application, giving a flawless and clean appearance.

Consumables:
-
- Base Coat: OPI Nail Envy Original
- Nude Polish: Essie “Mademoiselle”
- Baby Blue Polish: China Glaze “Secret Peri-Wink-Le”
- Top Coat: Seche Vite Dry Fast Top Coat
- French Tip Guides: Orly French Manicure White Tip Guides
How to Create This Look at Home:
-
- Begin by applying a base coat to protect and prep your nails.
- Paint your nails with a nude polish and allow it to dry completely.
- Use French tip guides to ensure precise baby blue tips. Apply the blue polish and carefully remove the guides.
- Finish with a glossy top coat to seal in the design and give your nails a shiny, professional look.
Pink and Black Leopard Print with French Tips
This striking design combines pink and black elements for a bold and playful look. The coffin acrylic nails feature a mix of plain pink nails with black leopard print accents and a modern twist on the French tip. The mix of animal print and French tips makes this design trendy and baddie, perfect for those looking to make a statement. The leopard spots add a wild flair, while the black French tips on the other nails tie the look together.

Consumables:
-
- Base Coat: Essie Here to Stay Base Coat
- Pink Polish: OPI “Mod About You”
- Black Polish: Sally Hansen Insta-Dri “Black to Black”
- Leopard Print Stencils: Nail Craze Leopard Print Vinyl Stencils
- Top Coat: Essie Gel Couture Top Coat
How to Create This Look at Home:
-
- Start with a base coat to ensure your nails are protected and smooth.
- Apply pink polish to all nails, letting it dry completely.
- Use leopard print stencils to apply the black polish on the accent nails.
- For the black French tips, use a steady hand or French tip guides to create clean lines.
- Finish with a top coat to seal and protect your design.
Pastel Swirls with a Matte Finish
If you’re looking for something fun and whimsical, these pastel swirl nails are the perfect choice. The design features light pink, baby blue, and soft purple shades, creating a delicate and playful look. The coffin acrylic nails are finished with a matte top coat, adding a modern touch to the otherwise vibrant design. The swirls give a sense of movement and creativity, making this style perfect for those who love to experiment with their nails.

Consumables:
-
- Base Coat: Zoya Naked Manicure Base
- Light Pink Polish: Essie “Fiji”
- Baby Blue Polish: OPI “It’s a Boy!”
- Purple Polish: Orly “Lola”
- Matte Top Coat: OPI Matte Top Coat
- Nail Art Brushes: Beetles Nail Art Liner Brush Set
How to Create This Look at Home:
-
- Apply a base coat to prep your nails.
- Paint each nail with a different pastel shade, allowing each layer to dry fully.
- Use a thin nail art brush to create swirling patterns with the contrasting colors.
- Apply a matte top coat to give your nails a smooth, non-glossy finish.
Black and White Cow Print Nails
For a bold, trendy look, these black and white cow print nails are a fantastic choice. The coffin acrylic nails are covered in a striking cow print pattern that’s both playful and fashion-forward. The milky white base contrasts sharply with the black spots, creating a design that is both fun and classy. This design is perfect for those looking to make a statement with their nails.

Consumables:
-
- Base Coat: CND Stickey Base Coat
- Milky White Polish: Essie “Marshmallow”
- Black Polish: Sally Hansen Xtreme Wear “Black Out”
- Cow Print Stencils: Twinkled T Cow Print Stencils
- Top Coat: Seche Vive Gel Effect Top Coat
How to Create This Look at Home:
-
- Start by applying a base coat to ensure the longevity of your manicure.
- Apply a milky white polish as the base color.
- Use cow print stencils or a dotting tool to create the black spots on each nail.
- Seal the design with a glossy top coat to add shine and protect the pattern.
Classic French Tips on Medium Length Nails
The final design is a classic French tip manicure on medium length coffin acrylic nails. This timeless look is perfect for those who prefer a more simple and classy style. The nails are kept natural with a milky white base and crisp, clean white tips. This design is versatile and can be worn for any occasion, offering a look that is both polished and elegant.

Consumables:
-
- Base Coat: Orly Bonder Base Coat
- Milky White Polish: OPI “Bubble Bath”
- White Polish: China Glaze “White on White”
- Top Coat: Sally Hansen Insta-Dri Top Coat
- French Tip Guides: KISS French Manicure Nail Guides
How to Create This Look at Home:
-
- Apply a base coat to protect your nails.
- Paint your nails with a milky white polish and let it dry.
- Use French tip guides to apply the white polish to the tips, ensuring a neat line.
- Finish with a top coat to seal in your manicure and add a glossy finish.
Red and Pink Heart Design for a Romantic Look
These coffin acrylic nails showcase a deep red base adorned with tiny pink hearts, perfect for those seeking a romantic and playful design. The vibrant red creates a strong contrast against the soft pink hearts, making them stand out beautifully. This design is ideal for special occasions like Valentine’s Day or any time you want to express your love through your manicure. The glossy finish adds a luxurious touch, making the nails look polished and sophisticated.

Consumables:
-
- Base Coat: Zoya Naked Base Coat
- Red Polish: OPI “Big Apple Red”
- Pink Polish: Essie “Romper Room”
- Nail Art Brushes: Pana Kolinsky Nail Art Brush Set
- Top Coat: Seche Vite Dry Fast Top Coat
How to Create This Look at Home:
-
- Apply a base coat to prep and protect your nails.
- Paint your nails with two coats of red polish, allowing each layer to dry thoroughly.
- Use a fine nail art brush to draw small pink hearts on each nail. For precision, use a dotting tool to create the base of the hearts.
- Seal your design with a glossy top coat to enhance the shine and longevity of your manicure.
Iridescent White Tips with a Nude Base
For a more subtle and classy look, these coffin acrylic nails feature iridescent white tips paired with a nude base. The combination of these two neutral tones creates a sophisticated and elegant appearance, perfect for any occasion. The slight shimmer in the white tips adds a touch of glamour without being overwhelming, making it an excellent choice for those who prefer understated beauty.

Consumables:
-
- Base Coat: Deborah Lippmann Hard Rock Nail Strengthener
- Nude Polish: Essie “Topless & Barefoot”
- Iridescent White Polish: Sally Hansen “Diamonds”
- Top Coat: Butter London Hardwear Shine UV Top Coat
How to Create This Look at Home:
-
- Start by applying a base coat to ensure your nails are smooth and ready for polish.
- Apply a nude polish to all your nails and allow it to dry completely.
- Using a brush, apply the iridescent white polish to the tips, creating a soft gradient effect.
- Finish with a high-shine top coat to seal the design and keep it looking fresh.
Baby Blue French Tips with Butterfly Accents
This design takes the classic French tip to a new level with baby blue tips and delicate butterfly accents. The coffin acrylic nails provide a perfect canvas for this light and airy design, making it ideal for spring or summer. The combination of the soft baby blue and the ethereal butterflies creates a trendy and cute look that’s both refreshing and playful.

Consumables:
-
- Base Coat: Orly Bonder Base Coat
- Nude Polish: Zoya “Laurie”
- Baby Blue Polish: OPI “It’s a Boy!”
- Butterfly Stickers: Maniology Butterfly Nail Stickers
- Top Coat: Essie Good To Go Top Coat
How to Create This Look at Home:
-
- Begin with a base coat to protect your natural nails.
- Apply a nude polish as the base color and let it dry completely.
- Use baby blue polish for the French tips, carefully painting the tips of each nail.
- Add butterfly stickers to each nail, placing them strategically for a balanced look.
- Finish with a top coat to protect your design and add a glossy finish.
Glittery Silver Tips for a Glamorous Look
If you’re looking for something glamorous and eye-catching, these coffin acrylic nails with glittery silver tips are perfect for you. The nude base provides a subtle backdrop, allowing the glitter to really shine. This design is great for special events or nights out, where you want your nails to be the center of attention. The glitter adds a touch of luxury, making your nails look like they belong on the red carpet.

Consumables:
-
- Base Coat: Essie Here to Stay Base Coat
- Nude Polish: OPI “Bubble Bath”
- Glitter Polish: China Glaze “Glamcore”
- French Tip Guides: Whats Up Nails French Tip Guides
- Top Coat: Sally Hansen Insta-Dri Top Coat
How to Create This Look at Home:
-
- Start by applying a base coat to your nails.
- Apply a nude polish and let it dry.
- Use French tip guides to apply the glitter polish to the tips, ensuring a neat line.
- Finish with a top coat to lock in the glitter and add a glossy finish.
Rose Gold Glitter with Floral Accents
These coffin acrylic nails feature a stunning rose gold glitter gradient combined with delicate floral accents. The rose gold glitter starts at the tips and fades into the nude base, creating a beautiful ombre effect. The floral accents add a touch of femininity, making this design perfect for weddings or other formal events. The combination of glitter and flowers makes these nails both elegant and eye-catching.

Consumables:
-
- Base Coat: Zoya Anchor Base Coat
- Nude Polish: Essie “Ballet Slippers”
- Rose Gold Glitter Polish: OPI “Rosy Future”
- Floral Stickers: Olive & June Floral Nail Stickers
- Top Coat: Seche Vive Gel Effect Top Coat
How to Create This Look at Home:
-
- Apply a base coat to start.
- Paint your nails with a nude polish and allow them to dry.
- Apply the rose gold glitter polish to the tips, blending it down towards the middle of the nail.
- Add floral stickers to the accent nails, placing them to enhance the ombre effect.
- Finish with a top coat to seal in the design and give your nails a high-shine finish.
Vibrant Neon Design with Abstract Elements
This coffin acrylic nails design grabs attention with its bold neon colors and abstract patterns. The nails showcase vibrant shades of turquoise, purple, and pink, each standing out on its own while beautifully complementing the others. The abstract swirls and lines add dynamism and a modern touch, making this manicure a perfect choice for those who love bright and unique designs. The glossy finish highlights the richness of the colors and makes the design even more striking.

Consumables:
-
- Base Coat: Essie Here to Stay Base Coat
- Turquoise Polish: OPI “Can’t Find My Czechbook”
- Purple Polish: Essie “Play Date”
- Pink Polish: Zoya “Barbie”
- Nail Art Brushes: Pana Kolinsky Nail Art Brush Set
- Top Coat: Seche Vite Dry Fast Top Coat
How to Create This Look at Home:
-
- Start with a base coat to protect your nails.
- Paint each nail with one of the chosen colors: turquoise, purple, or pink. Allow the polish to dry.
- Use a fine brush to create abstract swirls and lines on a few nails using contrasting colors.
- Finish with a glossy top coat to lock in the design and enhance the color vibrancy.
Soft Pastel Ombre with Mint and Pink
This coffin acrylic nails design embodies softness and elegance with a pastel ombre that transitions from mint to pink. The gradient effect creates a soothing, understated look that is perfect for everyday wear or any occasion requiring a more refined yet sophisticated manicure. The smooth color transition and light sheen give the nails a classy appearance.

Consumables:
-
- Base Coat: OPI Nail Envy Original
- Mint Polish: Essie “Mint Candy Apple”
- Pink Polish: OPI “Mod About You”
- Ombre Sponges: Nail Art Gradient Sponges
- Top Coat: CND Vinylux Long Wear Top Coat
How to Create This Look at Home:
-
- Apply a base coat to prep your nails.
- Using an ombre sponge, apply mint polish at the tips and pink polish at the base, blending them together for a smooth gradient.
- Repeat the sponging process until the desired opacity is achieved.
- Finish with a top coat to ensure a smooth, even surface and a lasting shine.
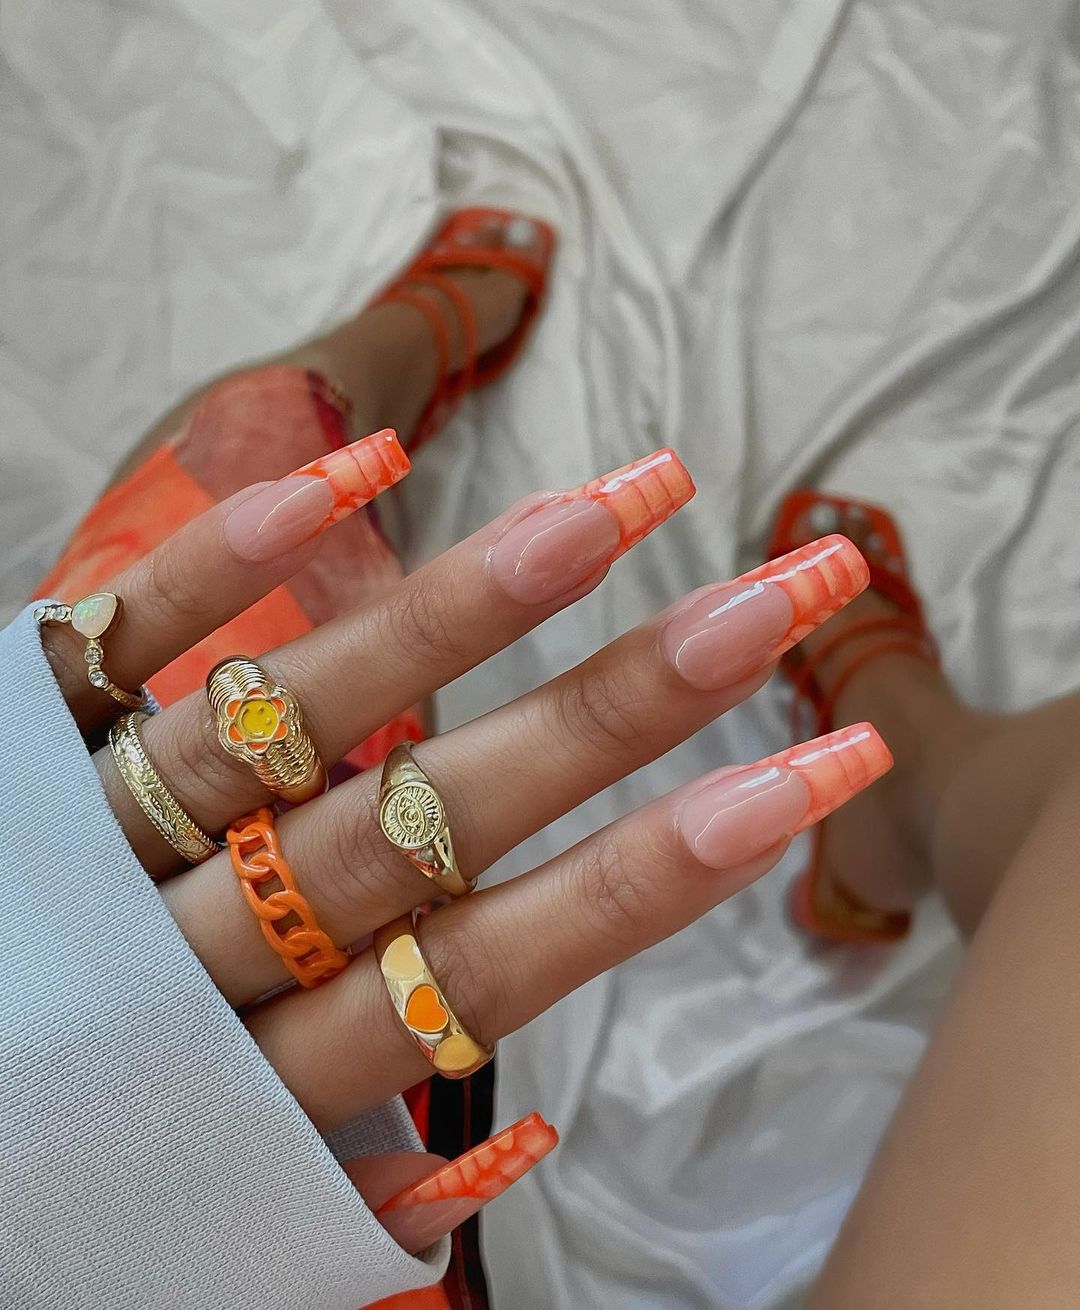
Orange Marble Tips for a Bold and Trendy Look
These coffin acrylic nails bring a burst of energy with their vibrant orange marble tips. The natural nude base contrasts sharply with the bold orange, creating a trendy and eye-catching design. The marble effect adds a touch of sophistication, making these nails perfect for someone who loves to stand out. This design is ideal for summer or any time you want to add a pop of color to your look.

Consumables:
-
- Base Coat: Zoya Naked Base Coat
- Nude Polish: OPI “Samoan Sand”
- Orange Polish: Essie “Meet Me at Sunset”
- Marble Effect Brush: Winstonia Marbleizing Brush
- Top Coat: Essie Gel Couture Top Coat
How to Create This Look at Home:
-
- Start with a base coat to protect your nails.
- Apply a nude polish as the base color and let it dry.
- Using a marbleizing brush, mix the orange polish with a bit of white to create a marble effect, then apply it to the tips.
- Seal with a top coat to protect the design and add a glossy finish.
Elegant Pink and White 3D Bow Design
For a delicate and elegant touch, these coffin acrylic nails feature a soft baby pink base with white accents and 3D bow details. The combination of matte and glossy finishes, along with the subtle glitter, creates a sophisticated look perfect for weddings or formal events. The 3D bows add a unique and feminine flair, making this design both charming and standout.

Consumables:
-
- Base Coat: Orly Bonder Base Coat
- Baby Pink Polish: OPI “Pink-ing of You”
- White Polish: Essie “Blanc”
- 3D Bow Decorations: Nailart 3D Bow Rhinestones
- Matte Top Coat: OPI Matte Top Coat
- Glossy Top Coat: Seche Vive Gel Effect Top Coat
How to Create This Look at Home:
-
- Apply a base coat to prepare your nails.
- Paint your nails with baby pink polish, then add white accents on select nails.
- Apply 3D bow decorations on one or two nails for a standout feature.
- Finish with a mix of matte and glossy top coats to highlight different areas of the design.
Tropical Floral Design with Bold Colors
These coffin acrylic nails are a tropical paradise on your fingertips. The bold orange, yellow, and red hues create a vibrant gradient, while the intricate 3D floral decorations add a touch of the exotic. This design is perfect for summer vacations or any time you want to bring a bit of the tropics with you. The use of bright colors and 3D elements makes this design truly unique and eye-catching.

Consumables:
-
- Base Coat: CND Stickey Base Coat
- Orange Polish: Essie “Tangerine Tease”
- Yellow Polish: OPI “Sun, Sea, and Sand in My Pants”
- Red Polish: China Glaze “Hot Flash”
- 3D Floral Decorations: Ejiubas 3D Nail Art Flowers
- Top Coat: Sally Hansen Insta-Dri Top Coat
How to Create This Look at Home:
-
- Start with a base coat to ensure the longevity of your manicure.
- Apply a gradient of orange, yellow, and red polishes using a sponge or brush technique.
- Add 3D floral decorations on select nails to create a tropical vibe.
- Seal with a top coat to protect your design and add a glossy finish.
Pink and White Mixed Media with Metallic Accents
This coffin acrylic nails design is a stunning combination of pink and white shades, elevated with metallic accents and intricate patterns. The design features a mix of matte and glossy finishes, with some nails adorned with metallic stars and hearts, adding a touch of glamour. This mixed media approach creates a trendy and baddie look, ideal for those who love to experiment with different textures and styles in their nail art.

Consumables:
-
- Base Coat: Essie Here to Stay Base Coat
- Pink Polish: OPI “Let Me Bayou a Drink”
- White Polish: Zoya “Snow White”
- Metallic Nail Stickers: Nail Accessories Metallic Decals
- Matte Top Coat: Sally Hansen Miracle Gel Matte Top Coat
- Glossy Top Coat: Seche Vite Dry Fast Top Coat
How to Create This Look at Home:
-
- Start with a base coat to prep your nails.
- Paint your nails with alternating pink and white polishes, allowing each layer to dry fully.
- Apply metallic stickers and decorations to some nails for a standout feature.
- Finish with a mix of matte and glossy top coats to add texture and dimension to the design.
Tiger Stripe Design with a Natural Base
This coffin acrylic nails design is inspired by the wild, featuring a bold tiger stripe pattern. The natural nude base provides the perfect backdrop for the striking black and orange stripes, creating a fierce and trendy look. The stripes are meticulously hand-painted to mimic the natural patterns found in tiger fur, giving the nails a realistic and captivating appearance. This design is perfect for anyone looking to make a bold statement with their nails.

Consumables:
-
- Base Coat: OPI Nail Envy Original
- Nude Polish: Essie “Spin the Bottle”
- Black Polish: Sally Hansen Insta-Dri “Black to Black”
- Orange Polish: China Glaze “Orange Knockout”
- Nail Art Brushes: Beetles Nail Art Liner Brush Set
- Top Coat: Essie Gel Couture Top Coat
How to Create This Look at Home:
-
- Begin with a base coat to protect your nails.
- Apply a nude polish as the base and allow it to dry completely.
- Using a fine nail art brush, carefully hand-paint black and orange stripes to create a tiger pattern on each nail.
- Finish with a glossy top coat to protect the design and add shine.
Save Pin
