
22 Wine Color Nail Ideas: Burgundy, Red, and Dark Designs with Glitter and Gold
When it comes to nail designs that exude sophistication and allure, wine color nails are an undeniable classic. Whether you’re aiming for a subtle, chic look or something more daring with glitter and gold accents, wine tones offer a versatile canvas. But how do you achieve that perfect wine manicure? What are the latest trends and techniques in this domain? In this article, I’ll walk you through some of the most captivating wine color nail designs, explaining in detail how to create these looks and the materials you’ll need.
Bold Burgundy Gloss Nails
This nail design showcases a rich, bold burgundy hue with a glossy finish, perfect for making a statement. The short, square shape gives the nails a modern and sophisticated look, while the deep wine color adds a touch of luxury. This design is ideal for those who prefer a classic yet impactful manicure.

Consumables Needed:
- Burgundy Gel Polish: Essie Gel Couture in ‘Bordeaux’
- Base Coat: Deborah Lippmann Gel Lab Pro Base Coat
- Top Coat: Seche Vite Dry Fast Top Coat
- Nail File: Tweezerman Nail File
How to Create This Look at Home:
- Start by filing your nails to a square shape and apply a base coat. Cure under a UV lamp.
- Apply two coats of burgundy gel polish, curing each layer for 60 seconds.
- Finish with a high-gloss top coat to seal the color and enhance the shine, curing one last time.
- Apply cuticle oil to keep your nails and surrounding skin hydrated.
Elegant Red Wine Almond Nails
This elegant design features a deep red wine color on almond-shaped nails, creating a timeless and feminine look. The rich color adds depth, while the almond shape elongates the fingers, giving them a delicate and graceful appearance. This design is perfect for any occasion, whether casual or formal.

Consumables Needed:
- Red Wine Gel Polish: OPI GelColor in ‘Malaga Wine’
- Base Coat: Butter London Nail Foundation Priming Base Coat
- Top Coat: Sally Hansen Insta-Dri Top Coat
- Nail File: Makartt Nail File
How to Create This Look at Home:
- File your nails into an almond shape and apply a base coat. Cure under a UV lamp.
- Apply two coats of the red wine gel polish, curing each layer for 60 seconds.
- Seal the design with a top coat, curing for the final time.
- Apply cuticle oil to maintain the health and appearance of your nails.
Burgundy and Floral Accent Nails
This nail design combines a deep burgundy base with intricate floral accents on one or two nails. The floral pattern, painted in contrasting colors, adds a delicate and artistic touch to the bold wine color. This design strikes a perfect balance between sophistication and creativity, making it ideal for those who love to experiment with their nail art.

Consumables Needed:
- Burgundy Gel Polish: Zoya Nail Polish in ‘Jem’
- White Gel Polish: OPI GelColor in ‘Alpine Snow’
- Nail Art Brushes: Winstonia Fine Detail Brush Set
- Base Coat: CND Stickey Base Coat
- Top Coat: Gelish Top It Off Top Coat
How to Create This Look at Home:
- Prep your nails with a base coat and cure under a UV lamp. Apply two coats of the burgundy gel polish, curing between each layer.
- Using a fine brush, paint floral accents on one or two nails with white gel polish. Cure after painting.
- Seal with a top coat, curing one last time for a glossy finish.
- Apply cuticle oil to keep your nails nourished and hydrated.
Classic Burgundy Short Nails
This classic design features a deep burgundy color on short, square-shaped nails. The simplicity of the design allows the rich color to take center stage, making this a perfect choice for those who prefer understated elegance. The glossy finish enhances the depth of the color, making your nails look polished and refined.

Consumables Needed:
- Burgundy Gel Polish: Sally Hansen Miracle Gel in ‘Wine Stock’
- Base Coat: Essie First Base Base Coat
- Top Coat: INM Out The Door Top Coat
- Nail File: KISS Professional Nail File
How to Create This Look at Home:
- File your nails to a square shape and apply a base coat, curing under a UV lamp.
- Apply two coats of the burgundy gel polish, curing each layer for 60 seconds.
- Finish with a high-gloss top coat to seal the color and enhance the shine. Cure for a final time.
- Use cuticle oil to keep your nails and surrounding skin moisturized.
Matte Burgundy Ombré Nails
This design features a stunning matte burgundy ombré effect that transitions from a deep wine color to a lighter shade. The matte finish gives the nails a velvety texture, adding a unique twist to the traditional ombré look. The elongated almond shape enhances the elegance of the design, making it perfect for a chic, modern look.

Consumables Needed:
- Burgundy Gel Polish: Essie Gel Couture in ‘Bordeaux’
- Light Pink Gel Polish: OPI GelColor in ‘Bubble Bath’
- Matte Top Coat: Butter London Matte Finish Shine Free Top Coat
- Nail Art Sponge: Winstonia Ombré Nail Sponge
How to Create This Look at Home:
- Start by filing your nails to an almond shape and apply a base coat. Cure under a UV lamp.
- Apply the light pink gel polish as the base color, curing it for 60 seconds.
- Using a sponge, dab the burgundy gel polish onto the tips of your nails, blending it towards the base for the ombré effect. Cure after each application.
- Seal the design with a matte top coat, curing for the final time.
- Finish with cuticle oil to keep your nails looking velvety smooth and moisturized.
Subtle Burgundy with Glitter Accent
This nail design is an elegant combination of classic burgundy fall nails with a touch of glitter on the ring finger, making it an ideal choice for those who love to keep things simple yet stylish. The deep wine color nails are complemented by a glitter accent that adds a hint of glam without overwhelming the look. The short nail length enhances the sophisticated appeal of this manicure.

Consumables Needed:
- Burgundy Gel Polish: OPI GelColor in ‘I’m Not Really a Waitress’
- Glitter Polish: Zoya PixieDust in ‘Tomoko’
- Base Coat: Essie Here to Stay Base Coat
- Top Coat: Seche Vite Fast Dry Top Coat
- Nail File: Revlon Shape ‘N’ Buff
How to Create This Look at Home:
- Begin by filing your nails to a short, even length. Apply a base coat to protect your natural nails.
- Apply two coats of the burgundy gel polish, curing each layer under a UV lamp.
- On the ring finger, apply a layer of glitter polish. For more intensity, add a second coat.
- Seal the manicure with a top coat, curing it under the UV lamp for a glossy finish.
- Apply cuticle oil to keep your nails and surrounding skin hydrated.
Wine Red with Marbled Glitter Detail
This design features an alluring dark wine red base with a unique marbled effect on a few accent nails. The marbling combines the richness of wine red with a swirl of glitter and a hint of transparency, creating a visually striking design that’s perfect for a night out or a special occasion.

Consumables Needed:
- Dark Red Gel Polish: Gelish in ‘A Touch of Sass’
- Glitter Polish: Essie Luxeffects in ‘Set in Stones’
- Base Coat: Gelish Foundation Base Gel
- Top Coat: Gelish Top It Off Top Coat
- Nail Art Brush: Winstonia Fine Liner Brush
How to Create This Look at Home:
- Start with a base coat and cure it under a UV lamp. Apply two coats of the dark red gel polish, curing each layer.
- For the marbled effect, apply a thin coat of glitter polish and use a fine brush to swirl the glitter into the wet polish. Cure under the UV lamp.
- Finish with a top coat to seal the design and add shine. Cure for the final time.
- Clean up any excess polish around the cuticles with a clean-up brush dipped in acetone.
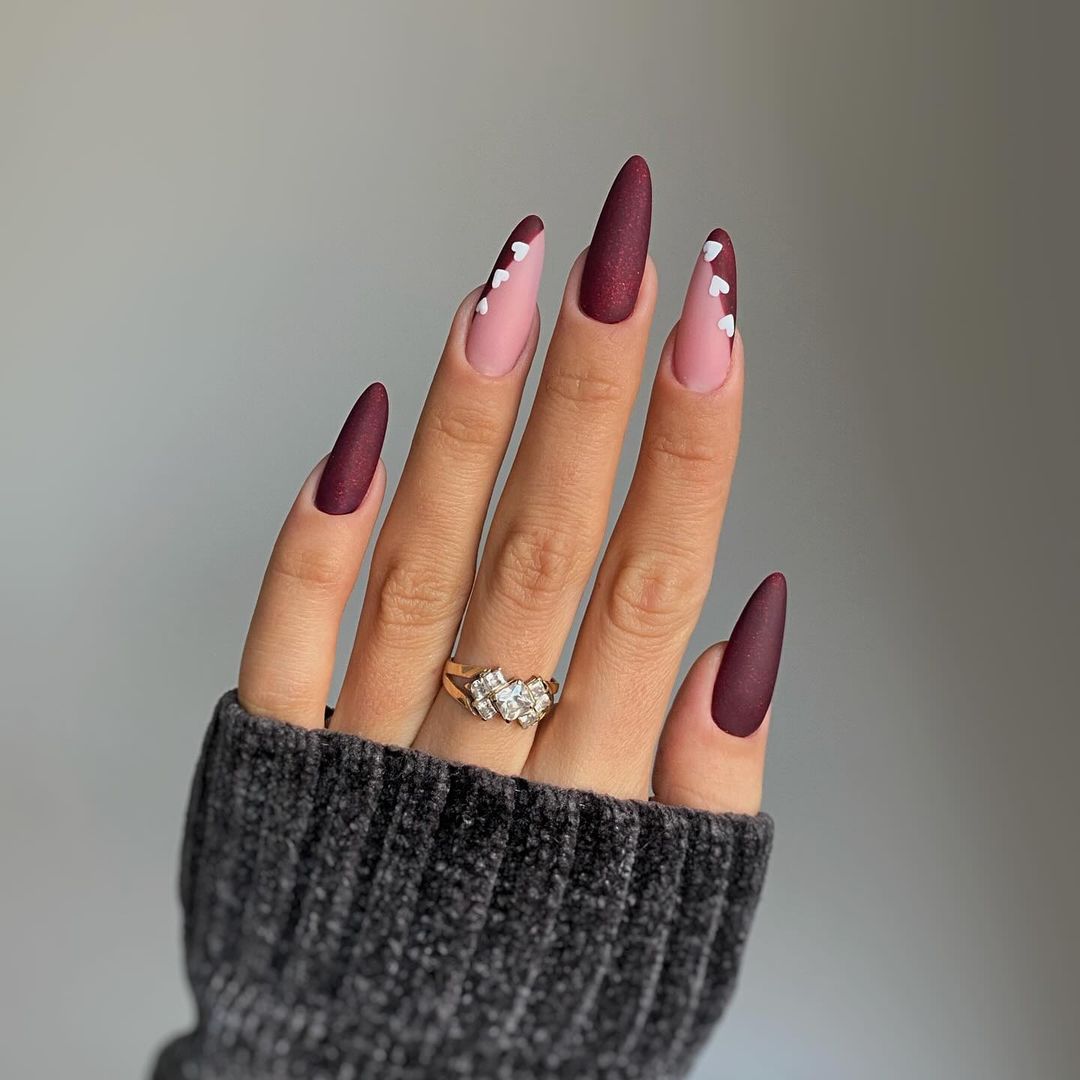
Matte Burgundy and Pink Combo with Heart Accents
This playful design combines the depth of burgundy with a soft pink base, enhanced with cute heart-shaped accents. The contrast between the matte finish and the glossy hearts adds an interesting texture, making this a fun yet chic nail art option for those who love to experiment with designs.

Consumables Needed:
- Burgundy Matte Gel Polish: Butter London in ‘Toff’
- Pink Gel Polish: OPI Infinite Shine in ‘Mod About You’
- Heart Decals: Born Pretty Store Love Heart Nail Art Stickers
- Base Coat: CND Stickey Base Coat
- Matte Top Coat: Revlon Matte Top Coat
- Nail File: Orly Black Board File
How to Create This Look at Home:
- Prep your nails with a base coat and cure under a UV lamp. Apply two coats of burgundy matte polish to the accent nails and pink polish to the others, curing between layers.
- Carefully place the heart decals onto the pink nails while the top coat is still tacky.
- Apply a matte top coat to the burgundy nails and a glossy top coat to the pink nails. Cure for a final time.
- Finish with a nourishing cuticle oil to keep your nails looking healthy and hydrated.
Bold Red Hearts on Wine Base
This design is all about making a statement. Featuring a deep wine red base with bold red heart accents, this look is perfect for those who want their nails to be the center of attention. The mix of glossy and matte textures adds depth to the design, making it both trendy and eye-catching.

Consumables Needed:
- Wine Red Gel Polish: Sally Hansen Miracle Gel in ‘Raisin the Bar’
- Red Heart Stickers: KADS Nail Art Decals
- Base Coat: Essie Strong Start Base Coat
- Top Coat: Sally Hansen Miracle Gel Top Coat
- Matte Top Coat: Zoya Matte Velvet Top Coat
How to Create This Look at Home:
- After applying a base coat and curing, apply two layers of the wine red gel polish and cure each layer.
- Place the red heart stickers on the accent nails, pressing firmly to adhere.
- Finish with a glossy top coat on the base nails and a matte top coat on the accent nails. Cure for the final time.
- Apply cuticle oil to maintain the health of your nails.
Gradient Wine and Gold Glitter French Tips
This sophisticated design features a gradient effect that transitions from a deep wine shade at the tips to a clear, natural base. The gold glitter adds a touch of luxury, making these nails perfect for any formal event or holiday gathering.

Consumables Needed:
- Wine Red Gel Polish: Essie Gel Couture in ‘Gala-Vanting’
- Gold Glitter Polish: Butter London in ‘West End Wonderland’
- Base Coat: Deborah Lippmann Gel Lab Pro Base Coat
- Top Coat: Dior Gel Coat
- Makeup Sponge: Beauty Blender Original
How to Create This Look at Home:
- Start with a base coat and cure it under the UV lamp. Apply a thin coat of the wine red gel polish just to the tips, and cure.
- Dab the gold glitter polish onto the tips using a makeup sponge for a gradient effect, then cure under the UV lamp.
- Finish with a top coat to seal in the design and cure for a glossy finish.
- To keep your nails looking fresh, apply a moisturizing hand cream regularly.
Delicate Burgundy and Pink Accent
This design beautifully blends the deep richness of burgundy with a soft pink accent nail that features a delicate gold leaf detail. The combination of wine color nails and a lighter shade creates a harmonious contrast that’s both subtle and elegant. This look is perfect for those who prefer a chic yet understated manicure.

Consumables Needed:
- Burgundy Gel Polish: OPI GelColor in ‘Malaga Wine’
- Pink Gel Polish: Essie Gel Couture in ‘Fairy Tailor’
- Gold Leaf Foil: Holographic Nail Art Foil
- Base Coat: Deborah Lippmann Hard Rock Base Coat
- Top Coat: CND Vinylux Weekly Top Coat
- Nail Art Brush: Modelones Nail Art Liner Brush
How to Create This Look at Home:
- Prep your nails by filing and applying a base coat, curing under a UV lamp.
- Apply two coats of burgundy gel polish to all nails except the accent nail, curing each layer.
- On the accent nail, apply the pink gel polish, and cure.
- Use a fine nail art brush to apply the gold leaf design on the pink nail while the polish is still tacky. Cure once more.
- Seal the design with a top coat and cure for a glossy finish.
Shimmering Purple Wine Nails
This bold and glamorous design features a rich purple wine shade with a shimmery finish that catches the light beautifully. The elongated shape of the nails enhances the elegance of the dark wine color, making it perfect for evening events or a luxurious everyday look.

Consumables Needed:
- Purple Shimmer Gel Polish: Zoya Professional Lacquer in ‘Blake’
- Base Coat: Orly Bonder Rubberized Basecoat
- Top Coat: INM Out The Door Top Coat
- Nail File: CND Kanga File
How to Create This Look at Home:
- Begin by filing your nails to the desired length and shape, then apply a base coat and cure.
- Apply two coats of the purple shimmer gel polish, curing each layer under a UV lamp.
- Finish with a high-gloss top coat to enhance the shine and cure for the final time.
- Apply cuticle oil to keep your nails nourished and healthy.
Burgundy and Black French Accent
This design combines the classic elegance of burgundy with a modern twist—a black French tip on a clear base accent nail. The contrast between the rich red and the sharp black creates a striking yet sophisticated look that’s perfect for those who love a bit of edge in their nail art.

Consumables Needed:
- Burgundy Gel Polish: OPI GelColor in ‘Got the Blues for Red’
- Black Gel Polish: Gelish in ‘Black Shadow’
- Base Coat: Zoya Naked Base
- Top Coat: Seche Vite Dry Fast Top Coat
- Nail Art Brush: Makartt Nail Art Brushes
How to Create This Look at Home:
- Prep your nails with a base coat and cure under a UV lamp. Apply two coats of burgundy gel polish to all nails except the accent nail, curing between layers.
- For the accent nail, apply a clear base coat and cure. Using a fine nail art brush, create a black French tip and cure.
- Finish with a top coat to seal the design and cure for a glossy finish.
- Moisturize your cuticles with a nourishing oil.
Floral Burgundy Nail Art
This design features a beautiful burgundy base with a delicate floral accent nail. The combination of the rich wine color and the soft, intricate flower design creates a look that’s both feminine and sophisticated. This is an excellent choice for those who want to add a touch of nature-inspired art to their manicure.

Consumables Needed:
- Burgundy Gel Polish: Essie Gel Couture in ‘Bordeaux’
- White Gel Polish: OPI GelColor in ‘Alpine Snow’
- Nail Art Stickers: Olive & June Flower Nail Art Stickers
- Base Coat: Deborah Lippmann Hard Rock Base Coat
- Top Coat: Zoya Armor Top Coat
How to Create This Look at Home:
- Start by filing and buffing your nails, then apply a base coat and cure.
- Apply two coats of burgundy gel polish to all nails except the accent nail, curing each layer.
- On the accent nail, apply a clear base coat and place the floral stickers carefully. Cure under the UV lamp.
- Seal the design with a top coat and cure for a final glossy finish.
- Finish by applying a hydrating cuticle oil to keep your nails healthy.
Burgundy and Pink Swirl with Glitter Accent
This design combines the richness of burgundy with soft pink swirls and a touch of glitter on an accent nail. The combination of colors and textures creates a unique and eye-catching manicure that’s perfect for both everyday wear and special occasions.

Consumables Needed:
- Burgundy Gel Polish: Gelish in ‘Good Gossip’
- Pink Gel Polish: Essie Gel Couture in ‘Fairy Tailor’
- Glitter Polish: Sally Hansen Xtreme Wear in ‘Strobe Light’
- Base Coat: CND Stickey Base Coat
- Top Coat: Sally Hansen Insta-Dri Top Coat
- Nail Art Brush: Beetles Nail Art Brushes
How to Create This Look at Home:
- Prep your nails with a base coat and cure under a UV lamp. Apply two coats of burgundy gel polish to all nails except the accent nail, curing each layer.
- For the swirls, use a fine nail art brush to create pink swirls on one or two nails and cure.
- On the accent nail, apply a layer of glitter polish and cure under the UV lamp.
- Finish with a top coat to seal the design and cure for a final time.
- Apply cuticle oil to keep your nails looking fresh and nourished.
Sparkling Burgundy Glitter Nails
This nail design features a bold burgundy color with a dazzling glitter finish. The combination of the rich wine color and the glitter creates a stunning effect that is perfect for a night out or a festive occasion. The short square shape of the nails keeps the look chic and manageable while allowing the glitter to shine without overwhelming the overall design.

Consumables Needed:
- Burgundy Glitter Gel Polish: Sally Hansen Miracle Gel in ‘Wine Stock’
- Base Coat: Essie Strong Start Base Coat
- Top Coat: OPI GelColor Top Coat
- Nail File: Tweezerman Nail File
How to Create This Look at Home:
- Begin by filing your nails to a square shape and applying a base coat, curing under a UV lamp.
- Apply two coats of the burgundy glitter gel polish, curing each layer for 60 seconds.
- Finish with a high-gloss top coat to seal in the glitter and enhance the shine, curing for a final time.
- Apply cuticle oil to keep your nails hydrated and healthy.
Elegant Burgundy French Tips
This design is a sophisticated take on the classic French manicure, using a deep burgundy for the tips instead of the traditional white. The elongated square shape of the nails adds a modern twist, making this look both timeless and trendy. The gel polish used provides a high-shine finish that ensures your manicure will last for weeks.

Consumables Needed:
- Burgundy Gel Polish: OPI GelColor in ‘Malaga Wine’
- Base Coat: Butter London Nail Foundation Priming Base Coat
- Top Coat: Seche Vite Dry Fast Top Coat
- Nail Art Brush: Beetles Detail Brush
How to Create This Look at Home:
- Prep your nails with a base coat and cure under a UV lamp. Apply a thin layer of clear or nude gel polish as your base, curing between layers.
- Using a fine brush, paint the tips of your nails with the burgundy gel polish, following the natural curve of your nails. Cure each nail as you go.
- Seal the design with a top coat, curing one last time.
- Apply cuticle oil to nourish your cuticles and keep your manicure looking fresh.
Classic Red Wine Nails with Heart Accent
This nail design features a deep, classic red wine color that is both bold and elegant. The standout feature of this look is the white heart accent on the ring finger, which adds a playful and romantic touch to the otherwise sophisticated manicure. The long almond shape elongates the fingers, creating a feminine and graceful appearance.

Consumables Needed:
- Red Wine Gel Polish: Essie Gel Couture in ‘Bordeaux’
- White Gel Polish: Gelish in ‘Arctic Freeze’
- Base Coat: Deborah Lippmann Gel Lab Pro Base Coat
- Top Coat: INM Out The Door Top Coat
- Nail Art Brush: Winstonia Fine Detail Brush
How to Create This Look at Home:
- Start by filing your nails to an almond shape, then apply a base coat and cure under a UV lamp.
- Apply two coats of the red wine gel polish, curing each layer for 60 seconds.
- Use a fine brush to paint the white heart on the accent nail, curing after application.
- Seal with a high-gloss top coat and cure for the final time.
- Finish with cuticle oil to keep your nails and surrounding skin moisturized.
Festive Burgundy Nails with Christmas Tree Accent
This festive design is perfect for the holiday season, featuring a deep burgundy base with a sparkling Christmas tree accent on the ring finger. The combination of the rich wine color and the holiday-inspired nail art makes this look both elegant and fun, perfect for Christmas parties or winter gatherings.

Consumables Needed:
- Burgundy Gel Polish: CND Vinylux in ‘Oxblood’
- White Gel Polish: OPI GelColor in ‘Alpine Snow’
- Glitter Gel Polish: Zoya Nail Polish in ‘Tinsley’
- Base Coat: CND Stickey Base Coat
- Top Coat: Sally Hansen Insta-Dri Top Coat
- Nail Art Brush: Modelones Nail Art Brushes
How to Create This Look at Home:
- Prep your nails with a base coat and cure under a UV lamp. Apply two coats of the burgundy gel polish to all nails, curing between layers.
- Use a fine brush to create the Christmas tree design with white gel polish on the ring finger. Add a touch of glitter polish to the tree for a sparkling effect. Cure after each step.
- Seal the design with a high-gloss top coat, curing for a final time.
- Apply cuticle oil to keep your nails looking festive and hydrated.
Burgundy French with Floral Accent
This design combines the classic burgundy French manicure with a delicate floral accent on the ring finger. The contrast between the rich wine color and the soft floral design creates a look that is both elegant and feminine. The square shape of the nails enhances the overall sophistication of the manicure.

Consumables Needed:
- Burgundy Gel Polish: Essie Gel Couture in ‘Spiked with Style’
- White Gel Polish: OPI GelColor in ‘Funny Bunny’
- Floral Nail Stickers: Olive & June Flower Nail Art Stickers
- Base Coat: Zoya Anchor Basecoat
- Top Coat: Dior Gel Top Coat
How to Create This Look at Home:
- Start by filing your nails to a square shape, then apply a base coat and cure under a UV lamp.
- Apply two coats of the burgundy gel polish to the tips of your nails, curing between layers.
- Apply the floral nail stickers to the ring finger and cure again.
- Seal the design with a top coat, curing for a glossy finish.
- Finish with a nourishing cuticle oil to keep your nails looking healthy and hydrated.
Burgundy with Gold Leaf Nail Art
This design features a rich burgundy base with stunning gold leaf accents, creating a luxurious and artistic manicure. The combination of the deep wine color and the gold foil creates a look that is perfect for special occasions or when you want to add a touch of luxury to your everyday look.

Consumables Needed:
- Burgundy Gel Polish: Zoya Nail Polish in ‘Jem’
- Gold Leaf Foil: Holographic Gold Leaf Nail Art
- Base Coat: OPI Nail Envy Original Nail Strengthener
- Top Coat: Gelish Top It Off Top Coat
- Nail Tweezers: Tweezerman Slant Tweezer
How to Create This Look at Home:
- Prep your nails with a base coat and cure under a UV lamp. Apply two coats of the burgundy gel polish, curing each layer.
- Using tweezers, carefully place the gold leaf foil onto your nails while the top coat is still tacky. Cure under the UV lamp.
- Seal the design with a high-gloss top coat and cure for a final time.
- Apply cuticle oil to keep your nails and cuticles nourished.
Burgundy Glitter and Silver French Tips
This design features a glamorous burgundy glitter base with silver French tips, creating a dazzling and sophisticated manicure. The combination of the rich wine color and the sparkling silver tips makes this look perfect for special occasions or a night out. The almond shape of the nails adds to the elegance of the design.

Consumables Needed:
- Burgundy Glitter Gel Polish: Butter London in ‘Ruby Murray’
- Silver Gel Polish: Sally Hansen Insta-Dri in ‘Silver Sweep’
- Base Coat: Essie First Base Base Coat
- Top Coat: CND Vinylux Weekly Top Coat
- Nail Art Brush: Makartt Nail Art Brush Set
How to Create This Look at Home:
- Start by filing your nails to an almond shape, then apply a base coat and cure under a UV lamp.
- Apply two coats of the burgundy glitter gel polish, curing each layer.
- Use a fine brush to paint the silver French tips on each nail, then cure again.
- Seal the design with a high-gloss top coat, curing for a final time.
- Finish with cuticle oil to keep your nails looking fresh and moisturized.
Save Pin
