
22 Winter Nails Ideas 2024 – 2025: Cute, Easy, and Aesthetic Designs for All Hair Lengths
Winter is the perfect season to experiment with cozy, creative, and bold nail designs. From sparkling accents to intricate details, winter nails bring an opportunity to showcase festive flair and chic aesthetics. But what are the must-try winter nails ideas 2024 – 2025? How can you create these beautiful looks at home? Let’s dive into the top nail designs for the season, including everything you need to know about achieving these looks effortlessly.
Festive Green and Nude Gnome Nails
This whimsical yet stylish nail design blends festive green glitter with nude shades to create a unique winter wonderland on your fingertips. The highlight is the adorable gnome with his iconic hat, adding a playful touch to the otherwise elegant green swirls and glitter. The beige accent nail, with its subtle embossed patterns, brings a beautiful balance, making this look both cute and sophisticated. The green glitter offers an eye-catching sparkle, perfect for the holiday season and beyond, providing a magical aesthetic that will impress.

Consumables for the Look:
- Base Coat: OPI Natural Nail Base Coat
- Green Glitter Polish: China Glaze – Emerald Sparkle
- Nude Polish: Essie – Topless & Barefoot
- Embossing Gel: Born Pretty 3D Embossing Gel
- Top Coat: Seche Vite Dry Fast Top Coat
- Nail Art Tools: Fine nail art brush, dotting tools for precise designs
DIY Steps:
- Start by applying a base coat for a smooth and protective layer.
- Paint two nails with green glitter polish and one with nude polish.
- Use embossing gel on the nude nail for the 3D accents. For the gnome, carefully paint the hat and details using a fine nail art brush.
- Finish with a top coat to seal in the design and add shine. This look is both simple and achievable at home with a little practice.
Cozy Lavender and Snowflake Design
Lavender nails are a cool-toned yet cozy choice for winter. This design blends a soft lavender base with plaid patterns and snowflake detailing, invoking the chilly but heartwarming spirit of winter. The snowflake accent nail adds a touch of intricate art while the plaid design is perfect for a casual and laid-back aesthetic. This is a trendy look that suits women who want a subtle but creative take on winter nails ideas 2024 – 2025.

Consumables for the Look:
- Lavender Polish: Zoya – Abby
- White Striping Polish: Orly Instant Artist in Crisp White
- Glitter Polish: Essie – Set in Stones
- Detail Brush: Twinkled T Fine Detail Brush
- Snowflake Stamp: Clear Jelly Stamper – Snowflake Plate
- Top Coat: Sally Hansen Insta-Dri
DIY Steps:
- Apply a base coat followed by two coats of lavender polish.
- Use a striping brush to create plaid patterns on two nails.
- For the snowflake design, use a stamping plate for precise results or freehand the snowflake with a detail brush.
- Seal everything with a glossy top coat. This look is easy yet effective for showcasing medium length hair or nails at any school or casual event.
Elegant Deep Green French Tips
For those who prefer a more understated and classic look, these elegant deep green French tips are the perfect choice. The sharp contrast between the nude base and dark green tips offers a sophisticated look while still feeling festive. It’s a sleek design that’s versatile enough for both everyday wear and special winter occasions. This minimalist design is ideal for medium shoulder length nails, giving the nails an elongated and graceful appearance.

Consumables for the Look:
- Base Polish: OPI – Bubble Bath
- Green Polish: Essie – Off Tropic
- French Tip Guides: Orly French Tip Stickers
- Top Coat: CND Vinylux Long Wear Top Coat
- Nail File: Tweezerman Nail File for sharp edges
DIY Steps:
- After prepping your nails with a base coat, apply a nude base color.
- Once dry, place French tip guides to ensure clean lines and paint the tips with deep green polish.
- Remove the guides carefully and finish with a top coat to lock in the design.
- These medium length hair nails are perfect for brunettes looking to complement their style with rich, deep tones.
Soft Pastel Stars and Snowflakes
For a dreamy, easy winter look, these soft pastel nails with star and snowflake details are a perfect choice. The pastel hues, combined with subtle glitter and tiny star accents, create a delicate and feminine design that feels magical and ethereal. This design is fantastic for kids or those who prefer a more understated look during the winter season. The soft gradient effect adds depth, while the tiny stars and snowflakes give it a touch of winter magic.

Consumables for the Look:
- Pastel Polish Set: Modelones Pastel Kit
- Glitter Polish: Sally Hansen – Twinkle Twinkle
- Star Stickers: Kiss Nail Art Stickers – Stars
- Snowflake Stamps: Maniology Snowflake Plate
- Top Coat: Essie – Gel Couture Top Coat
DIY Steps:
- Begin with a pastel base on all nails, using different shades for a gradient effect.
- Apply star stickers or stamps and add snowflake details on select nails.
- Finish with a glitter polish and a top coat for added sparkle and protection. These winter nails ideas 2024 – 2025 are both cute and simple to recreate at home, especially for women looking for a soft, whimsical design.
Sparkly Pink with Bow Accent
This playful pink manicure with glitter and a delicate bow accent is the epitome of cute winter charm. The soft pink base, combined with sparkling glitter and a carefully crafted bow, gives a festive yet feminine look perfect for holiday parties or casual winter days. The long nails give this design more room for intricate details, but it can easily be adapted for short nails as well.

Consumables for the Look:
- Pink Polish: OPI – Mod About You
- Glitter Polish: Zoya – Trixie
- Bow Sticker: Daily Charme – 3D Bow Charm
- Top Coat: Orly Glosser
- Nail Art Tweezers: Amazon Basics Nail Tweezers
DIY Steps:
- Apply a base coat, followed by two coats of the soft pink polish.
- Add glitter polish on an accent nail to make it stand out.
- Carefully apply the 3D bow sticker with nail tweezers, and finish with a glossy top coat to secure the design. This is a simple yet impactful look that can work for any winter occasion.
Matte Gray and Starry Winter Glam
This design combines soft matte gray with striking elements like stars, glitter, and 3D accents. The standout feature is the raised cable knit design on the middle finger, giving a cozy winter sweater feel. The black and silver stars against the gray background bring a futuristic vibe, while the glitter accent nail adds a glamorous touch, perfect for holiday celebrations. This set is bold yet approachable, offering a blend of sophistication and fun. The matte finish keeps it modern, and the silver accents elevate the overall look. Ideal for anyone wanting cute, fashion-forward nails this winter.

Consumables for the Look:
- Matte Gray Polish: Zoya – Dove
- Black and Silver Star Decals: Daily Charme Star Stickers
- 3D Embossing Gel: Born Pretty 3D Gel
- Silver Glitter Polish: OPI – Silver on Ice
- Matte Top Coat: Essie Matte About You
- Nail Art Tools: Dotting tool, fine detail brush
DIY Steps:
- Start by applying the matte gray polish on all nails except the accent glitter nail.
- Use the embossing gel to create the raised knit design on the middle finger.
- Apply star stickers to the remaining nails, and finish the look with a glitter accent nail for added sparkle.
- Seal everything with a matte top coat for long-lasting wear. This design is easy to recreate with practice and is perfect for those who love a mix of casual and festive vibes.
Sparkly Green Winter Magic
This glittery green design is a winter classic, with sparkling nails reminiscent of frosty mornings and festive celebrations. The key highlight is the clear accent nail with a delicate white snowflake, adding a wintery charm to the bold green. The glitter polish is ideal for adding shimmer without being overwhelming, making it a beautiful yet understated choice for winter nails ideas 2024 – 2025. The overall look is perfect for both casual and formal settings, providing a balance of simple and glamorous elements.

Consumables for the Look:
- Green Glitter Polish: Essie – Rock at the Top
- Snowflake Decal: Maniology Snowflake Stamping Plate
- Clear Polish: Sally Hansen Hard As Nails
- White Detailing Polish: OPI – Alpine Snow
- Top Coat: Seche Vite Dry Fast Top Coat
DIY Steps:
- Apply a base coat to protect the nails and follow with two layers of green glitter polish.
- On the accent nail, use a clear base coat and stamp a delicate white snowflake in the center.
- Apply a top coat to all nails for longevity and extra shine. This glittery design is easy to achieve and works well for women who love a bold yet festive look.
Bold Red and Snowflake Glam
For those who love a dramatic, festive look, this red manicure with a snowflake accent is a go-to for winter 2024-2025. The rich, glossy red polish covers the majority of the nails, creating a bold statement. The accent nail, featuring a nude base with a delicate white snowflake and tiny rhinestone details, adds a bit of whimsy to the otherwise powerful look. This design is perfect for medium or long nails, giving plenty of room for intricate details. It’s a classic winter style with a modern twist, perfect for parties or cozy nights by the fire.

Consumables for the Look:
- Red Polish: Clarisma – Red 420
- Nude Polish: OPI – Samoan Sand
- White Snowflake Decal: UberChic Snowflake Stamps
- Rhinestones: Swarovski Crystal Nail Gems
- Top Coat: Seche Vite Dry Fast Top Coat
DIY Steps:
- Apply two layers of red polish to the majority of the nails.
- Use the nude polish on the accent nail and apply a snowflake decal.
- Add rhinestones for extra sparkle and seal everything with a top coat. This design is simple yet eye-catching, ideal for creating a cute holiday look that’s both aesthetic and festive.
French Tips with Cardinals
This design brings a wintry forest scene to life with delicate hand-painted cardinals on an elegant French tip base. The red accents of the birds against the clean white tips add a festive, seasonal charm without being too over-the-top. This design is ideal for someone looking for a shoulder length nail style with an artistic touch. The soft pink base adds warmth to the design, while the cardinals add a pop of color, making it both simple and unique.

Consumables for the Look:
- French Tip White Polish: Essie – Blanc
- Red Polish: OPI – Big Apple Red
- Detailing Brush: Winstonia Nail Art Detail Brush
- Top Coat: Essie Good to Go Top Coat
- Glitter Accents: CND Vinylux Sparkle Effects
DIY Steps:
- Begin with a classic French tip, using a white polish on the tips and a soft pink base on the rest of the nails.
- Use a fine detailing brush to paint the cardinals on two accent nails.
- Add glitter accents for a touch of sparkle, and finish with a top coat. This cute design is perfect for casual winter events and works beautifully on medium length hair nails.
Soft Lilac and Glittery Winter Charm
This stunning design combines soft lilac tones with intricate white snowflakes and glitter accents, creating a whimsical winter look. The lilac shade is a refreshing departure from the usual winter reds and greens, while the silver glitter and white details add a festive touch. This design is perfect for those who love curly hair aesthetics, bringing a playful yet elegant vibe to the nails. The mix of textures, from matte to glitter, adds depth and dimension, making it perfect for long nails.

Consumables for the Look:
- Lilac Polish: Sally Hansen – Laven-Dear
- White Detailing Polish: Orly Instant Artist in White
- Silver Glitter Polish: Zoya – Celestia
- 3D Snowflake Stickers: Kiss Nail Art Stickers – Snowflakes
- Matte Top Coat: Revlon Matte Top Coat
DIY Steps:
- Start with a base coat followed by two layers of the soft lilac polish.
- Add silver glitter to one accent nail and use a detail brush to paint delicate snowflakes on another nail.
- Seal the design with a matte top coat for a soft, velvety finish. This design is easy to recreate and brings a medium-long hair aesthetic to your overall look.
Blue and Silver Winter Magic
This design combines icy blue shades with silver glitter and delicate white star details for a chic winter look. The deep blue accent nails with white wave-like patterns add a festive, wintry feel, while the light blue nails, adorned with tiny white snowflakes, bring a soft touch. The silver glitter nail provides just the right amount of sparkle to balance out the vibrant blue tones. This design is perfect for women who love medium length nails that blend bold colors with playful winter elements.

Consumables for the Look:
- Blue Polish: Semilac – Blue Lagoon
- Light Blue Polish: Essie – Bikini So Teeny
- White Detailing Polish: OPI – Alpine Snow
- Silver Glitter Polish: China Glaze – Silver Holographic
- Snowflake Stickers: Twinkled T Winter Snowflake Nail Art Stickers
- Top Coat: Sally Hansen Miracle Gel
DIY Steps:
- Start by applying a base coat, followed by two layers of blue polish on three nails and light blue on two.
- Use a white detailing brush to create wave patterns on the dark blue nails and small snowflakes on the light blue nails.
- Apply silver glitter polish on the ring finger for an accent.
- Finish with a top coat for a glossy and long-lasting finish. This look is cute, festive, and ideal for winter nails ideas 2024 – 2025.
Charcoal Snowflake Charm
A sophisticated and subtle winter look, this design features dark gray nails with intricate snowflake details. The combination of white and charcoal provides an elegant contrast, giving the nails a frosty wintery feel. The snowflakes stand out beautifully against the dark background, while the matte and glossy finishes add depth to the overall design. This look is perfect for shoulder length nails, providing a minimal yet festive aesthetic for winter.

Consumables for the Look:
- Charcoal Gray Polish: OPI – Dark Side of the Moon
- White Polish: Essie – Blanc
- Snowflake Decals: Born Pretty Snowflake Nail Art Stickers
- Matte Top Coat: Zoya Matte Velvet Topcoat
- Glossy Top Coat: Seche Vite Dry Fast Top Coat
DIY Steps:
- Apply a base coat, then paint two nails with charcoal gray polish and one with white.
- Use snowflake stickers on the accent nails or freehand the design with a fine brush for a more personalized touch.
- Seal the design with a matte top coat for a velvety finish, while keeping some nails glossy for contrast. This simple design is perfect for casual winter days or special events.
Elegant Black and Gold Geometric Nails
For those who love sleek and dramatic nails, this black and gold geometric design is a perfect choice. The deep black polish with hints of shimmer creates a luxurious base, while the white and gold geometric lines add a modern, high-fashion touch. This design is both sophisticated and bold, ideal for long nails, and provides an excellent option for formal winter events or parties.

Consumables for the Look:
- Black Shimmer Polish: Zoya – Storm
- Gold Foil: Twinkled T Gold Foil
- White Striping Polish: Orly Instant Artist in White
- Top Coat: Essie Good to Go Top Coat
- Nail Art Brush: Beetles Nail Art Detail Brush
DIY Steps:
- Begin with a base coat and apply two layers of black shimmer polish.
- Use a thin nail art brush to create clean geometric lines with white striping polish.
- Add gold foil to the tips of the nails for an elegant finishing touch.
- Finish with a high-shine top coat. This look is ideal for women who want a medium length hair style that pairs beautifully with sleek, modern nails.
Nude French with White Snowflakes
This wintery French manicure combines soft nude tones with crisp white snowflake details for a clean and polished look. The pointed French tips, paired with delicate snowflake designs, create a festive yet subtle style, perfect for both casual and formal winter occasions. The matte finish adds a touch of sophistication, making this design an excellent choice for school events or casual gatherings.
Consumables for the Look:
- Nude Polish: OPI – Bare My Soul
- White Polish: Essie – Blanc
- Snowflake Stamping Plate: UberChic Snowflake Nail Plate
- Matte Top Coat: Sally Hansen Insta-Dri Matte Finish
- Fine Nail Art Brush: Winstonia Nail Art Brush
DIY Steps:
- Start by applying a base coat and two layers of nude polish.
- Use white polish to create crisp French tips and add snowflake designs to two accent nails.
- Seal the design with a matte top coat for a sophisticated finish. This easy look is perfect for those who want a classic yet festive manicure.
Frosty Blue and Silver Gradient
This frosty blue and silver gradient manicure brings a cool, icy vibe to the winter season. The transition from light blue to a shimmering silver ombré effect is both subtle and eye-catching. The glitter adds a hint of glamour without overwhelming the soft base colors, making this design perfect for those who prefer simple and medium length hair nail styles that still capture the essence of winter.

Consumables for the Look:
- Light Blue Polish: Semilac – Baby Blue
- Silver Glitter Polish: Zoya – Trixie
- Gradient Sponge: Beauty Bigbang Sponge Set
- Top Coat: Orly Glosser High-Shine Top Coat
- Fine Glitter Powder: Twinkled T Fairy Dust
DIY Steps:
- Begin by applying the light blue polish as the base color.
- Use a makeup sponge to dab silver glitter polish onto the tips of the nails, creating a gradient effect.
- Seal the design with a glossy top coat and finish with a layer of fine glitter powder for extra sparkle. This look is cute, festive, and perfect for winter nails ideas 2024 – 2025.
Dual-Toned Winter Starburst
This bold winter nail design features a striking combination of deep blue and vibrant red nails with white starburst and dot patterns. The pointed stiletto shape enhances the dramatic flair, while the mix of cool and warm tones creates an exciting contrast. The intricate white lines and dots give a sense of a winter night sky, making this design perfect for festive events. The glitter in the red nails adds an extra touch of sparkle, making these nails a standout for long hair lovers who enjoy attention-grabbing designs.

Consumables for the Look:
- Deep Blue Polish: Essie – After School Boy Blazer
- Red Glitter Polish: OPI – All I Want for Christmas
- White Striping Polish: Orly Instant Artist in White
- Dotting Tool: Amazon Nail Dotting Tool Set
- Top Coat: Sally Hansen Miracle Gel Top Coat
DIY Steps:
- Apply two coats of deep blue polish on half of the nails and red glitter polish on the other half.
- Use a striping brush and dotting tool to create the starburst patterns on the accent nails.
- Seal the look with a high-shine top coat to lock in the design and ensure durability. This look is bold, fun, and easy to recreate for those who love long, curly hair aesthetics.
Icy Blue Snowflake Elegance
This soft and icy blue nail design exudes elegance, featuring subtle ombré gradients and delicate snowflake patterns. The design uses a frosty matte finish, adding a velvety touch to the nails, while the white snowflakes create a perfect wintery charm. This nail set is ideal for those seeking a simple yet eye-catching winter look that can easily complement medium length or shoulder length nails. It’s an aesthetic that pairs well with cozy outfits and casual winter gatherings.

Consumables for the Look:
- Icy Blue Polish: Victoria Vynn – Frosty Blue
- White Snowflake Stamping Plate: Clear Jelly Stamper – Snowflakes
- Matte Top Coat: Zoya Matte Velvet Top Coat
- Gradient Sponge: Beauty Bigbang Sponge Set
- Fine Detail Brush: Beetles Detail Brush
DIY Steps:
- Begin with a light blue base and create a gradient effect by dabbing a darker blue at the cuticle with a sponge.
- Stamp or freehand the white snowflakes on select nails.
- Apply a matte top coat to give the design a soft, frosted appearance. This look is cute, elegant, and easy to maintain, making it a casual favorite.
Holographic Glitter and Pearl Accents
This delicate design pairs soft nude tones with holographic glitter and pearl accents for an understated winter look. The focus is on the sparkle, with a combination of light-reflecting glitter and the sophisticated addition of small pearls at the cuticle. This style is perfect for those who prefer short nails, adding a bit of winter magic without overwhelming the overall appearance. It’s a simple yet chic look that would work perfectly for kids or women with busy lifestyles who want to keep their nails elegant but low-maintenance.

Consumables for the Look:
- Nude Polish: OPI – Bubble Bath
- Holographic Glitter Polish: ILNP – Mega
- Pearl Embellishments: Daily Charme Pearl Nail Charms
- Top Coat: Seche Vite Dry Fast Top Coat
- Nail Glue: KDS Nail Art Glue for Charms
DIY Steps:
- Apply two coats of nude polish for a soft base.
- Use holographic glitter polish on one accent nail and add pearl embellishments at the cuticle.
- Seal everything with a glossy top coat for durability. This easy design is ideal for a school look or a simple yet glamorous winter vibe.
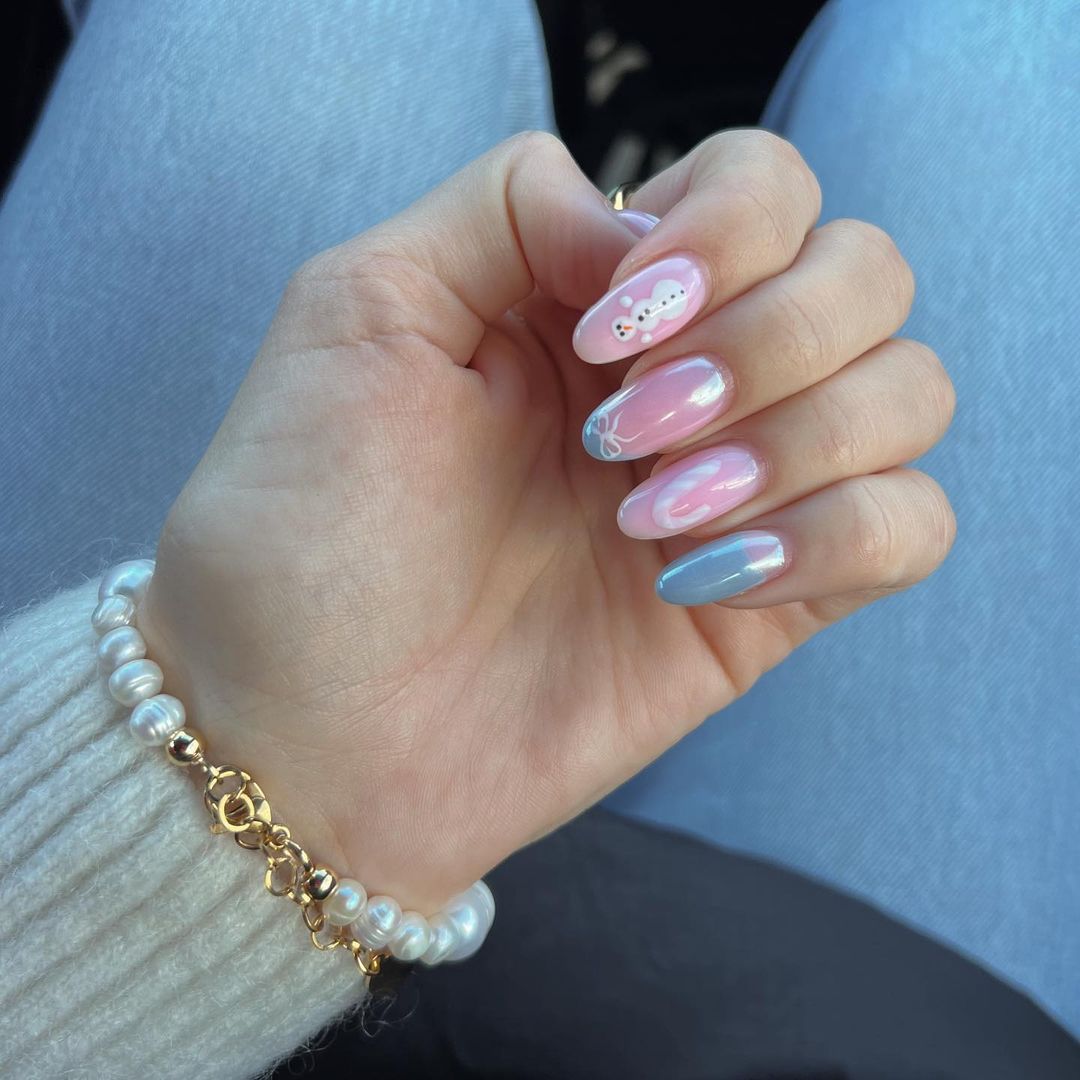
Pastel Snowman and Bow Accents
This playful design combines soft pastel shades with winter-themed details like a hand-painted snowman and dainty bow accents. The pastel pink and blue gradient adds a dreamy, cute aesthetic, while the snowman adds a festive and lighthearted touch. The glossiness of the nails ensures a smooth finish, making this a charming design for women or kids who want to add some fun to their winter nails.

Consumables for the Look:
- Pastel Pink Polish: OPI – It’s a Girl!
- Pastel Blue Polish: Essie – Bikini So Teeny
- White Striping Polish: Orly Instant Artist in White
- Bow Stickers: Twinkled T Bow Nail Stickers
- Top Coat: CND Vinylux Long Wear Top Coat
DIY Steps:
- Create a pastel gradient by blending pink and blue polish with a sponge.
- Use a fine detailing brush to paint the snowman and add bow accents on other nails.
- Seal the design with a top coat for a long-lasting glossy finish. This medium hair length nail design is simple and fun, ideal for any winter occasion.
Winter Wonderland Nail Art
This charming winter design features tiny holiday scenes on each nail, from pine trees to snowflakes and even the word “Winter.” The white base provides a clean canvas for these intricate hand-painted details, accented with gold glitter for a bit of sparkle. It’s a perfect choice for those who love a curly hair aesthetic, bringing a soft yet festive look to their nails. This cute and creative design is perfect for winter holidays and works well with medium nails.

Consumables for the Look:
- White Polish: OPI – Alpine Snow
- Gold Glitter Polish: Zoya – Astrid
- Fine Detail Brush: Twinkled T Nail Art Brush
- Winter Nail Decals: Maniology Winter Nail Art Stickers
- Top Coat: Essie Good to Go Top Coat
DIY Steps:
- Start with two coats of white polish.
- Use nail art stickers or a fine detail brush to paint winter-themed accents like pine trees and snowflakes.
- Apply a gold glitter top coat to add a festive sparkle and finish with a glossy top coat. This look is simple to recreate and perfect for a winter aesthetic.
Frosted Purple and Pink Nails
This frosted winter nail design uses shades of pink and purple to create a soft, gradient look that feels fresh and festive. The white snowflake details contrast beautifully with the matte background, giving the nails a simple yet elegant appearance. This design is ideal for medium length nails and is perfect for a school or casual winter look, providing a soft, cozy aesthetic that can easily transition into holiday celebrations.

Consumables for the Look:
- Pink Polish: Semilac – Frosty Pink
- Purple Polish: Essie – Play Date
- White Snowflake Decals: Born Pretty Snowflake Stickers
- Matte Top Coat: OPI Matte Finish Top Coat
- Nail Art Tools: Amazon Detail Brush Set
DIY Steps:
- Apply pink polish on two nails and purple on the remaining nails for a gradient effect.
- Add white snowflake decals to enhance the winter theme.
- Finish with a matte top coat to give the nails a frosted effect. This look is cute and cozy, perfect for those embracing a medium shoulder length nail style.
Pastel Blue and Marble Winter Vibes
This stunning winter nail design combines soft pastel blue tones with a captivating marble accent and a touch of orange ombré. The matte finish adds an elegant sophistication, while the subtle gradient and marble details create depth and visual interest. This look is both modern and chic, making it perfect for those who want a minimalist yet creative winter aesthetic. It pairs well with long hair or medium length hair styles, adding a cool wintery touch to any outfit.

Consumables for the Look:
- Pastel Blue Polish: OPI – It’s a Boy!
- Orange Ombre Polish: Essie – Tart Deco
- Marble Detailing Polish: Sally Hansen – Black to Black
- Matte Top Coat: Zoya Matte Velvet Topcoat
- Fine Detail Brush: Twinkled T Nail Art Brush Set
DIY Steps:
- Begin with two coats of pastel blue polish as your base color.
- Create the orange ombré effect using a sponge to blend the orange polish on one accent nail.
- Use a fine brush to create the marble design on another accent nail, layering black and white polish for a natural marbled look.
- Seal everything with a matte top coat for a velvety, wintery finish. This design is easy to recreate and brings a casual yet fashionable vibe to your overall look.
Save Pin
