
When it comes to fall nails, embracing the season’s rich palette and cozy vibes can elevate any look. But what defines classy fall nails? Is it the choice of colors, the subtle designs, or perhaps the elegance of the nail shape? In this article, we’ll explore various nail designs that are perfect for the fall season. Whether you’re a fan of simple and understated styles or looking for something more intricate and eye-catching, we’ve got you covered. Let’s dive into the world of classy fall nails and discover the perfect manicure to complement your autumn wardrobe.
Autumn Floral Elegance
For a truly refined and classy fall nails look, this design combines delicate floral accents with a muted palette. The nails are painted with a soft, matte green that complements the fall season. The floral elements are carefully crafted on a clear base, allowing the colors to stand out without being overwhelming. This design perfectly captures the essence of fall, with each flower’s subtle hints of red, yellow, and blue.

Consumables:
-
- Matte green polish (Essie in “Off Tropic”)
- Floral nail stickers (Sally Hansen Flower Power Stickers)
- Clear base coat (OPI Start to Finish)
- Matte top coat (Essie Matte About You)
Creating the Look:
-
- Start with a clear base coat to protect your nails.
- Apply two coats of the matte green polish, allowing each coat to dry thoroughly.
- Carefully place the floral stickers on the nails, focusing on the edges to create a delicate border.
- Seal the design with a matte top coat for a sophisticated finish.
Neutral Plaid Perfection
This classy fall nails design features a neutral palette with a sophisticated twist. The nails are painted in a chic beige tone, with one accent nail featuring a black plaid pattern. The combination of matte and glossy finishes adds a unique touch, making this design perfect for any occasion.

Consumables:
-
- Beige polish (OPI in “My Vampire is Buff”)
- Black nail striping tape (Kiss Nail Art Striping Tape)
- Matte top coat (OPI Matte Top Coat)
- Glossy top coat (Seche Vite Dry Fast Top Coat)
Creating the Look:
-
- Apply a base coat and two coats of beige polish.
- Use the black striping tape to create a plaid pattern on the accent nail.
- Finish with a matte top coat on all nails, except for the accent nail, which should have a glossy top coat.
Subtle Autumn Leaves
For those who prefer a more understated approach to classy fall nails, this design is ideal. The nails are painted in a creamy beige shade, with delicate leaf accents in autumnal colors. The leaves are positioned at the tips of the nails, giving a subtle nod to the changing seasons.

Consumables:
-
- Creamy beige polish (Zoya in “Chantal”)
- Leaf nail stickers (Dashing Diva Autumn Leaves)
- Matte top coat (Sally Hansen Matte Top Coat)
Creating the Look:
-
- Start with a base coat and apply two layers of the creamy beige polish.
- Gently place the leaf stickers at the tips of the nails.
- Seal the design with a matte top coat for a polished look.
Playful Fall Mix
This classy fall nails design is perfect for those who love a bit of fun with their nails. It features a mix of colors and patterns, including orange, black, mint, and cow print accents. The playful combination of designs makes it an eye-catching choice for the fall season.

Consumables:
-
- Orange polish (OPI in “A Good Man-darin is Hard to Find”)
- Black polish (Essie in “Licorice”)
- Mint polish (OPI in “That’s Hula-rious!”)
- Cow print nail stickers (Deco Miami Cow Print)
- Glossy top coat (Sally Hansen Miracle Gel Top Coat)
Creating the Look:
-
- Apply a base coat and then alternate the colors on each nail.
- Apply the cow print stickers to a couple of nails for a playful accent.
- Finish with a glossy top coat to seal the design.
Elegant Fall Swirls
This design showcases classy fall nails with a sophisticated twist. The nails are adorned with a combination of muted orange and deep green, intertwined with delicate gold swirls. The design is perfect for those who want a stylish yet elegant look.

Consumables:
-
- Orange polish (Essie in “Playing Koi”)
- Deep green polish (OPI in “Suzi – The First Lady of Nails”)
- Gold nail art brush (Modelones Nail Art Liner in Gold)
- Glossy top coat (CND Vinylux Weekly Top Coat)
Creating the Look:
-
- Start with a base coat and apply the orange and green polish in an alternating pattern.
- Use the gold nail art brush to create delicate swirl patterns on the nails.
- Seal the design with a glossy top coat.
Sunny Yellow Blossoms
Bright and cheerful, this classy fall nails design features a pop of yellow that brings a sunny vibe to your autumn look. The nails are painted in a glossy yellow, with two accent nails adorned with delicate black and white floral patterns on a clear base. This design blends simplicity with an eye-catching element, making it perfect for those who love a splash of color.

Consumables:
-
- Yellow polish (Sally Hansen in “Mellow Yellow”)
- Black and white floral nail decals (KADS Nail Art Stickers)
- Clear base coat (OPI Natural Nail Base Coat)
- Glossy top coat (Essie Gel Setter)
Creating the Look:
-
- Begin with a base coat and apply two coats of the yellow polish on all nails except the accent nails.
- For the accent nails, apply a clear base coat and let it dry.
- Place the floral nail decals on the accent nails, pressing down gently to ensure they adhere smoothly.
- Finish with a glossy top coat to seal the design and add shine.
Rustic Autumn Glam
For a sophisticated fall look, this design combines warm, earthy tones with a touch of shimmer. The nails feature a gradient of copper glitter and soft peach, creating a beautiful contrast. The subtle shimmer of the copper polish adds a glamorous touch, making it a perfect choice for evening outings.

Consumables:
-
- Copper glitter polish (Zoya in “Aubrey”)
- Peach polish (Essie in “Peach Side Babe”)
- Nude base polish (OPI in “Samoan Sand”)
- Glossy top coat (CND Vinylux Weekly Top Coat)
Creating the Look:
-
- Start with a nude base polish and apply two coats for an even finish.
- Create a diagonal gradient effect using the copper glitter and peach polishes, starting from the cuticle area and blending outwards.
- Finish with a glossy top coat to enhance the shimmer and protect the design.
Sage Green Delight
This classy fall nails design features a soothing sage green with delicate leaf and plaid accents. The nails are painted in a soft, muted green, with accent nails showcasing intricate leaf designs and a chic plaid pattern. This combination of natural elements and classic patterns makes it a versatile choice for any fall occasion.

Consumables:
-
- Sage green polish (China Glaze in “For Audrey”)
- Leaf nail art brush (Winstonia Nail Art Brush)
- Plaid nail stickers (Born Pretty Plaid Decals)
- Matte top coat (Essie Matte About You)
Creating the Look:
-
- Apply a base coat followed by two coats of sage green polish.
- Use the nail art brush to paint delicate leaf designs on selected nails.
- Apply plaid stickers on a few accent nails for a chic look.
- Finish with a matte top coat for a soft, velvety finish.
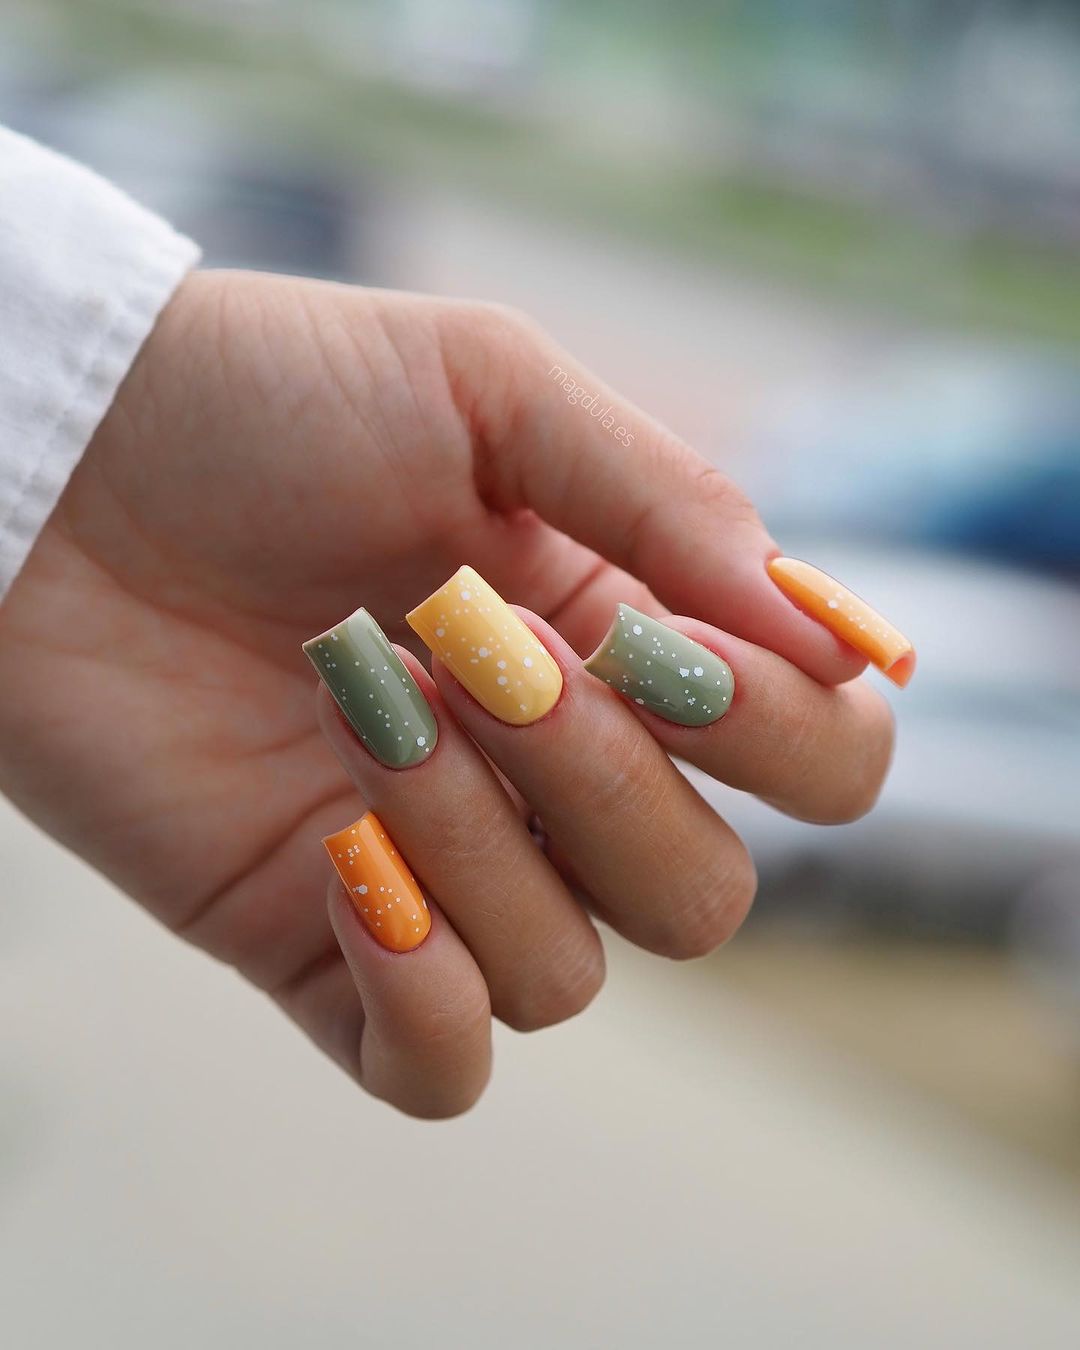
Speckled Perfection
This design takes a modern twist on the classic fall palette. The nails feature a deep maroon base with speckled accent nails in black, white, and gold. The playful speckled effect adds a unique touch to the otherwise understated look, making it a great choice for a casual yet stylish appearance.

Consumables:
-
- Maroon polish (OPI in “Malaga Wine”)
- White polish (OPI in “Alpine Snow”)
- Black polish (China Glaze in “Liquid Leather”)
- Gold glitter polish (Sally Hansen in “Golden-I”)
- Speckled effect brush (dotting tool or small nail art brush)
- Glossy top coat (Seche Vite Dry Fast Top Coat)
Creating the Look:
-
- Start with a base coat and apply the maroon polish to all nails.
- For the speckled nails, use a dotting tool or small brush to create random speckles in black, white, and gold.
- Seal the design with a glossy top coat to add shine and protect the nail art.
Orange Blossom
This classy fall nails design captures the essence of fall with its vibrant orange hue and intricate floral accents. The nails are painted in a warm orange shade, with accent nails featuring tiny white, yellow, and green floral designs. This lively and colorful design is perfect for those who want to celebrate the beauty of the season.

Consumables:
-
- Orange polish (OPI in “A Good Man-darin is Hard to Find”)
- Floral nail stickers (Dashing Diva Floral Fantasy)
- Clear base coat (OPI Start to Finish)
- Glossy top coat (Sally Hansen Miracle Gel Top Coat)
Creating the Look:
-
- Apply a base coat and then two coats of the orange polish.
- Apply the floral nail stickers to accent nails, arranging them for a balanced look.
- Finish with a glossy top coat to seal the design and add a brilliant shine.
Polka Dot Delight
This playful and colorful design features a variety of fall-inspired hues, including muted green, mustard yellow, and warm orange. Each nail is painted in a different color, with tiny white polka dots scattered across the nails, adding a whimsical touch. This design is perfect for those who love vibrant and fun classy fall nails.

Consumables:
-
- Muted green polish (Essie in “Sew Psyched”)
- Mustard yellow polish (OPI in “Never a Dulles Moment”)
- Warm orange polish (China Glaze in “Orange Knockout”)
- White nail art pen (Sally Hansen I Heart Nail Art Pen in White)
- Glossy top coat (Seche Vite Dry Fast Top Coat)
Creating the Look:
-
- Apply a base coat and paint each nail with two coats of the respective colors.
- Use the white nail art pen to draw small polka dots on each nail.
- Finish with a glossy top coat to seal the design and add shine.
Burnt Orange Elegance
Embodying the warm tones of autumn, this nail design features a rich burnt orange hue with a touch of sparkle. The nails are painted with a glossy finish, and a subtle line of gold glitter accents the tip of each nail. This elegant design is perfect for a chic and sophisticated look.

Consumables:
-
- Burnt orange polish (Essie in “Playing Koi”)
- Gold glitter polish (China Glaze in “Golden Enchantment”)
- Fine glitter brush (Winstonia Nail Art Brush)
- Glossy top coat (CND Vinylux Weekly Top Coat)
Creating the Look:
-
- Start with a base coat and apply two coats of the burnt orange polish.
- Use a fine glitter brush to apply a thin line of gold glitter at the tips.
- Seal the design with a glossy top coat for a smooth and shiny finish.
Retro Floral Vibes
This classy fall nails design brings a retro feel with its dark brown base and pastel floral accents. The nails are adorned with small, dainty flowers in shades of yellow, white, and green, set against a soft pink background. The combination of dark and light colors makes this design both stylish and versatile.

Consumables:
-
- Dark brown polish (OPI in “Espresso Your Inner Self”)
- Soft pink polish (OPI in “Let Me Bayou a Drink”)
- Floral nail stickers (Dashing Diva Floral Fantasy)
- Glossy top coat (Essie Gel Setter)
Creating the Look:
-
- Apply a base coat and paint each nail with the dark brown polish.
- For the floral nails, apply the soft pink polish as a base.
- Place the floral stickers on the nails, pressing them down gently.
- Finish with a glossy top coat to seal the design.
Marble Autumn
This sophisticated design features a beautiful marble effect in shades of brown, cream, and orange. The nails are adorned with intricate swirls and patterns, giving the appearance of natural stone. The combination of earthy tones and the marble pattern makes this design perfect for a classy fall look.

Consumables:
-
- Cream polish (Zoya in “Jacqueline”)
- Brown polish (OPI in “I Brake for Manicures”)
- Orange polish (Essie in “Playing Koi”)
- Nail art brush (Modelones Nail Art Liner Brush)
- Glossy top coat (Sally Hansen Miracle Gel Top Coat)
Creating the Look:
-
- Apply a base coat and a layer of cream polish.
- Using a nail art brush, swirl the brown and orange polishes to create a marble effect.
- Seal the design with a glossy top coat for a polished finish.
Minimalist Leaf Art
This minimalistic design features a soft grey base with delicate leaf motifs in muted autumn colors. The nails are painted in a subtle grey, with each nail showcasing a different leaf design. The simple yet elegant look makes this a perfect choice for those who prefer understated classy fall nails.

Consumables:
-
- Soft grey polish (OPI in “I Can Never Hut Up”)
- Brown polish (China Glaze in “Wood You Wanna?”)
- Black nail art pen (KADS Nail Art Pen in Black)
- Glossy top coat (CND Vinylux Weekly Top Coat)
Creating the Look:
-
- Start with a base coat and apply two coats of the soft grey polish.
- Use the black nail art pen to draw delicate leaf designs on each nail.
- Finish with a glossy top coat to protect the design and add shine.
Autumn French Tips
This design combines classic French tips with an autumnal twist. The nails feature a warm brown polish on the thumb and pinky, while the other nails showcase a soft pink base with yellow and white French tips. The addition of a delicate yellow swirl adds a modern touch to this elegant design, perfect for those who love subtle yet stylish classy fall nails.

Consumables:
-
- Brown polish (OPI in “Chocolate Moose”)
- Yellow polish (China Glaze in “Happy Go Lucky”)
- White polish (Essie in “Blanc”)
- Clear base coat (OPI Start to Finish)
- Glossy top coat (Essie Gel Setter)
Creating the Look:
-
- Apply a base coat and paint the thumb and pinky nails with the brown polish.
- For the remaining nails, apply a soft pink base and create French tips using yellow and white polishes.
- Add a delicate yellow swirl on one of the French tip nails.
- Seal with a glossy top coat for a smooth finish.
Blue Confetti Chic
This playful and chic design features a navy blue base with accent nails adorned with a confetti-like pattern. The accent nails have a clear base with a mix of green, blue, and gold dots, giving the nails a fun and festive look. The combination of solid and patterned nails makes this design versatile for any occasion.

Consumables:
-
- Navy blue polish (OPI in “Russian Navy”)
- Green polish (Essie in “Going Incognito”)
- Blue polish (China Glaze in “First Mate”)
- Gold foil (Sally Hansen Nail Art Foil)
- Clear base coat (Essie First Base)
- Glossy top coat (Seche Vite Dry Fast Top Coat)
Creating the Look:
-
- Start with a base coat and apply the navy blue polish to the thumb, index, and pinky nails.
- For the accent nails, use a clear base and create the confetti effect with green, blue, and gold dots.
- Apply gold foil pieces sporadically for added sparkle.
- Finish with a glossy top coat to seal the design.
Pastel Leaf Elegance
This elegant design features a soft pastel blue base with delicate leaf accents. The nails are painted in a matte blue, with two accent nails adorned with intricate black leaf patterns on a nude base. This subtle and sophisticated look is perfect for those who prefer understated classy fall nails.

Consumables:
-
- Pastel blue polish (Essie in “Saltwater Happy”)
- Black nail art pen (KADS Nail Art Pen in Black)
- Nude polish (OPI in “Bubble Bath”)
- Matte top coat (Essie Matte About You)
Creating the Look:
-
- Apply a base coat and two coats of pastel blue polish on most nails.
- For the accent nails, use a nude polish as the base and draw delicate black leaf patterns with the nail art pen.
- Finish with a matte top coat to give a velvety appearance.
Rustic Burnt Orange
Embrace the rich tones of fall with this burnt orange nail design. The nails are painted in a shimmery burnt orange polish, giving them a warm and cozy vibe. This simple yet stunning look is perfect for those who love a bold, single-color manicure that still feels classy and elegant.

Consumables:
-
- Burnt orange polish (Olive Ave Polish in “Autumn Blaze”)
- Clear base coat (OPI Natural Nail Base Coat)
- Glossy top coat (Sally Hansen Miracle Gel Top Coat)
Creating the Look:
-
- Start with a base coat to protect your nails.
- Apply two coats of the burnt orange polish, allowing each coat to dry thoroughly.
- Finish with a glossy top coat to enhance the shimmer and longevity.
Earthy Marble Elegance
This unique design features a stunning marble effect in shades of emerald green and rich brown. The nails are adorned with intricate marbling that mimics the look of precious stones. The combination of earthy tones and the glossy finish makes this design both elegant and eye-catching.

Consumables:
-
- Emerald green polish (Essie in “Off Tropic”)
- Brown polish (OPI in “Suzi – The First Lady of Nails”)
- Clear base coat (OPI Start to Finish)
- Glossy top coat (Seche Vite Dry Fast Top Coat)
- Nail art brush (Winstonia Nail Art Brush)
Creating the Look:
-
- Apply a base coat and a base layer of green polish.
- Use a nail art brush to swirl the brown polish into the green, creating a marble effect.
- Seal the design with a glossy top coat for a polished, stone-like finish.
Mixed Fall Palette
This classy fall nails design features a variety of rich, earthy tones, perfect for the autumn season. Each nail showcases a different color and pattern: a beige base with white lines on the thumb, a deep plum on the index finger, an olive green on the middle finger, a beige base with black polka dots on the ring finger, and a warm brown on the pinky. The mix of colors and patterns adds a playful yet sophisticated touch to this design.

Consumables:
-
- Beige polish (OPI in “My Vampire is Buff”)
- Deep plum polish (Essie in “Sole Mate”)
- Olive green polish (OPI in “Stay Off the Lawn!”)
- Black polish (China Glaze in “Liquid Leather”)
- Brown polish (Essie in “Clothing Optional”)
- White nail art pen (Sally Hansen I Heart Nail Art Pen in White)
- Clear base coat (OPI Natural Nail Base Coat)
- Glossy top coat (Seche Vite Dry Fast Top Coat)
Creating the Look:
-
- Apply a base coat and paint each nail with the respective colors.
- For the thumb, use the white nail art pen to draw clean, straight lines.
- Create polka dots on the ring finger using a dotting tool and black polish.
- Finish with a glossy top coat to seal the design.
Autumn Glitter Gradient
This stunning design captures the warm hues of autumn with a gradient glitter effect. The nails are painted in shades of brown, burgundy, orange, and mustard yellow, with a layer of gold glitter on top. The gradient effect and sparkling finish make this design perfect for adding a touch of glamour to any fall outfit.

Consumables:
-
- Brown polish (Zoya in “Louise”)
- Burgundy polish (OPI in “Malaga Wine”)
- Orange polish (China Glaze in “Free Love”)
- Mustard yellow polish (OPI in “Never a Dulles Moment”)
- Gold glitter polish (China Glaze in “Golden Enchantment”)
- Clear base coat (Essie First Base)
- Glossy top coat (CND Vinylux Weekly Top Coat)
Creating the Look:
-
- Apply a base coat and paint each nail with the chosen fall colors.
- Apply a layer of gold glitter polish, focusing on the tips to create a gradient effect.
- Seal with a glossy top coat for a shiny finish.
Sophisticated Plaid
This design features a chic and sophisticated look with a soft grey base and a classic plaid pattern accent nail. The plaid pattern is created with thin black, white, and red lines, adding a timeless touch to this simple yet elegant manicure. The clean lines and neutral colors make this design versatile for any occasion.

Consumables:
-
- Soft grey polish (OPI in “I Can Never Hut Up”)
- Black nail art pen (KADS Nail Art Pen in Black)
- White nail art pen (Sally Hansen I Heart Nail Art Pen in White)
- Red polish (Essie in “Really Red”)
- Clear base coat (OPI Natural Nail Base Coat)
- Glossy top coat (Seche Vite Dry Fast Top Coat)
Creating the Look:
-
- Apply a base coat and paint all nails with the soft grey polish.
- Use the nail art pens to draw the plaid pattern on the accent nail, starting with the black lines, followed by white and red.
- Finish with a glossy top coat to protect the design and add shine.
Save Pin
