
23 Cute and Simple Snowflake Nails Ideas for Winter: Sparkly Designs in Every Color
Winter is the perfect time to switch up your nail game, and nothing says winter better than snowflake nails ideas. Whether you’re looking for something simple and cute or a more intricate design, snowflakes add that frosty touch that’s both festive and stylish. From light blue, white, and silver hues to bold red and green, snowflake designs can be as versatile as they are fun to create. Let’s explore some of the best winter nail art featuring snowflakes, and I’ll show you how you can recreate them at home.
Snowflake Elegance: Nude & Sparkly
This set features stunning snowflake nails ideas with a natural and neutral nude base. The white snowflakes are delicately drawn on short, almond-shaped nails, with one accent nail in a sparkly glitter finish. The combination of white snowflakes against the muted background creates a chic, sophisticated look that is perfect for the winter season. The added sparkly accent nail elevates the entire design, making it ideal for a Christmas or holiday gathering.

Consumables:
- OPI Nail Lacquer in “Dulce de Leche” for the nude base.
- Essie Gel Couture in “Matter of Fiction” for the soft pink tint.
- Glitter polish such as China Glaze “Fairy Dust.”
- Nail art brush for creating detailed snowflake patterns.
- Seche Vite Fast Dry Top Coat for a glossy finish.
How to Create This Design at Home:
- Start by applying two coats of your nude base color. Make sure each layer dries thoroughly.
- Using a thin nail art brush, carefully draw snowflake patterns in white polish. Don’t worry about perfection—each snowflake is unique!
- For the accent nail, apply a coat of glitter polish for a sparkly effect.
- Seal with a high-gloss top coat to ensure your art lasts all winter long.
Frosted Snowflakes on Cool Blue
These snowflake nails ideas are all about the cool tones of blue and frosty designs. With light blue and white snowflakes, this manicure feels like stepping into a winter wonderland. The holographic accents on the snowflakes give the design an ethereal, icy vibe. The long square shape adds a bit of drama to the overall look.

Consumables:
- Essie “Bikini So Teeny” for the light blue base.
- Zoya Nail Polish in “Snow White” for the snowflakes.
- Swarovski crystals for added sparkle.
- Holo Taco’s “Linear Holo Taco” for a touch of holographic magic.
How to Create This Design at Home:
- Start by applying two coats of a light blue base polish.
- Using a detail brush, create white snowflakes across the nails. For an extra wintry feel, add smaller dots around the snowflakes.
- Use holographic accents or chrome dust to give the snowflakes a magical, sparkling finish.
- Don’t forget to apply a top coat to secure your art.
Navy Blue Snowflakes with Minimalist Charm
For a more simple yet striking look, these blue and white nails are a great choice. The deep navy blue contrasts beautifully with the silver snowflake on the accent nail. This manicure keeps it classy with solid blue on most nails, allowing the snowflake to truly shine as the centerpiece. Ideal for someone who wants winter nails without too much fuss.

Consumables:
- Essie “Midnight Cami” for the navy blue base.
- OPI “Alpine Snow” for the accent nail.
- Silver nail art foil or stickers for the snowflake.
- Top coat for long-lasting shine.
How to Create This Design at Home:
- Apply two coats of navy blue polish to all nails except the accent nail.
- For the accent nail, paint it in white and add a silver snowflake using either stickers or a detail brush.
- Seal your design with a top coat for a smooth, sparkly finish.
Bright Royal Blue with Snowflake Accents
Bold and beautiful, this royal blue manicure with intricate snowflake details is a winter showstopper. The blue polish is highly pigmented, creating a dramatic backdrop for the white and silver snowflakes. With rhinestones added for extra sparkle, this look is perfect for those who want their nails to stand out at any winter event.

Consumables:
- China Glaze “Frostbite” for the royal blue base.
- White striping polish for the snowflakes.
- Rhinestones or crystals for added sparkle.
- Nail glue to adhere rhinestones.
How to Create This Design at Home:
- Start by applying two coats of your blue base polish.
- Draw snowflake designs on one or two nails using white striping polish or a nail art pen.
- Add rhinestones to the center of each snowflake for that extra touch of Christmas magic.
- Apply a glossy top coat to lock everything in place.
Subtle Sparkle with Neutral Tones
If you love neutral tones but still want a bit of winter magic, this snowflake nails idea is perfect for you. The nails have a clear or nude base with subtle snowflake designs and hints of sparkly accents. This manicure is great for those who prefer natural nails with just a touch of snowflake charm. The light blue, silver, and gray accents keep it understated yet elegant.

Consumables:
- Essie “Mademoiselle” for the nude base.
- OPI “Silver Canvas” for the subtle silver accents.
- Thin nail art brush for snowflake details.
- Holographic glitter for added sparkle.
How to Create This Design at Home:
- Apply two coats of a sheer or nude polish.
- Draw small, intricate snowflakes using silver or light blue polish. For extra flair, add a few dots around the snowflakes to mimic falling snow.
- Dust the tips with a bit of holographic glitter for a frosted effect.
- Finish with a high-shine top coat.
Glittery Pink and White Snowflake Nails
This snowflake nails idea combines bright and soft hues, featuring a playful mix of pink, white, and silver. The standout feature is the delicate snowflake on a clear natural base, with a sparkly silver glitter nail as an accent. The pink nail adds a pop of color to balance the neutral tones, making this look cute yet sophisticated. Ideal for those who want a mix of playful and chic for the winter season.

Consumables:
- Essie “Ballet Slippers” for the pink shade.
- OPI “Alpine Snow” for the snowflake design.
- Sally Hansen “Disco Ball” for the sparkly glitter.
- A fine-tip brush for precise snowflake details.
How to Create This Design at Home:
- Apply two coats of pink on the designated nail, and two coats of white for the solid nails.
- Use a thin nail art brush to draw the snowflake design on a clear base.
- For the accent nail, apply silver glitter polish in layers to achieve the desired sparkle.
- Seal with a top coat to lock in the design and ensure long-lasting wear.
Red & White Snowflakes with Candy Cane Accents
This snowflake nails idea is a fun mix of Christmas colors with a candy cane-inspired twist. The red French tip with a delicate snowflake is the showstopper, while the red sweater texture and sparkly accent nail bring a cozy feel. The candy cane design with white stripes on red adds a festive element, making it perfect for holiday celebrations.

Consumables:
- Essie “Rock the Runway” for the red base.
- Sally Hansen “White On” for the snowflakes and stripes.
- OPI “Glitzerland” for the gold sparkle on the accent nail.
- Dotting tool and striping brush for the intricate art details.
How to Create This Design at Home:
- Start by applying red on the main nails and nude on the French tip base.
- Use a striping brush to create white snowflakes on one nail and stripes on another for the candy cane look.
- For the sweater design, apply a matte top coat over red and use a dotting tool to create the textured effect.
- Finish with a top coat to add shine and protect your festive winter nails.
Pastel Snowflake Delight
Soft and cute, this manicure brings together pastel tones of pink and light blue with subtle snowflake details. The sparkly glitter over the pink adds a frosty feel, while the light blue base with a simple white snowflake captures the essence of winter. It’s a perfect design for those who want to keep their nails bright yet simple.

Consumables:
- Essie “Mint Candy Apple” for the light blue base.
- OPI “Princesses Rule” for the pink glitter nail.
- White striping polish for the snowflakes.
- Nail art stickers or stamping tools for easy snowflake application.
How to Create This Design at Home:
- Paint the nails with two coats of light blue and pink, leaving one nail for a white glittery finish.
- Use a snowflake sticker or hand-draw a snowflake on one nail with a thin brush.
- Add a layer of glitter on the pink nails to give it that frosty winter look.
- Top it all off with a glossy top coat for shine and protection.
Festive Reindeer and Polka Dot Fun
This playful and whimsical snowflake nails idea takes holiday cheer to another level. The mix of pink, red, and white creates a cute and festive look, featuring a reindeer art on one nail and polka dots on another. The delicate red branch design on the pink base adds a sophisticated element to this fun and festive look.

Consumables:
- OPI “Mod About You” for the soft pink base.
- Essie “Forever Yummy” for the red accents.
- Dotting tool for the polka dots.
- Nail art stickers or fine-tip brush for reindeer art and branches.
How to Create This Design at Home:
- Apply the pink base color and let it dry completely.
- Use a thin brush to draw the red branches on one nail, and a dotting tool for the polka dots on another.
- For the reindeer, use a sticker or carefully paint the art with a detail brush.
- Seal your festive design with a clear top coat.
Soft Pink Snowflakes on Short Nails
For those who love simple and delicate looks, these soft pink nails with subtle snowflake details are perfect. The natural shade of pink serves as a clean and neutral base for the delicate white snowflake. The short square shape makes this look practical yet classy, great for everyday wear in the winter season.

Consumables:
- OPI “Bubble Bath” for the pink base.
- Essie “Blanc” for the white snowflake.
- Thin nail art brush for the snowflake details.
- Top coat for a smooth and glossy finish.
How to Create This Design at Home:
- Start by applying two coats of the soft pink base.
- Use a thin nail art brush to draw a delicate snowflake on one or two nails.
- Add a few small dots around the snowflake to mimic falling snow.
- Seal with a high-shine top coat to keep your simple and chic look intact.
Winter Wonderland Nails with Snowmen and Snowflakes
These snowflake nails ideas are a dreamy combination of delicate white snowflakes and festive winter-themed prints. The snowy landscape and Christmas elements, such as the snowman and tiny trees, make this design perfect for the holiday season. The soft pink base with hints of gold accents adds a touch of elegance, making it both playful and refined. The natural nails look delicate and stylish, thanks to the combination of light pink and intricate snowflake art.

Consumables:
- Essie “Mademoiselle” for the soft pink base.
- OPI “Alpine Snow” for the snowflakes and snowman detailing.
- Gold foil accents for the festive touch.
- Nail art stickers or decals for the snowman and tree art.
How to Create This Design at Home:
- Start with a sheer pink base, applying two coats for opacity.
- Use a detail brush to create the snowflakes and snowman. Alternatively, nail decals can be used for an easier application.
- Add gold foil to specific areas to give a sparkly touch.
- Finish with a top coat to lock in the design and add shine.
Black and Glitter Snowflake Nails
For a bold, glamorous look, these black glitter nails with white snowflakes are a striking option. The sparkly black base adds drama, while the snowflakes provide a sharp contrast, creating a visually stunning winter manicure. The short square shape keeps it practical, while the silver snowflakes add an extra touch of elegance.

Consumables:
- Essie “Licorice” for the black base.
- Holo Taco’s “Scattered Holo Taco” for the sparkly effect.
- White stamping polish or nail stickers for snowflakes.
- Thin brush for detailing.
How to Create This Design at Home:
- Apply two coats of black polish for full coverage.
- Using either a stamping plate or stickers, add white snowflakes to a few nails.
- Top with a sparkly holographic polish to create a galaxy-like effect.
- Finish with a top coat to enhance the shine and longevity of the design.
Festive Snowman Nail Art with Pink and White Accents
This snowflake nails idea features a cute snowman paired with delicate snowflakes and a pink glittery base. The mix of pink, white, and natural tones makes the nails look festive yet feminine. The addition of tiny snowflakes on the thumb and accent nails creates a lovely winter scene, while the snowman brings a playful Christmas vibe.

Consumables:
- OPI “Princesses Rule” for the glittery pink base.
- Essie “Blanc” for the white snowflake details.
- Nail art brush or stickers for the snowman.
- A dotting tool for creating tiny snowflakes.
How to Create This Design at Home:
- Paint your nails with the pink glitter polish for a frosty base.
- Use a fine brush to draw the snowflakes and snowman on the accent nails.
- Add small dots around the snowflake and snowman to imitate falling snow.
- Finish with a top coat for shine and protection.
Ombre Snowflake Nails with Sparkles
These snowflake nails ideas combine a light pink and white ombre with delicate snowflake details, creating a soft, dreamy effect. The snowflake design over the gradient base looks elegant and wintry. The subtle touch of silver glitter at the tips elevates this manicure, making it perfect for a classy holiday look.

Consumables:
- OPI “Let’s Be Friends” for the soft pink base.
- Essie “Blanc” for the white snowflakes.
- Glitter polish for added sparkly accents on the tips.
- Sponge for creating the ombre effect.
How to Create This Design at Home:
- Apply a gradient using a sponge with light pink at the base and white at the tips.
- Using a detail brush, create small snowflakes at the tips of the nails.
- Add glitter to the tips for a soft sparkly effect.
- Seal the design with a top coat for long-lasting wear.
Black and White Snowflake Nails with Rhinestone Accents
For a dramatic winter look, this snowflake nails idea uses a black base combined with white and gray snowflake details. The accent nails feature rhinestone embellishments arranged in a snowflake pattern, giving the manicure a luxurious touch. The overall look is simple yet impactful, making it a great choice for those who want something bold for the winter season.

Consumables:
- China Glaze “Liquid Leather” for the black base.
- OPI “Alpine Snow” for the white snowflakes.
- Rhinestones for the accent nails.
- Nail glue for adhering the rhinestones securely.
How to Create This Design at Home:
- Start with a black polish on all nails, and let it dry.
- Use a thin brush or stickers to apply snowflake designs on a few nails.
- Arrange rhinestones in a snowflake pattern on the accent nails using nail glue.
- Seal the look with a glossy top coat for a sparkly finish that lasts.
Blue and White Snowflake French Tips
This snowflake nails idea offers a creative twist on classic French tips with an elegant blue and white color combination. The sharp angles of the blue and white tips give a modern geometric feel, while the single snowflake accent on the ring finger keeps it cute and wintry. The neutral pink base makes the bright tips stand out, perfect for a simple yet bold winter look.

Consumables:
- OPI “Bubble Bath” for the neutral base.
- Essie “Blanc” for the white tips.
- China Glaze “Frostbite” for the blue tips.
- Thin nail art brush for snowflake detailing.
How to Create This Design at Home:
- Start with a neutral pink base to set a clean foundation.
- Use tape or a nail art stencil to create the sharp blue and white French tips.
- Add a delicate snowflake on the accent nail using a detail brush or stamping tool.
- Finish with a high-gloss top coat to seal the design.
Holographic Snowflake Coffin Nails
These snowflake nails ideas are perfect for those who love a longer, dramatic nail shape. The long coffin nails feature a soft, natural nude-to-white gradient with holographic snowflakes and iridescent flakes for a winter wonderland vibe. The snowflakes add a festive touch while the iridescent flakes give a sparkly and magical finish.
Consumables:
- OPI “Put It In Neutral” for the base color.
- Essie “Blanc” for the snowflakes.
- Iridescent foil flakes for the sparkly accents.
- Thin brush for snowflake details.
How to Create This Design at Home:
- Start with a soft gradient from natural nude to white at the tips.
- Use a fine brush to paint intricate snowflakes on each nail, or use stickers.
- Apply holographic foil flakes for an added sparkly effect.
- Seal everything with a high-gloss top coat for a smooth, glassy finish.
Red Glitter Snowflakes
These nails scream Christmas with a red glitter base and bold white snowflakes. The rich red creates a striking contrast with the snowflakes, making it a standout holiday manicure. The sparkly glitter finish adds depth and dimension, making this manicure ideal for festive parties or special events.

Consumables:
- OPI “Big Apple Red” for the red base.
- China Glaze “Ruby Pumps” for the glitter effect.
- Essie “Blanc” for the snowflake designs.
- Nail art brush for detailed snowflake work.
How to Create This Design at Home:
- Apply two coats of red polish, followed by a layer of sparkly glitter for depth.
- Use a thin nail art brush to paint snowflakes in white on a few accent nails.
- Seal with a top coat to lock in the glitter and design for long-lasting wear.
Green French Tips with Snowflakes
For a minimalist winter look, these green French tips with white snowflakes are the perfect mix of elegance and festivity. The green adds a holiday touch while the white snowflakes keep it seasonally appropriate without being over-the-top. This simple design is great for those who prefer a more subtle winter manicure.

Consumables:
- OPI “Don’t Bossa Nova Me Around” for the nude base.
- Essie “Off Tropic” for the green French tips.
- Essie “Blanc” for the snowflakes.
- Thin brush or stamping tool for the snowflake designs.
How to Create This Design at Home:
- Start by painting a neutral base coat.
- Apply green polish to the tips using a French tip stencil or freehand it with a brush.
- Add snowflake designs on a couple of nails using white polish and a detail brush.
- Finish with a glossy top coat for a polished look.
Colorful Christmas Lights and Snowflakes
This snowflake nails idea is perfect for anyone who loves vibrant, festive nails. The design features Christmas lights intertwined with delicate white snowflakes, and a glittery base adds a touch of glamour. The use of multiple colors and sparkly finishes gives it a fun, holiday spirit, ideal for a cheerful look.

Consumables:
- OPI “Alpine Snow” for the white snowflakes.
- Multiple colored nail polishes for the Christmas light effect.
- Glitter polish such as China Glaze “Fairy Dust.”
- Thin detail brush for precise Christmas lights.
How to Create This Design at Home:
- Apply a neutral or glitter base on all nails.
- Use a thin brush to paint colorful Christmas lights and white snowflakes on each nail.
- Apply a sparkly top coat to add shine and holiday flair.
- Seal with a clear top coat to protect your design.
Silver and Snowflake French Tips
This look is a modern twist on a French manicure, featuring silver glitter accents and white snowflakes on a neutral base. The combination of silver and white creates a wintry, icy effect that’s perfect for the holiday season. The glitter adds an extra element of sparkly charm, making the nails both classy and festive.

Consumables:
- Essie “Sugar Daddy” for the nude base.
- China Glaze “Silver Lining” for the glitter accent nails.
- OPI “Alpine Snow” for the snowflakes.
- Thin brush for detail work.
How to Create This Design at Home:
- Apply a nude base coat and let it dry.
- Use silver glitter polish for the French tips on selected nails.
- Create delicate white snowflakes on the glittered nails with a detail brush.
- Seal the design with a clear top coat for a long-lasting finish.
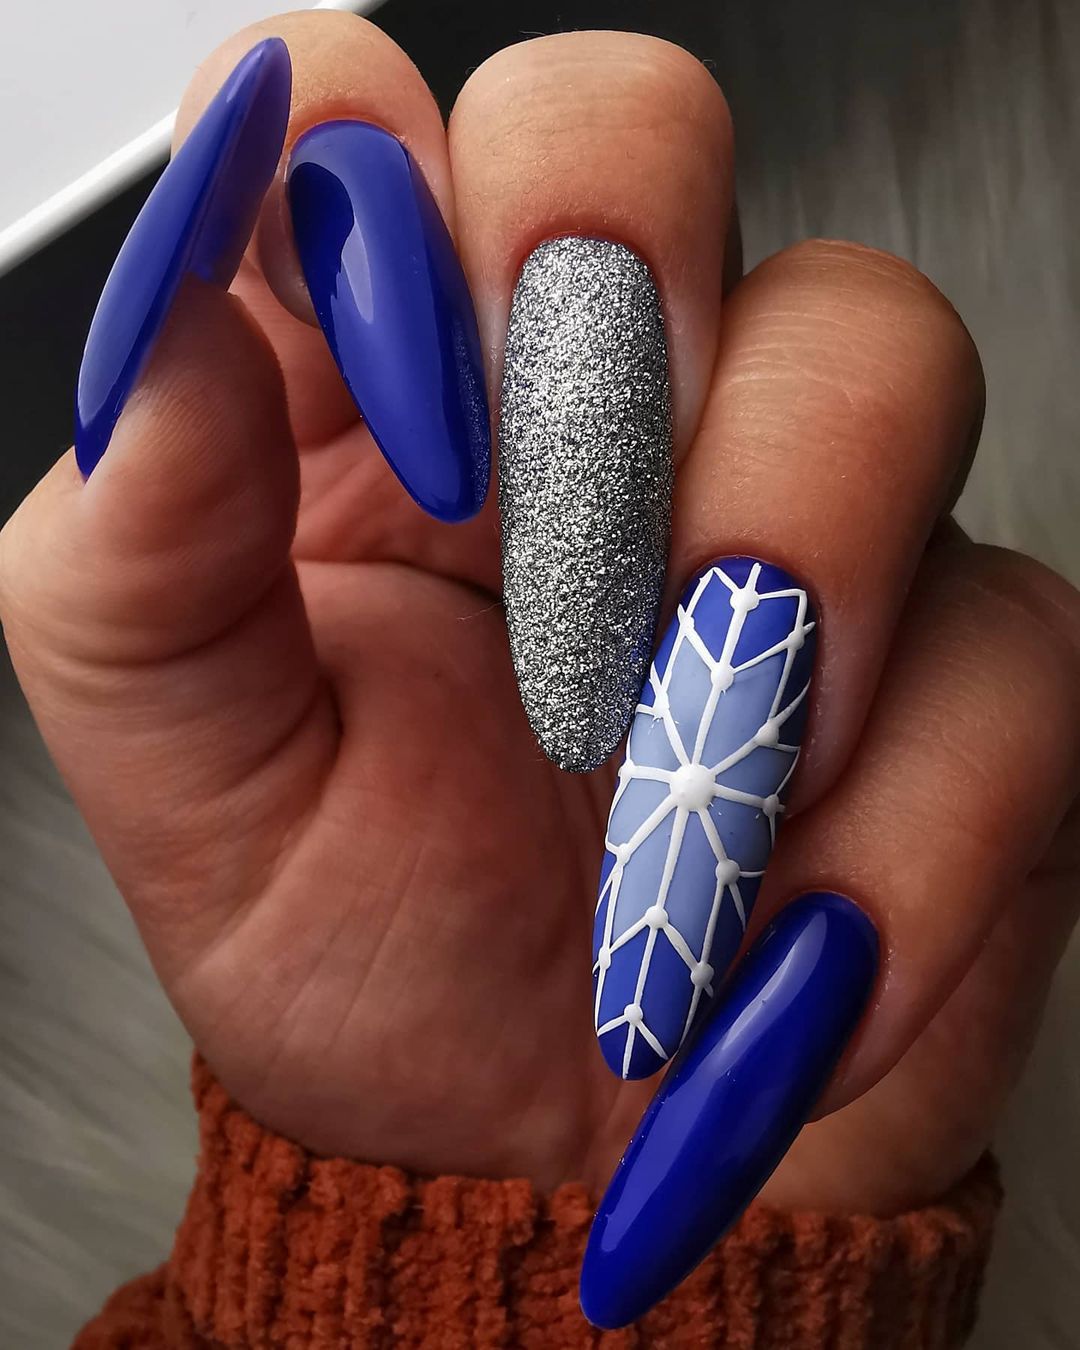
Royal Blue Snowflake and Glitter Nails
These bold royal blue nails with snowflake accents and silver glitter offer a striking winter look. The blue is deep and rich, while the snowflake on one nail adds a contrasting touch of white. The silver glitter accent nail creates a dazzling effect that’s both cute and festive, perfect for holiday parties or winter outings.

Consumables:
- Essie “Butler Please” for the royal blue base.
- OPI “Crown Me Already!” for the silver glitter accent.
- Essie “Blanc” for the snowflake designs.
- Thin nail art brush for snowflake details.
How to Create This Design at Home:
- Start with two coats of royal blue on most nails.
- Use silver glitter for one accent nail.
- Hand-paint or stamp a snowflake on one or two nails using white polish.
- Finish with a top coat to add shine and protect the design.
Pink Glitter Snowflake Nails
For those who love soft, sparkly looks, this pink glitter nail design with subtle snowflakes is perfect. The short, square shape makes it practical for everyday wear, while the sparkly silver glitter and delicate white snowflake accents add a festive touch. This look is ideal for someone who wants a cute and understated winter manicure.

Consumables:
- Essie “Ballet Slippers” for the soft pink base.
- OPI “Kyoto Pearl” for the silver glitter.
- Essie “Blanc” for the snowflake designs.
- Thin brush for snowflake detailing.
How to Create This Design at Home:
- Apply two coats of the soft pink base.
- Use a glitter polish on the accent nails for a sparkly effect.
- Add tiny white snowflakes using a thin brush or a stamping tool.
- Finish with a high-shine top coat for extra sparkle and protection.
Save Pin
