
As the summer days wind down and we prepare for the transition into autumn, it’s the perfect time to give your nails one last summer fling. Whether you’re looking for bold and bright designs to celebrate the final sunny days or more subdued tones to ease into the fall, we’ve got you covered. Here are some fantastic end of summer nails ideas to inspire your next manicure.
Vibrant Pink and Blue Acrylic Nails
Pink and blue are classic summer colors that work beautifully together. In this design, the nails are long and square, with a playful mix of pastel pink and sky blue. The use of metallic silver lines adds a touch of elegance and breaks up the color blocks in a chic way.

Consumables:
-
- Acrylic powder (pink and blue)
- Metallic silver nail tape
- Clear acrylic top coat
- Nail file and buffer
- Brushes for application
Recommendations:
-
- I recommend using Mia Secret Acrylic Powder for vibrant, long-lasting colors.
- For the metallic lines, Born Pretty Nail Art Striping Tape is precise and easy to use.
DIY Instructions:
-
- Start by shaping your nails into a square shape with a nail file.
- Apply a clear base coat to protect your natural nails.
- Dip your brush into the pink acrylic powder and apply to half of each nail.
- Clean the brush, then dip it into the blue acrylic powder and apply to the other half.
- Use the metallic tape to line the boundary between the colors.
- Finish with a clear acrylic top coat for a glossy finish.
Heart-Shaped Glitter Tips
For a cute and whimsical look, these heart-shaped glitter tips are perfect. Each nail features a different color, creating a rainbow effect that’s fun and youthful. The glitter adds a touch of sparkle, making these nails perfect for any end-of-summer celebration.

Consumables:
-
- Nail polish (red, orange, green, blue, purple)
- Fine glitter in corresponding colors
- Clear top coat
- Nail art brush
- Heart-shaped stencil
Recommendations:
-
- OPI Nail Lacquer offers a wide range of vibrant colors that are perfect for this look.
- For glitter, I suggest Martha Stewart Crafts Fine Glitter for its excellent quality and shine.
DIY Instructions:
-
- Apply a clear base coat to all nails.
- Use the heart-shaped stencil to paint the tips of your nails with different colors.
- While the polish is still wet, sprinkle a fine layer of glitter over each heart tip.
- Carefully remove the stencil and allow the polish to dry.
- Seal with a clear top coat to keep the glitter in place.
Solid Green Simplicity
Sometimes, simplicity is key. These solid green nails are bold yet understated, making them a versatile choice for any occasion. The almond shape adds a touch of sophistication, and the glossy finish ensures they look polished and chic.

Consumables:
-
- Green nail polish
- Clear top coat
- Nail file and buffer
Recommendations:
-
- I recommend Essie Nail Polish in Mojito Madness for a vibrant, long-lasting green.
- Use Sally Hansen Hard as Nails Top Coat for a durable finish.
DIY Instructions:
-
- File your nails into an almond shape.
- Apply a clear base coat to protect your natural nails.
- Paint each nail with two coats of green polish, allowing each coat to dry thoroughly.
- Finish with a clear top coat for added shine and protection.
Sky Blue Perfection
This sky blue nail design is perfect for those who love pastel colors. The soft blue hue is reminiscent of clear summer skies, and the oval shape gives a natural, elegant look. These nails are simple yet stunning, perfect for everyday wear.

Consumables:
-
- Sky blue nail polish
- Clear top coat
- Nail file and buffer
Recommendations:
-
- China Glaze Nail Lacquer in For Audrey is a beautiful shade of blue that’s perfect for this look.
- Use Seche Vite Dry Fast Top Coat to quickly seal your manicure.
DIY Instructions:
-
- Shape your nails into an oval with a nail file.
- Apply a clear base coat to protect your natural nails.
- Paint each nail with two coats of sky blue polish, letting each coat dry completely.
- Finish with a clear top coat for a glossy finish.
Subtle Pink Elegance
For a more subtle and sophisticated look, these soft pink nails are perfect. The short, square shape makes them practical for everyday wear, while the glossy finish adds a touch of elegance. This design is perfect for those who prefer a more understated manicure.

Consumables:
-
- Light pink nail polish
- Clear top coat
- Nail file and buffer
Recommendations:
-
- I suggest Zoya Nail Polish in Dot for a lovely, delicate pink.
- For a top coat, OPI Top Coat provides a beautiful shine and long-lasting protection.
DIY Instructions:
-
- Shape your nails into a short, square shape with a nail file.
- Apply a clear base coat to protect your natural nails.
- Paint each nail with two coats of light pink polish, allowing each coat to dry thoroughly.
- Finish with a clear top coat for added shine and durability.
Sunshine Yellow Almond Nails
These vibrant yellow nails are perfect for capturing the essence of the last sunny days of summer. The almond shape gives them a modern and elegant look, while the bright yellow color adds a cheerful and playful touch.

Consumables:
-
- Yellow nail polish
- Clear top coat
- Nail file and buffer
Recommendations:
-
- Sally Hansen Xtreme Wear in Mellow Yellow is a great choice for a vibrant yellow.
- For a durable finish, use Essie Gel Couture Top Coat.
DIY Instructions:
-
- Shape your nails into an almond shape using a nail file.
- Apply a clear base coat to protect your nails.
- Paint each nail with two coats of yellow polish, allowing each coat to dry thoroughly.
- Finish with a clear top coat to add shine and longevity to your manicure.
Neon Orange with Black Spots
This bold and edgy nail design features neon orange nails with black spots, creating a striking contrast. The matte finish adds a trendy twist, making these nails perfect for standing out at the end of summer parties.

Consumables:
-
- Neon orange nail polish
- Black nail polish
- Matte top coat
- Dotting tool or small brush
Recommendations:
-
- China Glaze Nail Lacquer in Pool Party is a vibrant neon orange.
- For the black spots, use OPI Nail Lacquer in Black Onyx.
DIY Instructions:
-
- Apply a clear base coat to protect your natural nails.
- Paint each nail with two coats of neon orange polish, allowing each coat to dry.
- Use a dotting tool or small brush to create black spots on the nails.
- Finish with a matte top coat for a modern finish.
Elegant Green and Gold Marble Nails
This sophisticated design combines shades of green with gold accents and marble effects. The mix of glossy and matte finishes, along with gold foil, creates a luxurious and intricate look that’s perfect for the transition from summer to fall.

Consumables:
-
- Green nail polish
- Clear polish
- Gold foil
- Nail art brush
- Clear top coat
Recommendations:
-
- Essie Nail Polish in Mojito Madness for a rich green.
- Use OPI Top Coat for sealing in the design.
DIY Instructions:
-
- Apply a clear base coat to all nails.
- Paint some nails green and others clear with marble effects using a nail art brush.
- Apply gold foil accents to enhance the marble effect.
- Finish with a clear top coat for added shine and protection.
Sunset Gradient with Rhinestones
This design features a stunning gradient from orange to pink, mimicking a summer sunset. The addition of small rhinestones adds a touch of sparkle, making these nails perfect for any end-of-summer event.

Consumables:
-
- Orange nail polish
- Pink nail polish
- Rhinestones
- Gradient sponge
- Clear top coat
Recommendations:
-
- China Glaze Nail Lacquer in Flip Flop Fantasy for a vibrant orange.
- OPI Nail Lacquer in Passion for a soft pink.
DIY Instructions:
-
- Apply a clear base coat to all nails.
- Use a gradient sponge to blend the orange and pink polishes.
- Apply rhinestones to add sparkle.
- Finish with a clear top coat to secure the rhinestones and add shine.
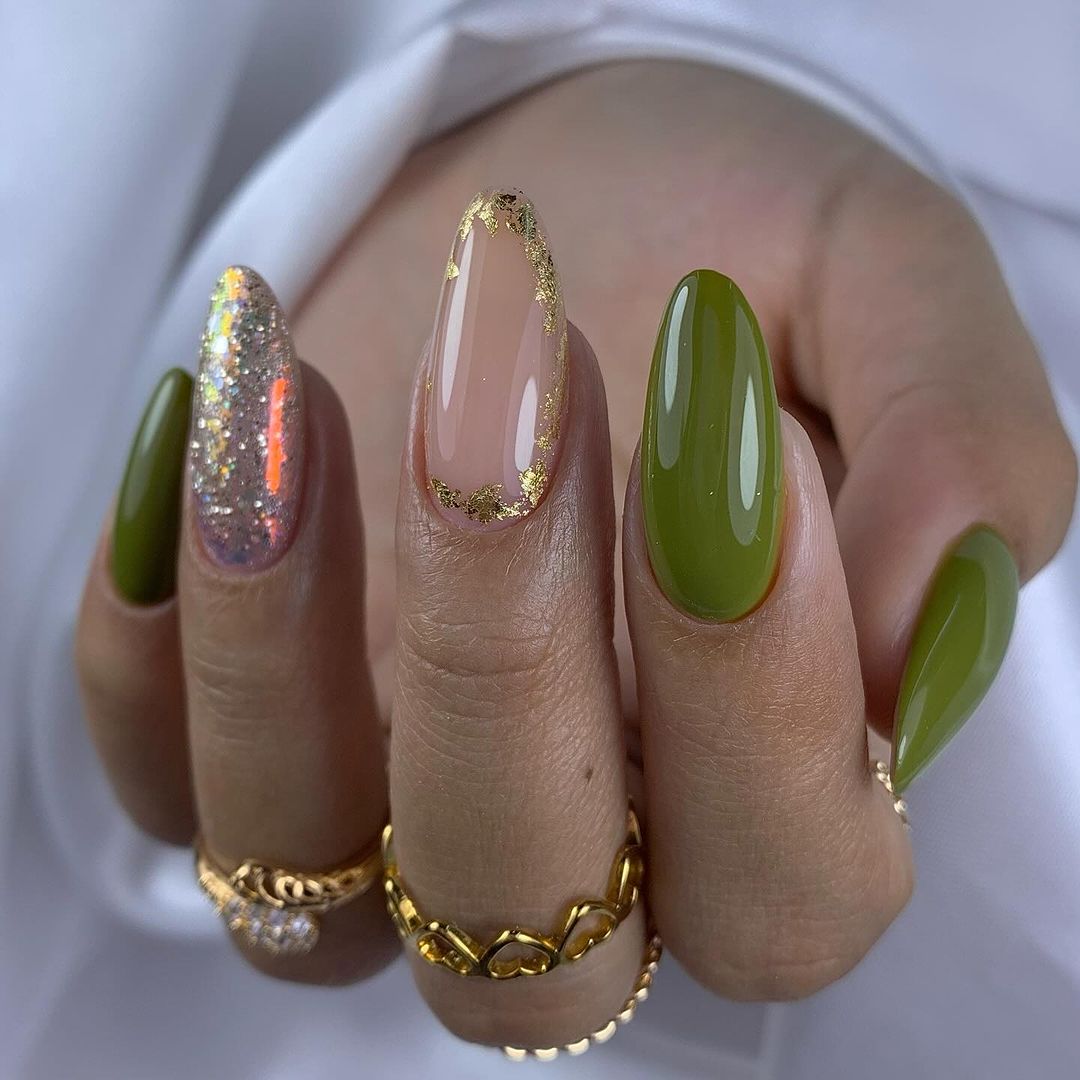
Olive Green and Gold Glitter
These olive green nails are both bold and elegant. The addition of gold glitter and accents gives them a luxurious feel, perfect for transitioning from the brightness of summer to the richness of fall.

Consumables:
-
- Olive green nail polish
- Gold glitter polish
- Clear top coat
- Nail file and buffer
Recommendations:
-
- Essie Nail Polish in Off Tropic for a deep olive green.
- Use Sally Hansen Hard as Nails glitter polish for sparkle.
DIY Instructions:
-
- Shape your nails into a preferred shape with a nail file.
- Apply a clear base coat to protect your natural nails.
- Paint each nail with two coats of olive green polish, allowing each coat to dry.
- Add gold glitter accents to some nails for a luxurious touch.
- Finish with a clear top coat to add shine and durability.
Peachy Waves with Silver Accents
This design features a lovely mix of peach and nude tones with silver wave accents. The soft, feminine colors are perfect for the end of summer, offering a subtle yet stylish look that’s ideal for both casual and formal settings.

Consumables:
-
- Peach nail polish
- Nude nail polish
- Silver nail tape or striping brush
- Clear top coat
Recommendations:
-
- OPI Nail Lacquer in Got Myself into a Jam-balaya for a beautiful peach.
- For the nude base, Essie Nail Polish in Ballet Slippers is perfect.
- Born Pretty Silver Striping Tape for the delicate accents.
DIY Instructions:
-
- Shape your nails into a square shape using a nail file.
- Apply a clear base coat to protect your nails.
- Paint alternating nails peach and nude.
- Use silver striping tape or a striping brush to create the wave accents on the nude nails.
- Finish with a clear top coat for shine and durability.
Holographic Tips with Nude Base
This design combines a nude base with holographic tips, creating a stunning contrast that catches the light beautifully. The use of holographic foil adds a touch of glamour, making these nails perfect for any special occasion.

Consumables:
-
- Nude nail polish
- Holographic foil
- Clear top coat
- Nail art glue
Recommendations:
-
- Zoya Nail Polish in Laurie for a soft nude base.
- OPI Holographic Foil for a dazzling effect.
DIY Instructions:
-
- Apply a clear base coat to all nails.
- Paint each nail with two coats of nude polish, allowing each coat to dry.
- Apply nail art glue to the tips of your nails and press on the holographic foil.
- Seal with a clear top coat to keep the foil in place and add shine.
Neon Animal Print
For those who love bold and vibrant designs, these neon animal print nails are perfect. Each nail features a different neon color with animal print patterns, creating a fun and eye-catching look that’s sure to turn heads.

Consumables:
-
- Neon nail polishes (green, orange, pink, blue)
- Black nail polish
- Nail art brush
- Clear top coat
Recommendations:
-
- China Glaze Nail Lacquer in Turned Up Turquoise, Sun Worshiper, Purple Panic, and Pink Voltage for the neon colors.
- OPI Nail Lacquer in Black Onyx for the animal print.
DIY Instructions:
-
- Apply a clear base coat to all nails.
- Paint each nail with a different neon color.
- Use a nail art brush to create animal print patterns with black polish.
- Finish with a clear top coat to seal the design and add shine.
Lavender Dreams with Glitter
These delicate lavender nails feature a gradient effect with glitter tips, creating a dreamy and ethereal look. The soft colors and subtle glitter make them perfect for a romantic end-of-summer look.

Consumables:
-
- Lavender nail polish
- Glitter nail polish
- Clear top coat
- Gradient sponge
Recommendations:
-
- Essie Nail Polish in Lilacism for a lovely lavender base.
- China Glaze Nail Lacquer in Fairy Dust for the glitter tips.
DIY Instructions:
-
- Shape your nails into an almond shape using a nail file.
- Apply a clear base coat to protect your nails.
- Use a gradient sponge to apply the lavender polish, creating a gradient effect.
- Apply glitter polish to the tips of your nails.
- Finish with a clear top coat to add shine and protect the design.
Metallic and Neon Abstract
This striking design combines metallic silver with neon pink and orange accents, creating a bold and modern look. The abstract lines add a unique and artistic touch, making these nails perfect for those who love to stand out.

Consumables:
-
- Metallic silver nail polish
- Neon pink and orange nail polish
- Nail art brush
- Clear top coat
Recommendations:
-
- Sally Hansen Color Foil in Sterling Silver for the metallic base.
- China Glaze Nail Lacquer in Pool Party (neon pink) and Sun Worshiper (neon orange) for the accents.
DIY Instructions:
-
- Apply a clear base coat to all nails.
- Paint each nail with two coats of metallic silver polish.
- Use a nail art brush to create abstract lines with neon pink and orange polish.
- Finish with a clear top coat to seal the design and add shine.
Vibrant Purple Snake Skin Nails
These nails feature a bold and vibrant purple snake skin pattern. The design is edgy and trendy, perfect for making a statement as summer ends. The short, square shape keeps the look modern and manageable for everyday wear.

Consumables:
-
- Purple nail polish
- Snake skin nail stickers or decals
- Clear top coat
Recommendations:
-
- Sally Hansen Hard as Nails Xtreme Wear in Purple Potion for a vibrant purple.
- Snake Skin Nail Stickers by VAGA for the pattern.
DIY Instructions:
-
- Apply a clear base coat to protect your nails.
- Paint each nail with two coats of purple polish, allowing each coat to dry.
- Apply the snake skin stickers or decals to each nail.
- Finish with a clear top coat to seal the design and add shine.
Blue and Leopard Print Nails
This design features a mix of bold blue polish and leopard print accents. The combination of the bright blue and the earthy tones of the leopard print creates a fun and dynamic look that’s perfect for the transition from summer to fall.

Consumables:
-
- Blue nail polish
- Brown and black nail polishes for the leopard print
- Clear top coat
Recommendations:
-
- Essie Nail Polish in Butler Please for a striking blue.
- OPI Nail Lacquer in Suzi Loves Cowboys and Black Onyx for the leopard print.
DIY Instructions:
-
- Apply a clear base coat to all nails.
- Paint some nails blue and others nude.
- Use a dotting tool to create the leopard print pattern on the nude nails with brown and black polish.
- Finish with a clear top coat to seal the design and add shine.
Neon Watermelon Nails
These playful nails feature a neon orange base with adorable watermelon designs on accent nails. The combination of the vibrant color and the cute fruit design makes these nails perfect for the end of summer.

Consumables:
-
- Neon orange nail polish
- Green and pink polishes for the watermelon design
- Black polish for the seeds
- Clear top coat
Recommendations:
-
- China Glaze Nail Lacquer in Pool Party for a bright neon orange.
- OPI Nail Lacquer in Pink Flamenco and Alpine Snow for the watermelon.
DIY Instructions:
-
- Apply a clear base coat to protect your nails.
- Paint most nails neon orange.
- On accent nails, use pink and green polish to create a watermelon design.
- Use a dotting tool to add black seeds.
- Finish with a clear top coat to protect the design.
Yellow Zebra Stripes
This design features yellow zebra stripes on a neutral base. The contrast between the bright yellow and the neutral background makes for a striking and unique look, perfect for ending the summer with a bold statement.

Consumables:
-
- Neutral nail polish
- Yellow nail polish
- Nail art brush
- Clear top coat
Recommendations:
-
- OPI Nail Lacquer in Pale to the Chief for a neutral base.
- Essie Nail Polish in Sunshine State of Mind for the yellow stripes.
DIY Instructions:
-
- Apply a clear base coat to all nails.
- Paint each nail with two coats of neutral polish.
- Use a nail art brush to create zebra stripes with yellow polish.
- Finish with a clear top coat to add shine and durability.
Tortoiseshell French Tips
These elegant nails feature a nude base with tortoiseshell French tips. The classic design with a modern twist makes these nails versatile and chic, perfect for any occasion as summer comes to a close.

Consumables:
-
- Nude nail polish
- Brown, black, and amber polishes for the tortoiseshell effect
- Clear top coat
Recommendations:
-
- Essie Nail Polish in Ballet Slippers for a nude base.
- China Glaze Nail Lacquer in Mahogany Magic, Liquid Leather, and Goldie But Goodie for the tortoiseshell effect.
DIY Instructions:
-
- Apply a clear base coat to protect your nails.
- Paint each nail with two coats of nude polish.
- Use a small brush to create the tortoiseshell effect on the tips with brown, black, and amber polishes.
- Finish with a clear top coat to seal the design.
Pastel Rainbow Nails with Black Speckles
These nails feature a delightful mix of pastel colors, each nail a different shade. The black speckles add a unique touch, giving the nails a fun and playful look perfect for the end of summer.

Consumables:
-
- Pastel nail polishes (yellow, pink, purple, blue, green)
- Black speckle polish or black nail art pen
- Clear top coat
Recommendations:
-
- Essie Nail Polish in Mint Candy Apple, Fiji, Bikini So Teeny, and Lilacism for the pastel shades.
- China Glaze Nail Lacquer in Fairy Dust for a speckle effect.
DIY Instructions:
-
- Apply a clear base coat to protect your nails.
- Paint each nail with a different pastel color, allowing each coat to dry.
- Use a black speckle polish or nail art pen to add the speckles.
- Finish with a clear top coat to seal the design and add shine.
Neon Pink French Tips
This design features a modern twist on the classic French manicure, with neon pink tips and a soft pink base. The bright neon color adds a fun and contemporary touch, making these nails perfect for the end of summer.

Consumables:
-
- Soft pink nail polish
- Neon pink nail polish
- Nail tape or striping brush
- Clear top coat
Recommendations:
-
- Essie Nail Polish in Ballet Slippers for a soft pink base.
- China Glaze Nail Lacquer in Shocking Pink for the neon tips.
DIY Instructions:
-
- Apply a clear base coat to all nails.
- Paint each nail with two coats of soft pink polish.
- Use nail tape or a striping brush to create the neon pink tips.
- Finish with a clear top coat to add shine and protect the design.
Abstract Blue and Red Waves
These nails feature a nude base with abstract waves in blue and red. The design is bold and artistic, making it a great choice for those who love unique and creative nail art.

Consumables:
-
- Nude nail polish
- Blue and red nail polishes
- Nail art brush
- Clear top coat
Recommendations:
-
- OPI Nail Lacquer in Tiramisu for Two for a nude base.
- Essie Nail Polish in Butler Please and Fifth Avenue for the blue and red waves.
DIY Instructions:
-
- Apply a clear base coat to protect your nails.
- Paint each nail with two coats of nude polish.
- Use a nail art brush to create abstract waves with blue and red polish.
- Finish with a clear top coat to seal the design and add shine.
Save Pin
