
23 Festive Xmas Nails Ideas: Cute, Simple, Red, Green, Gold, and Glitter Designs
When it comes to xmas nails ideas, there’s no shortage of creativity. From classic reds to sparkly designs, festive manicures can bring joy to your fingertips. Whether you’re looking for something simple, fun, or detailed, there’s a holiday nail idea for everyone. So, what’s the best way to get your nails ready for Christmas? Should you opt for red, green, or maybe something more minimalist? Keep reading for professional insights, detailed designs, and tips on recreating them yourself.
Red Glitter Almond Xmas Nails
These red almond nails are perfect for anyone wanting to embrace a classic Christmas look with a little extra sparkle. The deep red glitter is complemented by delicate white snowflake designs on accent nails. The almond shape adds a touch of elegance, making these nails stand out while maintaining a festive charm. This design is perfect if you love a bit of glitz but want something that’s still sophisticated.

Consumables:
- Red glitter nail polish: OPI in “Let’s Be Friends”
- White nail art pen for snowflakes: Sally Hansen Nail Art Pen
- Top coat for glitter: Seche Vite Dry Fast Top Coat
At-home creation tips:
- Start with a red glitter polish as your base.
- Once dry, use a fine white nail art pen to carefully draw snowflakes on two accent nails.
- Apply a top coat to seal in the design and add a high-gloss shine.
Xmas Lights on Nude Nails
For a cute and playful holiday look, these nude nails feature miniature colorful Christmas lights delicately painted across each nail. The minimalist nude background allows the colorful lights to pop without being overwhelming. This design is ideal for those who prefer a subtle yet festive look, perfect for everyday wear during the holiday season.

Consumables:
- Nude base coat: Essie “Ballet Slippers”
- Fine nail art brush for detailing: Winstonia Fine Detailing Brush
- Multi-colored nail polishes: OPI “Meet My Decorator” (Red), Essie “Butler Please” (Blue), OPI “Sunshine State of Mind” (Yellow)
At-home creation tips:
- Start by applying two coats of nude polish to create a neutral base.
- Using a fine nail art brush, draw the black wire of the lights.
- Add small dots in various colors to create the effect of twinkling Christmas lights.
- Finish with a top coat for a smooth, long-lasting design.
Classic Red and White Candy Cane Nails
This simple red and white striped nail design screams Christmas with its candy cane inspiration. The red glitter paired with clean white stripes is a timeless combination for the festive season. The almond shape elongates the fingers, giving this design a polished, refined look. It’s an easy yet cute option for anyone looking for a classic holiday manicure.

Consumables:
- Red glitter polish: Zoya “Ariel”
- White striping tape: Beauty BigBang Striping Tape
- Clear top coat: Essie Gel Couture Top Coat
At-home creation tips:
- Begin with a red glitter polish base.
- Use striping tape to mark off diagonal lines and apply white polish to create clean stripes.
- Once the polish is dry, carefully remove the tape and finish with a top coat for durability and shine.
Green Glitter Holiday Glam Nails
These green nails bring a glamorous twist to holiday nail art. The deep emerald green base is accented with rhinestones and sparkles, making them a show-stopping design for Christmas parties. The stiletto shape enhances the drama of this look, while the sparkling accents create a gold and glitter effect that’s both festive and elegant.

Consumables:
- Green glitter polish: China Glaze “Emerald Sparkle”
- Rhinestones for decoration: Kiss Nail Art Rhinestones
- Clear adhesive for rhinestones: Nailene Nail Glue
At-home creation tips:
- Apply two coats of green glitter polish for a rich base color.
- While the polish is still tacky, carefully place rhinestones on the accent nails.
- Secure the design with a clear top coat to prevent any chipping or loss of rhinestones.
Santa-Inspired Nails
Channel your inner Santa Claus with these red and white acrylic nails. With intricate details like a Santa belt, candy cane stripes, and “Ho Ho Ho” written across the nails, these square-shaped acrylics are both cute and festive. They’re a fun way to embrace the holiday spirit and make a statement with your manicure.

Consumables:
- Red acrylic powder: Mia Secret Acrylic Powder in “Red”
- White nail art pen: ArtsyNails White Pen
- Black polish for belt: Essie “Licorice”
At-home creation tips:
- Use red acrylic powder to create the base for the nails.
- Once cured, add details like the Santa belt, stripes, and lettering with a fine nail art brush.
- Finish with a high-gloss top coat to seal the design and ensure longevity.
Festive Green and Candy Cane Nail Art
This green and cute candy cane-inspired nail art brings a playful holiday touch. The green base on several nails is adorned with white snowflakes, candy canes, and holly leaves, giving it a Christmas vibe without being over the top. The nude nail with holly accent adds a minimalist contrast, balancing the festive designs. This look is ideal for someone who wants a simple yet elegant holiday manicure with fun accents.

Consumables:
- Green polish: OPI “Stay Off the Lawn”
- White polish for candy canes and snowflakes: Essie “Blanc”
- Fine brush for detailed holly and candy cane art: Winstonia Nail Art Brushes
- Top coat: Essie Gel Couture Top Coat
At-home creation tips:
- Apply green polish as the base for the majority of nails.
- Use a fine brush to draw candy canes and holly leaves on select nails.
- Seal the look with a glossy top coat for longevity and shine.
Pink and Gold Glam Christmas Nails
These pink and gold nails give off an elegant holiday feel, perfect for those who love a mix of glitter and soft hues. The design features snowflakes, glittery stars, and a 3D reindeer head in gold, making these nails a festive work of art. The long shape further emphasizes the luxurious look, perfect for those who love to make a statement with their manicure.

Consumables:
- Pink base coat: OPI “Mod About You”
- Gold glitter polish: Essie “Summit of Style”
- White nail art pen for snowflakes: Sally Hansen Nail Art Pen
- Gold 3D reindeer decal: Kiss Nail Art Decals
At-home creation tips:
- Start with a pink base coat to create a soft backdrop.
- Use a fine brush to paint gold accents and apply glitter.
- Carefully place 3D reindeer decals and finish with a top coat for a polished finish.
Reindeer and Gift Bow Nails
These short square nails bring a touch of gold elegance with a cute reindeer and gift bow design. The subtle nude base allows the golden accents to pop, creating a festive yet understated look. This is a simple yet classy option for the holidays, perfect for those who want something minimalist but festive.

Consumables:
- Nude base coat: Essie “Spin the Bottle”
- Gold nail art pen for details: OPI Nail Art Pen
- Glitter top coat: Sally Hansen Miracle Gel Top Coat
At-home creation tips:
- Start with a nude base coat to allow the golden details to stand out.
- Use a fine art brush or pen to draw the reindeer and bow designs.
- Seal the design with a glitter top coat for a festive sparkle.
Gold and White Stiletto Xmas Nails
These white and gold stiletto nails are the epitome of holiday glamour. Featuring gold glitter, stripes, and delicate snowflakes, this design is both festive and elegant. The pointed shape adds a level of drama, making these nails perfect for a Christmas party or special event. The mix of glitter and matte finishes offers a balanced, stylish look for the holidays.

Consumables:
- White polish: Essie “Blanc”
- Gold glitter polish: Zoya “Solange”
- Fine nail art brush for stripes and snowflakes: Beetles Nail Art Brushes
- Top coat: OPI “Plumping Top Coat”
At-home creation tips:
- Start with alternating nails of white and gold glitter.
- Use a fine brush to create the snowflake and stripe patterns on accent nails.
- Apply a thick top coat to seal in the design and ensure it lasts through the holiday festivities.
Green and Reindeer Accent Nails
These green square nails feature a simple yet adorable reindeer design on an accent nail. The shimmery green polish adds a festive glow, while the nude base on the reindeer nail balances the look, making it perfect for both casual and formal holiday settings. This short square design is ideal for those who want a cute yet practical manicure for the season.

Consumables:
- Green shimmer polish: China Glaze “Emerald Sparkle”
- Nude polish for accent nail: OPI “Bubble Bath”
- Red rhinestones for reindeer nose: Kiss Nail Art Rhinestones
- Black nail art pen for details: Sally Hansen I Love Nail Art Pen
At-home creation tips:
- Apply two coats of green shimmer polish on the nails.
- For the accent nail, use a fine brush to draw the reindeer and apply a red rhinestone for the nose.
- Seal the design with a clear top coat to keep everything in place.
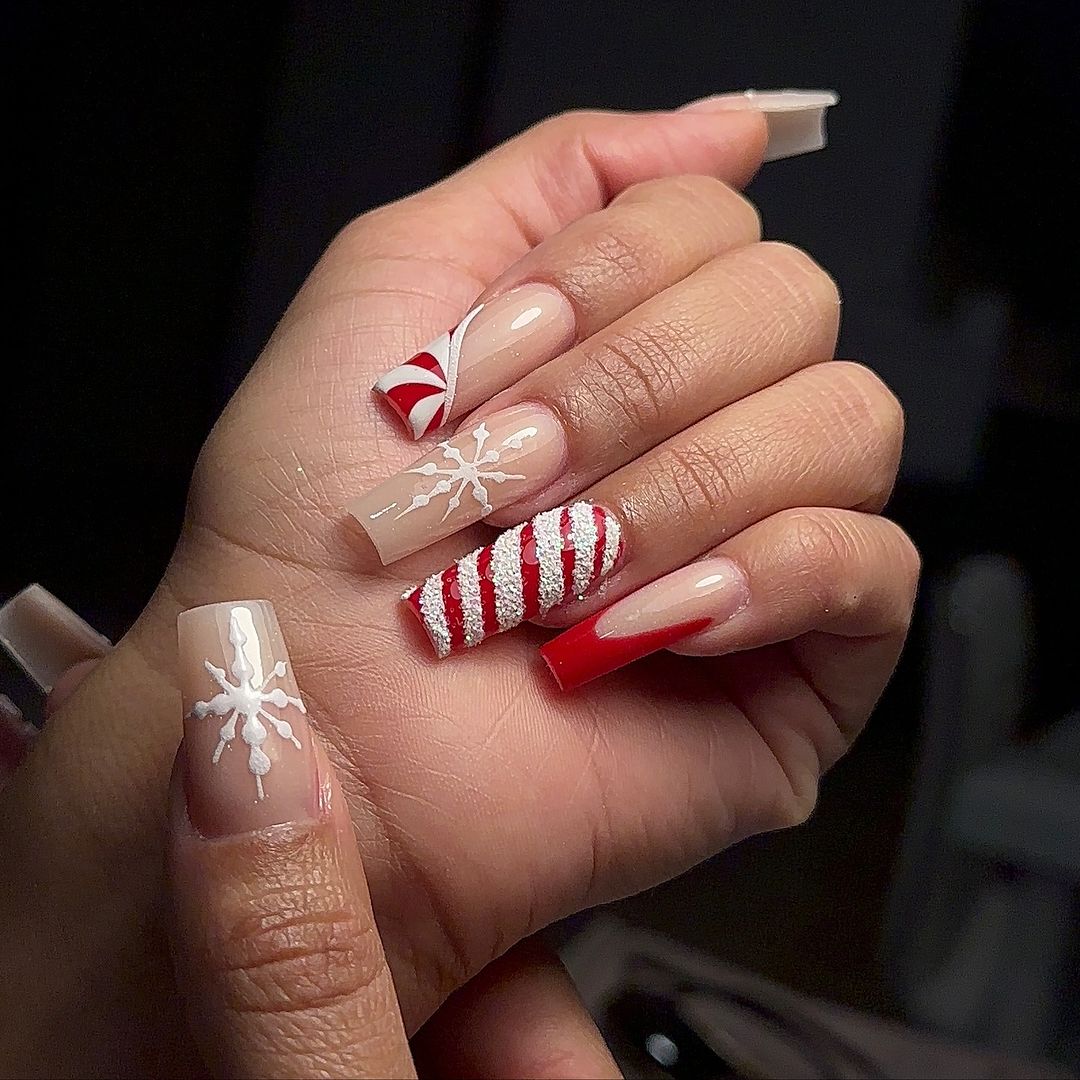
Candy Cane and Snowflake Christmas Nails
This playful set of red and white nails brings out the holiday cheer with a combination of candy cane stripes and large white snowflakes. The long square shape elongates the nails, giving a sleek appearance. The mix of simple red and white gel polishes creates a festive look without overwhelming the design. The textured candy cane accent nail is a standout feature, adding depth to the otherwise minimalist design.

Consumables:
- Red polish: Essie “Russian Roulette”
- White gel polish for snowflakes: Sally Hansen Miracle Gel “Get Mod”
- Red and white glitter for candy cane accent: OPI “Tinsel, Tinsel, Little Star”
- Top coat: Seche Vite Top Coat
At-home creation tips:
- Start with a nude base and add red and white candy cane stripes on an accent nail.
- Use a thin brush to carefully paint snowflakes on the middle nails.
- Add a touch of glitter on the candy cane nail for extra holiday sparkle and seal everything with a clear top coat.
Elegant White and Black Bow Nails
This simple white manicure offers a sophisticated look with intricate snowflake details and a standout black bow accent. The long almond shape adds a touch of elegance, perfect for holiday gatherings. The contrasting black accent lines combined with soft white give the design a minimalist feel while still embracing festive vibes. The 3D bow takes this manicure to the next level, providing texture and dimension.

Consumables:
- White gel polish: OPI “Alpine Snow”
- Black polish for contrast: Essie “Licorice”
- 3D white bow nail accessory: Kiss Nail Art 3D Bows
- Fine nail art brush for snowflakes: Beetles Nail Art Brushes
At-home creation tips:
- Start with a smooth white base, and then use a black polish to add thin accent lines.
- Apply 3D bows to one or two nails for a festive touch.
- Use a fine brush to paint snowflakes on the remaining nails and finish with a high-gloss top coat for a sleek look.
Blue and White Snowflake Stripes
These blue and white nails are the epitome of winter wonderland vibes. The simple snowflake accents combined with candy cane stripes in blue glitter make this a striking design. The long square nails give the design room to showcase detailed snowflakes, and the blue glitter offers a frosty, festive feel. The cable-knit pattern on one nail adds warmth and texture, perfect for cozying up during the holiday season.

Consumables:
- Blue glitter polish: China Glaze “Frostbite”
- White gel polish: Essie “Blanc”
- Cable-knit nail stencil for texture: Whats Up Nails Stencil Vinyls
- Fine brush for snowflake detailing: Winstonia Nail Art Brush Set
At-home creation tips:
- Start with a white base coat and create stripes using blue glitter polish for a frosty look.
- Use stencils to achieve the cable-knit pattern on an accent nail.
- Add snowflakes using a fine brush and finish with a clear top coat to ensure durability.
Red Glitter French with Snowflake Design
This elegant red glitter French manicure combines holiday sparkle with a simple snowflake accent. The long almond shape gives the nails a sleek and festive look. The red glitter on the French tips pops against the nude base, while the intricate white snowflake adds a delicate touch. This design is perfect for those wanting a festive manicure that remains minimalist and chic.

Consumables:
- Red glitter polish: OPI “Big Apple Red”
- White gel polish for snowflakes: OPI “Snowglobe Trotter”
- Clear nude base coat: Essie “Mademoiselle”
At-home creation tips:
- Apply a nude base coat and use red glitter polish for the French tips.
- Use a thin brush to add detailed snowflakes on one or two nails.
- Seal the design with a high-gloss top coat to lock in the festive sparkle.
Blue Gingerbread and Snowflake Nails
These blue holiday nails showcase the cutest Christmas characters like gingerbread men, snowflakes, and holly leaves, all on a cute light blue background. The designs are playful and fun, perfect for adding a bit of charm to your Christmas look. The medium-length square nails allow ample space for the intricate artwork, creating a festive masterpiece for the holiday season.

Consumables:
- Light blue base polish: Essie “Bikini So Teeny”
- White and brown polish for gingerbread and snowflakes: OPI “Suzi Loves Cowboys” and “Alpine Snow”
- Fine brush for detailed designs: Beetles Nail Art Brushes
At-home creation tips:
- Apply a light blue base for a wintery backdrop.
- Use white and brown polishes to paint gingerbread men and snowflakes with a fine detailing brush.
- Finish with a clear top coat to add shine and protect the artwork from chipping.
Red Plaid and Snowflake Nails
These red plaid nails bring a classic Christmas vibe with white stripes, snowflakes, and gold accents. The warm red base is elevated by the fine white plaid lines, making this design perfect for those who love a festive yet timeless look. The short square shape adds practicality, making this manicure ideal for everyday holiday wear.

Consumables:
- Red polish: OPI “Malaga Wine”
- White striping tape: Born Pretty Nail Art Striping Tape
- Gold glitter polish: Essie “Good as Gold”
- Fine brush for snowflake detailing: Beetles Nail Art Brushes
At-home creation tips:
- Start with a rich red base, and then use white striping tape to create plaid lines.
- Add delicate snowflakes using a fine brush for detail.
- Apply gold glitter on select lines for a subtle shine, and finish with a top coat.
Wreath and Red Stiletto Christmas Nails
These long stiletto nails combine intricate wreath designs with bold red accents, creating a festive masterpiece. The hand-painted wreaths adorned with red rhinestones add a glamorous touch, while the matte red nail and glittered tip balance the design perfectly. These nails are for those who want to embrace the holiday spirit in a bold and artistic way.

Consumables:
- Red rhinestones: Kiss Nail Art Rhinestones
- Green polish for wreath details: OPI “Stay Off the Lawn”
- Matte red polish: Essie “Really Red”
- Fine detailing brush for wreath designs: Winstonia Nail Art Brushes
At-home creation tips:
- Start with a nude base for the majority of the nails and paint wreath details with green polish.
- Add red rhinestones to complete the wreath and apply a matte red polish to one or two nails.
- Use a glittery red polish for the tip of the index finger and finish with a top coat.
Pink Reindeer Glitter Nails
These pink glitter nails bring a soft and cute holiday feel. The reindeer antler design on the accent nail adds a festive touch, while the fine glitter on the pinky nail elevates the look. The short square shape is ideal for those who prefer a more practical yet festive design.

Consumables:
- Pink polish: Essie “Ballet Slippers”
- Fine glitter for accent nails: OPI “Pink-A-Doodle”
- Nail art pen for reindeer details: Sally Hansen Nail Art Pen
At-home creation tips:
- Apply a soft pink base coat to all nails.
- Use a fine brush or pen to draw delicate antlers on one nail and add glitter to the pinky nail.
- Finish with a top coat for extra shine and durability.
Green and Red Glitter Ornament Nails
These acrylic nails are all about bold holiday glam. With red and green glitter and 3D ornament designs, this set screams Christmas. The gold bow on the accent nail adds a luxurious touch, perfect for festive parties. The long shape and heavy glitter give a high-impact look that’s sure to stand out.

Consumables:
- Red and green glitter polish: China Glaze “Ruby Pumps” and “Emerald Sparkle”
- 3D bow for accent nail: Kiss Nail Art 3D Bows
- White polish for contrast: Essie “Blanc”
At-home creation tips:
- Apply alternating red and green glitter polishes to different nails.
- Use a white polish to create candy cane stripes on an accent nail.
- Attach the 3D bow and seal everything with a top coat for long-lasting wear.
Grinch Christmas Nails
This playful Grinch design is perfect for anyone wanting to add some fun to their holiday nails. The red glitter French tips paired with an adorable Grinch accent nail make this a standout holiday design. The almond shape adds elegance while the character art keeps things light and festive.

Consumables:
- Red glitter polish for French tips: OPI “Big Apple Red”
- Green polish for Grinch art: OPI “I’m Sooo Swamped”
- Fine nail art brush for detailing: Beetles Nail Art Brushes
At-home creation tips:
- Start with a nude base and apply red glitter to the tips in a French style.
- Use a fine brush to paint the Grinch character on the accent nail.
- Finish with a top coat for shine and protection.
Festive Plaid and Wreath Nails
This simple yet detailed design features festive plaid, wreaths, and gold reindeer antlers. The neutral nude base with gold and green accents makes these nails understated but still festive. The short square shape keeps the design practical for everyday holiday wear.

Consumables:
- Nude base coat: Essie “Mademoiselle”
- Green polish for wreaths: OPI “Stay Off the Lawn”
- Gold glitter for antlers: Essie “Good as Gold”
- Fine detailing brush for plaid and wreath designs: Winstonia Nail Art Brushes
At-home creation tips:
- Apply a nude base to all nails.
- Use fine brushes to create plaid lines and wreath accents on different nails.
- Add gold reindeer antlers and finish with a clear top coat for a sleek finish.
Glitter French Tips with Christmas Tree Accent
This simple and elegant holiday look features glittery French tips with a single Christmas tree accent. The green tree on a nude base adds a festive yet minimalist touch. The short square shape makes this design perfect for those who prefer a subtle holiday look without too much fuss.

Consumables:
- Silver glitter polish for tips: Essie “Set in Stones”
- Green polish for Christmas tree: China Glaze “Four Leaf Clover”
- Fine brush for tree detailing: Beetles Nail Art Brushes
At-home creation tips:
- Apply a nude base to all nails and use a glitter polish for the French tips.
- On the accent nail, use a fine brush to paint a Christmas tree with green polish.
- Finish with a top coat to seal the design and give a long-lasting shine.
Green Glitter and White Snowflake Nails
These short square nails combine green glitter and white snowflakes for a festive and playful design. The swirl of green and white adds movement, making the nails feel dynamic and lively. This design is perfect for those who want a simple yet festive look that captures the essence of the holiday season.

Consumables:
- Green glitter polish: China Glaze “Emerald Sparkle”
- White polish for snowflakes: Essie “Blanc”
- Fine detailing brush for swirls and snowflakes: Winstonia Nail Art Brushes
At-home creation tips:
- Apply a nude base coat to all nails.
- Use green glitter polish to create swirling patterns on the nails.
- Add snowflakes using a fine detailing brush, then finish with a clear top coat for a polished look.
Save Pin
