
Summer is the perfect time to experiment with bold and vibrant nail colors. One trend that has been catching everyone’s eye is summer neon orange nails. These nails are not only striking but also fun and versatile. Whether you’re heading to the beach or a fun night out, neon orange nails can complement any summer outfit. In this article, I will walk you through some of the hottest neon orange nail designs for 2024, complete with detailed descriptions and step-by-step guides on how to recreate these looks at home.
Bold Neon Orange Simplicity
The bold neon orange simplicity is a classic choice for those who love a striking yet straightforward manicure. The vibrant orange color pops against any skin tone, making it a perfect choice for summer. The high-gloss finish adds a layer of sophistication, ensuring your nails look polished and well-maintained. This design is all about the color, allowing the neon shade to take center stage without any distractions.

Consumables Needed:
-
- Base coat: OPI Natural Nail Base Coat
- Neon orange polish: China Glaze Orange Knockout
- Top coat: Seche Vite Dry Fast Top Coat
Instructions:
- Start with clean, filed nails.
- Apply a thin layer of the base coat and let it dry completely.
- Apply two coats of the neon orange polish, allowing each coat to dry before applying the next.
- Finish with a top coat to seal in the color and add shine.
Neon Orange with Accent Nail
This design takes the neon orange trend to the next level by incorporating an accent nail. The accent nail features a soft pink base with subtle, colorful confetti, adding a playful twist to the overall look. The contrast between the neon orange and the pastel pink creates a fun and trendy combination, perfect for summer outings.

Consumables Needed:
-
- Base coat: OPI Natural Nail Base Coat
- Neon orange polish: China Glaze Orange Knockout
- Pink polish for accent nail: Essie Ballet Slippers
- Confetti glitter: Ciaté London Mini Paint Pot in Jewel
- Top coat: Seche Vite Dry Fast Top Coat
Instructions:
- Start with clean, filed nails.
- Apply a thin layer of the base coat and let it dry completely.
- Apply two coats of the neon orange polish on all nails except the ring finger.
- On the ring finger, apply two coats of the pink polish.
- Before the pink polish dries, sprinkle the confetti glitter on top.
- Finish with a top coat on all nails to seal in the design and add shine.
Neon Orange with Glitter and Rhinestones
For those who love a bit of sparkle, this neon orange design with glitter and rhinestones is perfect. The combination of neon orange with pink and a sparkling rhinestone accent makes for a glamorous and eye-catching manicure. This design is ideal for special occasions or when you want to make a bold statement.

Consumables Needed:
-
- Base coat: OPI Natural Nail Base Coat
- Neon orange polish: China Glaze Orange Knockout
- Pink polish: Essie Mod Square
- Silver glitter polish: Sally Hansen Insta-Dri in Silver Sweep
- Rhinestones: Kiss Nail Art Rhinestones
- Top coat: Seche Vite Dry Fast Top Coat
Instructions:
- Start with clean, filed nails.
- Apply a thin layer of the base coat and let it dry completely.
- Apply two coats of the neon orange polish on all nails except the middle finger.
- Apply two coats of the pink polish on the middle finger.
- Once the polish is dry, apply the silver glitter polish on the middle finger, and place a rhinestone at the base.
- Finish with a top coat on all nails to seal in the design and add shine.
Neon Orange and White Ombre
The neon orange and white ombre design is a trendy and sophisticated choice. The gradient effect from neon orange to white creates a striking and elegant look. This design is perfect for those who love the ombre trend and want to incorporate a fun summer color into their manicure.

Consumables Needed:
-
- Base coat: OPI Natural Nail Base Coat
- Neon orange polish: China Glaze Orange Knockout
- White polish: OPI Alpine Snow
- Sponge for ombre effect: Cosmetic sponge
- Top coat: Seche Vite Dry Fast Top Coat
Instructions:
- Start with clean, filed nails.
- Apply a thin layer of the base coat and let it dry completely.
- Paint the neon orange and white polish side by side on a sponge, slightly overlapping them.
- Dab the sponge on the nail, starting from the tip and working towards the base to create the gradient effect.
- Repeat the dabbing process until you achieve the desired ombre look.
- Finish with a top coat to seal in the design and add shine.
Neon Orange and Yellow Gradient with Gems
This neon orange and yellow gradient with gem accents is perfect for those who love a bit of sparkle and fun color combinations. The gradient effect from neon orange to yellow is bright and eye-catching, while the gem accents add a touch of glamour. This design is ideal for summer parties and events.

Consumables Needed:
-
- Base coat: OPI Natural Nail Base Coat
- Neon orange polish: China Glaze Orange Knockout
- Yellow polish: Sally Hansen Insta-Dri in Lightning
- Sponge for gradient effect: Cosmetic sponge
- Gems: Kiss Nail Art Rhinestones
- Top coat: Seche Vite Dry Fast Top Coat
Instructions:
- Start with clean, filed nails.
- Apply a thin layer of the base coat and let it dry completely.
- Paint the neon orange and yellow polish side by side on a sponge, slightly overlapping them.
- Dab the sponge on the nail, starting from the tip and working towards the base to create the gradient effect.
- Repeat the dabbing process until you achieve the desired gradient look.
- Place the gems at the base of the nails while the polish is still tacky.
- Finish with a top coat to seal in the design and add shine.
Neon Orange and Pink French Tips
This design incorporates a modern twist on the classic French tip, using neon orange and pink colors. The gradient French tips add a dynamic and playful element to the manicure. The neon orange seamlessly transitions into a bright pink, creating a fun and trendy look that is perfect for summer. The subtle pink lines add a delicate touch, making this design stand out without being overpowering.

Consumables Needed:
-
- Base coat: OPI Natural Nail Base Coat
- Neon orange polish: China Glaze Orange Knockout
- Pink polish: Essie Mod Square
- Fine nail art brush: Winstonia Fine Liner Nail Art Brush
- Top coat: Seche Vite Dry Fast Top Coat
Instructions:
- Start with clean, filed nails.
- Apply a thin layer of the base coat and let it dry completely.
- Apply a nude or light pink base color (optional) to create a clean canvas.
- Using a fine nail art brush, paint the tips of the nails with the neon orange polish.
- Gradually blend the pink polish into the orange tips for a gradient effect.
- Add fine pink lines on one of the nails for an accent.
- Finish with a top coat to seal in the design and add shine.
Neon Orange with Yellow and Black Detailing
This bold design combines neon orange with intricate yellow and black detailing. The vibrant orange base is complemented by a striking black and yellow pattern, creating a look that is both eye-catching and sophisticated. The addition of rhinestones adds a touch of glamour, making this design perfect for both everyday wear and special occasions.

Consumables Needed:
-
- Base coat: OPI Natural Nail Base Coat
- Neon orange polish: China Glaze Orange Knockout
- Yellow polish: Sally Hansen Insta-Dri in Lightning
- Black polish: OPI Black Onyx
- Rhinestones: Kiss Nail Art Rhinestones
- Fine nail art brush: Winstonia Fine Liner Nail Art Brush
- Top coat: Seche Vite Dry Fast Top Coat
Instructions:
- Start with clean, filed nails.
- Apply a thin layer of the base coat and let it dry completely.
- Apply two coats of the neon orange polish and let it dry.
- Using a fine nail art brush, create yellow and black detailing on the accent nails.
- Add rhinestones along the black lines for added sparkle.
- Finish with a top coat to seal in the design and add shine.
Neon Orange, Pink, and Yellow Ombre
This vibrant design features an ombre effect with neon orange, pink, and yellow. The bold color combination creates a fun and lively look that is perfect for summer. The sharp, pointed tips add an edgy touch to this playful design. The neon colors blend seamlessly into each other, creating a gradient effect that is both striking and trendy.

Consumables Needed:
-
- Base coat: OPI Natural Nail Base Coat
- Neon orange polish: China Glaze Orange Knockout
- Pink polish: Essie Mod Square
- Yellow polish: Sally Hansen Insta-Dri in Lightning
- Sponge for ombre effect: Cosmetic sponge
- Top coat: Seche Vite Dry Fast Top Coat
Instructions:
- Start with clean, filed nails.
- Apply a thin layer of the base coat and let it dry completely.
- Paint the neon orange, pink, and yellow polishes side by side on a sponge, slightly overlapping them.
- Dab the sponge on the nail, starting from the tip and working towards the base to create the gradient effect.
- Repeat the dabbing process until you achieve the desired ombre look.
- Finish with a top coat to seal in the design and add shine.
Neon Orange and Pink Geometric Design
This chic design features a combination of neon orange and pink with geometric patterns. The intricate lines and shapes add a modern and artistic touch to the manicure. The design is perfect for those who love to experiment with different patterns and want a unique and trendy look.

Consumables Needed:
-
- Base coat: OPI Natural Nail Base Coat
- Neon orange polish: China Glaze Orange Knockout
- Pink polish: Essie Mod Square
- Fine nail art brush: Winstonia Fine Liner Nail Art Brush
- Top coat: Seche Vite Dry Fast Top Coat
Instructions:
- Start with clean, filed nails.
- Apply a thin layer of the base coat and let it dry completely.
- Apply two coats of the neon orange polish and let it dry.
- Using a fine nail art brush, create geometric patterns with the pink polish.
- Allow the design to dry completely.
- Finish with a top coat to seal in the design and add shine.
Neon Orange and Pink Waves
This playful design features neon orange and pink waves, creating a dynamic and vibrant look. The wavy patterns add a sense of movement and fun to the manicure, making it perfect for summer. The combination of neon colors makes this design stand out and adds a touch of whimsy to your nails.

Consumables Needed:
-
- Base coat: OPI Natural Nail Base Coat
- Neon orange polish: China Glaze Orange Knockout
- Pink polish: Essie Mod Square
- Fine nail art brush: Winstonia Fine Liner Nail Art Brush
- Top coat: Seche Vite Dry Fast Top Coat
Instructions:
- Start with clean, filed nails.
- Apply a thin layer of the base coat and let it dry completely.
- Apply a nude or light pink base color (optional) to create a clean canvas.
- Using a fine nail art brush, paint wavy lines with the neon orange and pink polishes.
- Allow the design to dry completely.
- Finish with a top coat to seal in the design and add shine.
Neon Orange and Black Marble Design
This striking design combines the boldness of neon orange with the elegance of black marble. The neon orange nails add a pop of color, while the black marble effect brings a sophisticated touch. The contrasting colors create a chic and edgy look, perfect for making a statement this summer.

Consumables Needed:
-
- Base coat: OPI Natural Nail Base Coat
- Neon orange polish: China Glaze Orange Knockout
- Black polish: OPI Black Onyx
- White polish for marble effect: Essie Blanc
- Fine nail art brush: Winstonia Fine Liner Nail Art Brush
- Top coat: Seche Vite Dry Fast Top Coat
Instructions:
- Start with clean, filed nails.
- Apply a thin layer of the base coat and let it dry completely.
- Apply two coats of the neon orange polish on the designated nails.
- Apply two coats of the black polish on the other nails.
- Using the fine nail art brush, create marble patterns with the white polish on the black nails.
- Finish with a top coat to seal in the design and add shine.
Neon Orange and Pink Abstract Design
This design features a vibrant mix of neon orange and pink with abstract patterns. The use of neon colors and bold shapes creates a fun and eye-catching manicure. The abstract design elements add a unique and artistic flair, making this look perfect for those who love to stand out.

Consumables Needed:
-
- Base coat: OPI Natural Nail Base Coat
- Neon orange polish: China Glaze Orange Knockout
- Pink polish: Essie Mod Square
- Black polish for outlines: OPI Black Onyx
- Fine nail art brush: Winstonia Fine Liner Nail Art Brush
- Top coat: Seche Vite Dry Fast Top Coat
Instructions:
- Start with clean, filed nails.
- Apply a thin layer of the base coat and let it dry completely.
- Apply a nude or light pink base color (optional) to create a clean canvas.
- Using the fine nail art brush, paint abstract shapes with the neon orange and pink polishes.
- Outline the shapes with the black polish to add definition.
- Finish with a top coat to seal in the design and add shine.
Neon Orange Classic Elegance
For a classic yet bold look, this neon orange manicure with a glossy finish is perfect. The sharp, pointed tips add an elegant touch to the vibrant color, creating a sophisticated and timeless design. This look is perfect for both everyday wear and special occasions.

Consumables Needed:
-
- Base coat: OPI Natural Nail Base Coat
- Neon orange polish: China Glaze Orange Knockout
- Top coat: Seche Vite Dry Fast Top Coat
Instructions:
- Start with clean, filed nails.
- Apply a thin layer of the base coat and let it dry completely.
- Apply two coats of the neon orange polish, allowing each coat to dry before applying the next.
- Finish with a top coat to seal in the color and add shine.
Neon Orange, Pink, and Gold Chrome Design
This luxurious design features a mix of neon orange, pink, and gold chrome. The sharp, elongated tips add a dramatic effect, while the chrome finish gives the nails a reflective, metallic look. The combination of colors and finishes creates a bold and glamorous manicure.

Consumables Needed:
-
- Base coat: OPI Natural Nail Base Coat
- Neon orange polish: China Glaze Orange Knockout
- Pink polish: Essie Mod Square
- Gold chrome powder: Born Pretty Gold Mirror Chrome Powder
- Sponge applicator for chrome powder
- Top coat: Seche Vite Dry Fast Top Coat
Instructions:
- Start with clean, filed nails.
- Apply a thin layer of the base coat and let it dry completely.
- Apply two coats of the neon orange polish on the designated nails.
- Apply two coats of the pink polish on the other nails.
- Use the sponge applicator to apply the gold chrome powder over the pink nails.
- Finish with a top coat to seal in the design and add shine.
Neon Orange and Green Abstract Design
This vibrant design features a mix of neon orange and green with abstract patterns. The bold colors and playful shapes create a fun and lively look, perfect for summer. The combination of neon shades adds a trendy and modern touch to the manicure.

Consumables Needed:
-
- Base coat: OPI Natural Nail Base Coat
- Neon orange polish: China Glaze Orange Knockout
- Green polish: Essie Mojito Madness
- Pink polish: Essie Mod Square
- Fine nail art brush: Winstonia Fine Liner Nail Art Brush
- Top coat: Seche Vite Dry Fast Top Coat
Instructions:
- Start with clean, filed nails.
- Apply a thin layer of the base coat and let it dry completely.
- Apply two coats of the neon orange polish on the designated nails.
- Using the fine nail art brush, create abstract shapes with the green and pink polishes on the other nails.
- Allow the design to dry completely.
- Finish with a top coat to seal in the design and add shine.
Neon Animal Print Mix
This bold design features a mix of neon colors and animal prints, creating a wild and fun look. The neon orange, pink, and green nails are each adorned with different animal prints, including leopard and zebra patterns. This design is perfect for those who love to experiment with color and print, making a loud and proud statement.

Consumables Needed:
-
- Base coat: OPI Natural Nail Base Coat
- Neon orange polish: China Glaze Orange Knockout
- Neon pink polish: Essie Mod Square
- Neon green polish: OPI Green Come True
- Black polish: OPI Black Onyx
- Fine nail art brush: Winstonia Fine Liner Nail Art Brush
- Top coat: Seche Vite Dry Fast Top Coat
Instructions:
- Start with clean, filed nails.
- Apply a thin layer of the base coat and let it dry completely.
- Apply two coats of neon orange, pink, and green polish on the designated nails.
- Using the fine nail art brush, create animal print patterns with the black polish.
- Allow the design to dry completely.
- Finish with a top coat to seal in the design and add shine.
Neon Orange Marble Tips
This elegant design features neon orange marble tips on a clear base. The marble effect adds a sophisticated touch to the neon tips, creating a perfect balance between bold and classy. This design is ideal for those who want a unique and trendy look without being too overwhelming.

Consumables Needed:
-
- Base coat: OPI Natural Nail Base Coat
- Neon orange polish: China Glaze Orange Knockout
- White polish for marble effect: Essie Blanc
- Fine nail art brush: Winstonia Fine Liner Nail Art Brush
- Top coat: Seche Vite Dry Fast Top Coat
Instructions:
- Start with clean, filed nails.
- Apply a thin layer of the base coat and let it dry completely.
- Apply a clear or nude base color to the nails.
- Using the fine nail art brush, create marble patterns with the neon orange and white polishes on the tips.
- Allow the design to dry completely.
- Finish with a top coat to seal in the design and add shine.
Neon Orange Gradient
This classic neon orange gradient design is both simple and stunning. The gradient effect creates a smooth transition from a bright orange to a softer shade, giving a beautiful ombre look. This design is perfect for those who love vibrant yet elegant nails.

Consumables Needed:
-
- Base coat: OPI Natural Nail Base Coat
- Neon orange polish: China Glaze Orange Knockout
- Sponge for gradient effect: Cosmetic sponge
- Top coat: Seche Vite Dry Fast Top Coat
Instructions:
- Start with clean, filed nails.
- Apply a thin layer of the base coat and let it dry completely.
- Paint the neon orange polish on a sponge and dab it on the nails to create a gradient effect.
- Repeat the dabbing process until you achieve the desired gradient look.
- Finish with a top coat to seal in the design and add shine.
Neon Orange and Red Ombre
This vibrant design features a neon orange and red ombre, creating a fiery and bold look. The smooth transition between the two colors adds a dynamic and eye-catching effect. This design is perfect for those who love to play with bold color combinations and want a striking manicure.

Consumables Needed:
-
- Base coat: OPI Natural Nail Base Coat
- Neon orange polish: China Glaze Orange Knockout
- Red polish: OPI Big Apple Red
- Sponge for ombre effect: Cosmetic sponge
- Top coat: Seche Vite Dry Fast Top Coat
Instructions:
- Start with clean, filed nails.
- Apply a thin layer of the base coat and let it dry completely.
- Paint the neon orange and red polishes side by side on a sponge, slightly overlapping them.
- Dab the sponge on the nail, starting from the tip and working towards the base to create the gradient effect.
- Repeat the dabbing process until you achieve the desired ombre look.
- Finish with a top coat to seal in the design and add shine.
Neon Orange and Gold Stripe Design
This chic design features neon orange nails with gold stripes. The combination of neon orange and gold creates a luxurious and trendy look. The gold stripes add a touch of elegance, making this design perfect for both casual and formal occasions.
Consumables Needed:
-
- Base coat: OPI Natural Nail Base Coat
- Neon orange polish: China Glaze Orange Knockout
- Gold polish: Essie Good as Gold
- Striping tape or fine nail art brush: Winstonia Fine Liner Nail Art Brush
- Top coat: Seche Vite Dry Fast Top Coat
Instructions:
- Start with clean, filed nails.
- Apply a thin layer of the base coat and let it dry completely.
- Apply two coats of the neon orange polish and let it dry.
- Using striping tape or a fine nail art brush, create gold stripes on the nails.
- Allow the design to dry completely.
- Finish with a top coat to seal in the design and add shine.
Neon Orange and Citrus Glitter Design
This vibrant design combines neon orange with fun citrus elements and glitter accents. The orange slices and glitter add a playful touch to the neon base, making this manicure perfect for summer. The combination of bright colors and unique accents creates a fresh and eye-catching look.

Consumables Needed:
-
- Base coat: OPI Natural Nail Base Coat
- Neon orange polish: China Glaze Orange Knockout
- Orange glitter: Ciaté London Mini Paint Pot in Jewel
- Citrus nail decals: Born Pretty Citrus Nail Stickers
- Top coat: Seche Vite Dry Fast Top Coat
Instructions:
- Start with clean, filed nails.
- Apply a thin layer of the base coat and let it dry completely.
- Apply two coats of the neon orange polish and let it dry.
- Apply orange glitter to the designated nails.
- Place citrus nail decals on the accent nails.
- Finish with a top coat to seal in the design and add shine.
Neon Orange and Pink Glitter Glam
This glamorous design features neon orange and pink nails with glitter and rhinestone accents. The combination of neon colors with sparkly elements creates a luxurious and bold look. The rhinestones add a touch of elegance, making this design perfect for special occasions or a night out.

Consumables Needed:
-
- Base coat: OPI Natural Nail Base Coat
- Neon orange polish: China Glaze Orange Knockout
- Neon pink polish: Essie Mod Square
- Pink glitter: Sally Hansen Insta-Dri in Pink Blink
- Rhinestones: Kiss Nail Art Rhinestones
- Top coat: Seche Vite Dry Fast Top Coat
Instructions:
- Start with clean, filed nails.
- Apply a thin layer of the base coat and let it dry completely.
- Apply two coats of the neon orange and pink polishes on the designated nails.
- Apply pink glitter to the pink nails.
- Place rhinestones at the base of the accent nails.
- Finish with a top coat to seal in the design and add shine.
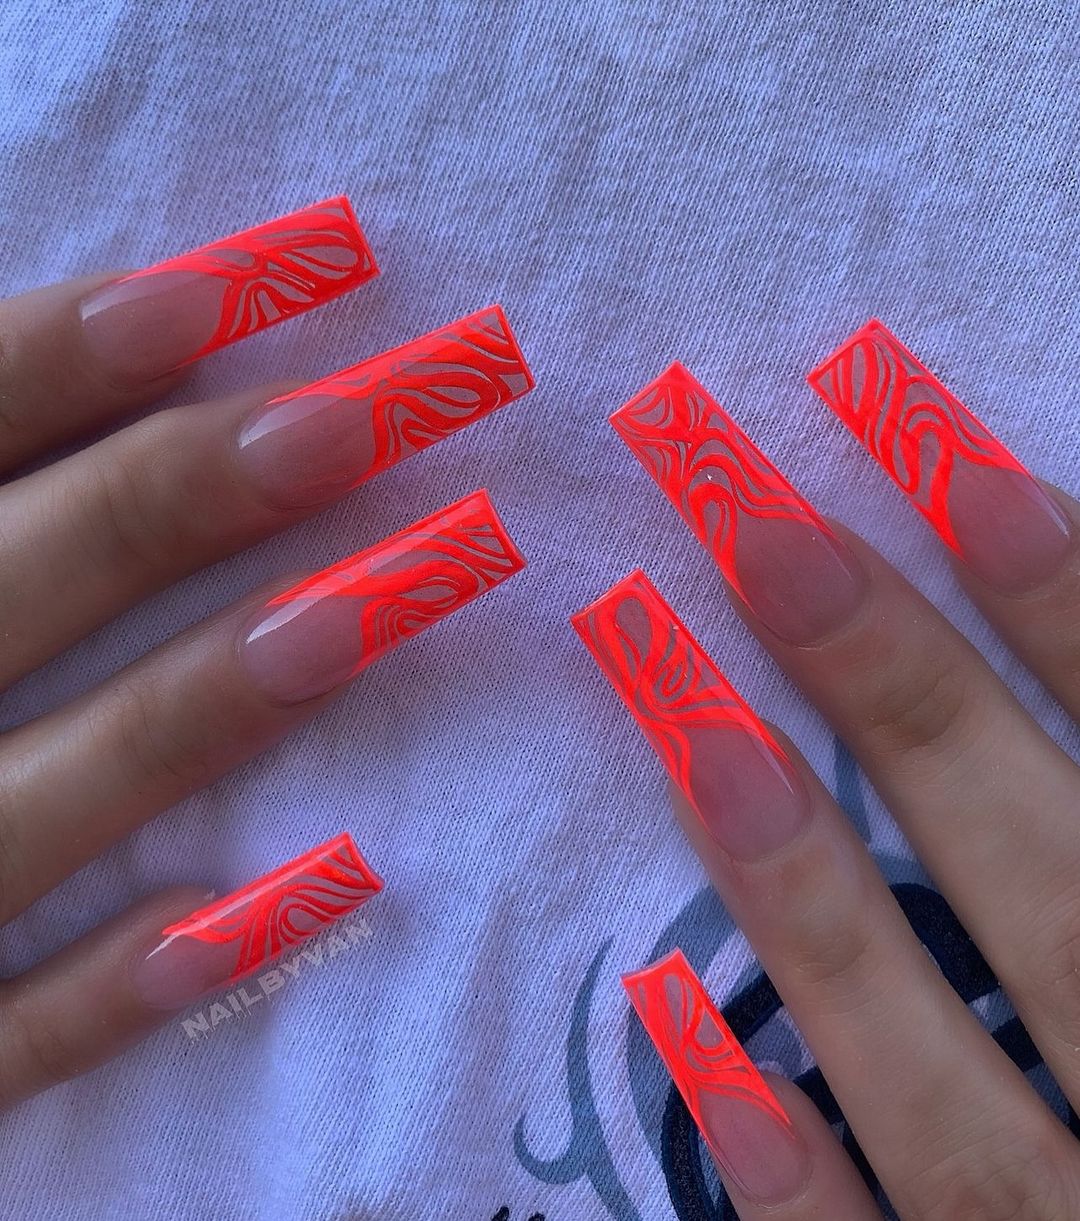
Neon Orange French Tips
This elegant design features neon orange French tips on a nude base. The vibrant tips add a pop of color, while the nude base keeps the look sophisticated and clean. This design is perfect for those who love a classic French manicure with a modern twist.
Consumables Needed:
-
- Base coat: OPI Natural Nail Base Coat
- Neon orange polish: China Glaze Orange Knockout
- Nude polish: Essie Ballet Slippers
- Top coat: Seche Vite Dry Fast Top Coat
Instructions:
- Start with clean, filed nails.
- Apply a thin layer of the base coat and let it dry completely.
- Apply a nude base color to the nails.
- Using the neon orange polish, paint the tips of the nails for a French manicure effect.
- Finish with a top coat to seal in the design and add shine.
Save Pin
