
23 Ideas Adorable Fall Pumpkin Nails Designs: Short, Long, and Acrylics
Fall is a season of vibrant colors, cozy sweaters, and of course, pumpkin everything. But why stop at pumpkin spice lattes and decorations? This year, let your nails join in on the autumnal fun with fall pumpkin nails. These designs range from cute and playful to sophisticated and chic, perfect for anyone looking to embrace the spirit of the season. Whether you’re a fan of short nails or prefer them long, we’ve got a variety of fall pumpkin nails designs to inspire your next manicure. Let’s dive into some of the most captivating fall pumpkin nails ideas for 2024.
Beautiful Fall Pumpkin Designs on Almond Nails
Fall nails often embrace earthy tones and creative designs, and this manicure is a perfect example. The combination of muted browns, soft beige, and vibrant orange creates a stunning autumn look. The almond shape adds elegance, while the pumpkin accents bring a festive touch.

Consumables:
- Base coat (OPI Nail Envy)
- Brown nail polish (Essie “Playing Koi”)
- Beige nail polish (Sally Hansen “In the Flesh”)
- Orange nail polish (Zoya “Arizona”)
- Nail art brushes (Winstonia Fine Liner Brush)
- Top coat (Seche Vite)
DIY Instructions:
- Start with a base coat to protect your nails.
- Apply two coats of brown polish on the thumb and pinky fingers.
- Use beige polish on the index and middle fingers.
- Paint the ring finger with orange polish.
- Once dry, use a fine liner brush to draw pumpkin designs on the accent nails.
- Finish with a top coat to seal and add shine.
Cute Pumpkin Tips on Short Nails
Short nails can be just as eye-catching with the right design. This manicure features adorable pumpkin tips on a nude base, perfect for a subtle yet festive look.

Consumables:
- Base coat (Sally Hansen Hard As Nails)
- Nude nail polish (OPI “Samoan Sand”)
- Orange nail polish (China Glaze “Orange Knockout”)
- Green nail polish (Essie “Mojito Madness”)
- Nail art brush (KADS Nail Art Detail Brush)
- Top coat (Revlon Quick Dry)
DIY Instructions:
- Apply a base coat to protect your nails.
- Paint your nails with two coats of nude polish.
- Use an orange polish to create small pumpkin tips at the edge of each nail.
- Add green stems to the pumpkins using a fine nail art brush.
- Seal the design with a top coat.
Elegant Green and Gold Pumpkins on Almond Nails
This design is both elegant and playful, combining green and gold with delicate pumpkin accents. The almond shape nails are perfect for showcasing intricate designs.

Consumables:
- Base coat (Butter London Nail Foundation)
- Green nail polish (OPI “Stay Off the Lawn”)
- Gold glitter polish (ILNP “Empire”)
- Nude polish for base (Zoya “Chantal”)
- Nail art brush (Born Pretty Store Nail Art Brushes)
- Top coat (Essie Gel Setter)
DIY Instructions:
- Start with a base coat.
- Paint your nails with green polish, leaving two accent nails nude.
- Add gold glitter to one accent nail.
- Use a fine brush to draw pumpkins on the nude nail.
- Seal with a top coat.
Glamorous Pumpkin Manicure with Glitter
For those who love a bit of glam, this pumpkin nail design incorporates glitter and bold colors. The combination of gold, orange, and brown creates a rich, festive look.

Consumables:
- Base coat (Zoya Anchor Base Coat)
- Brown nail polish (China Glaze “Foie Gras”)
- Orange nail polish (OPI “A Good Man-Darin is Hard to Find”)
- Gold glitter polish (JINsoon “Guilded”)
- Nail art brush (Makartt Nail Art Liner Brushes)
- Top coat (CND Vinylux Weekly Top Coat)
DIY Instructions:
- Apply a base coat.
- Paint nails with brown polish, leaving one nail orange.
- Add gold glitter to an accent nail.
- Use a fine brush to draw pumpkin designs.
- Seal with a top coat.
Neutral and Green Pumpkin Coffin Nails
Neutral colors with a pop of green make this pumpkin nail design stand out. The coffin shape is perfect for those who like longer nails.

Consumables:
- Base coat (Essie Ridge Filling Base Coat)
- Green nail polish (OPI “Suzi – The First Lady of Nails”)
- Nude nail polish (Essie “Bare With Me”)
- Orange nail polish (Sally Hansen “Sun Kissed”)
- Nail art brush (Beetles Nail Art Liner Brush)
- Top coat (Olive & June Top Coat)
DIY Instructions:
- Apply a base coat.
- Paint nails with green polish, leaving one nail nude.
- Add orange pumpkin designs on the nude nail.
- Seal with a top coat.
Bright Pumpkin Nails with Detailed Art
These bright orange nails with a detailed pumpkin accent are perfect for fall. The almond shape allows for an elegant canvas to showcase the intricate pumpkin art. The combination of vibrant orange with a nude base on the accent nail, featuring a meticulously drawn pumpkin, makes this design stand out.

Consumables:
- Base coat (Essie All In One Base)
- Orange nail polish (OPI “A Roll in the Hague”)
- Nude polish for the base (Essie “Ballet Slippers”)
- Green nail polish (China Glaze “Four Leaf Clover”)
- Nail art brush (Mia Secret Nail Art Brush)
- Top coat (Sally Hansen Miracle Gel)
DIY Instructions:
- Apply a base coat.
- Paint your nails with two coats of orange polish.
- Use a nude polish for the accent nail.
- Draw a detailed pumpkin design on the accent nail with the green polish and a nail art brush.
- Seal with a top coat.
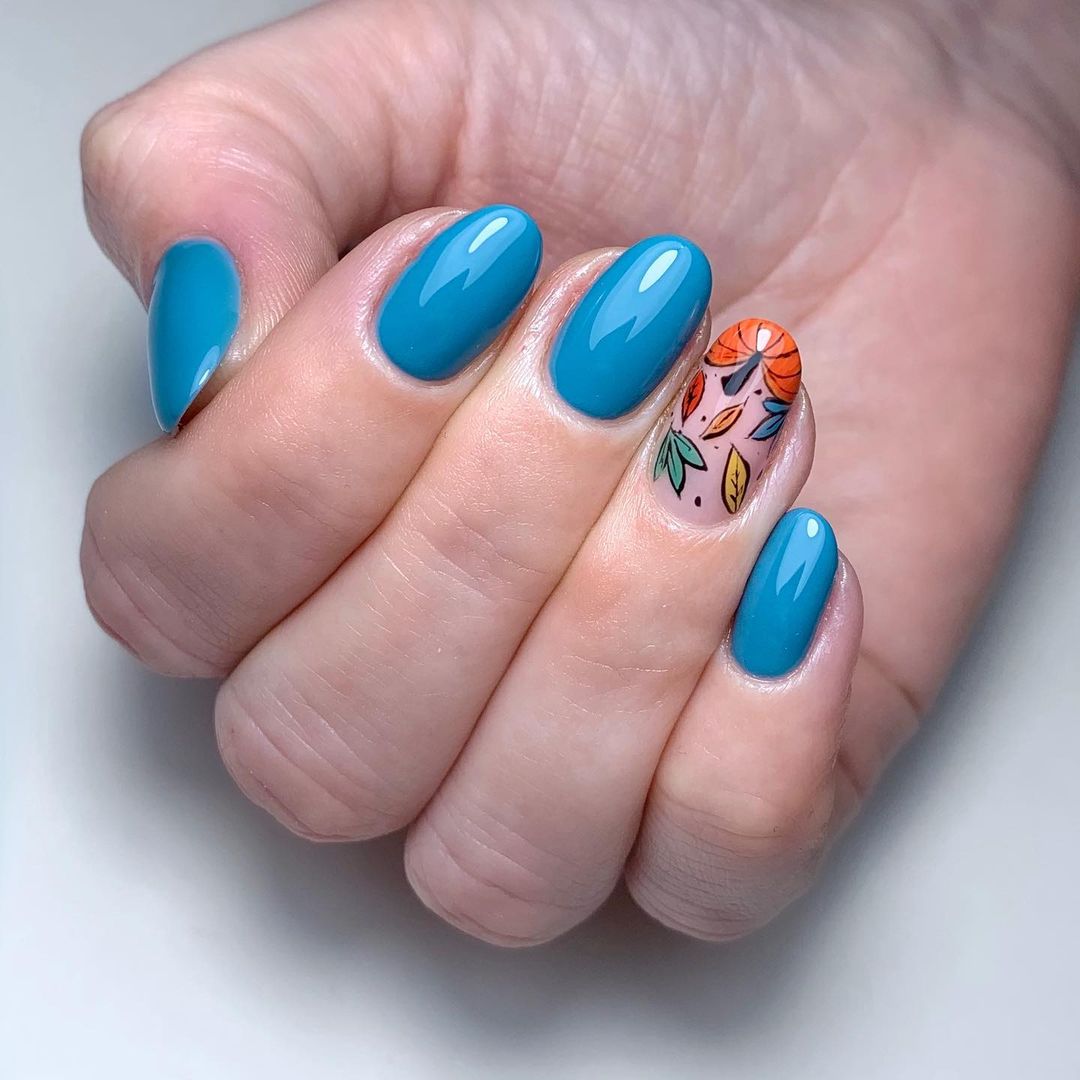
Vibrant Blue Pumpkin Nails
A unique twist on traditional fall colors, this manicure combines vibrant blue with cute pumpkin and leaf designs. Perfect for those who want to stand out this autumn.

Consumables:
- Base coat (Sally Hansen Double Duty)
- Blue nail polish (OPI “Fearlessly Alice”)
- Nude polish for base (Zoya “Rue”)
- Orange nail polish (Essie “Clambake”)
- Green nail polish (OPI “My Dogsled is a Hybrid”)
- Nail art brush (Winstonia Fine Liner Brush)
- Top coat (INM Out the Door)
DIY Instructions:
- Apply a base coat.
- Paint your nails with two coats of blue polish.
- Use a nude polish for the accent nail.
- Draw pumpkins and leaves on the accent nail using orange and green polish.
- Seal with a top coat.
Green and Brown Pumpkin Nail Art
This nail art design is a perfect blend of green and brown tones with detailed pumpkin illustrations. The almond shape nails provide a sophisticated canvas for the fall-themed art.

Consumables:
- Base coat (Deborah Lippmann Hard Rock)
- Green nail polish (Essie “Going Incognito”)
- Brown nail polish (China Glaze “Wood You Wanna?”)
- Nude polish for the base (OPI “Bubble Bath”)
- Nail art brush (Stylush Nail Art Brush Set)
- Top coat (Orly Glosser)
DIY Instructions:
- Apply a base coat.
- Paint your nails with green and brown polish.
- Use nude polish for the accent nails.
- Draw detailed pumpkin designs on the accent nails using the nail art brush.
- Seal with a top coat.
Plaid and Pumpkin Nail Design
A sophisticated and chic design, this manicure features a plaid pattern combined with pumpkin accents. Perfect for those who love a stylish and unique fall look.

Consumables:
- Base coat (Zoya Get Even Ridge Filler)
- Orange nail polish (OPI “It’s a Piazza Cake”)
- Black nail polish (Essie “Licorice”)
- Gold glitter polish (Zoya “Astra”)
- Nude polish for the base (Sally Hansen “Bare It All”)
- Nail art brush (Makartt Nail Art Liner Brushes)
- Top coat (Revlon Extra Life No Chip Top Coat)
DIY Instructions:
- Apply a base coat.
- Paint your nails with nude polish.
- Use orange and black polish to create a plaid pattern on the accent nails.
- Add gold glitter and pumpkin designs for an extra festive touch.
- Seal with a top coat.
Glittery Pumpkin Accent Nail
This nail design combines vibrant orange with glitter and cute pumpkin accents. The almond shape nails add a touch of elegance, making it perfect for fall festivities.

Consumables:
- Base coat (OPI Natural Nail Base Coat)
- Orange nail polish (Sally Hansen “Tangerine Tango”)
- Gold glitter polish (OPI “GoldenEye”)
- Nude polish for the base (Essie “Mademoiselle”)
- Nail art brush (Beetles Gel Polish Brush Set)
- Top coat (CND Super Shiney)
DIY Instructions:
- Apply a base coat.
- Paint your nails with orange polish, leaving one accent nail nude.
- Add gold glitter to the accent nail.
- Draw pumpkin designs on the accent nail with a nail art brush.
- Seal with a top coat.
Multicolor Pumpkin Tips
This fun and playful design features multicolored pumpkin tips on a matte nude base. Each nail showcases a different color pumpkin, making this design perfect for those who love vibrant and unique fall nails.

Consumables:
- Base coat (Orly Bonder)
- Nude matte polish (Zoya “Bela”)
- Yellow polish (China Glaze “Happy Go Lucky”)
- Orange polish (OPI “Y’all Come Back Ya Hear?”)
- Green polish (Essie “Off Tropic”)
- Brown polish (Sally Hansen “Branch Out”)
- Nail art brush (Stylush Nail Art Brushes)
- Matte top coat (OPI Matte Top Coat)
DIY Instructions:
- Apply a base coat.
- Paint your nails with a nude matte polish.
- Use different colored polishes to create pumpkin tips on each nail.
- Draw black outlines on the pumpkins with a fine nail art brush.
- Seal with a matte top coat.
Golden Pumpkin and Leaf Design
This elegant design combines orange and grey with gold leaf accents and a cute pumpkin. The intricate patterns and rich colors make it perfect for a sophisticated fall look.

Consumables:
- Base coat (Essie Ridge Filling Base Coat)
- Orange nail polish (Sally Hansen “Sun Kissed”)
- Grey nail polish (OPI “I Can Never Hut Up”)
- Gold leaf flakes (Born Pretty Gold Foil Flakes)
- Nail art brush (Mia Secret Nail Art Brush)
- Top coat (CND Super Shiney)
DIY Instructions:
- Apply a base coat.
- Paint your nails with alternating orange and grey polish.
- Apply gold leaf flakes on some nails.
- Use a nail art brush to draw pumpkin and leaf designs.
- Seal with a top coat.
Blue and White Pumpkin Nails
A refreshing take on fall nails, this design features blue and white pumpkins with delicate patterns on a nude base. The short nail length adds a cute and practical touch.

Consumables:
- Base coat (Sally Hansen Double Duty)
- Nude polish (Essie “Mademoiselle”)
- Blue polish (OPI “My Favorite Gal Pal”)
- White polish (China Glaze “White on White”)
- Nail art brush (Winstonia Fine Liner Brush)
- Top coat (Revlon Quick Dry)
DIY Instructions:
- Apply a base coat.
- Paint your nails with a nude polish.
- Use blue and white polishes to draw pumpkin designs with a fine nail art brush.
- Add delicate patterns to the pumpkins.
- Seal with a top coat.
Neutral and Pink Pumpkin Nails
Combining neutral and pink tones, this design features a cute pumpkin accent nail. The long almond shape provides an elegant canvas for the fall-themed art.
Consumables:
- Base coat (Deborah Lippmann Hard Rock)
- Neutral nail polish (Essie “Chinchilly”)
- Pink nail polish (Zoya “Dot”)
- Nail art brush (Makartt Nail Art Liner Brushes)
- Top coat (Olive & June Top Coat)
DIY Instructions:
- Apply a base coat.
- Paint your nails with neutral and pink polish, alternating colors.
- Use a fine nail art brush to draw a pumpkin on one accent nail.
- Seal with a top coat.
Lavender Pumpkin Nails with Gold Accents
This sophisticated design combines lavender with gold accents and a small pumpkin detail. The long length and coffin shape add to the elegance of the manicure.

Consumables:
- Base coat (Zoya Get Even Ridge Filler)
- Lavender nail polish (OPI “Do You Lilac It?”)
- Gold foil flakes (Born Pretty Gold Foil Flakes)
- Black nail polish (Essie “Licorice”)
- Nail art brush (Stylush Nail Art Brush Set)
- Top coat (Revlon Extra Life No Chip Top Coat)
DIY Instructions:
- Apply a base coat.
- Paint your nails with lavender polish.
- Apply gold foil flakes to some nails for a luxurious touch.
- Use black polish to draw a small pumpkin on one nail.
- Seal with a top coat.
Celestial Pumpkin Nails
This stunning nail design incorporates celestial elements with a pumpkin accent. The black, glittery base with star and pumpkin details creates a magical and festive look perfect for fall.

Consumables:
- Base coat (Essie First Base)
- Black glitter polish (China Glaze “Fairy Dust”)
- Nude polish (OPI “Bubble Bath”)
- Orange polish (Essie “Meet Me at Sunset”)
- Gold foil flakes (Born Pretty Gold Foil Flakes)
- Nail art brush (Stylush Nail Art Brushes)
- Top coat (Seche Vite)
DIY Instructions:
- Apply a base coat.
- Paint your nails with black glitter polish.
- Use a nude polish for the accent nail.
- Add gold foil flakes and draw pumpkin and star designs with orange polish.
- Seal with a top coat.
Funky Orange and Blue Pumpkin Nails
A funky design that pairs vibrant orange with a cool blue base, featuring playful pumpkin and stripe patterns. This bold combination is sure to make a statement.

Consumables:
- Base coat (Sally Hansen Hard As Nails)
- Blue polish (China Glaze “For Audrey”)
- Orange polish (OPI “A Good Man-Darin is Hard to Find”)
- Black polish (Essie “Licorice”)
- Nail art brush (Mia Secret Nail Art Brush)
- Top coat (CND Vinylux Weekly Top Coat)
DIY Instructions:
- Apply a base coat.
- Paint nails with blue polish, leaving one accent nail orange.
- Draw pumpkins and stripes with black polish on the accent nail.
- Add pumpkin designs on the blue nails using orange polish.
- Seal with a top coat.
Delicate Fall Pumpkin Nails
This delicate design features intricate fall-themed art, including pumpkins and leaves, on a white base. The soft colors and detailed artwork make it a charming choice for fall.

Consumables:
- Base coat (OPI Natural Nail Base Coat)
- White polish (Essie “Blanc”)
- Yellow polish (China Glaze “Lemon Fizz”)
- Orange polish (Sally Hansen “Sun Kissed”)
- Red polish (OPI “Big Apple Red”)
- Nail art brush (Beetles Gel Polish Brush Set)
- Top coat (Olive & June Top Coat)
DIY Instructions:
- Apply a base coat.
- Paint your nails with white polish.
- Use yellow, orange, and red polishes to draw detailed fall elements like pumpkins and leaves.
- Seal with a top coat.
Halloween Pumpkin and Ghost Nails
Perfect for Halloween, this design combines pumpkins and ghost elements on a bright orange and nude base. The playful art and vibrant colors make it a fun choice for the spooky season.

Consumables:
- Base coat (Essie All In One Base)
- Orange polish (OPI “Orange You Glad”)
- Nude polish (Essie “Ballet Slippers”)
- Black polish (China Glaze “Liquid Leather”)
- White polish (Sally Hansen “White On”)
- Nail art brush (Makartt Nail Art Liner Brushes)
- Top coat (CND Super Shiney)
DIY Instructions:
- Apply a base coat.
- Paint nails with alternating orange and nude polish.
- Draw pumpkins and ghost designs using black and white polish.
- Seal with a top coat.
Cute Halloween Nail Art
This nail design features a variety of Halloween-themed elements, including pumpkins, ghosts, and spiders, on a light pink base. The whimsical art and pastel colors make it a cute and festive option.

Consumables:
- Base coat (Sally Hansen Double Duty)
- Light pink polish (OPI “Bubble Bath”)
- Black polish (Essie “Licorice”)
- Orange polish (Essie “Meet Me at Sunset”)
- White polish (China Glaze “White on White”)
- Nail art brush (Winstonia Fine Liner Brush)
- Top coat (Revlon Quick Dry)
DIY Instructions:
- Apply a base coat.
- Paint your nails with light pink polish.
- Use black, orange, and white polishes to draw pumpkins, ghosts, and spiders.
- Seal with a top coat.
Playful Pumpkin Tips on Long Nails
This design features playful pumpkin tips on long coffin-shaped nails. The gradient from yellow to orange creates a vibrant base for the detailed pumpkin faces, making it a fun and eye-catching look for fall.

Consumables:
- Base coat (OPI Nail Envy)
- Yellow polish (China Glaze “Happy Go Lucky”)
- Orange polish (Sally Hansen “Sun Kissed”)
- Black polish (Essie “Licorice”)
- Nail art brush (Mia Secret Nail Art Brush)
- Top coat (Seche Vite)
DIY Instructions:
- Apply a base coat.
- Create a gradient effect using yellow and orange polishes.
- Use a fine nail art brush and black polish to draw pumpkin faces on the tips.
- Seal with a top coat.
Cute Ghost and Pumpkin Nails
This adorable nail design combines ghosts, pumpkins, and flowers on a nude base. The mix of elements and the playful art make it perfect for a whimsical fall manicure.

Consumables:
- Base coat (Essie First Base)
- Nude polish (OPI “Bubble Bath”)
- Orange polish (Essie “Meet Me at Sunset”)
- White polish (Sally Hansen “White On”)
- Brown polish (China Glaze “Foie Gras”)
- Nail art brush (Stylush Nail Art Brushes)
- Top coat (CND Vinylux Weekly Top Coat)
DIY Instructions:
- Apply a base coat.
- Paint your nails with a nude polish.
- Use orange, white, and brown polishes to draw pumpkins, ghosts, and flowers.
- Seal with a top coat.
Glittery Pumpkin Tips
This glamorous design features glittery orange tips with detailed pumpkin accents. The combination of glitter and elegant pumpkin art makes it a sophisticated choice for fall.

Consumables:
- Base coat (Butter London Nail Foundation)
- Orange glitter polish (ILNP “Empire”)
- Nude polish (Essie “Mademoiselle”)
- Black polish (OPI “Black Onyx”)
- Gold foil flakes (Born Pretty Gold Foil Flakes)
- Nail art brush (Beetles Gel Polish Brush Set)
- Top coat (Olive & June Top Coat)
DIY Instructions:
- Apply a base coat.
- Paint your nails with a nude polish.
- Add orange glitter tips and gold foil flakes.
- Use black polish to draw pumpkin designs.
- Seal with a top coat.
Save Pin
