
23 Ideas Stunning Neon Color Nails Designs for a Bright and Bold Summer Look
When it comes to making a statement, nothing quite captures attention like neon color nails. Whether you’re soaking up the sun on the beach or hitting the city streets, these electrifying hues are perfect for adding that extra spark to your summer look. But how do you take these bold colors and turn them into art? And what’s the secret to making neon nails look polished, not overdone? Let’s dive into some of the most striking neon color nail designs and learn how to create them at home.
Neon Multi-Colored Zebra Art
Neon nails are all about standing out, and this multi-colored zebra design does just that. The neon green, pink, and orange base colors serve as the perfect canvas for the black zebra stripes, creating a playful yet edgy look. This design plays with different neon shades, mixing them seamlessly for a truly eye-catching effect. The art designs combine bold color blocks with intricate patterns, making it ideal for those who want their nails to be a canvas of creativity.

Consumables:
- Base colors: Neon green, neon pink, neon orange (Brands like OPI’s “Neon Collection” or Essie’s “Neon Summer”)
- Striping brush: Thin brush for precision
- Black polish: For zebra stripes (Recommended: Sally Hansen Insta-Dri in “Black to Black”)
- Top coat: Glossy finish to seal the look (Essie Gel Couture Top Coat)
DIY Instructions:
- Start with a solid base of neon polish on each nail.
- Using a striping brush, paint black and stripes diagonally across one nail. Repeat with varied thickness for an authentic zebra print.
- Seal your design with a top coat to protect and add shine.
- For longevity, apply tips of the same neon color to the free edge after sealing.
Pastel and Neon Geometric French
This design beautifully combines the softness of pastel lilac with the vibrancy of neon yellow, proving that neon color nails can be both bold and subtle. The French tip design is modernized with geometric lines, creating an artistic look that’s perfect for summer. The different shapes and the mix of solid and sheer finishes make this a versatile option for anyone looking to update their French manicure.

Consumables:
- Base colors: Nude for the base, pastel lilac, and neon yellow for the tips (Consider CND Vinylux in “Be Demure” and “Sassy Lilac”)
- Striping tape: To create clean, straight lines
- Top coat: To seal and shine (Seche Vite Fast Dry Top Coat)
DIY Instructions:
- Apply a nude base color and let it dry completely.
- Use striping tape to section off areas for the neon and pastel polish.
- Paint the French tips in neon yellow and the remaining sections in pastel lilac.
- Once dry, carefully remove the tape and apply a top coat for a smooth finish.
Bright Neon Solid with Matte Finish
For those who prefer bright, solid nails with a twist, this design features a matte finish that tones down the shine while keeping the intensity of the color. This neon green manicure is all about making a statement with one color but with an unexpected matte twist. Perfect for summer, this look is both simple and striking.

Consumables:
- Base color: Neon green (Try China Glaze “I’m With the Lifeguard”)
- Matte top coat: To give a unique finish (OPI Matte Top Coat)
- Cuticle oil: To keep nails hydrated after application
DIY Instructions:
- Apply a solid neon green polish to all nails.
- Once dry, apply a matte top coat to each nail.
- Finish by moisturizing cuticles with oil to keep them looking healthy and hydrated.
Subtle Neon French Tips with a Pop of Color
If you love neon color nails but want something a bit more understated, these French tips with a neon twist are the perfect solution. With a neutral base and tips in different neon shades, this design offers a subtle yet stylish way to wear neon. The use of multiple colors on each tip adds a playful element without overpowering the overall look.

Consumables:
- Base color: Nude or soft pink (Essie “Ballet Slippers”)
- Neon colors: For the tips (Orly “Glowstick” for yellow, China Glaze “Shocking Pink”)
- Detail brush: For precise application on tips
DIY Instructions:
- Start with a nude or soft pink base coat.
- Using a detail brush, carefully paint neon French tips in multiple colors.
- Seal with a glossy top coat to ensure the neon colors pop.
Hot Pink Leopard Print
Neon pink paired with a leopard print accent nail brings a wild and fun vibe to your manicure. This design is perfect for those who love neon color nails with a bit of edge. The combination of solid neon pink with a different leopard pattern nail creates a mixed design that’s sure to turn heads. The art designs here emphasize boldness and personality, making it a go-to for anyone looking to make a statement.

Consumables:
- Base color: Neon pink (Essie “Punchy Pink”)
- Leopard print: Can be created with a nail art pen (Sally Hansen “I Heart Nail Art Pen”)
- Top coat: To protect the design (Sally Hansen Miracle Gel Top Coat)
DIY Instructions:
- Apply a solid neon pink base to all nails except one.
- For the accent nail, create a leopard print using a black nail art pen over a nude base.
- Apply a top coat to all nails to protect your art designs and ensure they last.
Geometric Neon French Tips
These neon French tips offer a modern twist on the classic style, featuring geometric accents that add a sophisticated edge to this bold look. The neon color nails are perfectly contrasted with a nude base, making the bright tips pop even more. This design is ideal for anyone who loves a minimalist approach with a hint of neon flair. The crisp lines and clean angles make this art design stand out, perfect for both short and long nails alike.

Consumables:
- Base color: Nude (OPI “Samoan Sand”)
- Neon polish: Bright yellow-green for tips (Orly “Glowstick”)
- Detail brush: For precision with the geometric shapes
- Top coat: To seal and protect the design (Essie Gel Couture Top Coat)
DIY Instructions:
- Start by applying the nude base color to all nails and let it dry completely.
- Using a detail brush, carefully paint the French tips in neon green, adding white geometric lines for an edgy look.
- Finish with a top coat to seal your design and ensure a long-lasting polish finish.
Neon Yellow with Animal Print Accent
This neon color nails look is all about mixing different styles to create something truly unique. The bright neon yellow polish is perfectly complemented by a fiery animal print accent nail, bringing together bold colors and patterns. This art design is a great example of how to combine acrylic nails with eye-catching art designs, making it an ideal choice for those who want their nails to be both bright and artistic.

Consumables:
- Base color: Neon yellow (China Glaze “Yellow Polka Dot Bikini”)
- Accent colors: Black and orange for the animal print (Sally Hansen Insta-Dri in “Black to Black” and OPI “A Good Man-darin is Hard to Find”)
- Detail brush: For creating the animal print
- Top coat: For a glossy, protective finish (Seche Vite Fast Dry Top Coat)
DIY Instructions:
- Apply the neon yellow polish to all nails except the ring finger.
- On the ring finger, paint the base in nude, then use the detail brush to create a gradient animal print with black and orange.
- Seal all nails with a top coat to protect the design and ensure a long-lasting finish.
Neon Green and Black Swirl Stiletto Nails
For those who love bold art designs, these stiletto nails feature neon green tips adorned with black and green swirls. This design is perfect for the adventurous, offering a striking look that is both modern and edgy. The neon color nails and sharp stiletto shape make this manicure ideal for making a statement. The art of combining neon and black swirls adds a layer of complexity that will definitely catch the eye.

Consumables:
- Base color: Nude (OPI “Bubble Bath”)
- Neon green: For the tips (China Glaze “I’m With the Lifeguard”)
- Black polish: For the swirl accents (Essie “Licorice”)
- Detail brush: Essential for creating precise swirls
- Top coat: For a glossy finish (Essie Gel Couture Top Coat)
DIY Instructions:
- Start with a nude base coat and let it dry.
- Paint the neon green French tips using a fine detail brush.
- Add black swirls over the neon tips, following the curvature of the nail.
- Seal the look with a top coat to protect your art design and add shine.
Hot Pink Almond Nails
These neon color nails are a true celebration of bright and bold hues. The hot pink shade used in this manicure is a standout color, perfect for those who want to keep their look simple yet impactful. The solid color covers the entire nail, emphasizing the sleek almond shape. This design is versatile and chic, ideal for both casual and more formal settings, and works wonderfully as an accent or a full set.

Consumables:
- Base color: Neon pink (Orly “Beach Cruiser”)
- Top coat: To seal and protect the color (Seche Vite Fast Dry Top Coat)
- Cuticle oil: To keep nails hydrated and healthy
DIY Instructions:
- Apply the neon pink polish to all nails, ensuring even coverage.
- Seal the color with a glossy top coat for a vibrant finish.
- After drying, apply cuticle oil to maintain nail health and hydration.
Rainbow Neon Gradient
This design features a neon color nails gradient that transitions from one bright color to another, creating a rainbow effect on each nail. The gradient technique blends multiple neon shades, offering a stunning visual effect that’s perfect for summer. This art design is ideal for those who love different and colorful nail designs, showcasing a variety of neon hues in one cohesive look.

Consumables:
- Base colors: Various neon shades (China Glaze “Flip Flop Fantasy,” “Sun Worshiper,” and “Blue Sparrow”)
- Sponge: For blending the colors into a seamless gradient
- Top coat: To seal and add shine (Sally Hansen Miracle Gel Top Coat)
- Clean-up brush: To tidy up the edges for a professional finish
DIY Instructions:
- Start by applying a white base coat to make the neon colors pop.
- Dab the different neon colors onto a sponge and press it onto the nail to create the gradient effect.
- Repeat for each nail, ensuring smooth transitions between colors.
- Apply a top coat to protect the design and give it a glossy finish.
Neon Yellow with Leopard Print Accent
This nail design combines the striking vibrancy of neon yellow with the timeless appeal of leopard print, creating a bold yet chic look. The leopard print is subtly placed on two nails, framed by a neon yellow stripe that perfectly complements the solid neon yellow nails. This art design is perfect for those who want to mix different patterns while maintaining a cohesive and stylish look.

Consumables:
- Base color: Sheer nude or white (OPI “Funny Bunny”)
- Neon yellow: For the solid nails and stripe (China Glaze “Yellow Polka Dot Bikini”)
- Black polish: For the leopard spots (Essie “Licorice”)
- Detail brush: Essential for precise leopard spots
- Top coat: To seal the design (Sally Hansen Miracle Gel Top Coat)
DIY Instructions:
- Apply a sheer nude or white base to all nails.
- Use neon yellow to paint a stripe down the middle of the accent nails and cover the remaining nails completely.
- Add leopard spots along the yellow stripe with a detail brush and black polish.
- Finish with a top coat to protect the design and add shine.
Speckled Neon Matte Nails
These neon color nails feature a playful mix of bright colors, each with a speckled finish that adds texture and interest. The matte finish on each nail softens the neon hues, making them both striking and sophisticated. The art designs here are simple yet effective, with the speckled pattern offering a unique twist on classic neon nails.

Consumables:
- Base colors: Various neon shades (Essie “Vibrant Vibes,” “In the Limelight,” “Turned Up”)
- Black speckled top coat: To create the speckled effect (China Glaze “Lickety Split Lime”)
- Matte top coat: For a matte finish (OPI Matte Top Coat)
DIY Instructions:
- Apply a different neon base color to each nail.
- Use a speckled top coat over each nail to create the effect.
- Seal the look with a matte top coat for a modern finish.
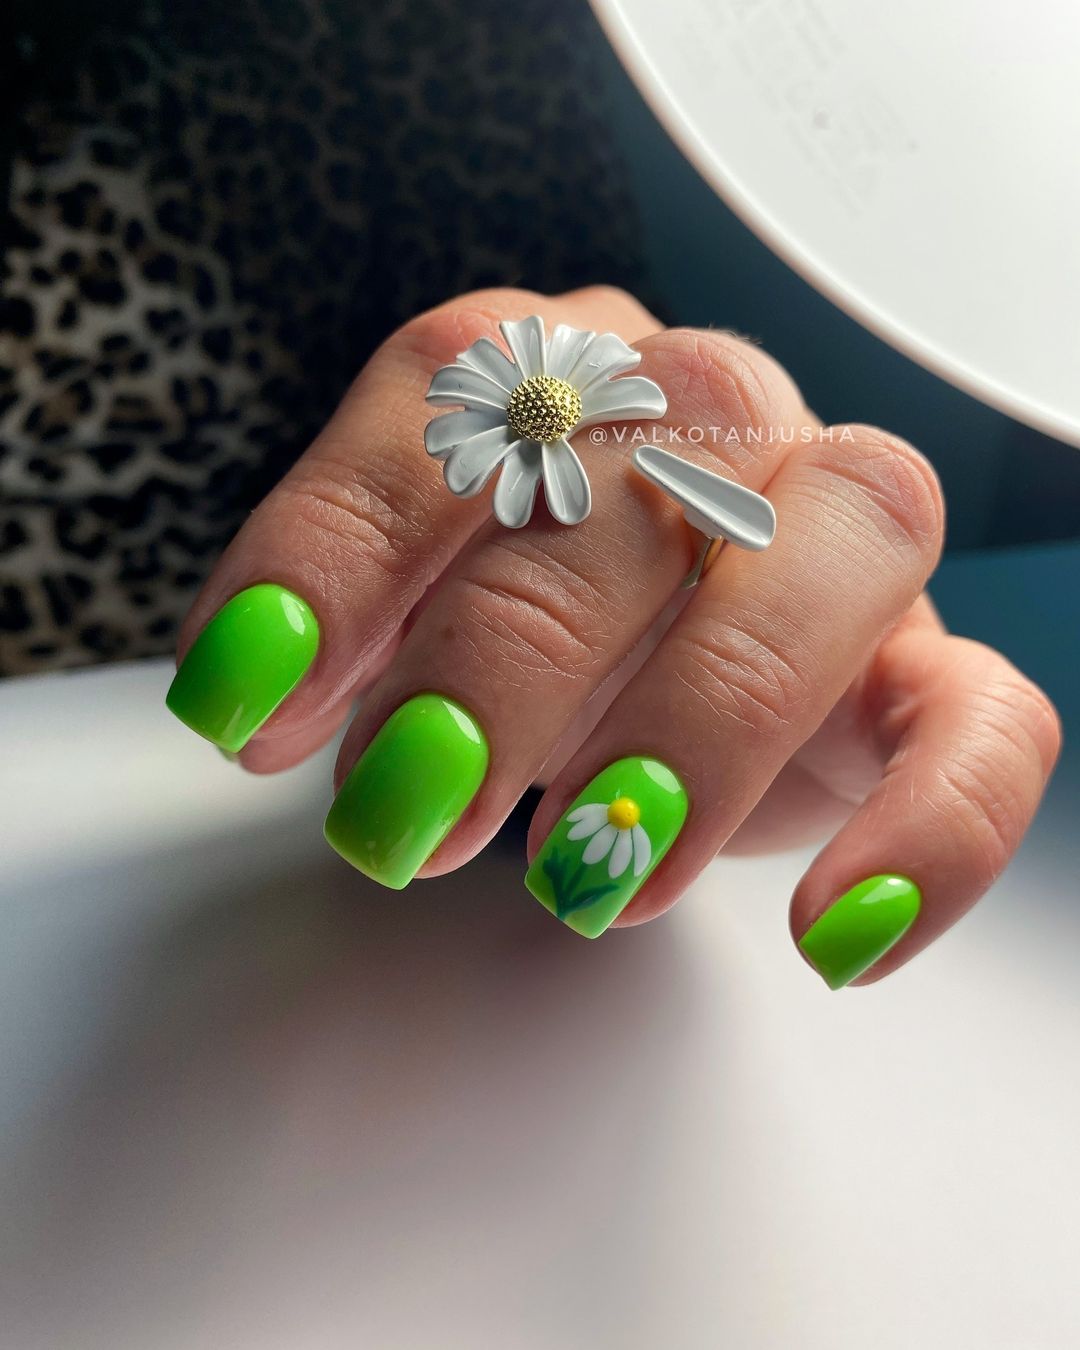
Neon Green Daisy Nail Art
This design brings a touch of floral elegance to neon color nails with a charming daisy accent. The neon green base color is bright and bold, making the white daisy stand out beautifully. This look is perfect for summer and adds a touch of nature-inspired beauty to your nails.

Consumables:
- Base color: Neon green (Orly “Glowstick”)
- White and yellow polish: For the daisy (Essie “Blanc” and “Hay There”)
- Detail brush: For creating the daisy petals and center
- Top coat: To seal the design (Seche Vite Fast Dry Top Coat)
DIY Instructions:
- Paint all nails with a neon green base color.
- Use a detail brush to paint the white daisy petals on the accent nail.
- Add a yellow dot in the center of the daisy.
- Seal with a top coat to protect the design and ensure longevity.
Neon Pink and Green with Rhinestone Hearts
This neon color nails design is a delightful mix of neon pink and green, with added rhinestone heart accents that bring a touch of glamour to the look. The art designs incorporate stripes and solid colors, creating a playful and stylish manicure. The rhinestones add sparkle, making this design perfect for a fun summer event.

Consumables:
- Base colors: Neon pink and green (Essie “Punchy Pink” and China Glaze “I’m With the Lifeguard”)
- Rhinestones: For the heart accents (Kiss Nail Art Rhinestones)
- Detail brush: For creating stripes and placing rhinestones
- Top coat: To seal the design (Sally Hansen Miracle Gel Top Coat)
DIY Instructions:
- Paint alternating nails with neon pink and green.
- Use a detail brush to create stripes on the accent nails.
- Apply rhinestones in the shape of hearts on select nails.
- Seal with a top coat to protect the design and add shine.
Neon Flames on Black Background
This design is a bold contrast of neon pink flames on a matte black background, creating a dramatic and edgy look. The art design is perfect for those who want to make a statement, combining the intensity of black with the vibrancy of neon pink. This manicure is ideal for a night out or whenever you want your nails to be the center of attention.

Consumables:
- Base color: Matte black (OPI “Black Onyx” with OPI Matte Top Coat)
- Neon pink: For the flames (China Glaze “Shocking Pink”)
- Detail brush: For creating the flame shapes
- Top coat: Matte finish to maintain the look (OPI Matte Top Coat)
DIY Instructions:
- Start with a matte black base on all nails.
- Use a detail brush to paint neon pink flames on each nail.
- Finish with a matte top coat to keep the flames vibrant against the matte black.
Neon Pink and Green Ombre with Glitter
This nail design features a stunning ombre effect, blending neon pink and green into a seamless transition. The addition of delicate glitter accents adds a touch of sparkle, making these nails perfect for both casual wear and special occasions. The bright colors combined with the subtle glitter make this look both fun and sophisticated.

Consumables:
- Base colors: Neon pink and green (Orly “Beach Cruiser” and “Glowstick”)
- Glitter polish: For added sparkle (OPI “Shine Bright”)
- Makeup sponge: For blending the ombre effect
- Top coat: To seal and protect the design (Seche Vite Fast Dry Top Coat)
DIY Instructions:
- Start with a base coat on all nails.
- Use a makeup sponge to apply the ombre effect, blending neon pink and green from the tips to the base.
- Add a layer of glitter polish to the accent nails.
- Seal the design with a top coat to protect and add shine.
Hot Pink Leopard Print Tips with Rhinestones
This neon color nails design combines bold hot pink French tips with a fierce leopard print, accented with rhinestones for an extra touch of glam. The contrast between the nude base and the bright tips creates a striking look that’s both playful and stylish. The rhinestones add a luxurious finish, making these nails perfect for a night out.

Consumables:
- Base color: Nude (OPI “Bubble Bath”)
- Hot pink polish: For the tips (Essie “Punchy Pink”)
- Black polish: For the leopard print (Sally Hansen Insta-Dri “Black to Black”)
- Rhinestones: For added bling (Kiss Nail Art Rhinestones)
- Detail brush: For precise application of the leopard spots and rhinestones
- Top coat: To seal the design (Sally Hansen Miracle Gel Top Coat)
DIY Instructions:
- Apply the nude base color and let it dry completely.
- Paint the tips with hot pink polish and use a detail brush to add leopard spots in black.
- Place rhinestones strategically on the leopard spots for a bit of sparkle.
- Finish with a top coat to secure the rhinestones and protect the design.
Pastel Neon French Tips
These neon color nails take a soft and elegant approach by combining pastel neon French tips with a sheer, iridescent base. The pastel hues give the nails a delicate and feminine feel, while the different colors on each tip add a playful twist. This design is perfect for those who want to embrace the neon trend in a more subtle and refined way.

Consumables:
- Base color: Sheer iridescent (OPI “Kyoto Pearl”)
- Pastel neon colors: For the tips (Essie “Go Ginza,” “Mint Candy Apple,” “Play Date”)
- Detail brush: For precise application of the French tips
- Top coat: To seal and enhance the shine (Seche Vite Fast Dry Top Coat)
DIY Instructions:
- Apply the iridescent base color to all nails.
- Use a detail brush to carefully paint each tip in a different pastel neon shade.
- Seal the design with a top coat to protect the colors and add a glossy finish.
Neon Yellow Short Nails
For a clean and simple look, these neon color nails focus on a solid neon yellow shade, applied to short nails. The bright color makes a bold statement while the short length keeps it practical and easy to maintain. This design is perfect for those who want a pop of color without any additional embellishments.

Consumables:
- Base color: Neon yellow (China Glaze “Yellow Polka Dot Bikini”)
- Top coat: To seal and protect the polish (Sally Hansen Miracle Gel Top Coat)
- Cuticle oil: To keep nails hydrated and healthy
DIY Instructions:
- Apply the neon yellow polish to all nails, ensuring even coverage.
- Seal the look with a top coat to add shine and protect the color.
- Finish with cuticle oil to maintain nail health.
Matte Neon French Tips
This design features neon color nails with a modern twist on the classic French tip. The matte finish adds sophistication, while the different neon shades on each tip bring a playful and youthful vibe. This art design is perfect for those who want a mix of elegance and fun, making it a great choice for both casual and formal settings.

Consumables:
- Base color: Nude (Essie “Ballet Slippers”)
- Neon colors: For the tips (China Glaze “Flip Flop Fantasy,” “Sun Worshiper,” “Blue Sparrow”)
- Matte top coat: To give the design a matte finish (OPI Matte Top Coat)
- Detail brush: For precise application of the French tips
DIY Instructions:
- Apply a nude base color to all nails and let it dry.
- Use a detail brush to paint each tip in a different neon shade.
- Finish with a matte top coat to give the nails a sophisticated look.
Hot Pink with Abstract Black and White Accents
This neon color nails design blends the vibrant energy of hot pink with the sophistication of abstract black and white accents. The art design is playful and eye-catching, featuring flowing lines and speckled effects that add texture and depth. The mix of different patterns on the accent nails keeps the look dynamic, making it perfect for those who want their nails to be a work of art.

Consumables:
- Base color: Hot pink (China Glaze “Pool Party”)
- Black and white polish: For the abstract lines and accents (Essie “Licorice” and “Blanc”)
- Speckled top coat: To add texture (Sally Hansen Miracle Gel in “Polished Pebbles”)
- Detail brush: For creating the abstract patterns
- Top coat: To seal the design and add a glossy finish (Seche Vite Fast Dry Top Coat)
DIY Instructions:
- Apply the hot pink base color to all nails.
- Use a detail brush to create the abstract black and white lines on the accent nails.
- Apply a speckled top coat over the entire design to add texture.
- Finish with a top coat to protect and enhance the shine.
Neon Yellow and Orange Ombre with Rhinestones
This design features a smooth ombre transition from neon yellow to orange, creating a sunset-like effect on your nails. The subtle addition of rhinestones adds just the right amount of sparkle, making this neon color nails look perfect for summer evenings. The gradient art design is both simple and stunning, ideal for anyone who loves bright colors with a touch of elegance.

Consumables:
- Base colors: Neon yellow and orange (Orly “Glowstick” and China Glaze “Sun Worshiper”)
- Rhinestones: For added sparkle (Kiss Nail Art Rhinestones)
- Makeup sponge: For blending the ombre effect
- Top coat: To seal the design (Sally Hansen Miracle Gel Top Coat)
DIY Instructions:
- Apply a base coat to all nails.
- Use a makeup sponge to blend the neon yellow and orange, creating a smooth ombre effect.
- Place rhinestones strategically on each nail for a bit of sparkle.
- Finish with a top coat to protect the design and ensure longevity.
Neon Gradient with Speckled Finish
This nail design is a vibrant mix of neon color nails in a gradient that transitions from pink to orange to yellow, creating a fiery, sunset-inspired look. The speckled finish adds texture and a unique twist to the gradient, making this art design stand out. It’s a bold and creative choice, perfect for those who want their nails to be both colorful and textured.

Consumables:
- Base colors: Neon pink, orange, and yellow (China Glaze “Shocking Pink,” “Sun Worshiper,” “Yellow Polka Dot Bikini”)
- Speckled top coat: To add texture (Sally Hansen Miracle Gel in “Polished Pebbles”)
- Makeup sponge: For blending the gradient
- Top coat: To seal and protect the design (Seche Vite Fast Dry Top Coat)
DIY Instructions:
- Apply a base coat to all nails.
- Use a makeup sponge to blend the pink, orange, and yellow into a seamless gradient on each nail.
- Apply a speckled top coat over the gradient to add texture.
- Seal the look with a top coat to protect the design and add shine.
Save Pin
