
As the leaves change color and the air turns crisp, it’s the perfect time to refresh your manicure with some stunning fall nail art. Whether you’re looking for something cute, minimalist, or bold, these designs will inspire your next trip to the nail salon. In this article, I’ll share some of my favorite fall nail designs and provide detailed descriptions and tutorials so you can recreate them at home.
Modern French Tips
This innovative take on the classic French tip features a combination of nude, green, and black. The modern design uses curved lines and contrasting colors to create a unique and eye-catching look. This design combines a nude base with green French tips accented by black and light green curved lines. It’s perfect for those who want a stylish and bold manicure that stands out.

Consumables:
- Nude nail polish (OPI “Bubble Bath”)
- Green nail polish (Essie “Mojito Madness”)
- Black nail polish (Sally Hansen “Black Out”)
- Fine detail brush
- Base coat
- Top coat
Tutorial:
- Apply a base coat to your nails.
- Paint your nails with two coats of nude polish and let them dry completely.
- Use a fine detail brush to create the curved green tips and outline them with black polish.
- Allow the design to dry before applying a top coat to seal and protect it.
Golden Leaf Accents
This elegant design features a matte mint green base with gold foil accents. The combination of soft green and metallic gold creates a luxurious and stylish look. The gold foil applied in a random pattern adds a touch of glamour to the minimalist green base. This design is perfect for those who want a chic yet understated manicure for fall.

Consumables:
- Mint green nail polish (Essie “Mint Candy Apple”)
- Gold foil
- Nail adhesive
- Base coat
- Matte top coat
Tutorial:
- Apply a base coat to your nails.
- Paint your nails with two coats of mint green polish.
- Apply gold foil accents using nail adhesive.
- Finish with a matte top coat to seal the design.
Royal Blue
A bold royal blue manicure is perfect for making a statement this fall. The rich, glossy blue polish highlights the nails’ shape and adds a touch of sophistication. This simple yet striking design is ideal for those who love bold, single-color manicures. The glossy finish enhances the depth of the blue, making your nails look chic and polished.

Consumables:
- Royal blue nail polish (OPI “Russian Navy”)
- Base coat
- Top coat
Tutorial:
- Apply a base coat to your nails.
- Paint your nails with two coats of royal blue polish.
- Let the polish dry completely before applying a top coat for a glossy finish.
Autumn Swirls
This vibrant design features swirls of orange and cream on a clear base, capturing the essence of autumn. The mix of colors creates a dynamic and eye-catching look. The almond shape of the nails enhances the fluidity of the swirls, making this design perfect for showcasing fall colors in a modern and artistic way.

Consumables:
- Orange nail polish (OPI “A Good Man-darin is Hard to Find”)
- Cream nail polish (Essie “Marshmallow”)
- Fine detail brush
- Base coat
- Top coat
Tutorial:
- Apply a base coat to your nails.
- Use a fine detail brush to create swirls of orange and cream on a clear base.
- Let the polish dry completely before applying a top coat to seal the design.
Minimalist Dots
This minimalist nail design features a combination of beige and taupe nails with simple white polka dots. The understated color palette and small dots create a cute and subtle look. The combination of neutral colors and minimalistic dots makes this design versatile and perfect for any occasion. It’s ideal for those who prefer a simple yet stylish manicure.

Consumables:
- Beige nail polish (OPI “Dulce de Leche”)
- Taupe nail polish (Essie “Mink Muffs”)
- White nail polish (Essie “Blanc”)
- Dotting tool
- Base coat
- Top coat
Tutorial:
- Apply a base coat to your nails.
- Paint your nails with a mix of beige and taupe polish.
- Use a dotting tool to create small white dots on the taupe nails.
- Let the polish dry completely before applying a top coat to seal the design.
Festive Pumpkins
Pumpkin-themed nail art is a delightful way to embrace the fall season. This design combines bright orange tips with charming pumpkin and floral accents, making it perfect for autumn. This fall nail art showcases a vibrant orange French tip, beautifully complemented by intricate pumpkins and delicate flowers painted on a nude base. The overall look is both festive and cute, ideal for adding a touch of autumn whimsy to your nails.

Consumables:
- Orange nail polish (Sally Hansen “Sun Kissed”)
- Nude base polish (OPI “Bubble Bath”)
- Assorted nail art brushes
- Acrylic paints for detailed designs
- Top coat
Tutorial:
- Apply a base coat to your nails.
- Paint the tips of your nails with orange polish to create a French tip effect.
- Use fine brushes and acrylic paints to draw the pumpkins and flowers on the accent nails.
- Allow the design to dry completely before applying a top coat to protect your artwork.
Tortoiseshell Elegance
Tortoiseshell nails are a sophisticated choice for fall, offering a timeless and luxurious look. The deep amber and brown hues create a rich, textured appearance that mimics the classic pattern found in tortoiseshell accessories. This design is perfect for those who want a minimal yet striking nail art that can be worn on any occasion. The glossy finish enhances the depth of the colors, making the nails look both chic and elegant.

Consumables:
- Amber brown nail polish (Essie “With the Band”)
- Dark brown nail polish (OPI “Good Girls Gone Plaid”)
- Fine detail brush
- Base coat
- Top coat
Tutorial:
- Apply a base coat to your nails.
- Paint your nails with two coats of amber brown polish.
- Use a fine detail brush to create random dark brown patches on the nails, mimicking the tortoiseshell pattern.
- Blend the edges of the patches slightly to create a natural look.
- Finish with a top coat to add shine and protect the design.
Mint and Marble Delight
For a fresh and modern twist on fall nails, try this mint and marble design. The combination of soft mint green and marble accents creates a chic and sophisticated look that’s perfect for autumn. The almond shape of the nails adds elegance to the design, while the marble effect brings in a touch of luxury. This look is perfect for those who prefer minimalist yet eye-catching nail art.

Consumables:
- Mint green nail polish (Essie “Mint Candy Apple”)
- White and grey polishes for marble effect (OPI “Alpine Snow” and “Cement the Deal”)
- Nail striping tape
- Base coat
- Top coat
Tutorial:
- Apply a base coat to your nails.
- Paint most of your nails with two coats of mint green polish.
- For the marble effect, apply white polish as a base on the accent nails.
- Use a detail brush to apply grey polish in thin, random lines on the white base, then blend lightly for a marble look.
- Use nail striping tape for clean lines on the marble nails if desired.
- Finish with a top coat to protect the design.
Dark Abstract
Abstract designs are a fantastic way to showcase your creativity through nail art. This design features a combination of dark and neutral shades, creating an edgy yet elegant look perfect for fall. The swirling patterns and muted colors make this design stand out, adding a touch of modern art to your nails. This look is ideal for those who love fall trends and want to make a bold statement with their manicure.

Consumables:
- Dark purple nail polish (OPI “Lincoln Park After Dark”)
- Nude base polish (Essie “Ballet Slippers”)
- Fine detail brush
- Base coat
- Top coat
Tutorial:
- Apply a base coat to your nails.
- Paint your nails with a nude base polish and let them dry completely.
- Use a fine detail brush to create abstract swirls with dark purple polish.
- Allow the design to dry before applying a top coat to seal and protect it.
Playful Pears
This whimsical nail design features tiny yellow pears on a soft grey base, creating a fun and unique look perfect for any fall occasion. The cute little pears add a touch of playfulness to the manicure, making it stand out. The matte finish adds a modern twist to the design, making it both trendy and charming. This look is ideal for those who want a simple yet distinctive nail art.

Consumables:
- Grey nail polish (Zoya “Dove”)
- Yellow nail polish (OPI “I Just Can’t Cope-acabana”)
- Black nail polish for pear stems (Essie “Licorice”)
- Dotting tool and fine detail brush
- Base coat
- Matte top coat
Tutorial:
- Apply a base coat to your nails.
- Paint your nails with two coats of grey polish.
- Use a dotting tool to create small yellow pear shapes on each nail.
- Use a fine detail brush to add tiny black stems to each pear.
- Let the polish dry completely before applying a matte top coat to finish the look.
Golden Leopard
Leopard print is a versatile and trendy design that never goes out of style. This fall nail art combines olive green, white, and leopard print with gold foil accents to create a sophisticated and edgy look. The mix of solid colors and animal prints makes this design stand out, perfect for adding a touch of wild elegance to your nails. The gold foil adds a luxurious touch, making this design suitable for any occasion.

Consumables:
- Olive green nail polish (Essie “Sew Psyched”)
- White nail polish (OPI “Alpine Snow”)
- Black nail polish for leopard spots (Sally Hansen “Black Out”)
- Gold foil flakes
- Nail adhesive
- Fine detail brush
- Base coat
- Top coat
Tutorial:
- Apply a base coat to your nails.
- Paint two nails with olive green polish and two with white polish.
- Use a fine detail brush to create leopard spots with black polish on one green nail and one white nail.
- Apply gold foil flakes on the white nail without leopard print, using nail adhesive to secure them.
- Finish with a top coat to protect the design and add shine.
Elegant Browns
Brown tones are perfect for fall, and this elegant design combines various shades of brown with a touch of glitter. The gradient effect and subtle glitter accents create a sophisticated look that’s ideal for the season. This design features a gradient of brown shades, from light to dark, with a hint of glitter at the tips. It’s a chic and timeless look that suits any occasion.

Consumables:
- Light brown nail polish (OPI “Taupe-less Beach”)
- Medium brown nail polish (Essie “Mink Muffs”)
- Dark brown nail polish (Zoya “Louise”)
- Gold glitter polish (China Glaze “Golden Enchantment”)
- Fine detail brush
- Base coat
- Top coat
Tutorial:
- Apply a base coat to your nails.
- Create a gradient effect by painting each nail a different shade of brown, from light to dark.
- Use a fine detail brush to add a thin line of gold glitter at the tips of each nail.
- Allow the polish to dry completely before applying a top coat to seal the design.
Autumn Leaves
Celebrate the fall season with this charming leaf design. The combination of orange, white, and black with delicate leaf patterns captures the essence of autumn. This design features bright orange nails and white nails with intricate black leaf patterns. It’s a cute and festive look that’s perfect for showcasing your love for the season.

Consumables:
- Orange nail polish (OPI “A Good Man-darin is Hard to Find”)
- White nail polish (Essie “Blanc”)
- Black nail polish for leaf designs (Sally Hansen “Black Out”)
- Fine detail brush
- Base coat
- Top coat
Tutorial:
- Apply a base coat to your nails.
- Paint two nails with orange polish and three with white polish.
- Use a fine detail brush to draw black leaf patterns on the white nails.
- Finish with a top coat to protect the design and add shine.
Neon French Tips
For a modern twist on the classic French manicure, try neon tips. This design features clear nails with vibrant neon tips in various colors, creating a fun and eye-catching look. The neon colors add a playful touch to the traditional French manicure, making it perfect for those who want to stand out. This design is great for any occasion, from casual outings to parties.

Consumables:
- Neon pink nail polish (China Glaze “Shocking Pink”)
- Neon green nail polish (Orly “Lime Twist”)
- Neon yellow nail polish (Essie “Neon & On & On”)
- Neon blue nail polish (OPI “Music is My Muse”)
- Clear base polish (Essie “Topless & Barefoot”)
- Nail striping tape
- Base coat
- Top coat
Tutorial:
- Apply a base coat to your nails.
- Paint your nails with a clear base polish.
- Use nail striping tape to create French tips, then paint each tip with a different neon color.
- Remove the tape carefully and let the polish dry.
- Finish with a top coat to seal the design and add shine.
Bold Autumn Colors
Embrace the vibrant colors of fall with this bold nail art. The combination of teal, red, and cream with black leaf patterns creates a striking and festive look. This design features solid teal and red nails with cream nails adorned with black leaf patterns. The bold colors and intricate details make this design perfect for showcasing your autumn spirit.

Consumables:
- Teal nail polish (OPI “My Dogsled is a Hybrid”)
- Red nail polish (Essie “Really Red”)
- Cream nail polish (Zoya “Jacqueline”)
- Black nail polish for leaf designs (Sally Hansen “Black Out”)
- Fine detail brush
- Base coat
- Top coat
Tutorial:
- Apply a base coat to your nails.
- Paint two nails with teal polish, two with red polish, and one with cream polish.
- Use a fine detail brush to draw black leaf patterns on the cream nail.
- Finish with a top coat to protect the design and add shine.
Elegant Leaves
This design is all about sophistication and elegance. The combination of white polish with gold and dark blue leaf patterns creates a striking yet understated look perfect for fall. The use of gold foil and dark blue leaves on a crisp white background makes this design stand out. It’s ideal for a minimalist look that still captures the essence of the autumn season.

Consumables:
- White nail polish (OPI “Alpine Snow”)
- Gold foil
- Dark blue nail polish (Essie “Aruba Blue”)
- Fine detail brush
- Nail adhesive
- Base coat
- Top coat
Tutorial:
- Apply a base coat to your nails.
- Paint your nails with two coats of white polish and let them dry completely.
- Use a fine detail brush to apply dark blue leaves on the nails.
- Add gold foil accents using nail adhesive.
- Finish with a top coat to seal the design and add shine.
Classic Red
A bold red manicure is a timeless choice, and this sleek design is perfect for fall. The vibrant red color is both classic and modern, making it suitable for any occasion. The rich, glossy red polish highlights the nails’ shape and length, making them look chic and sophisticated. This simple yet striking design is ideal for those who love a bold look.

Consumables:
- Red nail polish (OPI “Big Apple Red”)
- Base coat
- Top coat
Tutorial:
- Apply a base coat to your nails.
- Paint your nails with two coats of red polish.
- Allow the polish to dry completely before applying a top coat for a glossy finish.
Neon Gradient
This neon gradient design is perfect for those who love bright and bold colors. The smooth transition from neon pink, orange, and yellow to green creates a vibrant and eye-catching look. The gradient effect and neon colors make this design stand out, adding a touch of fun to your nails. It’s perfect for making a statement this fall.

Consumables:
- Neon pink nail polish (China Glaze “Shocking Pink”)
- Neon orange nail polish (Orly “Lime Twist”)
- Neon yellow nail polish (Essie “Neon & On & On”)
- Neon green nail polish (OPI “Music is My Muse”)
- Makeup sponge
- Base coat
- Top coat
Tutorial:
- Apply a base coat to your nails.
- Use a makeup sponge to apply the neon colors, blending them together to create a gradient effect.
- Allow the polish to dry completely before applying a top coat to seal the design and add shine.
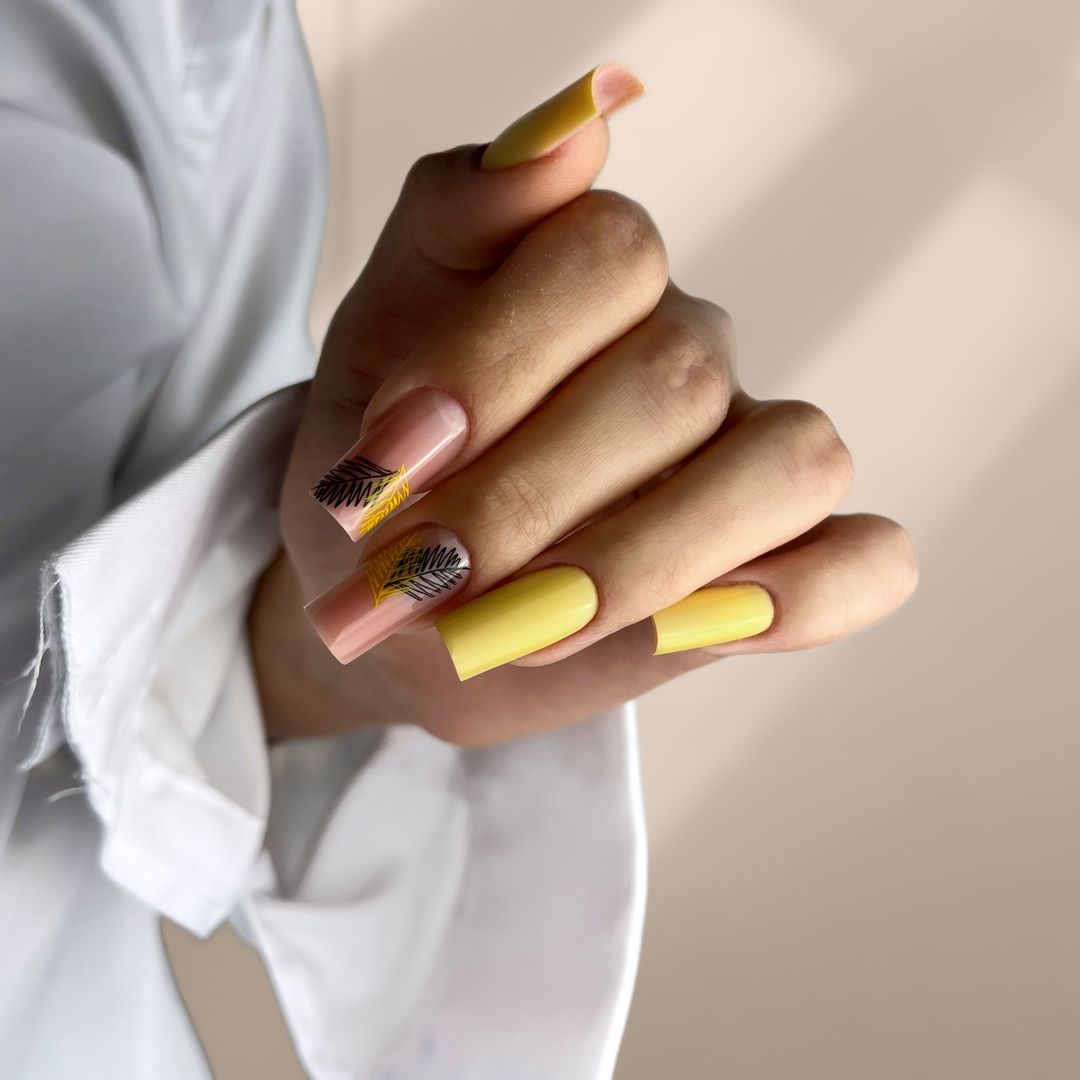
Yellow Delight
Brighten up your fall look with this cheerful yellow design. The combination of solid yellow nails and nude nails with black and yellow leaf accents creates a playful and vibrant look. This design is perfect for adding a pop of color to your fall wardrobe. The leaf accents add a touch of nature-inspired elegance to the bright yellow base.

Consumables:
- Yellow nail polish (Essie “Sunny Business”)
- Nude nail polish (OPI “Bubble Bath”)
- Black nail polish for leaf designs (Sally Hansen “Black Out”)
- Fine detail brush
- Base coat
- Top coat
Tutorial:
- Apply a base coat to your nails.
- Paint two nails with yellow polish and two with nude polish.
- Use a fine detail brush to draw black and yellow leaf patterns on the nude nails.
- Finish with a top coat to protect the design and add shine.
Purple Swirls
Embrace the mystical beauty of fall with this purple swirl design. The combination of light lavender and dark purple swirls creates a dreamy and enchanting look. The delicate swirls and glitter accents add a touch of magic to your nails, making this design perfect for any autumn occasion.

Consumables:
- Light lavender nail polish (Zoya “Malia”)
- Dark purple nail polish (OPI “Lincoln Park After Dark”)
- Fine detail brush
- Glitter top coat (China Glaze “Fairy Dust”)
- Base coat
- Top coat
Tutorial:
- Apply a base coat to your nails.
- Paint your nails with two coats of light lavender polish.
- Use a fine detail brush to create dark purple swirls on the nails.
- Apply a glitter top coat for added sparkle.
- Finish with a top coat to seal the design.
Abstract Minimalism
This abstract minimalistic design uses a nude matte base with sleek black lines and gold foil accents. The combination of the linear elements with the random gold flecks creates a sophisticated and modern look, perfect for fall. This design is ideal for those who prefer a minimalist approach but still want to make a statement. The use of black and gold against the nude base is both chic and subtle, making it suitable for any occasion.

Consumables:
- Nude matte nail polish (OPI “Samoan Sand”)
- Black nail polish for lines (Essie “Licorice”)
- Gold foil flakes
- Fine detail brush
- Nail adhesive
- Base coat
- Matte top coat
Tutorial:
- Apply a base coat to your nails.
- Paint your nails with two coats of nude matte polish and let them dry completely.
- Use a fine detail brush to draw sleek black lines on the nails.
- Apply gold foil flakes randomly on the nails using nail adhesive.
- Finish with a matte top coat to seal the design.
Emerald Elegance
This stunning emerald green design features solid green nails accented with a line of rhinestones at the cuticle. The rich green color and the sparkle of the rhinestones create a luxurious and elegant look. This design is perfect for those who love bold colors and a touch of bling. The deep green shade is perfect for fall, and the rhinestones add a glamorous touch, making it ideal for any special occasion.

Consumables:
- Emerald green nail polish (Essie “Off Tropic”)
- Rhinestones
- Nail adhesive
- Base coat
- Top coat
Tutorial:
- Apply a base coat to your nails.
- Paint your nails with two coats of emerald green polish and let them dry completely.
- Apply rhinestones at the cuticle line using nail adhesive.
- Finish with a top coat to secure the rhinestones and add shine.
Golden Accents
This elegant design features a nude base with gold foil accents on the tips. The combination of the soft nude and the metallic gold creates a sophisticated and understated look. The gold accents add a touch of luxury to the simple nude base, making this design perfect for any occasion. The subtle gold detailing is both chic and versatile, ideal for both everyday wear and special events.

Consumables:
- Nude nail polish (OPI “Bubble Bath”)
- Gold foil
- Nail adhesive
- Base coat
- Top coat
Tutorial:
- Apply a base coat to your nails.
- Paint your nails with two coats of nude polish.
- Apply gold foil to the tips of your nails using nail adhesive.
- Finish with a top coat to seal the design and add shine.
Save Pin
