
23 Inspiring Clear Acrylic Nail Ideas: From Classy French Tips to Cute Colors
When it comes to nail fashion, clear acrylic nails offer a canvas that is both versatile and elegant. But what makes clear acrylics so appealing? How can you style them to fit any occasion, from a casual day out to a glamorous event? In this guide, we’ll explore various Designs and styles, from Short and French tip to Long square and Girly Cute ideas, all brought to life through detailed descriptions of stunning nail art. Whether you’re looking for Inspo or practical tips on how to achieve these looks at home, this article has got you covered.
Shimmering Starry Nights
This nail design combines the ethereal beauty of a starry night with the modern twist of clear acrylics. The elongated Long square shape adds a touch of elegance, while the shimmering stars give a whimsical, almost magical feel. The transparent base allows the star decals to stand out, creating a Pretty and Girly look that’s perfect for a special event or a festive Holiday gathering. The light-catching quality of the stars against the clear base makes this design both Classy and Cute.

Consumables:
- Clear acrylic powder – Recommended brand: Mia Secret Clear Acrylic Powder
- Star decals – Recommended brand: Makartt Nail Art Stickers
- UV top coat – Recommended brand: Modelones Gel Top Coat
- Nail file and buffer – Suggested brand: OPI Crystal Nail File
How to Create:
- Prep your nails by filing them into a Long square shape and buffing the surface.
- Apply the clear acrylic using a brush dipped in liquid monomer, building up a smooth, even surface.
- Place the star decals strategically on each nail while the acrylic is still tacky.
- Seal with a UV top coat and cure under a UV lamp for a glossy finish.
Sparkling Simplicity
This nail design is all about embracing simplicity with a touch of sparkle. The clear acrylic base creates a clean and minimalist backdrop that allows the delicate glitter to shine through. The subtle Solid color of the glitter adds a sophisticated, Classy vibe to the nails, making them perfect for everyday wear or a chic evening out. The Short square shape keeps the look modern and understated, while the glitter provides just the right amount of Cute sparkle without being overwhelming.

Consumables:
- Clear acrylic powder – Recommended brand: Young Nails Clear Acrylic Powder
- Fine glitter powder – Suggested brand: Kiara Sky Nail Glitter
- UV top coat – Recommended brand: CND Shellac Top Coat
- Nail file and buffer – Suggested brand: Revlon Shape-N-Buff
How to Create:
- Start by shaping your nails into a Short square style using a nail file.
- Apply the clear acrylic over your nails, ensuring an even layer.
- Dust the glitter powder onto the still-tacky acrylic to allow it to adhere properly.
- Finish with a UV top coat to seal in the glitter and cure under a UV lamp for a smooth, long-lasting finish.
Vibrant Swirls of Color
This design is perfect for those who love a pop of color in their nail art. The clear acrylic base provides a neutral foundation that allows the vibrant pink and purple swirls to take center stage. The Colored swirls, accented with a hint of silver glitter, create a dynamic, Girly look that’s both playful and trendy. The Long square shape enhances the boldness of the design, making it a great choice for those who want their nails to stand out.

Consumables:
- Clear acrylic powder – Recommended brand: Valentino Beauty Pure Clear Acrylic Powder
- Pink and purple nail art gel – Suggested brand: Beetles Gel Polish Set
- Silver glitter gel – Recommended brand: Gelish Glitter Gel Polish
- Fine detail brush – Suggested brand: Pana Nail Art Brush Set
How to Create:
- Shape your nails into a Long square style and smooth the surface with a buffer.
- Apply a layer of clear acrylic, making sure it is even and smooth.
- Use a fine detail brush to create the pink and purple swirls, adding the silver glitter accents while the acrylic is still tacky.
- Cure each layer under a UV lamp, and finish with a top coat to seal in the design.
Monochrome Waves
This black and clear acrylic nail design is the epitome of modern elegance. The monochrome waves create a striking contrast against the clear base, making the design visually intriguing without being overly complex. The Short square shape adds to the Classy and refined appearance, making these nails suitable for both professional and casual settings. The simplicity of the black waves against the transparent background embodies a minimalist yet sophisticated aesthetic.

Consumables:
- Clear acrylic powder – Recommended brand: OPI Clear Acrylic Powder
- Black nail art gel – Suggested brand: Saviland Nail Art Gel
- Nail art brush – Recommended brand: Makartt Nail Art Brush Set
- Matte top coat – Suggested brand: Essie Matte About You Top Coat
How to Create:
- File your nails into a Short square shape and buff the surface.
- Apply the clear acrylic and allow it to set before adding the black wave design.
- Use a fine brush to carefully paint the black waves, ensuring they are evenly spaced and symmetrical.
- Finish with a matte top coat for a modern, muted finish, and cure under a UV lamp.
Butterfly Embellishments
For a design that’s both whimsical and elegant, these clear acrylic nails with butterfly embellishments are a stunning choice. The transparent base allows the intricate butterfly decals to take the spotlight, creating a Pretty and Girly design that’s ideal for spring or summer. The Long square shape adds a bit of drama, while the rhinestone accents provide an extra touch of glamour. This design is perfect for those who love delicate details with a Classy finish.

Consumables:
- Clear acrylic powder – Recommended brand: Tammy Taylor Clear Acrylic Powder
- Butterfly nail decals – Suggested brand: Kalolary Butterfly Nail Stickers
- Rhinestones – Recommended brand: Swarovski Crystals Nail Art
- Nail glue – Recommended brand: IBD 5 Second Nail Glue
- UV top coat – Recommended brand: Gellen Top Coat
How to Create:
- Shape your nails into a Long square style and apply a clear acrylic base.
- Place the butterfly decals on the nails while the acrylic is still tacky, positioning them strategically for balance.
- Add rhinestones along the edges or tips for a touch of sparkle, securing them with nail glue.
- Seal with a UV top coat and cure under a UV lamp to lock in the design and ensure durability.
Iridescent Stripes
This design is a beautiful blend of elegance and modern flair, featuring clear acrylic nails with iridescent striping. The transparent base allows the holographic stripes to reflect a spectrum of colors, giving the nails a multi-dimensional and Pretty effect. The almond shape adds a feminine touch, making these nails perfect for those who love a Classy yet Girly look. The simplicity of the design, combined with the striking visual impact of the iridescence, makes this a versatile choice for both casual and formal settings.

Consumables:
- Clear acrylic powder – Recommended brand: Mia Secret Clear Acrylic Powder
- Iridescent nail tape – Suggested brand: Twinkled T Holo Tape
- UV top coat – Recommended brand: Gelish Top Coat
- Nail file and buffer – Suggested brand: KISS Professional Manicure Kit
How to Create:
- Shape your nails into an almond style and smooth the surface with a buffer.
- Apply clear acrylic, ensuring an even and smooth base.
- Place the iridescent tape on the nails in vertical stripes, pressing firmly to ensure they adhere.
- Seal with a UV top coat and cure under a UV lamp for a high-gloss finish.
Pastel Perfection with Floral Accents
This nail design is the epitome of springtime beauty, combining soft pastels with delicate floral accents. The Clear acrylic nails serve as the perfect canvas for the pastel green tips and daisy decals, creating a fresh and Girly look. The Long square shape elongates the fingers, while the floral details add a touch of whimsy and Cute charm. This design is perfect for those looking for a light and airy manicure that still makes a statement.

Consumables:
- Clear acrylic powder – Recommended brand: Valentino Beauty Pure Clear Acrylic Powder
- Pastel green gel polish – Suggested brand: Beetles Gel Polish in Mint Candy
- Daisy nail decals – Recommended brand: Born Pretty Floral Stickers
- Nail glue – Suggested brand: Makartt Nail Art Glue
How to Create:
- File the nails into a Long square shape and smooth the surface.
- Apply the clear acrylic and let it set before adding the pastel green tips.
- Place the daisy decals on the nails, ensuring they are evenly spaced.
- Finish with a UV top coat to secure the design and cure under a UV lamp for durability.
Glitter Gradient Elegance
This design features a stunning glitter gradient on Clear acrylic nails, blending seamlessly from a nude base to a glittering tip. The mix of soft pink and green glitter adds a unique twist to the traditional glitter nail, giving it a more Classy and sophisticated feel. The Long square shape further enhances the elegance of the design, making these nails ideal for special occasions or just when you want to add a bit of sparkle to your day.

Consumables:
- Clear acrylic powder – Recommended brand: OPI Clear Acrylic Powder
- Pink and green glitter – Suggested brand: Kiara Sky Nail Glitter
- UV top coat – Recommended brand: DND DC Gel Top Coat
- Nail buffer and file – Suggested brand: Revlon Shape-N-Buff
How to Create:
- Shape the nails into a Long square style, and smooth the surface with a buffer.
- Apply clear acrylic as a base layer, ensuring it’s smooth and even.
- Dust the glitter onto the tips of the nails while the acrylic is still tacky, blending it towards the middle for a gradient effect.
- Seal with a UV top coat and cure under a UV lamp for a glossy, long-lasting finish.
Confetti Delight
These nails bring the party with a playful confetti design on a clear acrylic base. The scattered multicolored glitter pieces give a Cute and fun vibe, perfect for those who want a Girly and vibrant look. The Long square shape provides ample space to showcase the glitter, making this design ideal for festive occasions or simply adding a bit of joy to your daily style. The transparent base allows the colors to pop, making the glitter the star of the show.

Consumables:
- Clear acrylic powder – Recommended brand: Young Nails Clear Acrylic Powder
- Multicolored glitter – Suggested brand: Martha Stewart Crafts Glitter
- Nail glue – Suggested brand: Kiss Powerflex Max Speed Nail Glue
- UV top coat – Recommended brand: CND Shellac Top Coat
How to Create:
- Shape the nails into a Long square style and buff the surface.
- Apply clear acrylic as the base and let it set before adding the glitter.
- Sprinkle the glitter over the nails while the acrylic is still tacky, ensuring an even distribution.
- Seal with a UV top coat and cure under a UV lamp to lock in the design and add shine.
Glittery French Tips
This design puts a sparkling twist on the classic French tip, using a clear acrylic base with a glittery gradient at the tips. The subtle glitter adds a Classy touch while maintaining the timeless elegance of a French tip manicure. The Long square shape keeps the look modern and sophisticated, making these nails perfect for both formal events and everyday wear. The clear base allows the glitter to shine without overpowering the overall design.

Consumables:
- Clear acrylic powder – Recommended brand: Glam and Glits Clear Acrylic
- Glitter gel polish – Suggested brand: Gelish Glitter Gel Polish
- UV top coat – Recommended brand: Essie Gel Couture Top Coat
- Nail file and buffer – Suggested brand: Revlon Expert Nail File
How to Create:
- File the nails into a Long square shape and smooth the surface.
- Apply clear acrylic to create a solid base, allowing it to set properly.
- Apply glitter polish to the tips of the nails, creating a gradient effect that blends into the clear base.
- Finish with a UV top coat to seal the design and cure under a UV lamp for added durability.
Fantasy Flames and Glitter
This stunning design combines the ethereal beauty of glitter with the striking appeal of flame-like accents. The Long stiletto shape enhances the drama of the Clear acrylic nails, making them perfect for anyone who loves a bold and unique look. The soft, pastel flames in pink and blue add a dynamic, artistic touch that complements the shimmering glitter. This design is perfect for those who want to showcase their creativity while still keeping things Classy and Pretty.

Consumables:
- Clear acrylic powder – Recommended brand: Mia Secret Clear Acrylic Powder
- Glitter flakes – Suggested brand: Young Nails Mission Control Sparkles
- Nail art gel – Suggested brand: Saviland Nail Art Gel in Pink and Blue
- Fine detail brush – Recommended brand: Pana Nail Art Brush Set
How to Create:
- Shape the nails into a long stiletto style and smooth the surface with a buffer.
- Apply the clear acrylic as a base, ensuring it is even and smooth.
- Add the glitter flakes to the tips of the nails while the acrylic is still tacky.
- Use a fine detail brush to paint the pastel flame accents, allowing them to flow naturally across the nails.
- Finish with a UV top coat and cure under a UV lamp to secure the design and add shine.
Tropical Ombre with 3D Floral Accents
This vibrant nail design features a tropical ombre effect, transitioning from warm orange to bright yellow, all on a clear acrylic base. The Long almond shape adds elegance, while the 3D floral accents bring a touch of nature’s beauty to the nails. The combination of the bright ombre and the delicate 3D flowers makes this design perfect for summer or any occasion where you want to make a bold, Colorful statement.

Consumables:
- Clear acrylic powder – Recommended brand: Valentino Beauty Pure Clear Acrylic Powder
- Orange and yellow gel polish – Suggested brand: DND Gel Polish in Tangerine and Lemon
- 3D flower molds – Suggested brand: Ejiubas 3D Flower Nail Art Mold
- Nail art brush – Suggested brand: Beetles Nail Art Brush Set
How to Create:
- File the nails into a long almond shape and buff the surface.
- Apply clear acrylic to create a smooth base.
- Create the ombre effect by blending the orange and yellow gel polish, starting from the tips and working towards the center.
- Use the 3D flower molds to create floral accents and attach them to the nails using nail glue.
- Seal with a UV top coat and cure under a UV lamp for a glossy finish.
Floral and Iridescent Accents
This design combines the beauty of floral elements with the shimmering allure of iridescent accents on Clear acrylic nails. The mix of soft flowers and holographic shapes creates a visually stunning contrast that is both Girly and sophisticated. The Long square shape enhances the elegance of the design, making it ideal for those who appreciate intricate details and a touch of sparkle.

Consumables:
- Clear acrylic powder – Recommended brand: OPI Clear Acrylic Powder
- Floral nail decals – Suggested brand: Born Pretty Floral Stickers
- Iridescent foil – Recommended brand: Makartt Holographic Nail Foils
- Nail glue – Suggested brand: IBD 5 Second Nail Glue
How to Create:
- Shape the nails into a long square style and buff the surface.
- Apply clear acrylic as the base, ensuring a smooth application.
- Place the floral decals on the nails, arranging them in a balanced and aesthetically pleasing pattern.
- Add iridescent foil accents to create a multidimensional effect.
- Finish with a UV top coat to lock in the design and add shine, curing under a UV lamp.
Glittering Confetti on Stiletto Nails
This glittering confetti design on clear acrylic nails is perfect for anyone who loves a bit of sparkle in their life. The Long stiletto shape adds a dramatic flair, while the multicolored glitter provides a fun and Girly touch. The clear base allows the glitter to be the focal point, creating a Cute and festive look that’s perfect for parties or special occasions.

Consumables:
- Clear acrylic powder – Recommended brand: Glam and Glits Clear Acrylic Powder
- Multicolored glitter – Suggested brand: Martha Stewart Crafts Glitter
- UV top coat – Recommended brand: Essie Gel Couture Top Coat
- Nail file and buffer – Suggested brand: OPI Crystal Nail File
How to Create:
- File the nails into a long stiletto shape and smooth the surface with a buffer.
- Apply clear acrylic as the base, allowing it to set properly.
- Sprinkle multicolored glitter onto the nails while the acrylic is still tacky, ensuring even coverage.
- Seal with a UV top coat and cure under a UV lamp for a durable, high-gloss finish.
Minimalist Chic with Gold Accents
For those who appreciate subtle elegance, this minimalist design features clear acrylic nails with delicate gold accents. The Short square shape keeps the look clean and understated, while the tiny gold flecks add a touch of luxury. This design is perfect for those who prefer a Classy and Simple look that still makes a statement. The transparency of the clear acrylic base allows the gold accents to shine without overwhelming the overall design.

Consumables:
- Clear acrylic powder – Recommended brand: Young Nails Clear Acrylic Powder
- Gold leaf flakes – Suggested brand: Modelones Gold Foil Flakes
- UV top coat – Recommended brand: Gelish Top Coat
- Nail file and buffer – Suggested brand: Revlon Shape-N-Buff
How to Create:
- Shape the nails into a short square style and buff the surface.
- Apply clear acrylic as the base, ensuring it is even and smooth.
- Place the gold leaf flakes strategically on the nails, pressing them gently into the tacky acrylic.
- Finish with a UV top coat and cure under a UV lamp to secure the design and add a glossy finish.
Floral Extravaganza on Clear Acrylic
This nail design is a floral fantasy brought to life on Clear acrylic nails. The Long square shape provides the perfect canvas for a vibrant mix of dried flowers, creating a romantic and Girly look that is full of life and color. The clear base allows the flowers to stand out beautifully, while gold foil accents add a touch of luxury. This design is ideal for those who love nature-inspired art with a Classy and Cute finish.

Consumables:
- Clear acrylic powder – Recommended brand: Valentino Beauty Pure Clear Acrylic Powder
- Dried flower nail art – Suggested brand: Laza Pressed Dried Flower Nail Art Kit
- Gold foil flakes – Recommended brand: Modelones Gold Leaf Nail Art Flakes
- Nail glue – Suggested brand: Makartt Nail Art Glue
How to Create:
- Shape the nails into a long square style and buff the surface.
- Apply clear acrylic as the base, ensuring a smooth and even layer.
- Arrange the dried flowers on the nails, using nail glue to secure them in place.
- Add gold foil flakes for extra sparkle, then finish with a UV top coat to seal the design and cure under a UV lamp.
Marble Effect with a Modern Twist
This design combines the elegance of marble with the simplicity of a clear acrylic base. The Long square shape adds sophistication, while the single marbled accent nail provides a modern and chic touch. The soft, neutral tones keep the look minimalistic yet Classy, making it perfect for both everyday wear and special occasions. The clear nails with subtle marble detailing create a Pretty and Simple design that is effortlessly stylish.

Consumables:
- Clear acrylic powder – Recommended brand: Young Nails Clear Acrylic Powder
- Marble effect nail polish – Suggested brand: Beetles Gel Polish Marble Ink Set
- UV top coat – Recommended brand: Gelish Top Coat
- Nail buffer and file – Suggested brand: OPI Crystal Nail File
How to Create:
- Shape the nails into a long square style and buff the surface.
- Apply clear acrylic as the base, ensuring it is even and smooth.
- Create the marble effect on one nail using the marble ink, blending the colors for a natural stone look.
- Finish with a UV top coat to seal the design and cure under a UV lamp for added durability.
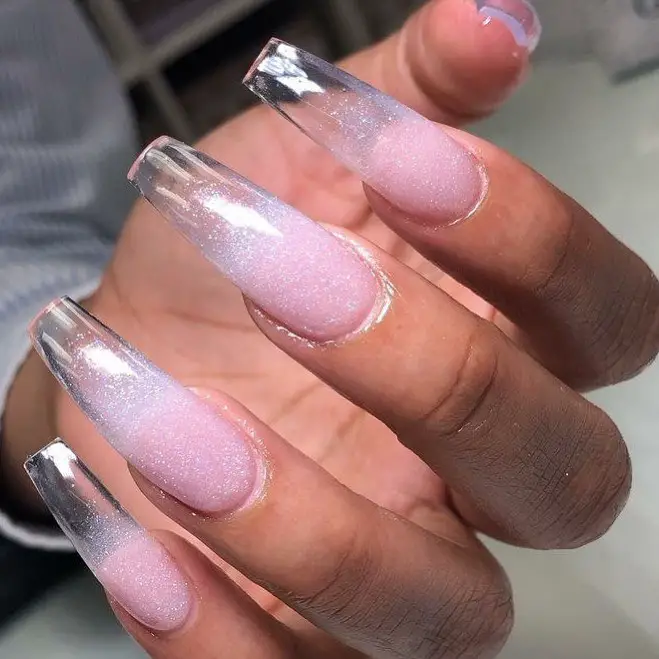
Pink Glitter Fade on Clear Tips
This design is a perfect blend of elegance and sparkle, featuring a pink glitter fade on clear acrylic tips. The Long square shape gives the nails a sleek and modern appearance, while the pink glitter adds a touch of Girly charm. The gradual transition from clear to glitter creates a soft, Pretty look that is both Classy and versatile, making it ideal for any occasion.

Consumables:
- Clear acrylic powder – Recommended brand: Mia Secret Clear Acrylic Powder
- Pink glitter – Suggested brand: Kiara Sky Nail Glitter in Pink Champagne
- UV top coat – Recommended brand: DND DC Gel Top Coat
- Nail file and buffer – Suggested brand: Revlon Expert Nail File
How to Create:
- File the nails into a long square shape and smooth the surface with a buffer.
- Apply clear acrylic as the base, ensuring an even layer.
- Add the pink glitter to the tips, blending it towards the middle for a gradient effect.
- Seal with a UV top coat and cure under a UV lamp for a glossy, long-lasting finish.
Rhinestone Elegance on Clear Acrylic
This luxurious nail design features clear acrylic nails adorned with sparkling rhinestones and intricate detailing. The Long square shape provides a large canvas for the rhinestones, which are arranged in a stunning pattern that adds both texture and dimension. The clear base allows the rhinestones to shine brightly, making this design perfect for special events or whenever you want to add a bit of glam to your look.

Consumables:
- Clear acrylic powder – Recommended brand: Glam and Glits Clear Acrylic
- Rhinestones – Suggested brand: Swarovski Crystals Nail Art
- Nail glue – Recommended brand: IBD 5 Second Nail Glue
- UV top coat – Recommended brand: Essie Gel Couture Top Coat
How to Create:
- Shape the nails into a long square style and buff the surface.
- Apply clear acrylic as the base, ensuring it is even and smooth.
- Arrange the rhinestones on the nails, securing them with nail glue in a balanced pattern.
- Finish with a UV top coat to seal the design and cure under a UV lamp for added durability.
Golden Elegance with Rhinestones
For a touch of luxury, this design combines clear acrylic nails with gold leaf and rhinestones. The Short square shape keeps the look clean and understated, while the gold leaf adds a touch of opulence. Rhinestones are strategically placed to enhance the overall elegance of the design, making it a perfect choice for those who prefer a Classy and Simple look with a bit of sparkle.

Consumables:
- Clear acrylic powder – Recommended brand: OPI Clear Acrylic Powder
- Gold leaf flakes – Suggested brand: Modelones Gold Leaf Nail Art Flakes
- Rhinestones – Suggested brand: Swarovski Crystals Nail Art
- Nail glue – Suggested brand: Kiss Powerflex Max Speed Nail Glue
- UV top coat – Recommended brand: CND Shellac Top Coat
How to Create:
- Shape the nails into a short square style and buff the surface.
- Apply clear acrylic as the base, ensuring a smooth application.
- Place the gold leaf flakes on the nails, securing them in place with nail glue.
- Add rhinestones for extra sparkle, then finish with a UV top coat to seal the design and cure under a UV lamp.
Natural Elegance with Clear Tips
This design showcases the natural beauty of clear acrylic nails with a subtle gradient effect. The Stiletto shape adds a touch of drama, while the clear tips create an illusion of longer, slender fingers. The soft pink base gently fades into the clear tips, creating a Classy and Simple look that is perfect for those who appreciate minimalist elegance. This design is ideal for both everyday wear and special occasions, offering a clean and polished appearance.

Consumables:
- Clear acrylic powder – Recommended brand: Valentino Beauty Pure Clear Acrylic Powder
- Soft pink gel polish – Suggested brand: OPI GelColor in Bubble Bath
- UV top coat – Recommended brand: Essie Gel Couture Top Coat
- Nail file and buffer – Suggested brand: Revlon Expert Nail File
How to Create:
- Shape the nails into a stiletto style and buff the surface for smoothness.
- Apply clear acrylic as the base, ensuring a smooth transition between the pink base and clear tips.
- Finish with a soft pink gel polish at the base of the nails, blending it towards the clear tips for a gradient effect.
- Seal with a UV top coat and cure under a UV lamp for a glossy, long-lasting finish.
Cow Print Nails
This fun and trendy design features a cow print pattern on Clear acrylic nails. The Almond shape keeps the look soft and feminine, while the bold brown and white cow spots add a playful twist. This design is perfect for those who love animal prints and want to incorporate them into their nail art in a Cute and Girly way. The clear base allows the cow print to stand out, making this design both unique and stylish.

Consumables:
- Clear acrylic powder – Recommended brand: Young Nails Clear Acrylic Powder
- Brown and white gel polish – Suggested brand: Beetles Gel Polish in Chocolate and White
- Nail art brush – Recommended brand: Saviland Nail Art Brush Set
- UV top coat – Recommended brand: CND Shellac Top Coat
How to Create:
- File the nails into an almond shape and smooth the surface with a buffer.
- Apply clear acrylic as the base, ensuring it is even and smooth.
- Use a nail art brush to create the cow print pattern, alternating between brown and white spots.
- Seal with a UV top coat and cure under a UV lamp to secure the design.
Fall-Inspired Leaf Accents
This autumn-inspired design features dried leaf accents on Clear acrylic nails. The Stiletto shape adds a touch of edginess, while the red and gold leaf accents bring warmth and richness to the design. The combination of clear acrylic and earthy tones makes this design perfect for the fall season, offering a Classy and Elegant look that captures the essence of autumn.

Consumables:
- Clear acrylic powder – Recommended brand: Glam and Glits Clear Acrylic Powder
- Dried leaf nail art – Suggested brand: Born Pretty Dried Flower Nail Art
- Gold foil flakes – Recommended brand: Modelones Gold Leaf Nail Art Flakes
- Nail glue – Suggested brand: Makartt Nail Art Glue
How to Create:
- Shape the nails into a stiletto style and buff the surface for smoothness.
- Apply clear acrylic as the base, ensuring it is even and smooth.
- Place the dried leaf accents on the nails, securing them with nail glue.
- Add gold foil flakes for extra richness, then seal with a UV top coat and cure under a UV lamp.
Save Pin
