
23 Inspiring Ombre Acrylic Nails Ideas: From French Tips to Classy Styles
When it comes to nail art, ombre acrylic nails have become a timeless trend that adds a touch of elegance and creativity to any manicure. Whether you’re a fan of long square nails, short square nails, or something in between, the versatility of ombre designs ensures there’s something for everyone. But what makes these designs so captivating, and how can you achieve them at home? Let’s dive into the world of ombre nails, exploring the nuances of each style and offering practical tips to get salon-quality results right from the comfort of your home.
A Burst of Color with Subtle Elegance
This design blends delicate shades of purple, pink, and orange into a seamless ombre transition that radiates sophistication. The gradient effect is flawlessly smooth, creating a soft and elegant look that’s perfect for any occasion. The ombre acrylic nails are accentuated by the long almond shape, giving the fingers a slender and elongated appearance. The choice of colors makes this design versatile enough to complement both casual and formal outfits, making it a must-try for anyone looking to elevate their nail game.

Consumables:
-
- Acrylic Powder: Valentino Beauty Pure in Soft Pink and Lilac.
- Liquid Monomer: Young Nails Professional Acrylic System.
- Nail Brushes: Kolinsky Acrylic Nail Brush #8.
- Top Coat: OPI Top Coat for a glossy finish.
To recreate this design at home, start by preparing your nails with a base coat. Mix the acrylic powder with the liquid monomer to create your ombre colors. Use a brush to apply the colors starting from the cuticle and blending towards the tip. Make sure to work quickly to blend the colors before the acrylic sets. Finish with a glossy top coat for that salon-like shine.
Playful Pinks and Glitter Glam
This playful design combines a bold pink ombre with glitter accents, making it the perfect choice for those who love a girly and cute look. The transition from a solid pink to a lighter hue adds depth and dimension to the nails, while the glitter on the accent nail provides just the right amount of sparkle. This long square shape is ideal for showing off the gradient effect and offers a durable canvas for the glitter embellishment.

Consumables:
-
- Pink Acrylic Powder: Glam and Glits in Flamingo Pink.
- Glitter Powder: Mia Secret Pink Glitter.
- Acrylic Brush: Pana Kolinsky Brush #10.
- Nail Primer: Mia Secret Extra Bond.
To achieve this look, apply the pink acrylic powder starting from the tip of the nail and blend it towards the cuticle. For the glitter accent, dip your brush into the glitter powder and apply it to one nail before the acrylic sets. This technique ensures the glitter stays embedded in the acrylic for a lasting effect. Seal with a top coat to protect your design and add shine.
Rainbow Tips for a Unique Twist
For those looking for a unique and colored twist on the classic ombre, this design features a rainbow of colors at the tips. The French tip style is reimagined with a modern ombre effect, blending multiple vibrant colors into a seamless gradient. The short square shape keeps the look fresh and manageable, perfect for daily wear while still making a statement.

Consumables:
-
- Acrylic Powder Set: Modelones Rainbow Collection.
- Base Coat: CND Stickey Anchoring Base Coat.
- Top Coat: Seche Vite Dry Fast Top Coat.
- Nail File: OPI Crystal Nail File for shaping.
To create this colorful design, start by applying a clear base coat. Use a thin brush to apply each color to the tips, blending them gently to create a smooth transition. The key to a perfect ombre is to work in thin layers, gradually building up the intensity of the colors. Finish with a top coat to protect the design and add a high-shine finish.
Sunset Vibes with a Modern Touch
This ombre design evokes the warm hues of a sunset, with shades of pink, orange, and yellow blending seamlessly together. The short square shape makes this a practical choice for everyday wear, while the vibrant colors add a touch of warmth and creativity. It’s a perfect set for those who want to carry a bit of sunshine wherever they go.

Consumables:
-
- Acrylic Powder: Kiara Sky in Sunrise Glow and Peachy Keen.
- Brush: Mia Secret Professional Brush #12.
- Top Coat: Essie Gel Couture Top Coat.
- Nail Dehydrator: Nail Tek Hydration Therapy.
To achieve this design, start with a well-prepped nail surface. Apply the acrylic powder in layers, starting with the yellow at the cuticle and blending towards the orange and pink at the tips. Use a clean brush to smooth out any harsh lines between the colors. Finish with a durable top coat to ensure your manicure lasts.
Bold and Bright Candy Colors
This playful and girly design features bright, candy-colored ombre nails that are perfect for those who love to stand out. The long square shape adds to the boldness of the design, giving ample space to showcase the vibrant transition from pastel hues to more intense colors. This cute and classy look is ideal for both casual outings and special occasions.

Consumables:
-
- Acrylic Powder: Saviland Pastel Collection.
- Top Coat: Sally Hansen Miracle Gel Top Coat.
- Cuticle Oil: CND SolarOil Nail & Cuticle Care.
- Nail Buffer: Revlon Shape ‘N’ Buff Nail File & Buffer.
To recreate this fun design, start by applying a base layer of the lightest color. Gradually build up the color intensity towards the tips, blending each shade into the next. This technique requires a steady hand and a bit of patience, but the results are well worth the effort. Finish with a nourishing cuticle oil to keep your nails healthy and shiny.
Earthy Green and Blue Ombre
This design showcases a stunning blend of green and blue hues, creating an earthy ombre effect that is both refreshing and bold. The long square shape perfectly highlights the gradient, with the colors transitioning smoothly from a deep blue at the tips to a soft, natural nude at the base. This design is ideal for those who love to experiment with unique and nature-inspired color combinations.

Consumables:
-
- Acrylic Powder: Valentino Beauty Pure in Aqua Blue and Forest Green.
- Liquid Monomer: Mia Secret Liquid Monomer.
- Top Coat: Gelish Top It Off Gel Sealer.
- Nail Forms: Young Nails Performance Forms.
To recreate this look, start by applying the green acrylic powder to the tips and blend it into the blue as you move towards the cuticle. Ensure a smooth gradient by lightly brushing the colors together where they meet. Finish with a glossy top coat to enhance the vibrant colors and protect the design.
Iridescent Purple Ombre
This ombre design features a captivating iridescent effect that shifts between purple and pink hues, giving the nails a mesmerizing glow. The long almond shape adds elegance, while the subtle shimmer makes this design stand out without being overly flashy. This look is perfect for those seeking a classy yet girly manicure that catches the light beautifully.

Consumables:
-
- Iridescent Powder: Kiara Sky Holographic Powder in Purple.
- Acrylic Powder: Mia Secret Pink Acrylic Powder.
- Base Coat: CND Stickey Anchoring Base Coat.
- Top Coat: DND Gel Top Coat.
To achieve this design, start with a pink acrylic base and gently blend in the iridescent powder from the middle of the nail towards the tip. The key to this look is a light touch, allowing the iridescence to catch the light at different angles. Seal with a high-shine top coat to lock in the shimmer.
Pink and White Ombre

This pink and white ombre design is a classic that never goes out of style. The short square shape keeps it cute and manageable, making it ideal for everyday wear. The soft gradient from a bright pink at the base to a crisp white at the tips gives the nails a fresh and clean look, perfect for any occasion.
Consumables:
-
- Acrylic Powder: Glam and Glits in Pink and White.
- Nail Primer: Young Nails Protein Bond.
- Top Coat: OPI Infinite Shine Top Coat.
- Nail Buffer: Beurer Electric Nail Buffer Set.
To recreate this timeless design, start with a bright pink acrylic at the base and blend it upwards towards the tips, finishing with a white acrylic powder. Smooth out any harsh lines by gently buffing the nails, and finish with a top coat for a glossy finish that enhances the ombre effect.
Rainbow Dream Ombre
This design is a vibrant and playful take on ombre nails, featuring a rainbow of pastel colors that blend seamlessly into each other. The long stiletto shape adds drama to the look, while the mix of colored hues keeps it light and fun. This manicure is perfect for those who love to experiment with unique and girly designs that make a statement.

Consumables:
-
- Acrylic Powder: Saviland Pastel Collection.
- Nail Tips: Kiss Salon Acrylic Natural Nails.
- Top Coat: Seche Vite Dry Fast Top Coat.
- Nail Brush: Kolinsky #12 Acrylic Nail Brush.
To achieve this look, apply each color in small sections, blending them together before the acrylic sets. Work quickly to ensure a smooth transition between colors. Finish with a top coat to protect the design and add a high-shine finish that brings out the vibrancy of the rainbow colors.
Mint Green Floral Ombre
This elegant design features a soft mint green ombre with delicate floral accents, creating a pretty and feminine look. The long square shape is ideal for showcasing the gradient and the intricate floral details, making this design perfect for special occasions or just to add a touch of spring to your everyday style.

Consumables:
-
- Acrylic Powder: Mia Secret Mint Green Acrylic Powder.
- 3D Flower Mold: PUEEN 3D Nail Art Mold.
- Nail Glue: KDS Nail Tip Glue for attaching flowers.
- Top Coat: Essie Gel Couture Top Coat.
To recreate this look, start by applying the mint green acrylic to the tips, blending it towards a nude base. Once the gradient is smooth, use the 3D flower mold to create floral accents and attach them to the nails with nail glue. Finish with a top coat to protect the flowers and give the nails a glossy finish.
Black to Nude Ombre
This black to nude ombre design is the epitome of sophistication and boldness. The long square shape emphasizes the dramatic gradient, starting from a deep, glossy black at the tips and transitioning smoothly into a natural nude towards the base. This design is perfect for those who want to make a classy statement with their nails, offering a modern twist on the traditional French manicure.

Consumables:
-
- Acrylic Powder: Valentino Beauty Pure in Black and Soft Nude.
- Base Coat: Orly Bonder Rubberized Base Coat.
- Top Coat: Seche Vite Dry Fast Top Coat.
- Nail File: Tammy Taylor Peel N Stick Files.
To recreate this look, begin by applying the black acrylic at the tips and blending it downward towards the nude base. The key to this ombre is to ensure a seamless transition between the two colors, which can be achieved by using a clean brush to blend the colors together while still wet. Finish with a top coat to enhance the shine and durability of the design.
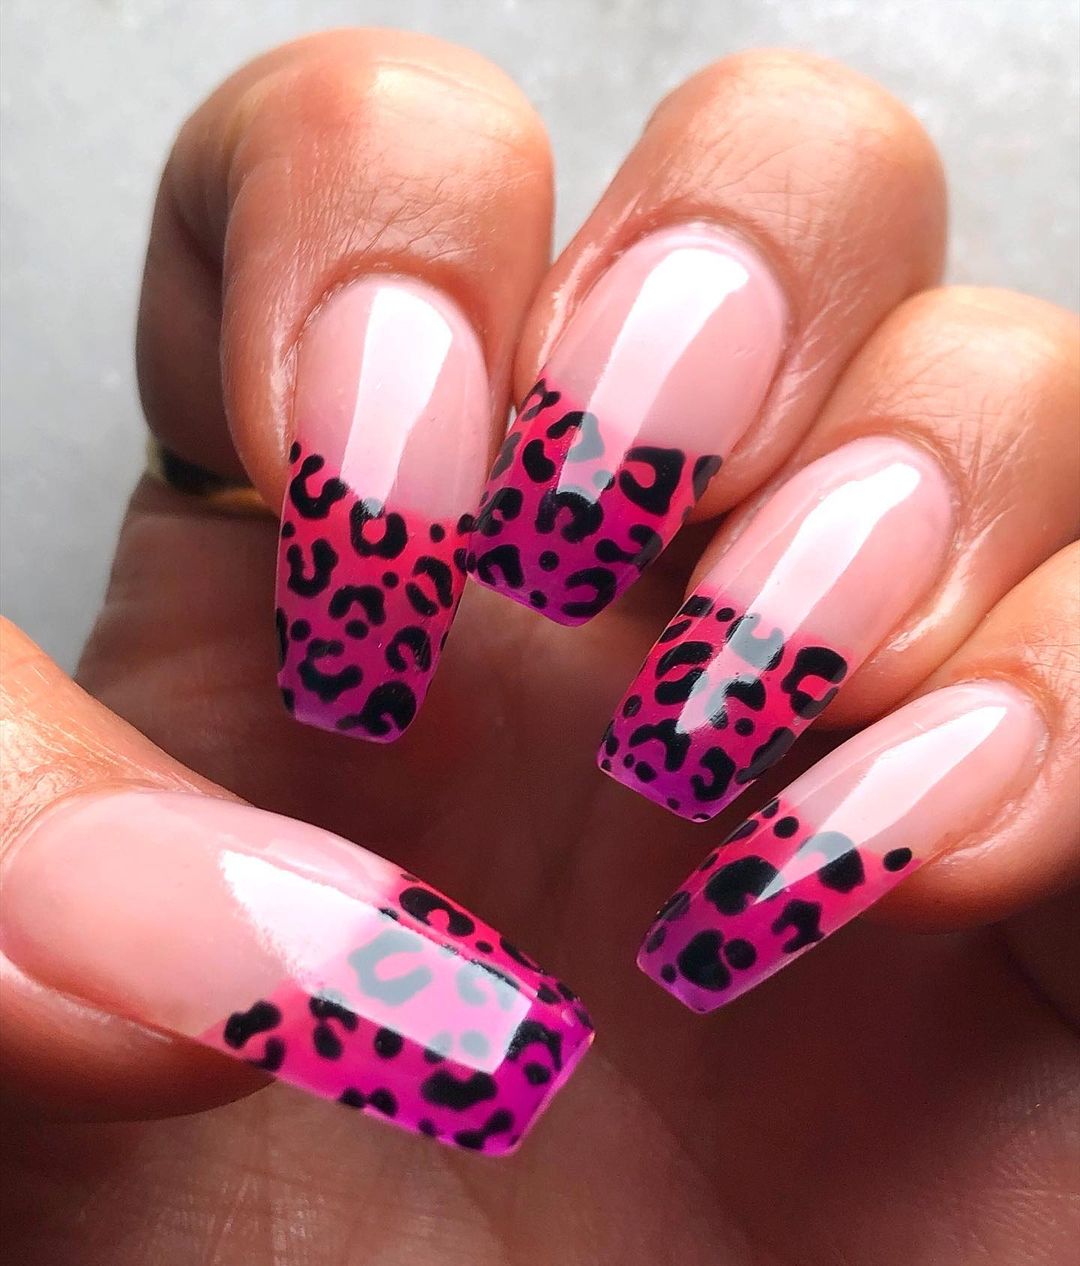
Pink Leopard Ombre
This pink leopard ombre design is a fun and fierce twist on the classic animal print. The long square nails are the perfect canvas for this playful design, which blends hot pink into a lighter shade and is adorned with bold leopard spots. This look is ideal for those who love to mix girly and unique styles with a touch of wildness.

Consumables:
-
- Acrylic Powder: Mia Secret Pink Acrylic Powder.
- Leopard Spot Stencil: Whats Up Nails Leopard Print Stencils.
- Top Coat: CND Vinylux Weekly Top Coat.
- Detail Brush: Pana Professional Nail Art Detail Brush Set.
To achieve this design, apply the pink acrylic, creating an ombre effect from dark to light. Once the base is set, use the leopard stencil and a detail brush to paint the spots onto the nails. The contrast between the vibrant pink and the dark spots creates a striking, high-fashion look. Seal with a top coat to protect the design and add a glossy finish.
Tropical Blue Ombre with 3D Flower
This tropical-inspired design features a serene blue ombre paired with a 3D floral accent, creating a fresh and pretty look. The long square nails provide ample space for the ombre gradient, which shifts from a pale blue to a deeper hue. The addition of a white 3D flower on the accent nail adds a delicate and feminine touch, perfect for a beach getaway or a special occasion.

Consumables:
-
- Acrylic Powder: Kiara Sky in Ocean Breeze.
- 3D Flower Mold: PUEEN 3D Nail Art Mold.
- Top Coat: Gelish Top It Off.
- Nail Glue: KDS Nail Tip Glue.
To recreate this look, apply the blue acrylic powder starting from the tip and blend it towards the base. Once the ombre is complete, use a 3D flower mold to create the floral accent and attach it to the nail using nail glue. Finish with a top coat to ensure the design is durable and the colors are vibrant.
Speckled Baby Blue and Pink Ombre
This design combines a baby blue and pink ombre with a speckled effect, creating a playful and cute look that’s both subtle and eye-catching. The short square shape keeps the design manageable and practical, making it ideal for everyday wear. The speckles add an extra layer of texture and interest, giving the nails a unique twist.

Consumables:
-
- Acrylic Powder: Young Nails in Baby Blue and Pastel Pink.
- Speckle Effect Polish: China Glaze ‘Point Me to the Party.’
- Base Coat: OPI Natural Nail Base Coat.
- Top Coat: Essie Gel Couture Top Coat.
To achieve this design, apply the baby blue and pink acrylic powders, blending them in the middle to create the ombre effect. After the acrylic sets, use a speckled effect polish to add the black speckles. Finish with a glossy top coat to protect the design and ensure a smooth finish.
Olive and Sage Solid Color Ombre
This design features a chic solid color ombre in shades of olive and sage green. The long square shape is perfect for this monochromatic look, which blends different shades of green for a classy and sophisticated appearance. This minimalist design is ideal for those who prefer a more understated yet stylish look.

Consumables:
-
- Acrylic Powder: Valentino Beauty Pure in Olive and Sage Green.
- Nail Primer: Young Nails Protein Bond.
- Top Coat: DND Gel Top Coat.
- Nail Buffer: Tropical Shine Buffer File.
To recreate this design, apply the olive green acrylic at the base of the nails and blend it into the sage green towards the tips. The key to this ombre is a smooth gradient, which can be achieved by carefully blending the two colors. Finish with a top coat to enhance the glossy finish and protect the design.
Pastel Pink and Green Ombre
This soft and subtle ombre design features a pastel blend of pink and green that fades gently from one color to the next. The long square shape allows the gradient to flow naturally, creating a serene and calming effect. The accent nail, with a minimalistic swirl of white, adds a touch of whimsy to the overall look. This design is perfect for those who appreciate a simple yet elegant manicure.

Consumables:
-
- Acrylic Powder: Valentino Beauty Pure in Pastel Pink and Mint Green.
- Detail Brush: Pana Nail Art Detail Brush Set.
- Top Coat: Essie Gel Couture Top Coat.
- Nail Primer: Young Nails Protein Bond.
To achieve this design, apply the pink acrylic powder near the base of the nail, blending it into the green as you move towards the tip. Use a detail brush to create the white swirl on the accent nail. Finish with a glossy top coat to protect the design and enhance the pastel colors.
Bright Blue Solid Color Ombre
This vibrant solid color ombre features a striking blue gradient that transitions from a deep oceanic hue at the base to a lighter sky blue at the tips. The short square nails keep the look bold yet practical, making it a perfect choice for those who love a pop of color that’s easy to maintain. This basic yet impactful design is ideal for everyday wear, adding a burst of energy to your look.

Consumables:
-
- Acrylic Powder: Mia Secret in Royal Blue and Sky Blue.
- Base Coat: OPI Natural Nail Base Coat.
- Top Coat: Sally Hansen Miracle Gel Top Coat.
- Nail File: KISS 4-Way Nail Buffer Block.
To recreate this design, start by applying the darker blue acrylic at the base of the nail and blend it upwards towards the tip with the lighter blue. Smooth out the transition with a buffer block and seal with a top coat to give the nails a glossy, long-lasting finish.
Neon French Tip Ombre
This playful design combines a French tip style with a neon ombre twist, featuring vibrant shades of pink and orange. The long almond shape elongates the fingers, while the bold color choice adds a girly and fun vibe to the manicure. The neon hues make this design stand out, perfect for those who want their nails to be the center of attention.

Consumables:
-
- Acrylic Powder: Glam and Glits in Neon Pink and Neon Orange.
- Base Coat: Orly Bonder Rubberized Base Coat.
- Top Coat: DND Gel Top Coat.
- Nail Art Pen: Makartt Nail Art Pen for detailing.
To achieve this look, start with a nude base and apply the neon acrylic powders at the tips, blending them downward towards the center of the nail. Use a nail art pen to add any additional detailing, if desired. Finish with a top coat to enhance the neon colors and provide a glossy finish.
Stained Glass Ombre
This unique ombre design mimics the look of stained glass, blending pastel colors within black geometric lines. The long almond shape provides a sleek canvas for this intricate design, which combines artistic flair with a classy finish. The contrast between the pastel ombre and the black outlines creates a bold and stylish look that’s perfect for those who love to make a statement with their nails.

Consumables:
-
- Acrylic Powder: Valentino Beauty Pure Pastel Collection.
- Nail Art Brush: Pana Professional Nail Art Detail Brush.
- Black Gel Polish: Beetles Black Gel Nail Polish.
- Top Coat: Gelish Top It Off.
To create this design, start by applying the pastel acrylic powders in sections, blending them together to create a smooth ombre effect. Once the ombre is complete, use a fine brush to paint the black geometric lines over the ombre. Seal with a top coat to lock in the design and add a glossy finish.
Rainbow French Ombre
This design is a fresh take on the French manicure, featuring a rainbow ombre effect that blends various pastel hues with a crisp white tip. The long almond shape adds elegance, while the gradient colors bring a playful and modern twist to the classic French tip. This cute and colorful design is perfect for those who love to experiment with girly and fun nail art ideas.

Consumables:
-
- Acrylic Powder: Saviland Rainbow Pastel Collection.
- White Gel Polish: OPI Alpine Snow.
- Base Coat: CND Stickey Anchoring Base Coat.
- Top Coat: Essie Gel Couture Top Coat.
To achieve this look, apply the pastel acrylic powders, blending them from the cuticle towards the middle of the nail. Finish with a white tip and seal the entire design with a top coat. The rainbow effect adds a touch of inspo to the traditional French manicure, making it a stylish choice for any occasion.
Tropical Leaves Ombre
This design blends a vibrant ombre of pink and green shades, creating a tropical vibe that’s both lively and stylish. The long almond shape enhances the smooth gradient, while the delicate black leaf designs add an artistic touch. The matte finish adds a modern twist to the overall look, making it perfect for summer days or any occasion where you want your nails to stand out.

Consumables:
-
- Acrylic Powder: Valentino Beauty Pure in Pastel Pink and Mint Green.
- Nail Art Brush: Pana Professional Nail Art Detail Brush.
- Matte Top Coat: OPI Matte Top Coat.
- Nail Stamping Plate: Born Pretty Leaf Patterns Stamping Plate.
To recreate this look, start with the ombre base using pink and green acrylic powders. Once the gradient is smooth, use a detail brush or stamping plate to add the black leaf designs. Finish with a matte top coat to give the nails a modern, non-glossy finish that highlights the intricate details.
Subtle Green French Ombre
This design features a minimalist French tip with a twist, using a soft green ombre that gently fades into a natural nude base. The short length and square shape keep the look understated and elegant, making it a perfect choice for those who prefer a simple and subtle manicure with a touch of color.

Consumables:
-
- Acrylic Powder: Glam and Glits in Soft Green.
- Base Coat: Essie Ridge Filling Base Coat.
- Top Coat: Sally Hansen Miracle Gel Top Coat.
- Nail Buffer: Makartt Nail Buffer Block.
To achieve this design, start with a nude base and apply the green acrylic powder at the tips, blending it downwards towards the base to create a soft ombre effect. Use a buffer to smooth out any harsh lines and finish with a top coat for a glossy, long-lasting finish.
Golden Hearts Ombre
This romantic ombre design combines a warm golden hue with delicate white heart accents, creating a look that’s both cute and sophisticated. The medium almond shape is ideal for showcasing the soft gradient, which fades from a rich gold at the tips to a natural pink at the base. The tiny hearts add a whimsical touch, making this design perfect for a date night or any special occasion.

Consumables:
-
- Acrylic Powder: Kiara Sky in Gold Dust and Blush Pink.
- Heart Stencil: Whats Up Nails Heart Shape Stencils.
- Top Coat: Essie Gel Couture Top Coat.
- Detail Brush: Pana Kolinsky Nail Art Brush #00.
To recreate this look, apply the gold acrylic at the tips and blend it into the pink base. Once the ombre is complete, use a detail brush to add the tiny white hearts near the cuticle area. Finish with a top coat to seal in the design and add a glossy finish that enhances the shimmer of the gold.
Save Pin
